Ultimate Cannoli Cream Sandwich Cookies
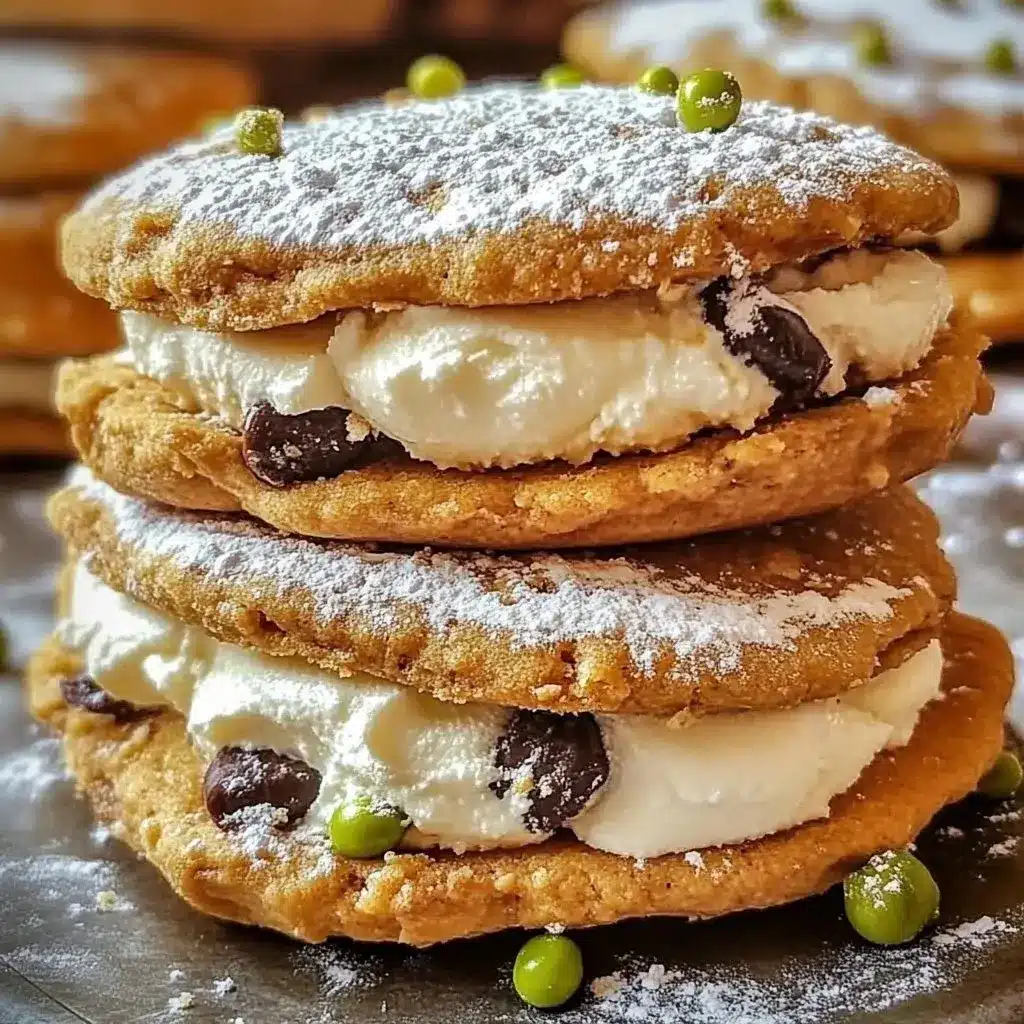
Imagine the delightful crunch of a perfectly baked cookie giving way to a cloud-like, sweet cream filling. This is the essence of Cannoli Cream Sandwich Cookies, a masterful fusion of two iconic Italian desserts that promises an unforgettable taste experience. These cookies are designed to capture the heart of both traditional cannoli and beloved sandwich cookies, offering a unique texture and flavor profile that will leave you craving more with every single bite. Prepare to elevate your dessert game with this truly exceptional recipe.
What makes these cookies so special is the ingenious combination of a rich, creamy cannoli filling nestled between two soft, chewy cookies, studded with delightful textures from oats and pistachios, and pockets of melted chocolate. It’s a symphony of flavors and textures, perfectly balanced to create a dessert that is both comforting and luxuriously decadent. They are more than just cookies; they are little parcels of pure joy, ready to be shared or savored all to yourself.
Why You Will Love This Recipe
- Irresistible Flavor Combination: Experience the classic taste of cannoli cream enhanced by the comforting chewiness of oat-flecked cookies and delightful chocolate and pistachio bits, creating a truly unique and craveable treat.
- Impressive Yet Easy to Make: These cookies look and taste gourmet, but the preparation is surprisingly straightforward, making them accessible for bakers of all skill levels to achieve professional-looking results.
- Versatile for Any Occasion: From holiday parties and birthday celebrations to simple afternoon treats, their elegant presentation and crowd-pleasing flavor make them a perfect fit for any event.
- Customizable to Your Liking: Easily adapt the recipe by swapping out nuts, chocolate types, or even adding extracts to create a personalized cookie that perfectly suits your taste preferences or dietary needs.
- A Crowd-Pleasing Delight: Both children and adults are captivated by these cookies, ensuring they are a guaranteed hit that will be requested again and again, making them a wonderful addition to any family gathering.
Ingredients You Need
The success of these Cannoli Cream Sandwich Cookies hinges on the quality of the ingredients you choose. Opting for fresh, high-quality components will significantly enhance the final taste and texture, ensuring each bite is an absolute delight. Remember to drain your ricotta cheese exceptionally well to achieve the perfect creamy consistency for the filling, a crucial step for authentic cannoli flavor.
Cannoli Cream Sandwich Cookies

Soft, chewy cookies filled with sweet ricotta-mascarpone "cannoli" cream — a handheld, sandwich-style twist on classic cannoli. These cookies are inspired by classic cannoli fillings and sandwich-style cookies.
- For the Cookies:
- 1 cup unsalted butter, softened
- 1 cup brown sugar
- 1/2 cup granulated sugar
- 2 large eggs
- 1 tsp vanilla extract
- 1.5 cups all-purpose flour
- 1 tsp baking soda
- 1/2 tsp salt
- 2 cups quick oats (for chewy texture)
- 1/2 cup mini chocolate chips (optional, for mix-in)
- 1/4 cup chopped pistachios (optional, for crunch)
- For the Cannoli Cream Filling:
- 1.5 cups ricotta cheese, well drained
- 1/2 cup mascarpone cheese (or cream cheese)
- 1/2 cup powdered sugar
- 1 tsp vanilla extract
- 1/4 cup mini chocolate chips (optional, for classic cannoli feel)
- 1Preheat oven to 350°F (175°C). Line baking sheets with parchment paper.
- 2Cream together softened butter, brown sugar, and granulated sugar until light and fluffy. Add eggs one at a time, then stir in vanilla extract.
- 3In a separate bowl, whisk together all-purpose flour, baking soda, and salt. Gradually mix the dry ingredients into the wet ingredients until just combined. Be careful not to overmix.
- 4Fold in the quick oats, mini chocolate chips, and chopped pistachios (if using).
- 5Drop spoonfuls of dough (about 1.5 Tbsp) onto the prepared baking sheets, spacing them about 2 inches apart.
- 6Bake for 10–12 minutes, or until the edges are lightly golden brown.
- 7Let the cookies cool completely on a wire rack.
- 8Meanwhile, ensure the ricotta cheese is very well drained (using a strainer or cheesecloth). In a medium bowl, beat together the drained ricotta, mascarpone cheese, powdered sugar, and vanilla extract until smooth and creamy. Fold in the mini chocolate chips (if using).
- 9To assemble, spread a generous amount of the cannoli cream on the bottom of one cookie. Place another cookie on top to form a sandwich. If desired, roll the edges in extra mini chocolate chips or chopped pistachios.
- 10Refrigerate the assembled cookies for at least 30 minutes before serving to allow the filling to set.
Keywords: Cannoli, Cookies, Mascarpone, Ricotta, sandwich cookies
- unsalted butter, softened: crucial for a creamy cookie dough base.
- brown sugar: provides moisture and a rich caramel note to the cookies.
- granulated sugar: adds sweetness and helps with the cookie’s structure.
- large eggs: bind the ingredients together and contribute to richness.
- vanilla extract: enhances the overall flavor profile of both the cookies and the cream.
- all-purpose flour: the foundation of the cookie dough.
- baking soda: acts as a leavening agent, giving the cookies a slight lift.
- salt: balances the sweetness and brings out other flavors.
- quick oats: contribute a wonderful chewy texture to the cookies.
- mini chocolate chips: add delightful bursts of chocolatey sweetness throughout the cookie.
- chopped pistachios: provide a lovely crunch and a hint of nutty flavor, reminiscent of traditional cannoli.
- ricotta cheese, well drained: the star of the cannoli cream, providing a smooth and slightly tangy base.
- mascarpone cheese: adds unparalleled creaminess and a rich, velvety texture to the filling.
- powdered sugar: sweetens the filling and helps achieve a smooth, luscious consistency.
- mini chocolate chips: an optional addition to the filling for extra chocolatey goodness.
The precise quantities for these ingredients can be found within the accompanying recipe card, ensuring you have all the necessary details for a perfect bake.
Variations
For those seeking a completely plant-based indulgence, a vegan version of these Cannoli Cream Sandwich Cookies is easily achievable. You can substitute the unsalted butter with a high-quality vegan butter and opt for a dairy-free cream cheese alternative in place of the mascarpone, alongside ensuring your ricotta is a plant-based variety. Flax eggs can effectively replace the large eggs, binding the dough beautifully. The result is a decadent vegan treat that honors the original’s delightful character.
A low-carb or keto-friendly adaptation can also be made with a few smart ingredient swaps. Utilize a quality almond flour or coconut flour blend in place of all-purpose flour, and swap the granulated and powdered sugars for your preferred sugar-free sweetener, such as erythritol or xylitol. You might need to slightly adjust the liquid content depending on the flour used, but the rich, creamy filling can still be made using well-drained, full-fat ricotta and mascarpone cheese, making it a satisfying low-carb indulgence.
Another exciting variation involves infusing the cookies with seasonal flavors or different profiles. Consider adding a touch of orange zest to the cookie dough for a brighter, citrusy note, or incorporating a tablespoon of espresso powder for a coffee-kissed cookie that pairs wonderfully with the sweet cream. You could also experiment with different nut combinations in the filling or cookie, perhaps using finely chopped almonds or hazelnuts for a different textural and flavor dimension.
How to Prepare Cannoli Cream Sandwich Cookies
The journey to these delightful cookies begins with the careful preparation of your ingredients, a step that ensures a smooth and enjoyable baking process. Begin by gathering all your necessary items, measuring them out precisely, and ensuring your unsalted butter is softened to room temperature. This softening is absolutely essential for achieving the perfect creamy texture when you start creaming it with the sugars, laying a crucial foundation for light and airy cookies.
In a spacious mixing bowl, you will commence the process of creaming together the softened unsalted butter along with both the brown and granulated sugars. You’ll want to beat this mixture vigorously until it transforms into a light, fluffy, and pale yellow consistency, which typically takes about two to three minutes when using an electric mixer. This aerated sugar-butter mixture is the secret to cookies that are tender and have a pleasant chew, rather than being dense or heavy.
Once you’ve achieved that beautifully creamy texture, it’s time to introduce the eggs and vanilla extract to the mixture. Add the two large eggs into the bowl one at a time, ensuring that each egg is thoroughly incorporated and the mixture emulsifies before adding the next. Following the eggs, stir in the teaspoon of vanilla extract. This step not only adds moisture but also imbues the cookie dough with a warm, inviting aroma and flavor that complements the other ingredients beautifully.
In a separate, medium-sized bowl, you will combine all the dry ingredients. Whisk together the all-purpose flour, baking soda, and salt until they are thoroughly distributed. This ensures that the baking soda, a vital leavening agent, is evenly spread throughout the flour mixture, preventing any pockets of unsweetened soda flavor and guaranteeing a consistent rise and texture in your baked cookies.
Now comes the important step of gradually integrating the dry ingredients into the wet mixture. Add the flour mixture to the butter-sugar-egg base in a few additions, mixing on a low speed or by hand until just combined. It is crucial to avoid overmixing the dough at this stage, as overworking the gluten in the flour can result in tough, dense cookies instead of the soft, chewy ones you desire.
With the dough base formed, it’s time to introduce the elements that will give your cookies their signature texture and flavor. Gently fold in the quick oats, mini chocolate chips, and the chopped pistachios. Use a spatula or a wooden spoon for this, ensuring that these additions are evenly distributed throughout the dough without overworking it. The oats will lend a delightful chewiness, while the chips and nuts provide little bursts of flavor and crunch.
Using a cookie scoop or two spoons, drop rounded portions of the dough onto a baking sheet that has been prepared with parchment paper. Aim for portions of about 1.5 tablespoons each, and ensure you space them at least two inches apart on the baking sheet. This spacing is important because the cookies will spread as they bake, and you want to avoid them running into each other, which can lead to uneven baking and oddly shaped cookies.
Preheat your oven to 350°F (175°C) and prepare to bake your cookies. Place the baking sheets into the preheated oven and bake for approximately 10 to 12 minutes, or until you notice that the edges of the cookies are just beginning to turn a light golden brown. Keep a close watch on them during the last few minutes, as oven temperatures can vary, and you don’t want to overbake them; slightly underbaked is better for chewiness.
Once the cookies are baked to perfection, carefully remove the baking sheets from the oven. Allow the cookies to cool on the baking sheet for a minute or two before transferring them to a wire rack to cool completely. This cooling process is absolutely vital; the cookies need to be entirely cool to the touch before you attempt to fill them, otherwise, the heat from the cookies will melt the filling prematurely, creating a messy and less appealing result.
While your cookies are cooling, you’ll prepare the star of the show: the luscious cannoli cream filling. In a medium-sized bowl, combine the well-drained ricotta cheese, mascarpone cheese (or cream cheese as an alternative), powdered sugar, and vanilla extract. Beat these ingredients together using an electric mixer or a whisk until the mixture is exceptionally smooth, creamy, and free of any lumps. This smooth consistency is key for a delightful filling experience.
If you’re adding the optional mini chocolate chips to the filling, gently fold them in now using a spatula. This will give your cannoli cream that classic, authentic feel and add delightful little pops of chocolate within the creamy filling. Ensure they are evenly distributed for a consistent taste in every bite.
Finally, it’s time to assemble your magnificent Cannoli Cream Sandwich Cookies. Take one cooled cookie and spread a generous amount of the prepared cannoli cream onto its flat side. Then, take another cooled cookie and place it on top of the cream, pressing down gently to create a sandwich. For an extra touch of visual appeal and texture, you can lightly press the exposed edges of the cream filling into additional mini chocolate chips or finely chopped pistachios.
Pro Tips for Cannoli Cream Sandwich Cookies
Drain Your Ricotta Thoroughly: This is perhaps the most critical step for achieving a perfect cannoli cream filling. Excess moisture in the ricotta will lead to a runny filling that can make your cookies soggy. You can drain it in a fine-mesh sieve lined with cheesecloth or paper towels for at least an hour, or even overnight in the refrigerator, pressing out as much liquid as possible.
Don’t Overmix the Cookie Dough: While you want to ensure all ingredients are combined, overmixing the dough after adding the flour can develop the gluten too much, resulting in tough cookies. Mix just until the ingredients are incorporated to maintain a tender, chewy texture.
Achieve the Perfect Creaminess: For the smoothest cannoli cream, ensure your mascarpone cheese is at room temperature and beat the filling until it’s completely homogenous and silky. A stand mixer or hand mixer works wonderfully for this, ensuring no grainy texture remains.
Cool Cookies Completely: Resist the temptation to fill the cookies while they are still warm. Allowing them to cool completely on a wire rack is essential. Warm cookies are fragile and can crumble, and the heat will melt the filling, leading to a messy assembly process and a less appealing final product.
Experiment with Extracts: While vanilla is classic, consider adding a touch of almond extract to the cannoli cream or a hint of orange zest to the cookie dough for a more complex and nuanced flavor profile. These small additions can elevate the cookies from delicious to extraordinary.
Serving Suggestions for Cannoli Cream Sandwich Cookies
Decoration
For a touch of elegance, consider lightly dusting the tops of the assembled cookies with a delicate veil of powdered sugar, reminiscent of a winter snowfall. Alternatively, you could pipe a small swirl of extra cannoli cream on top and garnish it with a single candied cherry or a sprinkle of finely chopped pistachios, adding both visual appeal and a burst of color. Drizzling melted chocolate, either dark or white, in a thin pattern over the top cookie can also add a sophisticated finish.
Side Dishes
These delightful cookies pair exceptionally well with a strong cup of Italian espresso or a smooth, dark roast coffee, the bitterness of which beautifully cuts through the sweetness of the cream and cookie. For an even more decadent experience, serve them alongside a scoop of creamy vanilla bean ice cream or a rich chocolate gelato. A small bowl of fresh, vibrant berries such as raspberries or strawberries can also offer a refreshing counterpoint to the cookies’ richness.
Creative Serving Ideas
Present these cookies on a tiered dessert stand for a stunning visual display at parties, allowing guests to easily select their treat. You could also arrange them on a rustic wooden board, perhaps with a few scattered cocoa nibs or edible flowers for an artisanal touch. For themed events, consider arranging them alongside other Italian-inspired desserts to create a complete dessert buffet that transports your guests straight to Sicily.
Preparation & Storage
Storing Leftovers
To keep your delightful Cannoli Cream Sandwich Cookies tasting their best, it is essential to store them correctly. Place any uneaten cookies in an airtight container, ensuring they are not too densely packed to prevent crushing. It is highly recommended to store them in the refrigerator, as the cool environment helps to maintain the integrity of the creamy filling and keeps the cookies from becoming too soft or stale.
These cookies are best enjoyed within three to four days of preparation. While they will remain edible for longer, the texture of the cookie might begin to soften considerably, and the cream filling could lose some of its optimal freshness. For the absolute best flavor and texture, consume them within this recommended timeframe, allowing you to savor their delightful qualities.
Freezing
If you find yourself with an abundance of these cookies or wish to prepare them well in advance, freezing is an excellent option. The most successful way to freeze them is *before* assembling the sandwiches. Allow the baked cookies to cool completely, then arrange them in a single layer on a baking sheet and freeze until solid. Once frozen, transfer the cookies to an airtight container, layering them between sheets of parchment paper to prevent sticking.
Frozen cookies can be stored for up to three months. When you are ready to enjoy them, simply transfer the desired number of cookies from the freezer to the refrigerator and allow them to thaw overnight. This slow thawing process helps to preserve their texture. After thawing, you can then proceed with making the cannoli cream and assembling your delicious sandwich cookies.
Reheating
While these cookies are typically served at room temperature or chilled, there are occasions when a slight reheating might be desired, especially for the cookie component. If you have assembled cookies and wish to enjoy them with a slightly warmer cookie base, you can microwave them very briefly, for about 10 to 15 seconds. Be extremely cautious with this method, as overheating can cause the filling to melt excessively.
A gentler approach is to allow the assembled cookies to come to room temperature from the refrigerator for about 15-20 minutes before serving. This allows the chill to dissipate slightly from the cookie itself, making it a bit softer and more yielding, while still keeping the filling pleasantly cool and stable. This method is generally preferred to preserve the cookie’s structure and the filling’s texture.
Frequently Asked Questions
-
Can I prepare the components of these Cannoli Cream Sandwich Cookies ahead of time?
Yes, absolutely! The cookie dough can be made and chilled for up to 2 days before baking, or even frozen. The cannoli cream filling can also be prepared a day in advance and stored in an airtight container in the refrigerator. It is generally best to assemble the cookies closer to serving time to ensure the cookies remain crisp and the filling is at its freshest, but you can assemble them a few hours ahead and refrigerate.
-
Is it possible to freeze these cookies, and if so, what is the best method?
Freezing is a great option to preserve these delicious cookies. The most effective method is to freeze the baked cookies *before* assembling them. Once completely cooled, arrange them in a single layer on a baking sheet and freeze until firm. Then, transfer them to an airtight container, separating layers with parchment paper. They can be stored for up to three months. Thaw them overnight in the refrigerator before filling.
-
How long do these Cannoli Cream Sandwich Cookies typically last when stored properly?
When stored correctly in an airtight container in the refrigerator, these cookies are best enjoyed within approximately 3 to 4 days. Beyond this timeframe, the cookies may begin to absorb moisture from the filling and become softer than ideal, and the freshness of the cream might diminish. For optimal taste and texture, it’s recommended to consume them within this window.