Irresistible Brownie Bottom Mini Cheesecakes You’ll Love
The moment I take a bite of these Brownie Bottom Mini Cheesecakes, memories of warm family gatherings rush back—sweet laughter fills the air as dessert is served. This delightful treat combines a chewy brownie base with a smooth, creamy cheesecake layer, creating a dessert experience that feels both nostalgic and exciting.
What’s even better? These mini cheesecakes are not only customizable to fit gluten-free or vegan diets, but they are also a breeze to whip up, making them the perfect addition to any gathering or simply for indulging at home. With every creamy bite, you can savor the comfort of homemade goodness without the guilt. Are you ready to discover your new favorite treat? Let’s dive into the recipe!
Why You Will Love This Recipe
- Decadent Combination: Indulge in the perfect marriage of a rich, fudgy brownie base and a luxuriously smooth, creamy cheesecake topping.
- Effortless Elegance: Despite their sophisticated appearance, these mini cheesecakes are surprisingly simple to prepare, making them ideal for both novice bakers and seasoned professionals.
- Customizable Delight: Easily adapt the recipe to accommodate dietary needs, with simple substitutions for gluten-free or vegan preferences, ensuring everyone can enjoy this treat.
- Perfect Portions: Each mini cheesecake is perfectly sized for individual enjoyment, making them an excellent choice for parties, potlucks, or simply a sweet personal indulgence.
- Visually Stunning: The beautiful contrast between the dark brownie and the pale cheesecake layer makes these treats an attractive centerpiece for any dessert table, guaranteed to impress guests.
Ingredients You Need
The foundation of these exquisite Brownie Bottom Mini Cheesecakes lies in the quality of the ingredients you select. Opting for fresh, high-quality components will elevate the flavors and textures to an unparalleled level of deliciousness. Think of it as building a masterpiece, where each ingredient plays a crucial role in the final symphony of taste.
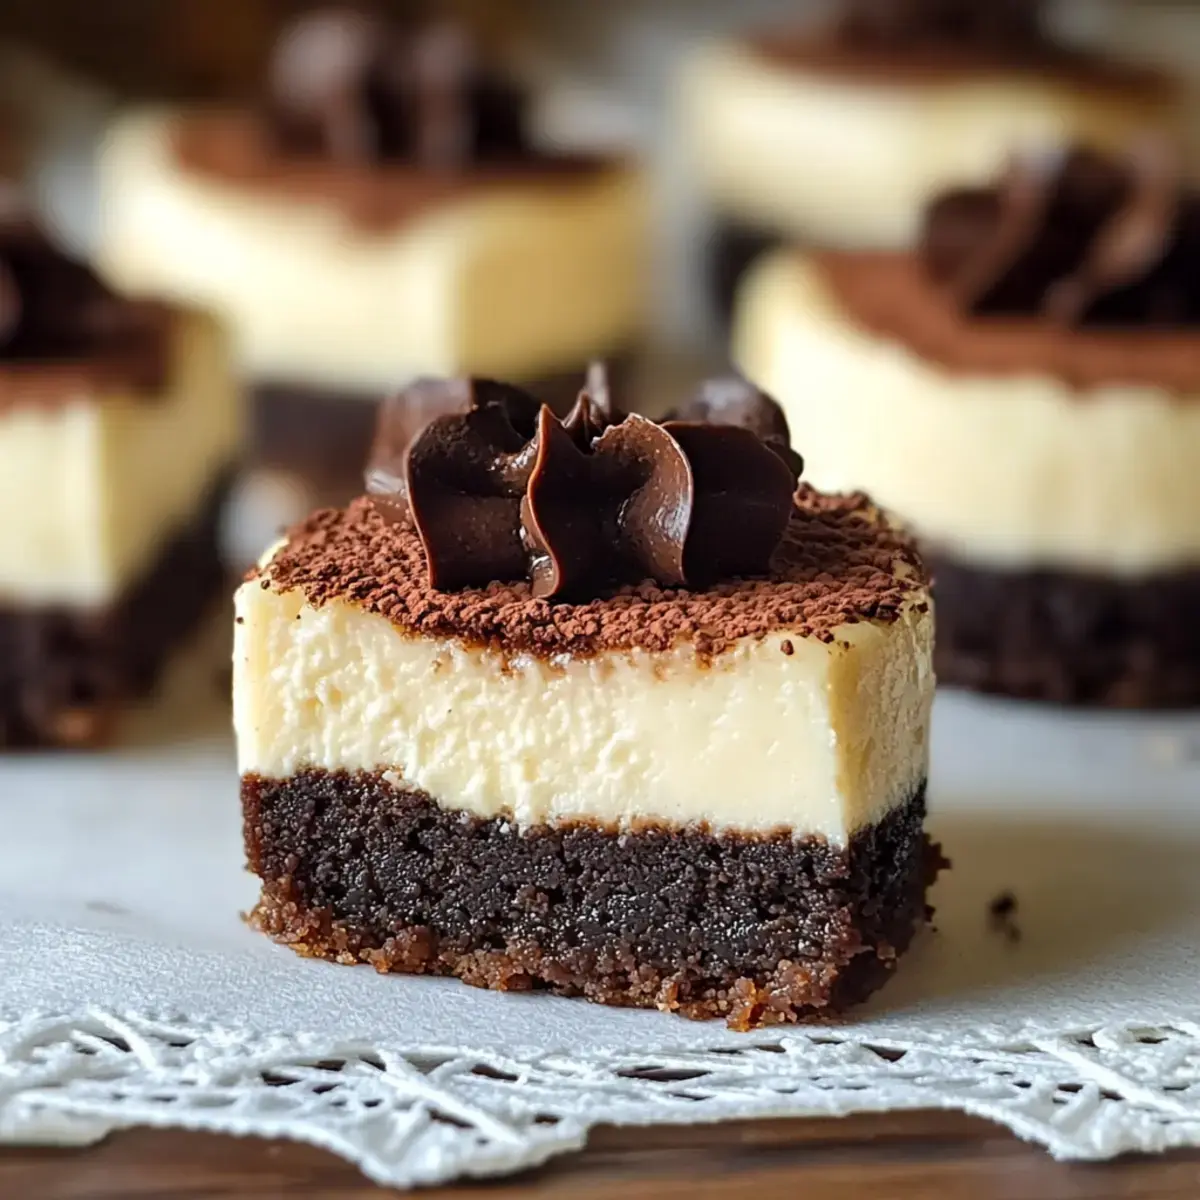
Brownie Bottom Mini Cheesecakes

These Brownie Bottom Mini Cheesecakes combine a chewy brownie base with a smooth, creamy cheesecake layer. They are customizable for gluten-free or vegan diets and are easy to make, perfect for any gathering or a sweet indulgence at home.
- For the Brownie Layer:
- 0.5 cups unsalted butter (margarine or vegan butter can be used as substitute)
- 6 oz semisweet chocolate (dark chocolate can offer a richer taste)
- 1 cup granulated sugar (coconut sugar serves as a lower-glycemic alternative)
- 2 large eggs (use flax eggs or chia seeds for vegan option)
- 1 teaspoon vanilla extract (opt for pure vanilla extract for the best taste)
- 0.5 cups all-purpose flour (replace with gluten-free flour blends for gluten-free option)
- 0.25 teaspoon salt (no substitutions are necessary)
- For the Cheesecake Layer:
- 8 oz cream cheese (use full-fat for best results)
- 0.5 cups sour cream (Greek yogurt is a healthier alternative)
- Optional Sugar Substitutes (consider this for a lighter treat)
- 1Melt Butter and Chocolate: Melt 0.5 cups of unsalted butter and 6 ounces of semisweet chocolate in a microwave-safe bowl in 30-second intervals until smooth. Let cool slightly.
- 2Mix Sugar and Eggs: Stir in 1 cup of granulated sugar. Add 2 large eggs one at a time, mixing thoroughly after each. Mix in 1 teaspoon of vanilla extract.
- 3Combine Dry Ingredients: In a separate bowl, whisk together 0.5 cups of all-purpose flour and 0.25 teaspoon of salt. Gently fold this mixture into the chocolate concoction until just combined.
- 4Prepare Muffin Cups: Line a mini muffin pan with cupcake liners or grease lightly. Spoon the brownie batter into each cup, filling about one-third full.
- 5Bake Brownie Base: Preheat oven to 350°F (175°C). Bake brownie bases for about 8 minutes until edges set. Let cool slightly in the pan.
- 6Prepare Cheesecake Layer: Beat 8 ounces of softened cream cheese until smooth. Gradually add 0.5 cups of granulated sugar and 1 teaspoon of vanilla extract, mixing well. Incorporate 1 large egg and 0.5 cups of sour cream, blending until velvety and lump-free.
- 7Assemble: Spoon the cheesecake mixture over the cooled brownie bases, filling each cup nearly to the top.
- 8Bake Cheesecakes: Lower oven temperature to 325°F (163°C). Bake for 15-18 minutes, or until edges are set and centers have a gentle wobble.
- 9Chill: Let cheesecakes cool in the pan for about 30 minutes, then transfer to the refrigerator and chill for at least 2 hours.
Keywords: mini cheesecake, brownie, chocolate, dessert, easy recipe, crowd-pleaser, customizable, gluten-free, vegan
- unsalted butter: for richness and a tender crumb in the brownie layer.
- semisweet chocolate: provides a deep, classic chocolate flavor essential for a fudgy brownie.
- granulated sugar: sweetens both layers and contributes to their ideal textures.
- large eggs: bind the ingredients and contribute to the fudgy consistency of the brownie and the creamy structure of the cheesecake.
- vanilla extract: enhances the chocolate notes and adds a warm aromatic complexity.
- all-purpose flour: provides structure for the brownie base, creating that satisfying chew.
- salt: balances the sweetness and intensifies the overall flavor profile.
- cream cheese: the star of the cheesecake layer, ensuring a smooth, tangy, and rich texture.
- sour cream: adds an extra layer of creaminess and a subtle tang to the cheesecake filling.
Quantities for each ingredient are detailed in the recipe card.
Variations
The beauty of these Brownie Bottom Mini Cheesecakes lies in their inherent versatility. You can transform them into something truly unique with a few creative twists, catering to various tastes and dietary needs. Imagine a vibrant burst of fruit or a subtle hint of spice adding another dimension to this already beloved dessert.
Consider a delightful berry-infused variation for a refreshing change. Gently swirl a homemade raspberry or strawberry puree into the cheesecake batter before baking. This not only adds a beautiful marbled effect but also introduces a bright, fruity counterpoint to the rich chocolate and creamy cheesecake, creating a truly summery sensation.
For those seeking a low-carb option, you can easily adapt the recipe. Replace the granulated sugar in both the brownie and cheesecake layers with a suitable sugar substitute like erythritol or stevia. Ensure you use a blend that bakes well to maintain the desired textures, offering a guilt-free indulgence that doesn’t compromise on flavor.
Another exciting avenue is to enhance the brownie layer with a nutty crunch. Toasted walnuts or pecans, finely chopped, can be folded into the brownie batter. This addition provides a wonderful textural contrast to the smooth cheesecake, adding depth and a satisfying bite that complements the rich chocolate notes beautifully.
You could also explore a mocha twist by incorporating a teaspoon of instant espresso powder into the brownie batter. This deepens the chocolate flavor and adds a subtle coffee undertone that is incredibly sophisticated. For an extra decadent touch, a drizzle of chocolate ganache or a sprinkle of sea salt just before serving can elevate these mini cheesecakes to pure bliss.
How to Prepare brownie bottom mini cheesecakes
Step 1: Crafting the Fudgy Brownie Base
Begin this culinary adventure by preparing the foundational brownie layer for your exquisite Brownie Bottom Mini Cheesecakes. In a microwave-safe bowl, combine 1/2 cup of unsalted butter with 6 ounces of finely chopped semisweet chocolate. Microwave this mixture in short, 30-second intervals, stirring diligently between each burst of heat until the chocolate is completely melted and the butter is fully incorporated, creating a smooth, glossy chocolate mixture.
It is crucial to allow this luscious chocolate concoction to cool slightly before proceeding. This gentle cooling period prevents the eggs from scrambling when they are added, ensuring a smooth and homogenous brownie batter. A slightly cooled mixture will integrate the eggs more seamlessly, leading to a superior texture in your finished brownie bottom.
Once the chocolate mixture has reached a palatable temperature, it’s time to introduce the sweetness. Stir in 1 cup of granulated sugar until the mixture is thoroughly combined and appears glossy. This sugar not only sweetens the brownie but also contributes significantly to its characteristic fudgy texture and the delicate chewiness that makes it so irresistible.
Step 2: Enriching the Batter with Eggs and Vanilla
With the sugar beautifully incorporated into the chocolate base, the next step involves adding the eggs. Crack in 2 large eggs, one at a time, ensuring you mix thoroughly after each addition. This gradual incorporation helps to emulsify the batter, creating a stable structure that is essential for a rich and fudgy brownie. The eggs are vital for binding the ingredients and providing that signature dense, moist texture.
Following the eggs, add 1 teaspoon of pure vanilla extract. Vanilla is not merely an additive; it’s a flavor enhancer that truly makes the chocolate sing. Opting for pure vanilla extract will provide a more nuanced and complex aroma and taste compared to artificial varieties. Ensure everything is whisked together until the batter is smooth, cohesive, and exhibits a beautiful sheen, indicating readiness for the dry ingredients.
The combination of melted chocolate, butter, sugar, eggs, and vanilla creates a decadent base that promises an explosion of chocolate flavor. Take a moment to appreciate the richness of this mixture; it’s the promise of the delightful brownie layer that will cradle your creamy cheesecake filling.
Step 3: Incorporating the Dry Elements
In a separate, medium-sized bowl, whisk together the dry ingredients: 1/2 cup of all-purpose flour and 1/4 teaspoon of salt. Whisking these together ensures that the flour is evenly distributed and the salt is incorporated throughout, preventing any pockets of saltiness. The flour provides the necessary structure to the brownie layer, giving it substance and that satisfying bite.
Now, it’s time to gently fold this dry mixture into your already rich chocolate concoction. Use a spatula or a large spoon to carefully incorporate the flour and salt into the wet ingredients. The key here is to avoid overmixing. Mix only until you can no longer see streaks of flour. Overmixing develops the gluten in the flour too much, which can result in a tougher brownie rather than the desired fudgy texture.
The goal is to achieve a perfectly combined batter that is still thick and luscious. This gentle folding technique preserves the integrity of the brownie texture, ensuring it remains tender and fudgy. This careful balance of wet and dry ingredients is paramount to creating the ideal foundation for your mini cheesecakes.
Step 4: Preparing the Muffin Pan for Baking
With your delicious brownie batter ready, the next crucial step is to prepare your mini muffin pan. You can either line each cup with standard mini cupcake liners or lightly grease the pan with butter or cooking spray. Using liners can make for easier cleanup, while a greased pan ensures the brownie bases release cleanly after baking.
Carefully spoon the brownie batter into each prepared mini muffin cup. Aim to fill each cup about one-third of the way full. This specific amount is important because it leaves ample space for the creamy cheesecake layer that will be added later. This controlled distribution ensures that each mini cheesecake will have a balanced ratio of brownie to cheesecake.
Taking the time to portion the batter evenly will result in uniform mini cheesecakes, both in appearance and in taste. This thoughtful preparation sets the stage for the beautiful visual and flavorful harmony that defines these Brownie Bottom Mini Cheesecakes, making them a delightful treat for any occasion.
Step 5: Baking the Brownie Bases
Preheat your oven to 350°F (175°C) and position an oven rack in the center. Carefully place the prepared mini muffin pan with the brownie batter into the preheated oven. Allow the brownie bases to bake for approximately 8 minutes. You’ll want to watch them closely; the edges should begin to set and look slightly firm, while the centers will still appear soft and perhaps a little glossy.
This short baking time is intentional. We are not aiming to fully cook the brownie layer at this stage, but rather to set its structure so it can hold the cheesecake filling. The slight underbaking ensures that the brownie remains wonderfully fudgy and chewy once the cheesecake is baked on top. Overbaking here would lead to a dry, cakey base.
Once the 8 minutes are up, remove the muffin pan from the oven. Let the brownie bases cool slightly in the pan. This cooling period allows them to firm up just enough to handle, making them ready for the next stage of assembly. While they cool, you can begin preparing the decadent cheesecake layer that will crown these delightful creations.
Step 6: Creating the Creamy Cheesecake Filling
In a clean mixing bowl, begin by beating 8 ounces of softened cream cheese. Use an electric mixer on medium speed to achieve a smooth, creamy, and lump-free consistency. Softened cream cheese is essential for a truly silky texture, preventing any grainy or lumpy surprises in your final cheesecake layer. Ensure the cream cheese is at room temperature for optimal results.
Gradually incorporate 1/2 cup of granulated sugar and 1 teaspoon of vanilla extract into the cream cheese. Mix these ingredients until they are thoroughly combined and the mixture becomes lighter in color and fluffier in texture. The sugar sweetens the filling, while the vanilla extract complements the tanginess of the cream cheese and adds a warm aromatic note.
Next, you’ll add the binders and enrichers. Blend in 1 large egg until just combined, being careful not to overmix. Finally, gently fold in 1/2 cup of sour cream. Continue mixing until the entire cheesecake mixture is velvety smooth, lustrous, and free of any imperfections. This ensures a luscious, decadent topping for your brownie bases.
Step 7: Assembling the Mini Cheesecakes
Now comes the exciting part: assembling your Brownie Bottom Mini Cheesecakes. Carefully spoon the prepared cheesecake mixture over the slightly cooled brownie bases in each mini muffin cup. Ensure you distribute the cheesecake filling evenly, filling each cup almost to the very top. This generous filling will create a beautiful, domed top once baked.
The goal is to create a harmonious blend of flavors and textures. The cheesecake layer should completely cover the brownie base, providing a smooth transition when you take a bite. Take your time with this step to ensure each cheesecake is equally proportioned and aesthetically pleasing. A uniform appearance will make your dessert spread even more enticing.
This careful assembly is what gives the Brownie Bottom Mini Cheesecakes their signature appeal. The contrast in color and the promise of two distinct yet complementary flavors are evident even before baking. This step is where the magic truly begins to take shape, preparing them for their final transformation in the oven.
Step 8: Baking the Cheesecake Layers
Reduce your oven temperature to 325°F (163°C). This lower temperature is key to achieving a perfectly baked cheesecake that is creamy and avoids cracking. Place your muffin pan, now filled with the assembled mini cheesecakes, back into the center of the preheated oven.
Bake the mini cheesecakes for approximately 15 to 18 minutes. You will know they are ready when the edges appear set and slightly puffed, but the very center of each cheesecake still has a slight, gentle wobble. This “jiggle test” is the hallmark of a perfectly baked cheesecake; it indicates that the center is cooked through but still moist and creamy, and it will continue to firm up as it cools.
Avoid the temptation to overbake. Overbaking will result in a dry, rubbery texture and is a common cause of cracking. The slight wobble ensures that your Brownie Bottom Mini Cheesecakes will achieve that coveted silky-smooth texture that is so delightful. Once baked, remove the pan from the oven and place it on a wire rack to begin the cooling process.
Step 9: The Crucial Chilling Phase
After removing the mini cheesecakes from the oven, allow them to cool in the muffin pan on a wire rack for about 30 minutes. This gradual cooling prevents a sudden temperature change, which can also lead to cracking. During this time, the cheesecake will continue to set and firm up considerably.
Once they have cooled sufficiently in the pan, it’s time to transfer them to their final chilling environment. Carefully lift the mini cheesecakes (along with their liners, if used) out of the muffin pan and place them on a tray or plate. Then, transfer this tray to the refrigerator. Allow the Brownie Bottom Mini Cheesecakes to chill for at least 2 hours, though chilling them overnight is even better for optimal flavor development and texture.
This extended chilling period is absolutely essential. It allows the flavors to meld beautifully, the cheesecake to become perfectly firm and smooth, and the brownie base to achieve its ultimate fudgy consistency. Patience during this stage is richly rewarded with a dessert that is truly irresistible and a testament to the art of homemade baking.
Pro Tips for brownie bottom mini cheesecakes
Room Temperature Ingredients: For an impeccably smooth cheesecake batter, ensure your cream cheese and eggs are at room temperature. This allows them to emulsify more effectively, preventing lumps and creating a velvety texture that is characteristic of a premium dessert.
Gentle Mixing is Key: When preparing the cheesecake filling, avoid overmixing. Beat the ingredients until just combined. Excessive mixing can incorporate too much air, which can lead to cracks forming on the surface of the cheesecakes as they bake and cool.
The Perfect Wobble: Pay close attention to the baking time. As mentioned, the center of the mini cheesecakes should still have a slight wobble when you remove them from the oven. This indicates they are cooked through but will achieve the perfect creamy texture upon chilling.
Chill Time is Non-Negotiable: While it might be tempting to dig in immediately, allowing the Brownie Bottom Mini Cheesecakes to chill for at least 2-3 hours is critical. This period allows the flavors to fully develop and the texture to set, transforming a good dessert into an extraordinary one.
Experiment with Toppings and Variations: Don’t be afraid to get creative! Consider a drizzle of caramel, a dusting of cocoa powder, or a few fresh berries. These additions can elevate the visual appeal and add complementary flavors, making each cheesecake a unique masterpiece. Explore different flavor profiles for the brownie base as well.
Serving Suggestions for brownie bottom mini cheesecakes
Decoration
Elevate the presentation of your Brownie Bottom Mini Cheesecakes with simple yet stunning decorative touches. A light dusting of cocoa powder or powdered sugar can add an elegant finish, mimicking a fresh snowfall over the rich chocolate and creamy white layers. For a more vibrant look, consider a few fresh berries, such as raspberries or small sliced strawberries, carefully placed on top.
A delicate drizzle of melted chocolate or a swirl of caramel sauce can add an extra layer of decadence and visual appeal. If you’re feeling artistic, a small sprig of fresh mint offers a beautiful contrast of color and a hint of refreshing aroma. The key is to enhance, not overpower, the natural beauty of the cheesecake.
For a truly special occasion, consider adding a tiny edible flower or a delicate chocolate curl. These small details can transform an already delightful dessert into a showstopper, making your Brownie Bottom Mini Cheesecakes a memorable part of any gathering or celebration.
Side Dishes
Complement the rich flavors of your Brownie Bottom Mini Cheesecakes by pairing them with thoughtful side dishes that offer a delightful contrast or harmony. A small bowl of fresh, mixed berries is a classic choice; their natural tartness cuts through the sweetness and richness of the cheesecake beautifully. Raspberries, blueberries, and blackberries all work wonderfully.
Alternatively, a dollop of freshly whipped cream, lightly sweetened or even unsweetened, adds an airy, cloud-like texture that balances the dense, creamy cheesecake. This provides a refreshing counterpoint and a pleasing textural variation. For those who enjoy a bolder pairing, a small cup of strong, freshly brewed coffee or a shot of espresso can enhance the deep chocolate notes of the brownie base.
Consider a light fruit salad for a refreshing interlude. The crispness of fruits like melon or grapes can cleanse the palate between bites of the rich cheesecake. Even a simple garnish of mint leaves can add a subtle, aromatic element that brightens the overall dessert experience.
Creative Serving Ideas
Think beyond the standard plate when serving your Brownie Bottom Mini Cheesecakes to make the experience truly memorable. For a fun party idea, arrange them on a tiered dessert stand, allowing guests to easily select their treat. You could also serve them in mini shot glasses or small dessert cups for an elegant, self-contained presentation.
Consider creating a “make-your-own-topping” bar. Provide small bowls of various toppings like mini chocolate chips, crushed cookies, chopped nuts, sprinkles, and various sauces. This interactive approach allows guests to customize their own mini cheesecake, adding an element of playful engagement.
For a more rustic presentation, arrange them on a wooden serving board, perhaps interspersed with a few cinnamon sticks or star anise for visual interest and aroma. You might even present them as part of a dessert tasting flight, alongside other small, complementary desserts, showcasing a variety of flavors and textures.
Preparation & Storage
Storing Leftovers
Should you find yourself with any leftover Brownie Bottom Mini Cheesecakes, proper storage is key to maintaining their deliciousness. The best way to store them is in an airtight container. This prevents them from drying out and absorbing any unwanted odors from other foods in the refrigerator. Ensure the container is clean and completely dry before placing the cheesecakes inside.
Place the airtight container in the refrigerator. They will keep well for up to 3 to 4 days when stored this way. For best results, avoid stacking them too high, as this can potentially cause them to lose their shape or get squashed. If they are placed in liners, you can often leave them in the liners within the container for easy handling.
It’s advisable to let them sit at room temperature for about 10-15 minutes before serving if they have been refrigerated. This brief warming period helps to soften the cheesecake slightly, bringing back its creamy texture and allowing the full flavors to be appreciated. Do not leave them out for extended periods, however.
Freezing
These Brownie Bottom Mini Cheesecakes freeze exceptionally well, making them perfect for making ahead. To freeze them properly, ensure they are completely cooled and have been thoroughly chilled in the refrigerator first. This chilling step helps them firm up, making them easier to handle and less prone to damage during the freezing process.
Once chilled, individually wrap each mini cheesecake tightly in plastic wrap. Be generous with the wrap to create a good seal that protects against freezer burn. After individual wrapping, place the wrapped cheesecakes into a heavy-duty freezer-safe bag or an airtight container. Squeeze out as much air as possible from the bag before sealing.
Label the bag or container with the date. Properly frozen, these mini cheesecakes can maintain their quality for up to 3 months. When you are ready to enjoy them, simply transfer the frozen cheesecakes from the freezer to the refrigerator to thaw slowly overnight. This gradual thawing process helps preserve their delicate texture and flavor.
Reheating
Generally, Brownie Bottom Mini Cheesecakes are best served chilled or at room temperature, so extensive reheating is not typically necessary. However, if you prefer a slightly warmer, more decadent experience, especially if they have been refrigerated or thawed, a very brief period of warming can be applied.
For a slight warming, you can place a chilled or thawed mini cheesecake on a microwave-safe plate. Microwave on the lowest power setting for very short intervals, perhaps 10-15 seconds at a time. Keep a close eye on it, as cheesecakes can become overly soft or melt quickly. The goal is just to take the chill off and slightly soften the texture, not to cook it.
Alternatively, if you have thawed them from frozen, and they are still a little too firm for your liking after refrigerating overnight, you can let them sit at room temperature for 20-30 minutes to naturally soften. This gentle warming at room temperature usually achieves the perfect creamy consistency without any risk of over-processing.
Frequently Asked Questions
- What kind of chocolate is best for the brownie base?
For the brownie base, using high-quality semisweet chocolate is highly recommended as it provides a balanced richness and a classic chocolate flavor that pairs wonderfully with cheesecake. If you prefer a more intense chocolate experience, you can certainly opt for dark chocolate, ensuring it has a cocoa content of around 60-70%. The key is to use chocolate that melts smoothly and has a good flavor profile, as it forms the backbone of the brownie layer. Avoid using chocolate chips that are designed to hold their shape, as they may not melt as smoothly, potentially affecting the texture of the brownie.
- How should I store Brownie Bottom Mini Cheesecakes?
To ensure your Brownie Bottom Mini Cheesecakes remain delicious and maintain their texture, proper storage is essential. Store them in an airtight container in the refrigerator. This prevents them from drying out and protects them from absorbing any other flavors from your fridge. When stored correctly in an airtight container, they will stay fresh and enjoyable for approximately 3 to 4 days, making them a perfect make-ahead dessert for impromptu cravings or planned gatherings.
- Can I freeze the mini cheesecakes?
Yes, absolutely! Brownie Bottom Mini Cheesecakes freeze wonderfully, allowing you to enjoy them even longer. For the best results, wrap each individual mini cheesecake securely in plastic wrap to prevent freezer burn. Then, place the wrapped cheesecakes into a freezer-safe bag or an airtight container. When properly frozen, they can retain their quality for up to 3 months. To enjoy, simply transfer them from the freezer to the refrigerator and let them thaw overnight. This slow thawing method helps preserve their creamy texture and delicate flavor, ensuring they are just as delightful as when they were freshly made.