Irresistible Blueberry Lemon Oat Bars – A Delicious No Bake Treat
Sometimes, the best culinary creations are born out of necessity and a craving for something both comforting and invigorating. That was precisely my situation when I decided to craft these No Bake Blueberry Lemon Oat Bars. They are a testament to simple ingredients transforming into a delightful treat, offering a perfect balance of textures and vibrant flavors that are sure to brighten any day. The ease with which they come together makes them an absolute winner for busy schedules.
Imagine a snack that is both satisfyingly chewy and wonderfully zesty, bursting with the natural sweetness of blueberries and the bright tang of lemon. These bars deliver exactly that, providing a wholesome option for breakfast, a midday energy boost, or a guilt-free dessert. They are incredibly versatile, adapting to your preferences with minimal effort. Let’s get started on creating these effortlessly delicious bars that will quickly become a family favorite!
Why You Will Love This Recipe
- Effortless Preparation: These bars are no-bake, meaning you can whip them up in minutes without ever turning on your oven, making them perfect for warm weather or time-strapped bakers.
- Wholesome Goodness: Packed with hearty oats, vibrant blueberries, and nutritious nut butter, these bars offer a fantastic balance of complex carbohydrates, healthy fats, and fiber for sustained energy.
- Bright and Zesty Flavor: The dynamic duo of fresh lemon and sweet blueberries creates a refreshing taste profile that is both invigorating and deliciously satisfying, cutting through any sweetness beautifully.
- Customizable Treat: While delicious as is, these bars are a fantastic base for creativity; feel free to add your favorite nuts, seeds, or even a touch of spice for a personalized twist that suits your palate.
- Perfect for On-the-Go: Their portable nature and firm texture make these bars an ideal snack for packing in lunchboxes, taking on hikes, or enjoying during a busy workday, ensuring a healthy treat is always within reach.
Ingredients You Need
Crafting these delightful bars relies on a selection of simple, wholesome ingredients that come together to create a symphony of flavors and textures. The quality of your ingredients will shine through, so opt for the freshest possible whenever you can. Each component plays a crucial role in achieving the perfect chewy, flavorful, and satisfying bar. Remember, the exact quantities are detailed in the recipe card provided, ensuring perfect results every time you bake.
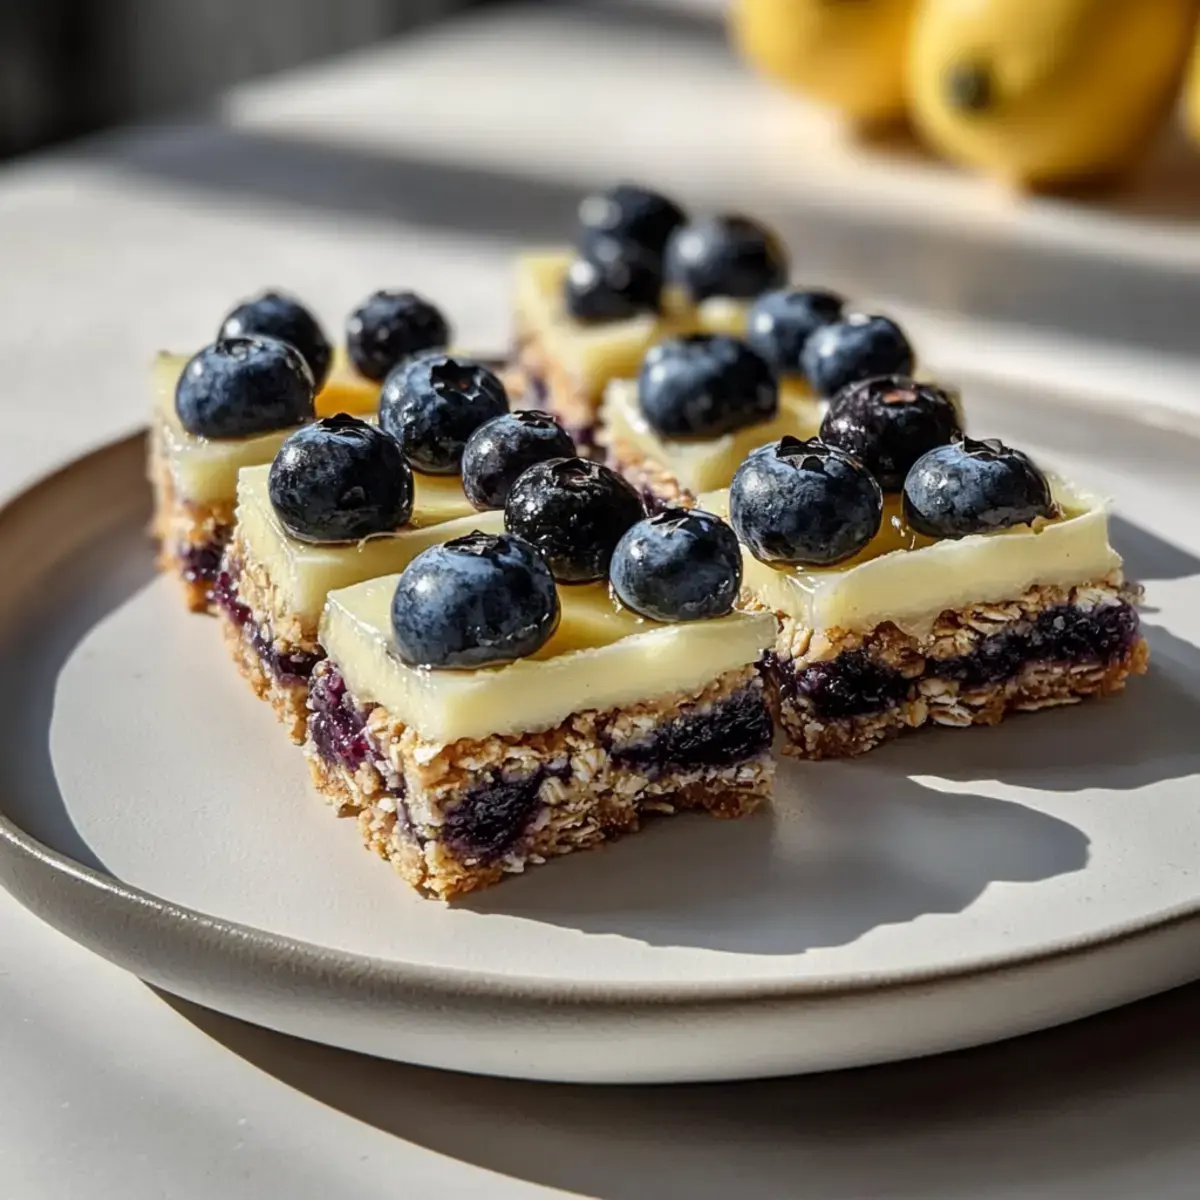
No Bake Blueberry Lemon Oat Bars
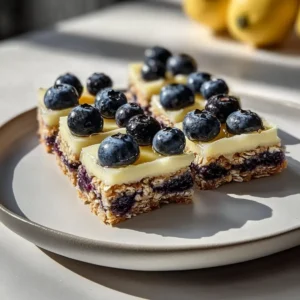
These delightful No Bake Blueberry Lemon Oat Bars are a perfect blend of chewy oats, zesty lemon, and bursty blueberries, creating a healthy snack that requires no oven.
- 2 cups rolled oats
- 1 cup blueberries (fresh or frozen)
- 1 cup lemon juice (freshly squeezed preferred)
- 1/2 cup nut butter (e.g., almond or peanut)
- 1/3 cup honey or maple syrup
- 1/4 cup coconut oil
- 1In a large mixing bowl, combine rolled oats and blueberries, stirring gently until evenly incorporated.
- 2In another bowl, whisk together nut butter, honey or maple syrup, and lemon juice until the mixture is smooth and creamy.
- 3Pour the wet mixture over the dry ingredients and use a spatula to gently fold them together until fully combined.
- 4Line an 8x8 inch baking dish with parchment paper. Transfer the oat mixture into the dish, spread it evenly, and press down firmly to create a compact, smooth layer.
- 5Place the baking dish in the refrigerator to chill for at least 2 hours to ensure the bars set properly.
- 6Remove the bars from the dish using the parchment paper, slice into squares, and store in an airtight container.
Keywords: no bake, blueberry, lemon, oat bars, healthy snack, vegan option, dessert
- rolled oats: provides the sturdy, chewy base for your bars, offering sustained energy.
- blueberries: bursts of sweet-tart flavor and vibrant color, fresh or frozen work beautifully.
- lemon juice: adds a bright, zesty tang that perfectly balances the sweetness and enhances the fruitiness.
- nut butter (e.g., almond or peanut): binds the ingredients together, contributing creaminess and healthy fats.
- honey or maple syrup: acts as a natural sweetener, providing moisture and helping the bars set.
- coconut oil: helps solidify the mixture when chilled, ensuring the bars hold their shape.
These foundational ingredients form the backbone of your Blueberry Lemon Oat Bars, promising a delicious and nourishing treat that’s incredibly easy to make.
Variations
The beauty of these Blueberry Lemon Oat Bars lies not only in their inherent deliciousness but also in their incredible adaptability. You can effortlessly transform them to suit different dietary needs or simply to explore new flavor profiles. Consider these exciting variations for your next batch.
Vegan Delight: To create a fully vegan treat, ensure you use maple syrup or agave nectar as your sweetener instead of honey. Coconut oil is naturally vegan, and most nut butters are too, so this substitution is straightforward. The result is a plant-based bar that’s just as satisfying and flavorful, perfect for sharing with vegan friends or family members.
Nut-Free Option: For those with nut allergies or simply looking to avoid nuts, sunflower seed butter is an excellent substitute for almond or peanut butter. It provides a similar creamy texture and binding properties without any nuts. Ensure your oats and other ingredients are also certified nut-free if cross-contamination is a concern.
Lower Carb Approach: While oats are a healthy carbohydrate source, you can modify these bars for a lower-carb profile. Replace a portion of the oats with almond flour or shredded coconut, and use a sugar-free sweetener like erythritol or stevia. You might need to slightly adjust the liquid ingredients to achieve the right consistency.
Citrus Twist: Elevate the citrus notes by adding a teaspoon of fresh lemon zest to the wet ingredients. This intensifies the lemon flavor, making the bars even more vibrant and refreshing. You could even experiment with a hint of lime zest for a different tropical tang.
Added Texture: For a delightful crunch, consider adding a quarter cup of chopped nuts like walnuts or pecans, or even some seeds such as chia seeds or pumpkin seeds to the dry ingredients. These additions not only enhance the texture but also boost the nutritional profile of your bars, making them even more wholesome.
How to Prepare Blueberry Lemon Oat Bars
Embarking on the journey to create these delightful Blueberry Lemon Oat Bars is a straightforward and rewarding process. The simplicity of the steps ensures that even novice bakers can achieve spectacular results. From gathering your ingredients to the final chilling, each stage is designed for ease and maximum flavor payoff. Let’s walk through the process, ensuring every step contributes to the perfect bar.
Step 1: Combine the Dry Ingredients
Begin by taking a large mixing bowl and adding your rolled oats. These form the hearty, chewy foundation of your bars. To this, gently fold in the fresh or frozen blueberries. The goal here is to distribute them evenly throughout the oats, ensuring each bite will contain those wonderful bursts of fruity flavor. If you’re incorporating any optional dry additions like seeds or chopped nuts for extra texture, now is the perfect time to add them to the bowl.
Stir the contents of the bowl gently with a spatula or a spoon. You want to ensure the oats and blueberries are well acquainted but avoid crushing the delicate berries. A light hand is key at this stage to preserve the integrity of the blueberries, which will contribute visually and flavor-wise to the finished product. This mixture sets the stage for the binding elements that will bring it all together.
The Importance of Even Distribution: Taking a moment to ensure the oats and blueberries are thoroughly mixed means that your bars will have a consistent texture and flavor profile throughout. No one wants a bite that’s all oats or a clump of blueberries; an even blend guarantees delightful harmony in every piece. This foundational step is crucial for the overall success of your no-bake creation.
Step 2: Prepare the Wet Binding Mixture
In a separate, medium-sized bowl, it’s time to craft the binding agent for your bars. Start by measuring out your chosen nut butter, whether it’s creamy almond butter, rich peanut butter, or a nut-free alternative like sunflower seed butter. Add this to the bowl, ensuring it’s at room temperature to make mixing easier.
Next, incorporate your liquid sweetener, which will be either honey or maple syrup, depending on your preference or dietary needs. Follow this with the freshly squeezed lemon juice; this is where the bright, zesty magic happens. Whisk these ingredients together vigorously until they are completely combined and form a smooth, cohesive mixture. The goal is a homogenous blend that will effectively hold all the oat and blueberry components together.
Achieving Perfect Consistency: The texture of this wet mixture is paramount. It should be smooth, pourable, but not too runny. If your nut butter is particularly stiff, you might need to warm it very slightly to achieve the desired consistency. Likewise, ensure your lemon juice is well-integrated, as any separation can affect how the bars set. This well-emulsified mixture is the glue that transforms loose ingredients into a solid, sliceable treat.
Step 3: Combine Wet and Dry Ingredients
Now, it’s time to bring everything together. Pour the smooth, creamy wet mixture directly over the combined dry ingredients in the larger mixing bowl. Using a sturdy spatula or a large spoon, begin to gently fold the wet ingredients into the dry. The aim is to coat every single oat and blueberry with the binding mixture. Take your time with this step to ensure thorough incorporation.
Continue to fold and mix until the entire mixture appears well-combined and holds together when squeezed. It should be a sticky, cohesive mass, with no dry pockets of oats visible. This step is where the structure of your bars begins to form, so make sure every component is adequately bound. The consistency should be firm enough to press into a pan but not so dry that it crumbles.
The Art of Folding: Gentle folding is crucial here. Overmixing can break down the oats and make the bars too dense, while under-mixing will result in them falling apart. You’re looking for a texture that’s like thick cookie dough, where the ingredients are evenly distributed and slightly sticky. This ensures that when chilled, the bars will slice cleanly and maintain their desired chewy texture.
Step 4: Press the Mixture into the Pan
Prepare your baking dish by lining it with parchment paper. Ensure the parchment paper extends slightly up the sides of the dish, creating an overhang. This overhang will be invaluable later, allowing you to lift the entire block of bars out of the pan cleanly. An 8×8 inch square baking dish is typically ideal for this recipe, creating bars of a good thickness.
Transfer the entire oat mixture into the prepared baking dish. Spread it out as evenly as possible across the bottom. Now comes the critical part: pressing the mixture down firmly. You can use the back of your spatula, a flat-bottomed glass, or even your hands (lightly dampened if it’s very sticky) to compact the mixture. Apply firm, even pressure to create a solid, dense layer.
Achieving Density for Slicing: The firmer you press the mixture, the more cohesive and sliceable your bars will be. If the mixture is too loosely packed, they will likely crumble when you try to cut them. Take your time, ensuring the surface is smooth and level. This compacting step is what transforms the sticky mass into a structure that can be cut into perfect portions, making them ideal for serving and storage.
Step 5: Chill to Set
Once the mixture is firmly pressed into the prepared baking dish, it’s time for it to firm up. Cover the baking dish tightly, either with plastic wrap or by placing it in a resealable container. Transfer the dish to the refrigerator. You’ll want to let the bars chill for a minimum of two hours, but a longer chilling period, up to four hours, can yield an even firmer texture.
This chilling period is essential. It allows the coconut oil (if used) to solidify, the nut butter to firm up, and all the ingredients to meld together, creating a cohesive block. Without adequate chilling time, the bars will be too soft and will likely fall apart when you attempt to slice them. Patience here will be rewarded with beautifully formed bars.
The Magic of Refrigeration: The cold temperature is what transforms the sticky, malleable mixture into firm, sliceable bars. Think of it like chocolate that hardens when chilled. The longer they chill, the more structure they will have. This step is non-negotiable for achieving that perfect chewy, yet firm, consistency that makes these bars so satisfying to eat and handle. Ensure your refrigerator is at its standard temperature for optimal results.
Step 6: Slice and Enjoy
After the chilling period is complete and the bars have firmed up nicely, it’s time for the moment of truth. Carefully lift the entire block of bars out of the baking dish using the parchment paper overhang. Place this block onto a clean cutting board. You can then use a sharp knife to slice the bars into your desired shapes and sizes. Squares are common, but rectangles or even triangles work perfectly well.
Once sliced, your Blueberry Lemon Oat Bars are ready to be enjoyed! They are delicious served chilled directly from the refrigerator. These bars are perfect for a quick breakfast, a satisfying snack, or even a light dessert. If you have any leftovers, which is unlikely given how tasty they are, they can be stored in an airtight container in the refrigerator.
Serving and Storage Readiness: Slicing them before storing makes it incredibly convenient to grab one (or two!) whenever the craving strikes. The firm texture achieved through proper chilling means they should hold their shape well when cut. Enjoy the fruits of your simple labor, knowing you’ve created a wholesome and delicious treat with minimal fuss. These bars are a delightful addition to any occasion, from a simple afternoon tea to a packed lunch.
Pro Tips for Blueberry Lemon Oat Bars
Elevate your Blueberry Lemon Oat Bar game with these expert insights. These tips are designed to ensure perfect texture, lasting freshness, and maximum flavor in every bite. Implementing these small adjustments can make a significant difference in your final outcome.
Pressing Power: The most crucial tip for firm bars is to press the mixture into the pan with significant, even pressure. Use the bottom of a glass or a spatula to create a dense, compact layer. This ensures the bars hold together beautifully when sliced and don’t crumble easily. A loosely packed mixture will inevitably lead to crumbly bars.
Quality Ingredients Matter: Always opt for fresh, good-quality ingredients. Freshly squeezed lemon juice provides a brighter, more vibrant citrus flavor than bottled alternatives. Similarly, using good quality oats and nut butter will significantly enhance the overall taste and texture of your bars. The blueberries should be plump and free from mold.
Perfect Chilling is Key: Don’t rush the chilling process. A minimum of two hours is essential, but letting them chill for four hours or even overnight will result in the firmest, most sliceable bars. This allows the fats to fully solidify, binding everything together effectively. Cold bars are the best bars when it comes to structure.
Storage Savvy: For optimal freshness, store your sliced bars in an airtight container in the refrigerator. They will stay delicious for up to a week. If you need to store them for longer, freezing is an excellent option. Wrap them individually in parchment paper and then in foil to prevent freezer burn, and they can last for up to three months.
Flavor Additions: Don’t be afraid to experiment! A teaspoon of vanilla extract in the wet ingredients can add another layer of flavor. A pinch of salt can also enhance the sweetness and balance the tartness of the lemon. For a bit of warmth, consider adding a quarter teaspoon of cinnamon to the dry ingredients.
Serving Suggestions for Blueberry Lemon Oat Bars
These Blueberry Lemon Oat Bars are wonderfully self-sufficient, but they can be elevated further with thoughtful pairings and presentations. Consider these ideas to make your bars even more special, whether for a casual snack or a more refined dessert occasion.
Decoration
A simple dusting of powdered sugar can add an elegant touch, especially if serving as a dessert. For a burst of freshness, top each bar with a fresh blueberry or a tiny sprig of mint just before serving. A delicate drizzle of melted white chocolate or a thin swirl of lemon icing can also transform these bars into something truly decadent. Even a sprinkle of shredded coconut can add visual appeal and a subtle tropical note.
Side Dishes
Pair your bars with a dollop of thick Greek yogurt or creamy cottage cheese. The tanginess of the yogurt complements the sweetness of the bars, while cottage cheese offers a protein boost. A side of fresh fruit salad, featuring complementary berries or stone fruits, adds vibrant color and additional natural sweetness. For a more indulgent experience, consider serving them with a small scoop of vanilla bean ice cream or a rich chocolate ganache dip.
Creative Serving Ideas
Break down the bars into crumbles and use them as a topping for smoothie bowls or fruit parfaits, adding a delightful texture and flavor. You could also serve them as part of a larger dessert platter alongside other baked goods and fresh fruits. For a fun brunch idea, stack them with slices of fresh banana and a drizzle of maple syrup. They also make a wonderful addition to a picnic basket, offering a portable and satisfying treat for outdoor enjoyment.
Preparation & Storage
Ensuring your Blueberry Lemon Oat Bars remain delicious and fresh is simple with proper preparation and storage techniques. These methods will help you enjoy their delightful taste for days to come.
Storing Leftovers
The best way to store any leftover Blueberry Lemon Oat Bars is in an airtight container. Place them in the refrigerator to maintain their texture and prevent spoilage. If layered, you might want to place parchment paper between the layers to prevent them from sticking together. Properly stored, they can retain their optimal chewy consistency for up to a week.
Freezing
For longer-term storage, these bars freeze exceptionally well. It’s advisable to slice the bars before freezing. This allows for easy portioning. Wrap each bar individually in plastic wrap or parchment paper, then place them inside a freezer-safe bag or container. They can be kept in the freezer for up to three months, providing a convenient stash of healthy treats.
Reheating
While these bars are delicious served cold, some people enjoy them slightly warmed. You can gently reheat them in a microwave for about 10-15 seconds. This will soften them slightly and can enhance the flavor, making the nut butter wonderfully gooey. Avoid overheating, as this can make them too mushy. They can also be enjoyed at room temperature if taken out of the refrigerator a little while before serving.
Frequently Asked Questions
-
How do I choose the best blueberries for my bars, and what if I only have frozen ones?
When selecting fresh blueberries, look for plump, firm berries that are a deep, uniform blue color, with a slight powdery bloom. Avoid any that are soft, bruised, or moldy, as these indicate spoilage. If you only have frozen blueberries, they are perfectly suitable for this recipe. You can use them directly from the freezer without thawing; they will release their juices as the bars bake (or set, in this no-bake case), contributing moisture and flavor. Just ensure they are well distributed within the oat mixture to prevent clumping.
-
My bars turned out crumbly. What could have gone wrong, and how can I prevent this next time?
Crumbly bars usually result from a lack of proper binding or insufficient chilling. Ensure you are pressing the mixture into the pan very firmly and evenly; a dense, compact layer is crucial. If your nut butter is too dry or stiff, consider warming it very slightly before mixing to improve its binding properties. Also, make sure you chill the bars for the full recommended time, ideally 2-4 hours, allowing the fats to solidify completely. If they are still a bit crumbly, try gently pressing them together again after slicing.
-
Can I substitute the nut butter with something else if I have allergies, and are there any other common substitutions?
Absolutely! For a nut-free version, sunflower seed butter is an excellent substitute for almond or peanut butter; it offers a similar creamy texture and binding capability. Tahini (sesame seed paste) is another option, though it has a more distinct flavor. If you’re looking to make the bars vegan, ensure you use maple syrup or agave nectar instead of honey. Coconut oil can be omitted if you prefer a lower-fat bar, but the bars may be slightly softer. Remember to check that all your ingredients, especially oats, are certified free from allergens if preparing for someone with severe allergies.