Irresistible Glazed Homemade Honey Buns – A Delicious Treat!
There is a unique sense of magic that occurs in the kitchen when you decide to bake something from scratch. As I looked back through my worn recipe journal, the warm, comforting memories of sweet, sticky honey buns came rushing back to me. These treats represent the ultimate nostalgic snack, perfectly bridging the gap between childhood comfort and sophisticated, modern dietary choices.
These homemade vegan honey buns are far more than just a quick sugar fix for your afternoon craving. They offer a pillowy, soft texture and a decadent glaze that truly rivals any traditional bakery version. By stripping away dairy and eggs, we have created a compassionate delight that everyone can enjoy regardless of their dietary lifestyle.
Why You Will Love This Recipe
- Nostalgic Comfort: These buns evoke heartwarming memories of childhood treats, rekindling that classic, dreamy flavor we all crave.
- Vegan Delight: Completely free from dairy and eggs, this recipe is perfect for all diets, ensuring everyone can indulge without compromise.
- Simple Steps: With only a handful of easy-to-find ingredients, these buns come together effortlessly, making them accessible for bakers of all skill levels.
- Delicious Variations: You have the freedom to choose between deep frying for a crispy, indulgent exterior or air frying for a lighter, modern twist.
- Perfect Pair: Serve these warm alongside a cup of drinks like coffee or tea to elevate your snack game during cozy moments at home.
Ingredients You Need
To ensure your honey buns turn out perfect every single time, I highly recommend using high-quality ingredients, especially when it comes to the plant-based butter and pure vanilla extract. Freshness is key when working with yeast, so check your expiration dates before you begin your baking journey. Following these simple quality guidelines will make your final result taste truly professional.
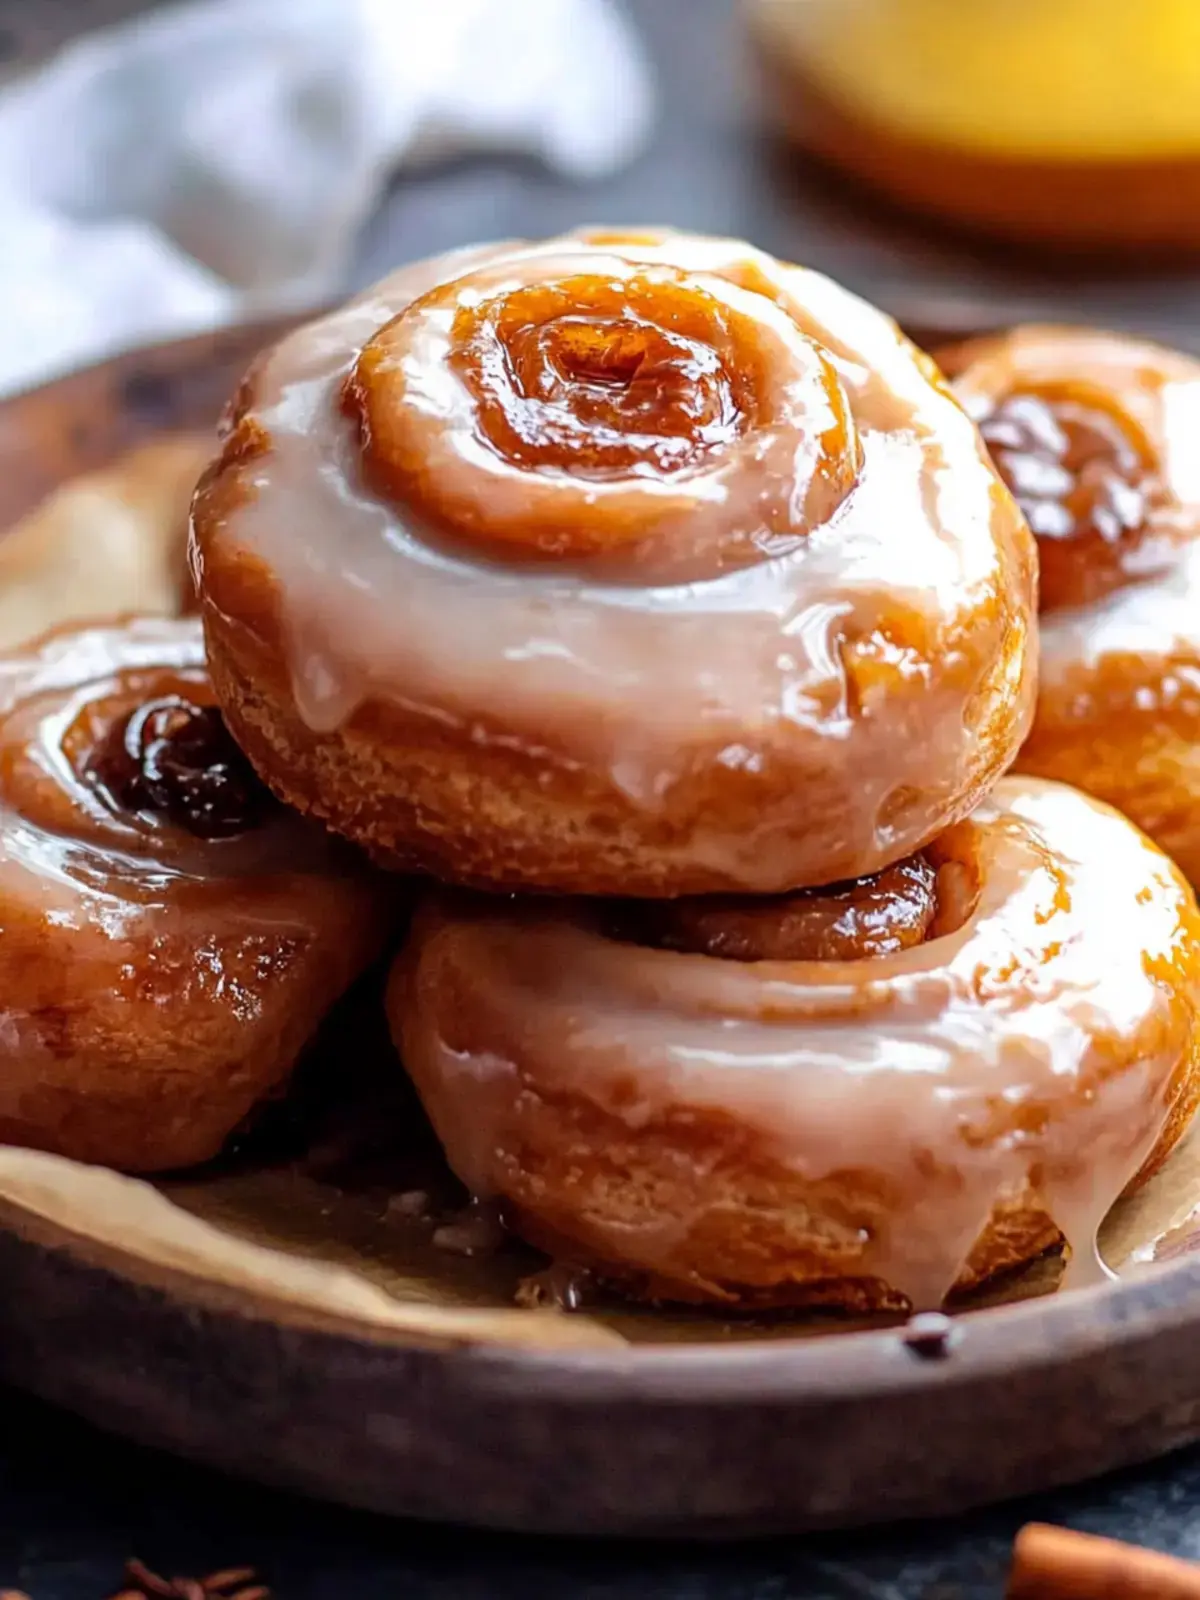
Irresistibly Glazed Homemade Honey Buns

These delicious homemade honey buns are soft, pillowy, and completely vegan. Whether you choose to fry them for a classic crispy exterior or air fry them for a lighter twist, each bite promises a delightful melt-in-your-mouth experience.
- 1 tbsp granulated sugar
- 2 ¼ tsp active dry yeast
- 2 ½ cups all-purpose flour
- 1 tsp ground cinnamon
- 1 pinch table salt
- 4 tbsp salted vegan butter
- 2 tsp vanilla extract
- 1 tbsp Bob’s Red Mill Egg Replacer
- 2 tbsp salted vegan butter
- 2 tbsp agave nectar or vegan honey
- 1 ½ cups powdered sugar
- 1 tbsp salted vegan butter
- 2 tbsp agave nectar or vegan honey
- 1 tsp vanilla extract
- 2-3 tbsp almond milk
- 1Prepare the Yeast Mixture: Dissolve granulated sugar in ¼ cup of warm almond milk. Sprinkle the yeast on top and let it sit for 5-10 minutes until bubbly and frothy.
- 2Make the Dough: In a mixing bowl, combine flour, cinnamon, and salt. Create a well, adding yeast mixture, additional almond milk, melted butter, egg replacer, vanilla, and agave nectar. Stir until a soft dough forms.
- 3Knead the Dough: On a floured surface, knead for about 10 minutes until smooth. Place in a greased bowl, cover, and let rise for 1 ½ hours or until doubled.
- 4Shape the Buns: Roll risen dough into a square, spread filling, roll tightly, cut into 8 pieces, flatten slightly, and rise again for 30 minutes.
- 5Fry or Air Fry: Heat oil to 350°F for frying, cooking each bun for 2-3 minutes on each side. For air frying, preheat to 375°F and cook for 6-8 minutes.
- 6Prepare the Glaze: Mix powdered sugar, butter, agave, and vanilla. Gradually add almond milk to desired thickness. Drizzle glaze over cooled buns.
Keywords: vegan honey buns, homemade donuts, glazed buns, vegan desserts, breakfast treat
- granulated sugar: acts as the primary sweetener and vital activator for the yeast.
- almond milk: provides the necessary moisture for a tender crumb; soy or oat milk also work well.
- active dry yeast: the powerhouse ingredient that ensures your dough rises to airy perfection.
- all-purpose flour: serves as the structural foundation, though you can experiment with gluten-free blends.
- ground cinnamon: infuses the dough with a deep, warming spice profile that is absolutely essential.
- table salt: carefully balances the sweetness to ensure the flavors do not become cloying.
- vegan butter: adds the rich, creamy mouthfeel that is a hallmark of great dessert recipes.
- vanilla extract: imparts an aromatic sweetness that enhances the overall flavor profile significantly.
- egg replacer: provides the essential binding properties needed to keep the dough cohesive and soft.
- agave nectar: a fantastic vegan honey substitute that brings sticky, natural sweetness to the glaze.
- powdered sugar: the main component for a smooth, pourable glaze that sets beautifully on the buns.
Please refer to the full recipe card above for the exact measurements required to achieve these delicious results. Having your ingredients measured out before you start will make the process feel smooth and organized. Remember that consistency in measuring is the secret to successful baking every time.
Variations
Chocolate Chip Twist: You can easily fold in half a cup of high-quality dairy-free chocolate chips into the dough before rolling it out. This adds a molten, gooey surprise in the center of every bite that is simply irresistible.
Cinnamon Sugar Coating: If you want an extra layer of crunch, roll your freshly cooked, warm buns in a bowl of granulated sugar and cinnamon. This classic coating provides a wonderful texture contrast to the soft dough beneath.
Fruit-Filled Buns: For a refreshing alternative, try spreading a thin layer of your favorite fruit preserves or vegan cream cheese over the dough before rolling. Raspberry or peach preserves work exceptionally well to provide a bright, tangy balance to the sweet honey glaze.
How to Prepare vegan honey buns
Step 1: Activate the Yeast
The Foundation: Begin by dissolving your granulated sugar into the warm almond milk within a small mixing bowl. Ensure the milk is warm to the touch, as excessive heat will destroy the yeast, while cold milk will fail to activate it.
The Bloom: Sprinkle the active dry yeast over the surface of the sweetened milk and allow it to sit undisturbed for about ten minutes. You will know it is ready when the mixture begins to look bubbly and frothy, indicating the yeast is alive and ready to work.
Step 2: Create the Dough
The Mix: In a large mixing bowl, whisk together your flour, ground cinnamon, and a small pinch of table salt until perfectly combined. Creating a well in the center of these dry ingredients helps to incorporate the wet components without making a mess.
The Blend: Pour your frothy yeast mixture, the remaining almond milk, melted vegan butter, egg replacer, and agave nectar into the center. Stir the mixture gently with a wooden spoon or spatula until a shaggy, soft dough begins to form.
Step 3: Knead the Dough
The Technique: Turn your dough out onto a clean, floured surface to begin the kneading process. Work the dough for approximately ten minutes, using the heels of your hands to push and fold until the texture becomes smooth and elastic.
The Rise: Place your prepared dough ball into a lightly greased bowl, ensuring you cover it with a warm, damp towel. Allow it to rest in a draft-free spot for about ninety minutes, or until the volume has visibly doubled in size.
Step 4: Shape the Buns
The Roll: Once risen, roll the dough out into a uniform square shape on your floured surface. Evenly spread your filling, which consists of melted vegan butter and agave nectar, across the surface before rolling it tightly into a log.
The Cut: Slice the dough log into eight equal pieces using a sharp knife or a piece of kitchen string to avoid squishing the layers. Flatten each piece slightly with your palm and place them on a tray for their final thirty-minute rise.
Step 5: Cook the Buns
The Fry: If you prefer the classic approach, heat your vegetable oil in a deep pot until it reaches 350°F. Carefully drop the buns into the oil, frying for two to three minutes per side until they achieve a deep, golden brown color.
The Air Fryer: For a lighter variation, preheat your air fryer to 375°F and arrange the buns in a single layer. Cook for six to eight minutes, keeping a close eye on them to ensure they develop that signature golden crust without burning.
Step 6: Glaze and Serve
The Finish: In a medium bowl, whisk together your powdered sugar, vegan butter, agave nectar, and vanilla extract until smooth. Slowly incorporate the almond milk one tablespoon at a time until the consistency reaches your desired level of thickness.
The Drizzle: Generously drizzle the glaze over your cooled buns, allowing it to soak into the crevices of the dough. Serve immediately for the best texture, perhaps alongside a easy-berry-tart-2 or other sweet snacks.
Pro Tips for vegan honey buns
Check Your Yeast: Always ensure your active dry yeast is fresh by performing the bloom test before adding it to your flour. If the mixture does not bubble after ten minutes, it means the yeast is likely dead, and using it will result in dense, flat buns.
Avoid Over-Kneading: While kneading is essential for developing gluten, over-working the dough can lead to tough, chewy results. Aim for a texture that is smooth and springs back when touched, then stop immediately to keep the final crumb soft and pillowy.
Maintain Oil Temperature: If you are frying your buns, use a digital thermometer to keep the oil steady at 350°F. If the oil is too cold, the buns will absorb excess fat and become greasy; if it is too hot, the exterior will burn before the inside is cooked.
Customize the Glaze: The beauty of this recipe lies in its adaptability, so feel free to adjust the glaze thickness based on your preference. If you prefer a translucent, shiny coating, add a little extra almond milk, but for a thick, bakery-style finish, keep the mixture stiff.
Storage Strategy: While these are best eaten immediately, store any leftovers in an airtight container to keep them from drying out. Even a short stint in the microwave will help revive the soft texture if they have been sitting out for a few hours.
Serving Suggestions for vegan honey buns
Decoration
For a beautiful presentation, you can sprinkle a little extra cinnamon or even some toasted coconut flakes over the wet glaze before it sets. This adds a lovely texture and makes the buns look like they came straight from a gourmet bakery display. You might also consider adding a touch of dried edible flowers for a more elegant, brunch-appropriate aesthetic.
Side Dishes
These buns pair beautifully with a side of fresh seasonal fruit salad to cut through the richness of the dough. A bowl of savory easy-lobster-bisque-recipe might seem unusual, but the sweet and savory combination is a classic breakfast profile. You could also serve them with a side of coconut yogurt for a creamy, tangy addition that complements the honey flavor perfectly.
Creative Serving Ideas
Consider cutting the buns in half horizontally and using them as a base for a sweet breakfast sandwich filled with vegan cream cheese and fresh berries. You can also serve them on a large platter surrounded by assorted nuts and seeds for a casual, shareable snack during brunch gatherings. For a fun dessert experience, serve a warm bun with a scoop of dairy-free vanilla ice cream on the side.
Preparation & Storage
Storing Leftovers
To keep your buns fresh, store them in an airtight container at room temperature for up to two days. If you need them to last a bit longer, place them in the refrigerator for up to five days. Be aware that the refrigerator can sometimes make the dough feel slightly firm, so a quick reheat is always recommended.
Freezing
Freezing these buns is an excellent way to have a treat ready whenever a craving strikes. Wrap each bun tightly in plastic wrap to prevent freezer burn, then tuck them into a freezer-safe bag for up to three months. When you are ready to indulge, simply move them to the counter or the fridge to thaw before reheating.
Reheating
For the best results, reheat your buns in the oven at 350°F for about ten minutes, which restores that heavenly, just-baked aroma. If you are in a rush, a thirty to sixty-second burst in the microwave will work well, although it may result in a softer rather than crispy texture. Always add a tiny extra drizzle of fresh glaze after reheating to make them feel brand new again.
Frequently Asked Questions
- How do I choose the best ingredients for my Glazed Homemade Honey Buns?
Choosing high-quality, fresh ingredients is the key to success. Use fresh active dry yeast and ensure your almond milk is warm, not hot, to properly activate the yeast without killing it. For the best flavor, use pure vanilla extract and high-quality vegan butter, as these form the base of the delicious, rich taste profile. - What is the best way to handle the dough if it does not seem to be rising?
If your dough is not rising after the allocated ninety minutes, first check that your yeast was fresh and that the environment is warm enough. If the room is chilly, move the bowl to a warmer spot, such as near a preheating oven. If the dough still shows no signs of life, it is unfortunately best to start over with fresh yeast, as a proper rise is essential for the pillowy texture. - Are these buns suitable for people with nut allergies?
Yes, the recipe is very easy to modify for those with nut allergies. Simply swap the almond milk for soy, oat, or even hemp milk, and ensure your vegan butter is certified nut-free. Always read the labels on your purchased ingredients, such as egg replacers or specific plant milks, to ensure they were not produced in a facility that processes tree nuts.
You can find more inspiration for your next meal by checking out my collection of breakfast favorites. Whether you are hosting a party or just enjoying a quiet morning, I hope these buns become a staple in your home. Don’t forget to follow me on Pinterest for more delicious updates and photos!
Cooking is a journey that connects us to our past while allowing us to embrace the future of food. I truly hope you enjoy every bite of these glazed honey buns as much as I enjoyed creating them for you. Happy baking, and may your kitchen always be filled with the sweet scent of success!