Irresistible Pistachio Thumbprint Cookies to Savor

The aroma of freshly baked cookies has a way of wrapping around you, instantly transporting you to a cozy kitchen moment. Today, I am thrilled to share my recipe for Pistachio Thumbprint Cookies, a delightful twist on traditional favorites that combines creamy pistachio goodness with a buttery cookie base.
Not only are these cookies a stunning centerpiece for any gathering, but they also offer a melt-in-your-mouth texture that will make every bite truly unforgettable. With just a few simple ingredient swaps, you can easily whip up a gluten-free version that everyone will love, and I am here to guide you through every step.
Why You Will Love This Recipe
- Unique Flavor Profile: These cookies offer a sophisticated fusion of buttery sweetness and deep, nutty richness that sets them apart from standard sugar cookies.
- Versatile Preparation: Whether you need a dessert that is gluten-free or you want to experiment with different nut butters, this recipe is highly adaptable.
- Melt-in-Your-Mouth Texture: Every bite provides an indulgent experience, pairing a tender, crumbly cookie base with a decadent, creamy pistachio filling.
- Crowd-Pleasing Appeal: These treats are perfect for holidays, tea parties, or casual get-togethers, and they are guaranteed to impress guests of all ages.
- Effortless Baking: The straightforward steps make the process a breeze, ensuring that you can achieve bakery-quality results right in your own home kitchen.
Ingredients You Need
Quality is the foundation of any great pastry, so I always recommend using high-quality unsalted butter and fresh, vibrant pistachios for the best results. You will find that sourcing the freshest ingredients elevates the natural, earthy notes of the nut butter used for the filling. Please refer to the comprehensive recipe card below for the exact measurements and quantities needed for your batch.
Delightfully Nutty Pistachio Thumbprint Cookies
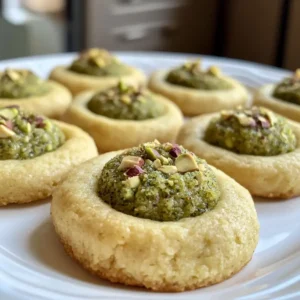
Indulge in these melt-in-your-mouth Pistachio Thumbprint Cookies, a nutty twist on a classic dessert that features a buttery base and a creamy, dreamy pistachio center.
- 1 cup Unsalted butter, softened
- 2 cups Powdered sugar
- 1 teaspoon Vanilla extract
- 1 teaspoon Almond extract
- 2 cups All-purpose flour
- 1 cup Finely ground pistachios, unsalted
- 1 cup Pistachio cream or pistachio butter
- 1In a large mixing bowl, beat 1 cup softened butter and 2 cups powdered sugar for 2–3 minutes until light and fluffy.
- 2Mix in 1 teaspoon vanilla extract and 1 teaspoon almond extract until incorporated.
- 3Whisk together 2 cups flour, 1 cup ground pistachios, and ½ teaspoon salt. Gradually mix this into the butter mixture until combined.
- 4Scoop dough into balls, place on a lined baking sheet, and press a thumb into the center of each. Chill in the fridge for 30 minutes.
- 5Preheat oven to 350°F (175°C). Bake for 12–14 minutes until edges are lightly golden.
- 6Cool completely, then fill indents with pistachio cream and top with chopped pistachios.
Keywords: pistachio, thumbprint cookies, dessert, nutty, buttery, holiday cookies
- unsalted butter: must be softened to room temperature to ensure the creaming process creates the perfect fluffy base.
- powdered sugar: provides the necessary sweetness while ensuring the cookie texture remains smooth and delicate.
- vanilla extract: adds a classic, warm aromatic quality that balances the earthiness of the green nuts.
- almond extract: serves to enhance the natural nuttiness, though you can use lemon zest for a bright, citrusy contrast.
- all-purpose flour: acts as the essential structural component to keep your thumbprint shapes intact during the baking process.
- finely ground pistachios: these provide the primary flavor profile and that beautiful, festive green color within the dough.
- salt: a small pinch is crucial to sharpen the sweet flavors and round out the richness of the butter.
- pistachio cream or butter: this rich, smooth filling is the star of the show and sits perfectly in the center of the baked cookie.
- chopped pistachios: these are used as a final garnish to add a satisfying crunch and a professional, polished look.
Variations
The Vegan Twist: You can easily adapt these by replacing the butter with a high-quality vegan butter stick and using a plant-based, egg-free flour blend. Ensure your pistachio cream is also dairy-free to keep the entire cookie vegan-friendly.
Low Carb Adaptation: For a lower sugar option, try substituting the powdered sugar with a high-quality powdered erythritol or monk fruit sweetener. You should also ensure your pistachio butter contains no added sugars to keep the overall carbohydrate count low.
The Citrus Explosion: Add two tablespoons of freshly grated lemon or lime zest directly into the dough during the mixing phase. This creates a refreshing profile that pairs perfectly with the breakfast-friendly aesthetic of a tea-time cookie.
How to Prepare Pistachio Thumbprint Cookies
Step 1: Creaming the Base
In a large mixing bowl, combine one cup of softened unsalted butter with two cups of sifted powdered sugar. Use a high-quality electric mixer to beat these ingredients together for at least three minutes. You are looking for a mixture that appears pale, light, and airy, similar to a whipped cloud.
This initial creaming step is the secret to achieving that signature melt-in-your-mouth texture. Do not rush this process, as it incorporates the necessary air to ensure your cookies remain tender rather than dense. Once the mixture is fluffy, scrape down the sides of the bowl to ensure a uniform consistency throughout.
Step 2: Incorporating Flavor
Add your vanilla extract and almond extract to the butter mixture, ensuring they are evenly distributed. Beat the mixture for another thirty seconds to allow the aromatic oils to blend completely with the fat. The scent that arises at this stage is absolutely heavenly and sets the tone for your cookies.
If you prefer a different profile, this is the exact moment to substitute the almond extract with citrus zest or even a tiny splash of rose water. Keep the mixer on a low speed to ensure the liquids don’t splash out of the bowl. The result should be a smooth, fragrant paste that serves as the foundation for the dry ingredients.
Step 3: Mixing the Dry Ingredients
Whisk together your all-purpose flour, finely ground pistachios, and salt in a separate medium-sized bowl. Slowly introduce this dry mixture to your wet base in three separate stages, mixing on low speed each time. Be very careful not to overwork the dough, as doing so can lead to tough cookies.
The dough will appear slightly crumbly at first, which is perfectly normal given the nut content. Use your hands to gently bring the dough together if the mixer seems to be struggling. You want a cohesive mass that is soft enough to handle but firm enough to hold its shape.
Step 4: Shaping and Chilling
Scoop the dough into even portions using a tablespoon and roll them into smooth, perfect spheres. Place these balls on a parchment-lined baking sheet with about two inches of space between them for airflow. Using your thumb or the back of a measuring spoon, press a deep indentation into the center of each ball.
The chilling phase is non-negotiable if you want professional results that do not spread excessively. Refrigerate your tray for at least thirty minutes to firm up the butter content. This step ensures your thumbprint wells remain deep and well-defined during the high-heat exposure of the oven.
Step 5: Perfect Baking
Preheat your oven to 350°F (175°C) while the cookies are chilling in the refrigerator. Place the tray in the center of the oven and bake for twelve to fourteen minutes. You are looking for edges that are just barely turning golden, while the center should remain soft and pale.
Remove the cookies from the oven and allow them to rest on the hot tray for five minutes. This short resting period allows the structure to set slightly without overcooking the delicate centers. Use a wire rack to finish the cooling process completely before moving to the filling stage.
Step 6: Filling and Garnish
Once the cookies have reached room temperature, it is time to add the filling. Use a small piping bag or a teaspoon to gently spoon the pistachio cream into each indentation. Be generous with the filling, allowing it to mound slightly above the surface of the cookie.
Finish by sprinkling finely chopped pistachios over the creamy center for a beautiful textural contrast. This final touch provides a lovely crunch that highlights the smooth texture of the cream. Your cookies are now ready to be presented on a beautiful platter for your guests.
Pro Tips for Pistachio Thumbprint Cookies
Tip: The Grind Matters: Ensure your pistachios are ground to a fine, sandy consistency before adding them to the flour mixture. If the pieces are too large, the dough may crack when you press your thumb into it during the shaping phase.
Tip: Use Parchment Paper: Always use high-quality parchment paper on your baking sheets to prevent the cookies from sticking. This also helps with cleanup and ensures that the bottoms of the cookies achieve an even, golden bake.
Tip: Filling Temperature: Only fill the cookies once they have completely cooled to room temperature. Adding the pistachio cream to warm cookies will cause the filling to melt and lose its structural integrity, resulting in a messy presentation.
Tip: Storage Success: If you plan to bake these for a special event, you can freeze the shaped, unfilled dough balls for up to two months. Simply place them on a tray to freeze individually, then transfer them to an airtight bag for long-term storage.
Serving Suggestions for Pistachio Thumbprint Cookies
Decoration
Consider dusting the finished cookies with a tiny bit of extra powdered sugar for a snowy, elegant look. You can also press a single, whole pistachio into the center of the cream filling for a more rustic and artisanal appearance.
Side Dishes
These cookies pair beautifully with a strong, unsweetened cup of green tea, which highlights the earthy notes of the pistachios. If you are hosting a larger event, they also look stunning when served alongside fresh, tart berries like raspberries or strawberries.
Creative Serving Ideas
Arrange these cookies on a tiered dessert stand at your next party to create a focal point. They are the perfect addition to a holiday cookie box, especially when paired with other lunch-time finger foods or delicate pastries.
Preparation & Storage
Storing Leftovers
Keep your leftover cookies in an airtight container at room temperature for up to four days. If your kitchen is particularly warm, it is safer to store them in the refrigerator to keep the pistachio cream filling from becoming too soft.
Freezing
You can freeze the cookies for up to two months, but it is best to freeze them without the filling if possible. If you must freeze filled cookies, place them in a single layer to avoid damaging the delicate cream centers.
Reheating
These cookies are best enjoyed at room temperature, so there is usually no need to reheat them. However, if you prefer them slightly warm, place them in a low-temperature oven for about two minutes, just until the filling softens slightly.
Frequently Asked Questions
- How do I choose ripe and fresh pistachios for the best flavor? Look for pistachios that are vibrant green in color and avoid any that have dark spots or an oily, rancid smell. Fresh nuts will have a distinctly sweet, earthy aroma, which is exactly what you want to ensure the cookies taste rich rather than dull.
- What is the best way to handle the dough if it feels too crumbly during the shaping step? If the dough feels like it is falling apart, your butter might be too cold or you may have measured the flour slightly loosely. Simply add a teaspoon of room-temperature milk or water to the mixture and knead it gently until the dough holds together when squeezed between your fingers.
- Can I use a different type of nut butter if I don’t have pistachio cream available? You can absolutely experiment with hazelnut or almond butter, as both provide a delicious, nutty profile that works well with this cookie base. While the flavor will change slightly, the texture remains consistent, making it a reliable and fun way to customize the recipe to your personal pantry staples.
For more inspiration, check out my favorite Pinterest board for endless baking ideas! You can also find additional dessert inspiration by visiting the dessert category on my blog for more ways to satisfy your sweet tooth.