Irresistible Chocolate Fruit Skewers for a Healthy Snack Treat
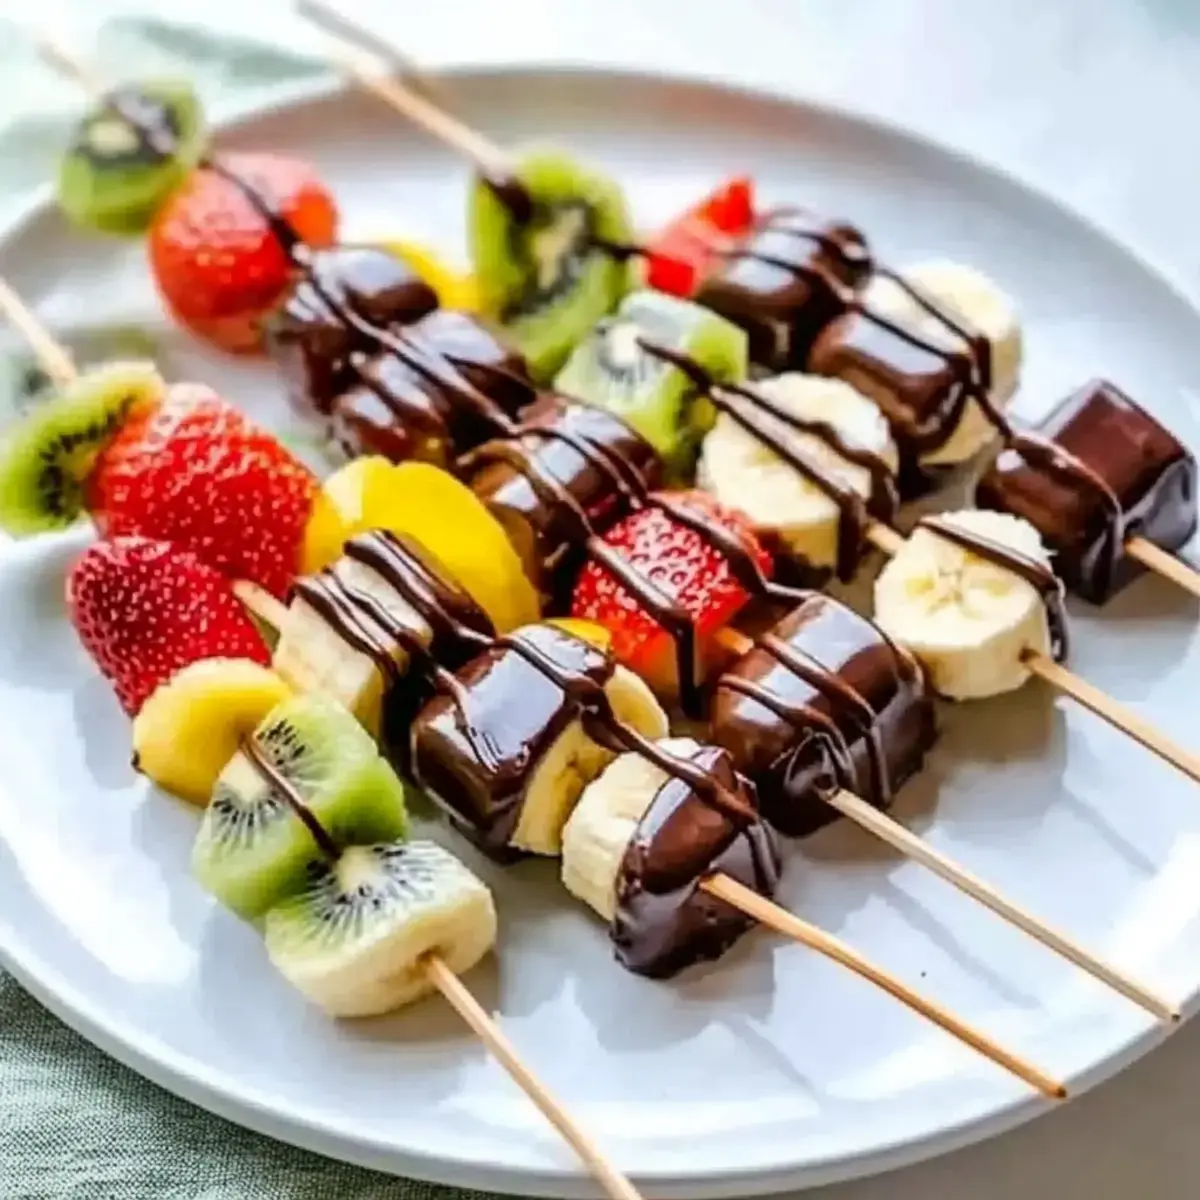
There’s a charming rhythm to summer gatherings, where laughter dances in the air and colorful plates steal the spotlight. That’s how I stumbled upon the delightful concept of Chocolate Fruit Skewers, a no-bake snack that blends the natural sweetness of fresh fruit with a rich chocolate twist.
It’s the perfect solution for those busy days when you crave a treat that’s as easy to make as it is enjoyable to eat. These skewers make for fun, hands-on cooking that invites little helpers into the kitchen, turning dessert time into a joyful family experience. Plus, they’re a healthier alternative to traditional sweets, brimming with vitamins and antioxidants! Ready to impress your friends and family with this vibrant, mouthwatering dish? Let’s dive into the delicious details!
Why You Will Love This Recipe
- Versatile: The beauty of these skewers lies in their flexibility; you can mix and match fruits like strawberries, bananas, or even tropical options like mango or pineapple to suit your taste!
- Quick Preparation: With no baking required, you can whip these up in just minutes, making them perfect for busy days when you want to create something special without the fuss.
- Healthy Indulgence: Indulge without guilt—the fruit provides natural sweetness and packed nutrients, making these skewers a healthier dessert option than traditional sweets.
- Fun for Everyone: Get the kids involved in the kitchen! They’ll love helping to assemble their own unique skewers, making snack time a fun bonding experience.
- Eye-Catching Presentation: With their colorful arrangement and glossy chocolate finish, these skewers are sure to be a hit at any gathering, much like other beautifully crafted desserts found on our dessert category.
Ingredients You Need
To make your Chocolate Fruit Skewers, gather these simple ingredients for a deliciously fun experience that is sure to impress. The quality of your fruit will significantly impact the final flavor, so selecting ripe and vibrant produce is key. Choosing a variety of colors will also make your skewers visually stunning, turning a simple snack into a work of art.
Chocolate Fruit Skewers

These Chocolate Fruit Skewers are a delightful, healthy, no-bake snack combining fresh fruit with a rich chocolate twist. They are perfect for busy days, family fun in the kitchen, and vibrant gatherings, offering vitamins and antioxidants in a visually appealing treat.
- 1 cup Strawberries (Hulled and whole)
- 2 medium Bananas (Sliced into rounds)
- 1 cup Kiwi (Peeled and sliced)
- 1 cup Mango (Cut into 1-inch chunks)
- 1 cup Pineapple (Cut into chunks)
- 1 cup Semi-sweet Chocolate (For a balanced sweetness)
- 1 cup Dark Chocolate (For an indulgent treat)
- 1 cup White Chocolate (For a sweeter option)
- 1 cup Dairy-Free Chocolate (For vegan option)
- Wooden skewers
- 1Wash the fresh fruit under cool running water. Slice the bananas, hull the strawberries, and peel and slice the kiwi. Cut mango and pineapple into 1-inch chunks.
- 2Thread the fruit onto wooden skewers, alternating types for visual appeal.
- 3Melt your choice of chocolate in a microwave-safe bowl in 30-second intervals, stirring until smooth.
- 4Dip the fruit skewers into the melted chocolate or drizzle it over, letting excess chocolate drip off.
- 5Place skewers on a parchment-lined baking sheet to set. Chill in the refrigerator for about 15-20 minutes.
- 6Arrange the skewers on a platter and serve fresh with optional whipped cream or yogurt.
Keywords: chocolate, fruit, skewers, no-bake, healthy, dessert, snack, easy, kid-friendly, party
- strawberries: the sweetness and color of strawberries bring a classic touch to your skewer.
- bananas: add sliced bananas for creamy texture and a delightful contrast to the chocolate.
- kiwi: the vibrant green of kiwi not only adds color but a refreshing zing, perfect with chocolate.
- mango: swap in mango for its tropical sweetness, offering a juicy alternative.
- pineapple: for a tangy twist, use fresh pineapple chunks that complement the chocolate beautifully.
- semi-sweet chocolate: this option creates a perfect balance of sweetness that pairs wonderfully with fruit.
- dark chocolate: opt for dark chocolate for an indulgent treat that adds depth and richness.
- white chocolate: if you prefer a sweeter taste, white chocolate is a delicious alternative that complements fruity flavors.
- dairy-free chocolate: for a vegan-friendly option, choose dairy-free chocolate to keep this treat accessible to everyone!
Specific quantities for each ingredient can be found in the recipe card above for your convenience.
Variations
Feel free to make these Chocolate Fruit Skewers your own with delightful twists and substitutions that cater to your taste buds and dietary needs!
Seasonal Fruits: Swap in fresh fruits like ripe peaches, juicy cherries, or even crisp apple slices for a delightful summer treat that showcases peak seasonal flavors. These additions bring a unique texture and taste profile that can wonderfully complement the chocolate coating.
Flavored Chocolate: Experiment with flavored chocolates like hazelnut, mint chocolate, or even a hint of chili-infused chocolate for an unexpected burst of taste that’s sure to surprise and delight your guests. The possibilities for flavor pairings are truly endless.
Nutty Crunch: Add a sprinkle of finely chopped nuts such as almonds, pistachios, or even toasted sesame seeds on top of the chocolate before it sets. This elevates the texture and adds a satisfying nutty flavor to each bite, creating a more complex sensory experience.
Coconut Twist: Roll the chocolate-coated fruit pieces in shredded coconut, either sweetened or unsweetened, for a tropical feel. It adds a lovely chewiness that beautifully complements the juiciness of the fruit, making them reminiscent of a delightful vacation treat.
Vegan Delight: For a completely vegan version, ensure you use dairy-free chocolate. Fruits like avocados can even be used for a creamy, luscious vegan treat that’s just as indulgent and surprisingly satisfying, proving that plant-based options can be incredibly delicious and creative.
How to Prepare chocolate fruit skewers
Step 1: Prepare the Fruit
Start by washing your fresh fruit, such as strawberries, bananas, and kiwi, under cool running water to ensure they are clean and ready for use. Once cleaned thoroughly, slice the bananas into uniform, bite-sized rounds, and carefully hull the strawberries, leaving them whole for an appealing shape on the skewer. Peel the kiwi, then slice it into neat rounds or wedges, and if you are using tropical fruits like mango or pineapple, cut them into manageable 1-inch chunks.
Lay out the prepared fruit on a clean cutting board, arranging them to showcase a vibrant assortment of colors and shapes. This visual appeal is the first step in creating aesthetically pleasing chocolate fruit skewers that are as beautiful as they are delicious. Taking a moment to arrange the cut fruit also ensures you have a good variety readily available for the assembly stage, making the process smoother.
Step 2: Assemble the Skewers
Grab your wooden skewers, ensuring they are of a suitable length for your chosen fruit pieces and intended serving size. Begin the art of assembly by carefully threading the prepared fruit onto each skewer, alternating between different types of fruit for maximum visual appeal and a dynamic eating experience. Aim for an arrangement that offers a harmonious balance of color, texture, and flavor, such as a bright red strawberry, a creamy banana slice, and a zesty green kiwi piece in succession.
This thoughtful arrangement not only makes the skewers more enticing to the eye but also significantly enhances the tasting experience as you bite into each uniquely flavorful combination. Consider the way the fruits will look together—juxtaposing soft textures with firmer ones, or sweet fruits with slightly tart ones. This careful layering is where the creativity truly shines, transforming simple ingredients into a delightful edible creation. Think about creating patterns, like a repeating sequence, or a more random, vibrant mix, depending on the desired aesthetic for your dessert.
Step 3: Melt the Chocolate
In a microwave-safe bowl, add your chosen chocolate—whether it’s semi-sweet, dark, white, or a dairy-free alternative—and microwave it in 30-second intervals. Crucially, stir the chocolate thoroughly in between each interval until it is completely smooth and gloriously melted. Alternatively, for a more controlled and gentle melting process that minimizes the risk of scorching, you can use a double boiler set over medium heat, stirring continuously.
The chocolate should achieve a smooth, glossy consistency, perfect for coating the fruit. It’s vital to ensure you don’t overheat the chocolate, as it can burn easily and develop an unpleasant grainy texture. Aim for a rich, flowing melted consistency that will generously coat the fruit skewers without being too thick or too thin. If the chocolate becomes too thick, you can add a tiny bit of coconut oil or vegetable shortening to help it regain its desired fluidity.
Step 4: Dip or Drizzle
Once the chocolate has reached its perfect melted state, remove the bowl from the heat source and allow it to cool for just a moment to prevent it from becoming too hot to handle or overly fluid. You now have two delightful options for coating your fruit skewers: you can either dip the assembled fruit skewers directly into the bowl of melted chocolate, ensuring they are coated generously from base to tip, or you can use a spoon to artfully drizzle the chocolate over the fruit for a more artistic and refined touch.
Regardless of the method chosen, allow any excess chocolate to drip off the skewers back into the bowl, creating beautiful, tempting patterns as it falls. This controlled dripping ensures that each piece of fruit is coated sufficiently for a satisfying chocolate experience, adhering perfectly to the delightful theme of chocolate fruit skewers. The goal is a beautiful, even coating that enhances the fruit’s natural flavors without overwhelming them. This step is where the visual magic truly happens, turning simple fruit into an elegant treat.
Step 5: Set the Chocolate
Carefully place the dipped or drizzled chocolate fruit skewers onto a baking sheet that has been lined with parchment paper or wax paper. This lining prevents the chocolate from sticking to the baking sheet, making for easy removal once set. For quicker results and to ensure the chocolate firms up beautifully, chill the entire baking sheet in the refrigerator for approximately 15 to 20 minutes. Alternatively, if you have more time and prefer a natural setting, you can leave them at room temperature until the chocolate firms up sufficiently.
This critical setting step ensures that you achieve that satisfying chocolate snap as you bite into the fruity goodness, which is an integral part of the overall chocolate fruit skewers experience. A well-set chocolate coating not only provides a delightful textural contrast but also prevents the chocolate from smudging or melting prematurely when served. Properly setting the chocolate is key to presenting polished, professional-looking skewers that are ready to impress.
Step 6: Serve and Enjoy
Once the chocolate coating has completely set and hardened to perfection, it’s time for the grand finale: arranging the skewers on a vibrant platter that will make them pop. These skewers are now ready to impress at any gathering, party, or casual get-together, offering a beautiful and delicious treat for all your guests. Serve them fresh to ensure the fruit remains crisp and the chocolate is at its optimal texture.
Allow everyone to select their favorite fruit combinations from the beautifully arranged platter, encouraging interaction and enjoyment. For an added touch of decadence and a delightful flavor contrast, consider pairing the skewers with a side of whipped cream or a light, tangy yogurt dip. Your Chocolate Fruit Skewers are now the star of the show—a perfect, healthy snack treat that is sure to delight both children and adults alike with their vibrant colors and delicious taste!
Pro Tips for chocolate fruit skewers
Here are some expert tips to elevate your chocolate fruit skewer game and ensure perfect results every time.
Uniform Sizes: Ensure all your fruit pieces are cut to relatively even sizes. This consistency allows for uniform chocolate coverage, preventing any disappointingly naked fruit spots and ensuring each bite is perfectly balanced.
Separate Melting: If you are using multiple types of chocolate for dipping or drizzling, make sure to melt each one separately. This practice keeps flavors distinct and prevents any unwanted mixing or color contamination, ensuring a clean and professional finish.
Chill Time: While it’s best to serve these skewers fresh, if you do need to prepare them in advance, aim to refrigerate them for no more than a few hours. This helps maintain the vibrant texture of the fruit and the crispness of the chocolate coating.
Creative Combinations: Don’t hesitate to experiment with less common fruit pairings or even try adding a sprinkle of edible glitter or finely chopped nuts to the chocolate before it sets. Pushing the boundaries can elevate the taste experience of your chocolate fruit skewers.
Presentation Matters: Arrange your finished skewers on a colorful platter or a themed serving board. A striking visual presentation can make them even more appealing to guests, turning them into a true centerpiece for any event.
Serving Suggestions for chocolate fruit skewers
Decoration
To make your chocolate fruit skewers truly stand out, consider adding a final decorative flourish. A drizzle of contrasting chocolate color—think white chocolate over dark, or vice versa—can create elegant patterns. For a touch of sparkle, a light dusting of edible glitter or gold leaf can transform them into luxurious treats. A sprinkle of finely chopped nuts or shredded coconut, applied while the chocolate is still wet, adds both visual interest and textural complexity.
Side Dishes
These skewers are wonderfully versatile and can be paired with a variety of delightful side dishes. A creamy yogurt dip, whether plain or flavored with a touch of honey or vanilla, offers a refreshing contrast to the sweetness of the fruit and chocolate. For a more substantial offering, a light, refreshing fruit salad featuring complementary fruits can enhance the overall fruity experience. A scoop of premium vanilla or chocolate ice cream also makes for a decadent pairing, turning the skewers into a gourmet dessert.
Creative Serving Ideas
Think outside the platter! For a fun party activity, set up a “skewer bar” where guests can choose their own fruits and chocolate dips. Presenting the skewers upright in a vase or a decorative container can create an eye-catching centerpiece. You can also serve them individually wrapped as delightful party favors, adding a personalized touch. For a sophisticated brunch or dessert table, arrange them alongside German pancakes or other elegant treats.
Preparation & Storage
Storing Leftovers
If you happen to have any chocolate fruit skewers left over, the key is to store them properly to maintain their quality. Place them in an airtight container in the refrigerator. It’s best to place a layer of parchment paper between skewers if stacking them to prevent the chocolate from sticking together or to the container. They should retain their best quality for up to 3 days when stored this way.
Ensure that the chocolate has fully set before refrigerating. If the ambient temperature is very warm, the chocolate might soften slightly, so refrigeration is generally the best option for longevity. Avoid storing them in the main part of your refrigerator if it tends to be overly humid, as moisture can affect the chocolate’s sheen.
Freezing
For longer-term storage, chocolate fruit skewers can be frozen. The best method is to individually wrap each skewer tightly in plastic wrap, then place the wrapped skewers into a freezer-safe bag or airtight container. This double-layer of protection helps prevent freezer burn and ice crystal formation. Properly frozen, they can last for up to 1 month.
When you’re ready to enjoy them after freezing, it’s crucial to thaw them slowly. Transfer the frozen skewers to the refrigerator and allow them to thaw gradually for several hours. This slow thawing process helps prevent condensation from forming on the chocolate coating, which can lead to a less-than-ideal texture and appearance.
Reheating
Chocolate fruit skewers are best enjoyed cold, directly from the refrigerator or after thawing from frozen. There is typically no need to reheat them, as the fruit is meant to be refreshing and crisp, and the chocolate should be firm. Reheating would likely cause the chocolate to melt, ruining the skewer’s structure and appearance.
If, for some reason, the chocolate coating seems a bit too hard after freezing and thawing, you can gently warm it slightly by placing the skewers in a slightly warmer, but still cool, environment for a very short period. However, direct reheating is not recommended. The goal is to enjoy the cool, refreshing contrast between the fruit and the solid chocolate.
Frequently Asked Questions
-
What fruits are best for Chocolate Fruit Skewers?
Absolutely! You can choose any fruit you like, but the best options are generally those that hold their shape well and have a pleasing texture contrast with chocolate. Classic choices include strawberries, which offer natural sweetness and vibrant color, and bananas, which provide a creamy counterpoint. Kiwis add a refreshing, slightly tart zing, while tropical fruits like mango and pineapple offer a juicy, exotic sweetness. It’s always a good idea to mix and match based on seasonal availability, personal preferences, or the specific theme of your gathering. Consider fruits that aren’t too watery, as this can affect how the chocolate adheres.
-
How do I store Chocolate Fruit Skewers?
To ensure optimal freshness and maintain that delightful glossy chocolate coating, store your Chocolate Fruit Skewers in an airtight container in the refrigerator. This method helps prevent the fruit from drying out and keeps the chocolate firm and appealing. For parties or events, they can safely be left at room temperature for about 2 hours before they begin to lose their ideal texture and flavor. If you plan to store them for longer than a day, refrigeration is highly recommended for the best results.
-
Can I freeze Chocolate Fruit Skewers?
Yes, you can freeze Chocolate Fruit Skewers for longer storage, and they freeze surprisingly well. For the best outcome, individually wrap each skewer tightly in plastic wrap to protect it from air exposure. Then, place the wrapped skewers into a freezer-safe bag or an airtight container. They can be kept frozen for up to 1 month. When you’re ready to enjoy them, the key is to thaw the skewers gradually in the refrigerator for a few hours. This slow thawing process helps preserve both the integrity of the fruit and the smooth finish of the chocolate coating, ensuring they are as delicious as when they were first made.
-
What should I do if the chocolate hardens too quickly?
If you notice your chocolate hardening too quickly while you’re in the process of dipping or drizzling, it could be due to overheating and subsequent seizing of the chocolate. A helpful tip is to keep the melted chocolate over a bain-marie (a double boiler) on very low heat or warm water, stirring periodically to maintain its smooth consistency without further cooking. If it has already hardened, don’t despair; you can gently reheat it with a tiny amount of coconut oil or vegetable shortening added to the chocolate. This addition will help thin it out, making it easier to work with again for dipping.
-
Are there any allergy considerations for Chocolate Fruit Skewers?
Yes, it’s very important to be mindful of potential allergies when preparing and serving Chocolate Fruit Skewers. For individuals with dairy allergies or lactose intolerance, it is essential to use dairy-free chocolate options, which are readily available. Additionally, be aware of common fruit allergies, such as allergies to strawberries, bananas, or kiwi. It’s always a good practice to check with your guests beforehand regarding any known allergies or dietary restrictions. For safety, it’s also advisable to cut the fruit and handle the chocolate separately if preparing items for individuals with severe allergies to avoid cross-contamination.
-
How can I make Chocolate Fruit Skewers more visually appealing?
To elevate the visual appeal of your Chocolate Fruit Skewers, focus on variety and artistic flair. Use an assortment of fruits with different colors and textures, and aim for an alternating pattern on each skewer—perhaps a vibrant strawberry followed by a creamy slice of banana and a bright piece of kiwi, for example! Furthermore, consider drizzling a contrasting chocolate color over the finished skewers for an artistic, marbled effect. Arranging them artfully on a colorful platter or in a decorative holder can also make them as delightful to the eyes as they are to the palate.