Irresistible Cajun Style Fried Deviled Eggs for Any Gathering
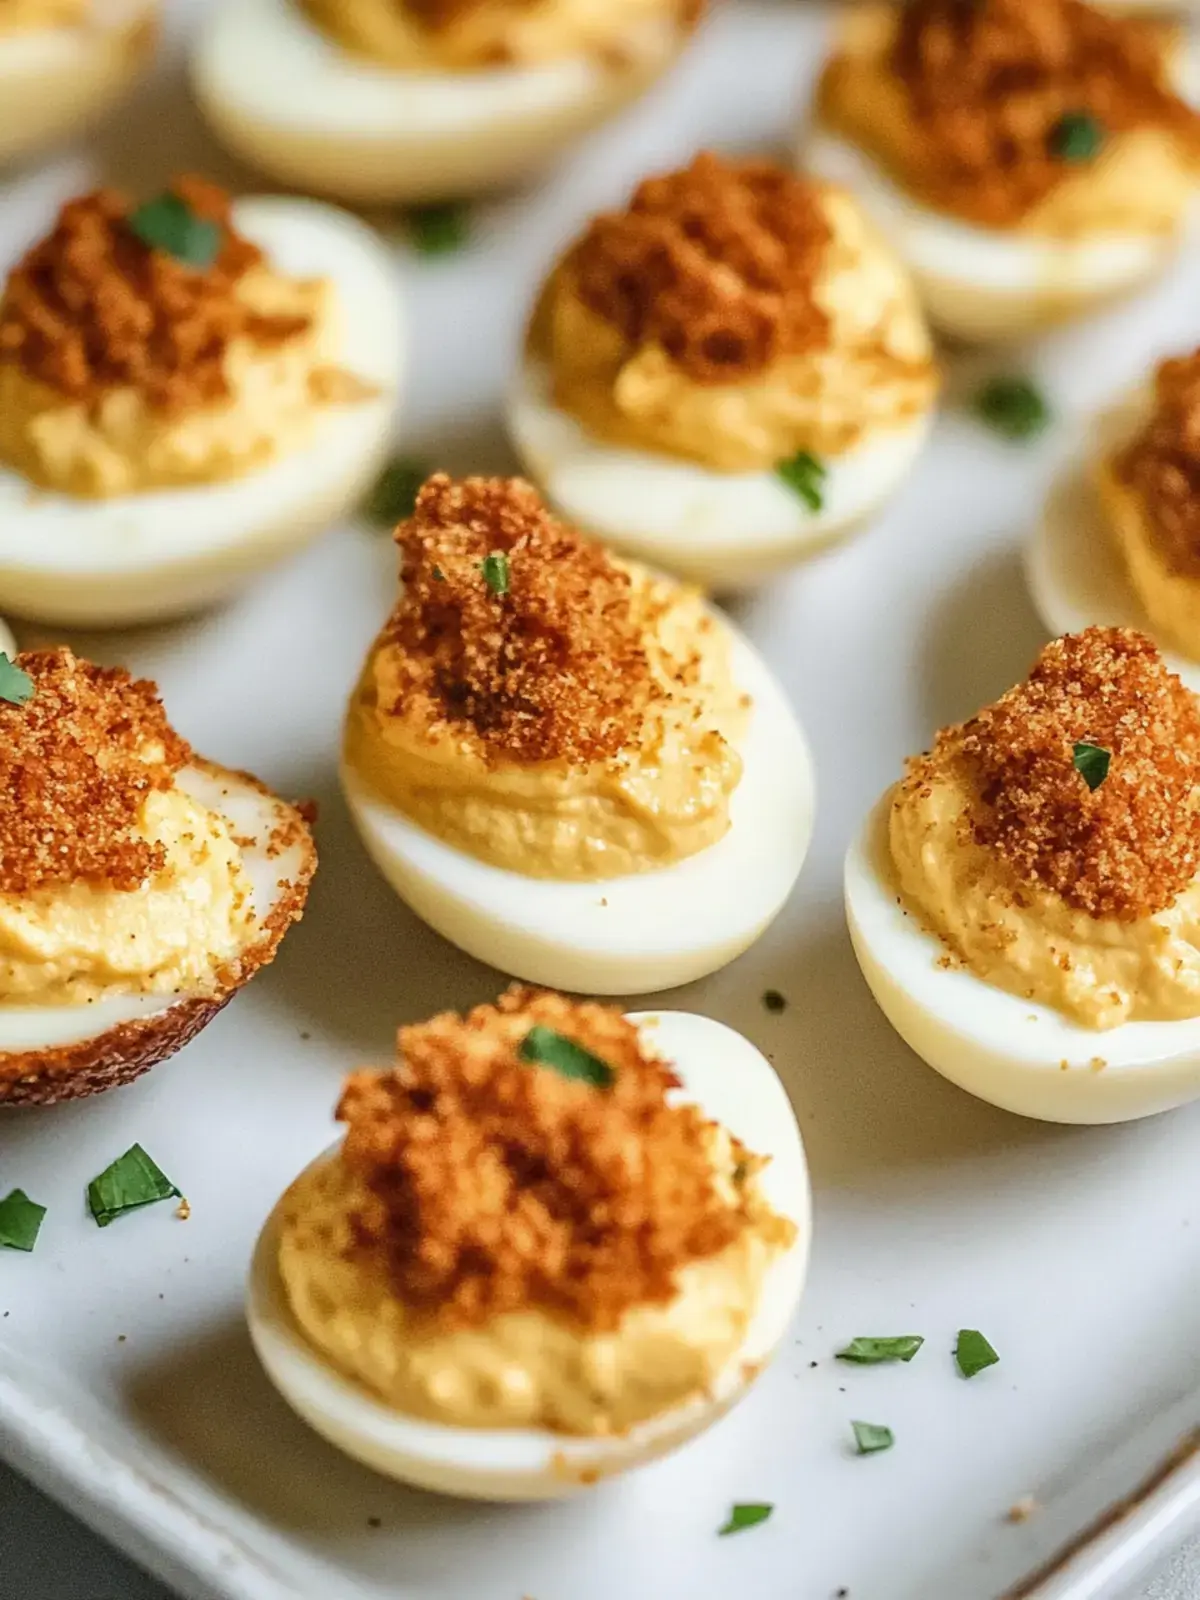
When the craving for a delightful bite arises, nothing beats the irresistible crunch of Cajun Style Fried Deviled Eggs! Picture this: vibrant gatherings filled with laughter, the tantalizing aroma of spices wafting through the air, and a plate of these crispy creations making their grand entrance.
I first stumbled across this twist on the classic deviled egg while exploring the exciting world of Southern cuisine, and I knew I had to share the magic with you all. Each egg is enveloped in a golden Panko crust that crackles to perfection, hiding a smooth, creamy filling infused with bold Cajun flavors.
Why You Will Love This Recipe
- Addictive Crunch: The crispy Panko coating creates a delightful crunch that contrasts perfectly with the creamy filling, offering a truly satisfying textural experience in every bite.
- Bold Flavors: Infused with a proprietary blend of Cajun spices, every bite delivers a zesty, layered kick that’s anything but ordinary, awakening your palate with authentic Southern warmth.
- Crowd-Pleaser: These are guaranteed to be the star of any appetizer spread, making them ideal for parties, potlucks, game days, or any occasion where delicious finger foods are a must.
- Easy Preparation: With simple, readily available ingredients and straightforward steps, you can whip up these impressive deviled eggs in no time, perfect for even novice cooks.
- Versatile Variations: Feel free to customize them to your heart’s content; try adding crumbled bacon for extra savory notes or experimenting with different seasonings for a truly unique twist that reflects your personal taste.
Ingredients You Need
To create these incredibly delicious Cajun Style Fried Deviled Eggs, selecting high-quality ingredients is paramount. The freshness of your eggs and the potency of your spices will directly influence the final flavor profile, so opt for the best you can find. The foundation of the filling relies on the creaminess of mayonnaise and the tang of pickle relish, while the outer coating requires a specific combination of flour, eggs, and Panko bread crumbs to achieve that signature crispiness.
Crispy Cajun Style Fried Deviled Eggs

Cajun Style Fried Deviled Eggs deliver a deliciously crispy flavor packed with bold spices, perfect for any gathering. This recipe offers an addictive crunch, bold flavors, and is a guaranteed crowd-pleaser.
- 6 large Hard Boiled Eggs, peeled and halved
- 1/2 cup Mayonnaise (or Greek yogurt for lighter version)
- 2 tablespoons Dill Pickle Relish (or chopped pickles)
- 1 tablespoon Yellow Mustard (or Dijon for sharper taste)
- 1 tablespoon Cajun Seasoning
- 1 teaspoon Hot Sauce (optional)
- 1/2 cup Flour
- 2 large Eggs, beaten
- 1 cup Panko Bread Crumbs
- 1 teaspoon Gumbo File Powder
- Salt to taste
- Pepper to taste
- 1Prepare Filling: Separate yolks from hard-boiled eggs and place them in a mixing bowl. Add mayonnaise, dill pickle relish, yellow mustard, Cajun seasoning, and hot sauce. Mix until smooth, then refrigerate.
- 2Create Breading: In another bowl, combine Panko bread crumbs, gumbo file powder, salt, and pepper.
- 3Coat Egg Whites: Dredge each egg white in flour, dip in beaten eggs, then coat with the bread crumb mixture.
- 4Heat Oil: Fill a heavy pot with 2-3 inches of canola oil and heat to 350°F.
- 5Fry Egg Whites: Carefully place breaded egg whites into hot oil in batches for 2-3 minutes per side until golden brown and crispy. Drain on paper towels.
- 6Pipe Filling: Transfer chilled yolk mixture to a piping bag and fill the fried egg cavities.
- 7Garnish and Serve: Sprinkle smoked paprika on top and serve immediately.
Keywords: fried deviled eggs, cajun, appetizer, party food, southern cuisine, crispy eggs
- hard boiled eggs: the foundation of the recipe; ensure they are peeled and halved for easy stuffing, providing a sturdy base for the creamy filling.
- mayonnaise: adds essential creaminess and richness to the yolk mixture; Greek yogurt is a fantastic lighter substitute for a tangier profile.
- dill pickle relish: provides a crucial tangy sweetness and a hint of brine that cuts through the richness; use finely chopped pickles if you prefer a chunkier texture.
- yellow mustard: enhances the overall flavor with a classic vinegary kick; Dijon mustard works beautifully for a sharper, more complex taste.
- cajun seasoning: infuses the dish with that signature, warming spice blend; adjust the quantity to your personal heat preference or create your own custom mix for ultimate control.
- hot sauce: adds an extra layer of heat and complexity to the filling; feel free to omit it or use a milder sauce to keep the spice level gentle for all to enjoy.
- flour: acts as a crucial binder, helping the subsequent egg wash and breadcrumbs adhere effectively to the egg whites for an even coating.
- large eggs: these are beaten to create the egg wash, a vital step that allows the Panko bread crumbs to stick firmly to the egg whites, ensuring a perfectly crispy exterior.
- panko bread crumbs: these Japanese-style breadcrumbs create a delectably airy and incredibly crunchy exterior that shatters delightfully with every bite; regular breadcrumbs can be used in a pinch but will significantly alter the texture.
- gumbo file powder: this unique ingredient, made from dried sassafras leaves, adds a distinctive earthy, slightly peppery depth of flavor; you can swap it for a mix of dried thyme and bay leaves if needed for a similar aromatic quality.
- salt: an essential flavor enhancer that elevates all the other ingredients in both the filling and the breading, bringing out their best characteristics.
- pepper: freshly ground black pepper adds a subtle pungency and warmth that complements the other spices, rounding out the flavor profile perfectly.
With these carefully selected ingredients at your fingertips, you are just a few simple steps away from preparing your own show-stopping Cajun Style Fried Deviled Eggs that are guaranteed to wow your family and friends.
Variations
The beauty of these Cajun Style Fried Deviled Eggs lies not only in their original flavor but also in the endless possibilities for customization. Imagine transforming them into a completely different culinary experience with just a few clever tweaks and additions. These variations ensure that the recipe can cater to diverse palates and dietary needs, making it an even more universally loved appetizer.
For those who adore the savory depth of cured meats, consider a “Bacon Boost” by finely crumbling crispy bacon and incorporating it directly into the creamy yolk filling. This adds a delightful salty, smoky dimension that perfectly complements the Cajun spices and fried exterior, creating an irresistible flavor combination that is sure to be a hit at any gathering. The added texture from the bacon bits also provides an extra layer of interest.
If you’re aiming for a lighter yet equally flavorful option, a “Greek Style” variation offers a fantastic alternative. Simply swap out the traditional mayonnaise for creamy Greek yogurt in the yolk mixture. This substitution not only reduces fat content but also introduces a pleasant tanginess that brightens the filling, creating a wonderfully refreshing contrast to the fried crunch of the egg white. The creamy texture is beautifully maintained.
Another exciting avenue for creativity is exploring different coatings. Instead of Panko, try using crushed cornflakes or finely crushed tortilla chips for an unconventional yet equally delightful crunch. This simple swap can introduce subtle hints of sweetness from the cornflakes or a zesty, slightly salty note from the tortilla chips, offering a unique textural experience that is both surprising and satisfying. It’s a fun way to add a playful twist.
How to Prepare Cajun Style Fried Deviled Eggs
Step 1: Prepare the Flavorful Filling
The journey to creating these extraordinary Cajun Style Fried Deviled Eggs begins with meticulously preparing the creamy, spiced yolk filling. Start by carefully separating the vibrant yellow yolks from the firm, cooked egg whites, ensuring no yolk fragments are left behind in the whites. Place these precious yolks into a medium-sized mixing bowl, ready to be transformed into a luxurious spread.
To the bowl of yolks, add the mayonnaise, which provides the essential creamy base and a smooth consistency. Next, incorporate the dill pickle relish; its tangy sweetness is crucial for balancing the richness of the yolks and mayonnaise, offering a bright counterpoint to the savory elements. Follow this with the yellow mustard, adding its characteristic vinegary zest and a subtle depth of flavor that harmonizes beautifully with the other ingredients. Don’t forget the star of the show: the Cajun seasoning. Add a generous tablespoon, or adjust to your personal preference for heat and complexity, allowing its robust blend of spices to infuse the mixture.
Finally, for those who crave an extra spark of heat, add a teaspoon of hot sauce. This can be adjusted or omitted based on your spice tolerance. Once all the ingredients are in the bowl, use a fork or a whisk to thoroughly combine everything until the mixture is exceptionally smooth and uniform in color and texture. Cover the bowl tightly with plastic wrap and refrigerate for at least 30 minutes. This chilling period is vital; it allows the flavors to meld and deepen, ensuring that every bite of the filling is bursting with a complex, harmonious taste that is truly unforgettable.
Step 2: Craft the Irresistible Breading Station
While the flavorful yolk filling is chilling and allowing its spices to truly bloom, it’s time to set up your breading station. This critical step ensures that each fried egg white achieves that coveted golden-brown, shatteringly crisp exterior that defines these deviled eggs. You will need three separate shallow dishes or bowls for this process, arranged in the order of application for a smooth workflow.
In the first shallow dish, place the all-purpose flour. This initial dredging in flour is essential; it creates a dry surface that the egg wash can adhere to effectively, preventing the Panko crumbs from sliding off during the frying process. Ensure the flour is evenly distributed across the bottom of the dish. In the second dish, whisk together the two large eggs until they are thoroughly beaten and uniform in color, creating your egg wash. This liquid binder is what will hold the Panko bread crumbs tightly to the egg whites, forming a robust and crispy coating.
For the third and final dish, combine the Panko bread crumbs with the gumbo file powder, salt, and freshly ground black pepper. The Panko bread crumbs are key to achieving an exceptionally light and crispy texture, far superior to regular bread crumbs. The gumbo file powder adds a subtle, earthy depth that is characteristic of Cajun cuisine, while the salt and pepper enhance the overall savory flavor of the coating. Mix these dry ingredients together thoroughly to ensure even distribution of the seasonings throughout the Panko.
Arrange these three dishes in a neat line: flour, then beaten eggs, and finally the Panko mixture. This organized setup will allow you to efficiently coat each of the hollowed-out egg white halves in a systematic manner, ensuring each piece is perfectly prepared for its hot oil transformation. Having everything ready in advance prevents any last-minute scrambling and ensures a consistently crisp result for all your deviled eggs.
Step 3: Achieve Perfectly Fried Egg Whites
Now comes the exciting part: transforming the prepared egg whites into crispy, golden vessels. Begin by carefully heating your cooking oil. Select a heavy-bottomed pot or Dutch oven and fill it with approximately 2 to 3 inches of canola oil, or another high-smoke point neutral oil. Insert a candy or deep-fry thermometer into the oil, ensuring it doesn’t touch the bottom of the pot.
Heat the oil over medium-high heat until it reaches a stable temperature of 350°F (175°C). Maintaining this precise temperature is crucial for achieving perfectly fried results; oil that is too cool will result in greasy, soggy egg whites, while oil that is too hot will cause the breading to burn before the inside is heated through. It is highly recommended to use a thermometer to ensure accuracy. Once the oil has reached the desired temperature, it’s time to carefully begin frying.
Working in small batches to avoid overcrowding the pot, which can lower the oil temperature and lead to uneven cooking, carefully place the breaded egg white halves into the hot oil. Gently position them cut-side down first if you want to help the filling hold its shape better during frying. Fry the egg whites for approximately 2 to 3 minutes per side. You are looking for a beautiful, even golden-brown color and a wonderfully crisp exterior. Use a slotted spoon or spider strainer to carefully turn them over and ensure both sides are cooked to perfection.
Once they are golden and crispy, carefully remove the fried egg whites from the oil and place them onto a plate lined with paper towels. This step is essential for draining away any excess oil, helping to maintain the crispiness of the coating. Allow them to cool slightly before proceeding to the next step. Frying in batches ensures that each piece achieves optimal crispness and prevents the oil temperature from dropping too drastically, which is key to this technique.
Step 4: Tenderly Coat the Egg Whites
With your oil precisely heated to 350°F and your breading station meticulously organized, it’s time to lovingly coat each hollowed-out egg white half. This stage is where the magic of texture truly begins to develop, preparing the whites for their fiery descent into the hot oil and the subsequent delicious filling.
Take one of the carefully halved and hollowed-out hard-boiled egg whites and gently dredge it first in the shallow dish of all-purpose flour. Ensure that every surface of the egg white is lightly coated with the flour. Shake off any excess flour; you don’t want a thick, clumpy layer, just a fine dusting that will help the egg wash adhere. This initial flour coating creates a slightly tacky surface.
Next, carefully transfer the floured egg white into the second dish containing the beaten eggs. Submerge the egg white completely in the egg wash, making sure it is thoroughly coated on all sides. Lift it out and allow any excess egg wash to drip back into the dish for a moment. This liquid coating is the glue that will bind the final, crucial layer of breadcrumbs to the egg white.
Finally, immediately place the egg white, still wet from the egg wash, into the third dish containing the Panko bread crumb mixture. Gently press the bread crumbs onto the egg white, turning it to ensure an even and generous coating on all surfaces. You want a nice, thick layer of Panko to achieve that ultimate crunch. Don’t be afraid to gently pat them down to help them stick firmly. Handle each coated egg white with care, as they are now delicate and ready for frying. Repeat this entire process for all the prepared egg white halves.
Step 5: Skillfully Pipe in the Creamy Filling
Once your golden, crispy fried egg white shells have cooled slightly and your flavorful yolk filling has had ample time to meld its delicious spices, it’s time to bring it all together. This step is where the deviled egg truly comes to life, uniting the crunchy exterior with the smooth, zesty interior. For the most elegant and consistent filling, a piping bag is highly recommended, but a zip-top bag with a corner snipped off or even a spoon can work in a pinch.
If using a piping bag, transfer the chilled yolk mixture into the piping bag fitted with a star or round tip. For a zip-top bag, simply spoon the filling into the bag and carefully press out any air before snipping off a small corner to create a neat opening for piping. This will allow for a controlled and attractive presentation of the filling.
Carefully take one of the cooled, fried egg white halves and place it on your serving platter or a clean surface. Gently pipe the creamy yolk mixture into the hollowed-out cavity of the egg white. Aim for a generous dollop that mounds slightly, showcasing the rich texture and color of the filling. Ensure you fill each egg white cavity evenly, creating a visually appealing presentation for each deviled egg. Don’t be shy; a well-filled deviled egg is a sign of generosity and deliciousness.
If you are not using a piping bag, you can simply use a small spoon to carefully scoop and mound the filling into each egg white. While it may not look as polished as piped filling, the taste will be just as incredible. The goal is to get that luscious, spiced yolk mixture into every available space, creating a delightful contrast with the crunchy shell.
Step 6: Garnish and Serve with Flair
The final flourish that elevates these already magnificent Cajun Style Fried Deviled Eggs is the artful garnish and presentation. This is your moment to add visual appeal and a final layer of flavor that will entice your guests before they even take their first bite. It’s the small details that often make the biggest impression.
A classic and effective garnish is a sprinkle of smoked paprika. The deep red hue of the paprika provides a beautiful visual contrast against the creamy yellow filling and the golden-brown exterior. It also adds a subtle smoky undertone that complements the Cajun spices beautifully. Use a fine-mesh sieve or a small spoon to dust a light, even layer over the peak of the filling on each deviled egg.
For an added touch of freshness and color, consider garnishing with finely chopped fresh herbs. Chives offer a delicate oniony flavor and a vibrant green hue, while finely chopped fresh parsley or cilantro can add a bright, herbaceous note and a pop of contrasting green. A tiny sprig of fresh dill can also be quite elegant. Choose herbs that you know will pair well with the other flavors present.
Serve your Cajun Style Fried Deviled Eggs immediately while they are at their peak crispness. The contrast between the warm, crunchy exterior and the cool, creamy filling is most pronounced when served soon after assembly. Arrange them attractively on a serving platter, perhaps nestled amongst some fresh greens or surrounded by other appetizers, to create a truly inviting display. These little flavor bombs are guaranteed to be a memorable addition to any occasion.
Pro Tips for Cajun Style Fried Deviled Eggs
Achieving that perfect, crispy exterior and creamy, flavorful filling requires a few insider secrets. These professional tips will help you navigate the process with confidence, ensuring your Cajun Style Fried Deviled Eggs are always a resounding success.
Master the Oil Temperature: The single most critical factor for achieving crispy, non-greasy results is maintaining the correct oil temperature. Always use a reliable deep-fry thermometer and ensure your oil hovers consistently around 350°F (175°C). If the oil is too cool, the breading will absorb too much oil and become soggy; if it’s too hot, the Panko will burn before the inside is heated through.
Fry in Small Batches: Never overcrowd your frying pot. Adding too many pieces of breaded egg white at once will cause the oil temperature to plummet. Fry them in small, manageable batches (3-4 at a time) to allow the oil to recover its heat between additions, ensuring each piece fries evenly and achieves optimal crispness.
Cool Before Filling: While you want to serve them warm and crispy, allow the fried egg white shells to cool slightly before piping in the filling. Piping hot filling into a hot shell can cause the filling to become overly soft or even melt slightly, compromising its texture and making it harder to pipe neatly. A few minutes of cooling is all that’s needed.
Gentle Handling is Key: When cutting the hard-boiled eggs in half and when handling the fried egg whites, always be gentle. Use a sharp knife for clean cuts on the hard-boiled eggs to minimize breakage. Similarly, when coating and transferring the fried shells, handle them with care to prevent the delicate Panko crust from cracking or breaking off.
The Make-Ahead Advantage: For parties, you can fry the egg white shells a few hours ahead of time. Store them in a single layer on a paper towel-lined plate, loosely covered with foil, at room temperature. Prepare the filling separately and refrigerate. Then, just before serving, pipe the filling into the cooled shells and garnish. This preserves the crispiness of the shells beautifully.
Serving Suggestions for Cajun Style Fried Deviled Eggs
Decoration
The visual appeal of your Cajun Style Fried Deviled Eggs can be significantly enhanced with thoughtful decoration. A classic and effective garnish is a sprinkle of smoked paprika, which imparts a beautiful deep red hue and a subtle smoky flavor that complements the Cajun spices. For added freshness and visual vibrancy, consider a scattering of finely chopped fresh chives or a small sprig of fresh parsley. A tiny pinch of cayenne pepper can add a visual hint of the spice within for those who appreciate a bolder presentation.
Side Dishes
These flavor-packed deviled eggs pair wonderfully with a variety of Southern-inspired sides that complement their spicy, crispy nature. Crispy fried okra offers a delightful textural echo, providing another satisfying crunch. A cooling, creamy coleslaw offers a refreshing counterpoint to the richness and spice of the eggs. For something heartier, a classic potato salad with fresh herbs or a tangy Southern-style macaroni salad would be excellent choices.
Creative Serving Ideas
Elevate your appetizer game by presenting these deviled eggs in unique ways. Arrange them on a tiered serving stand for an elegant buffet presentation, making them easily accessible and visually striking. For a themed party, consider using small, individual appetizer spoons or hollowed-out mini bell peppers as edible serving vessels. You could even create a “deviled egg bar” with various toppings and garnishes on the side, allowing guests to customize their own creations, turning it into an interactive culinary experience.
Preparation & Storage
Storing Leftovers
If by some miracle you have leftover Cajun Style Fried Deviled Eggs, proper storage is key to maintaining their appeal. It’s best to store the filled deviled eggs in an airtight container in the refrigerator. However, be aware that the crispy coating will begin to soften overnight due to the moisture from the filling. For optimal texture, it’s recommended to enjoy them within 24 hours of preparation.
Freezing
Unfortunately, these delightful Cajun Style Fried Deviled Eggs do not fare well in the freezer. The combination of the creamy yolk filling and the delicate Panko crust tends to become mushy and lose its signature crispness upon thawing and reheating. It is strongly advised to prepare them fresh and consume them promptly to experience their intended texture and flavor.
Reheating
If you absolutely must reheat them, it’s best to do so very carefully. You can place the filled deviled eggs on a baking sheet in a preheated oven at a low temperature, around 300°F (150°C), for just a few minutes. The goal is to gently warm them through without overcooking or further compromising the crispiness of the shell. Overheating will almost certainly lead to a less desirable texture, so err on the side of caution.
Frequently Asked Questions
-
How do I achieve the perfect crispy coating on my Cajun Style Fried Deviled Eggs?
Achieving the perfect crispy coating involves several key steps. Firstly, ensure your oil is heated to the correct temperature of 350°F (175°C) and maintained throughout frying. Secondly, use Panko bread crumbs for their superior texture and ability to crisp up beautifully. Thirdly, don’t overcrowd the frying pan, as this lowers the oil temperature and leads to soggy results; fry in small batches. Finally, ensure your egg whites are completely dry before dredging in flour, then the egg wash, and finally the Panko, pressing the crumbs on firmly.
-
Can I prepare the filling and egg white shells separately in advance?
Yes, you absolutely can! The yolk filling can be prepared up to 2 days in advance and stored in an airtight container in the refrigerator. This allows the flavors to meld beautifully. The hard-boiled eggs can be cooked and peeled a day ahead as well. The egg white shells can be fried up to 4-6 hours in advance and stored at room temperature in a single layer on a paper towel-lined plate, loosely covered with foil. Assemble by piping the filling into the slightly cooled shells just before serving to maintain maximum crispness.
-
What are some good substitutions for the Cajun seasoning if I can’t find it?
If you can’t find pre-made Cajun seasoning, you can easily create your own blend at home. A common DIY Cajun seasoning mix includes paprika, cayenne pepper, garlic powder, onion powder, dried oregano, and dried thyme. You can adjust the ratios to suit your preference for heat and flavor. For a milder alternative, you can use a combination of paprika, garlic powder, onion powder, and a pinch of black pepper. Another option is to use a different spicy blend like Creole seasoning, though it may have a slightly different flavor profile.