Blueberry Pie Filling
Creating a truly exceptional homemade blueberry filling is a delightful culinary adventure, offering a burst of sweet and tangy flavor that can elevate countless desserts. This recipe is meticulously crafted to ensure a perfectly thick, luscious consistency that’s ideal for everything from classic pies to delicate cheesecakes and even fluffy pancakes.
Imagine the vibrant hue and irresistible aroma filling your kitchen as you prepare this simple yet elegant treat. It’s a versatile staple that transforms everyday baked goods into something truly special, providing a taste of summer’s best berries any time of year.
Why You Will Love This Recipe
- Quick Preparation: This filling comes together in a remarkably short time, usually under 30 minutes, making it perfect for weeknight baking or when dessert cravings strike unexpectedly.
- Incredible Versatility: Beyond pies, this filling is a dream for hand pies, as a topping for yogurt or ice cream, swirled into batters, or used as a luscious layer in cakes and trifles.
- Bright, Fresh Flavor: Using quality blueberries, whether fresh or frozen, ensures a vibrant, natural berry taste that isn’t overly sweet, with a pleasant tartness that complements many flavors.
- Perfectly Thick Texture: The careful use of a thickening agent like Clear Jel or cornstarch guarantees a smooth, non-runny consistency that holds its shape beautifully, preventing soggy bottoms in pies.
- Customizable Sweetness: You have complete control over the sugar content, allowing you to adjust it to your personal preference or the sweetness of your chosen blueberries.
Ingredients You Need
The secret to an outstanding homemade blueberry filling lies in the quality of the ingredients you select. Fresh, plump blueberries are ideal for their bright flavor and texture, but high-quality frozen blueberries are an excellent and convenient alternative. Using good butter adds a subtle richness, while fresh lemon juice and zest provide that essential brightness to balance the sweetness of the berries and sugar. The choice of thickening agent, whether Clear Jel or cornstarch, is crucial for achieving that perfect, luxurious consistency.
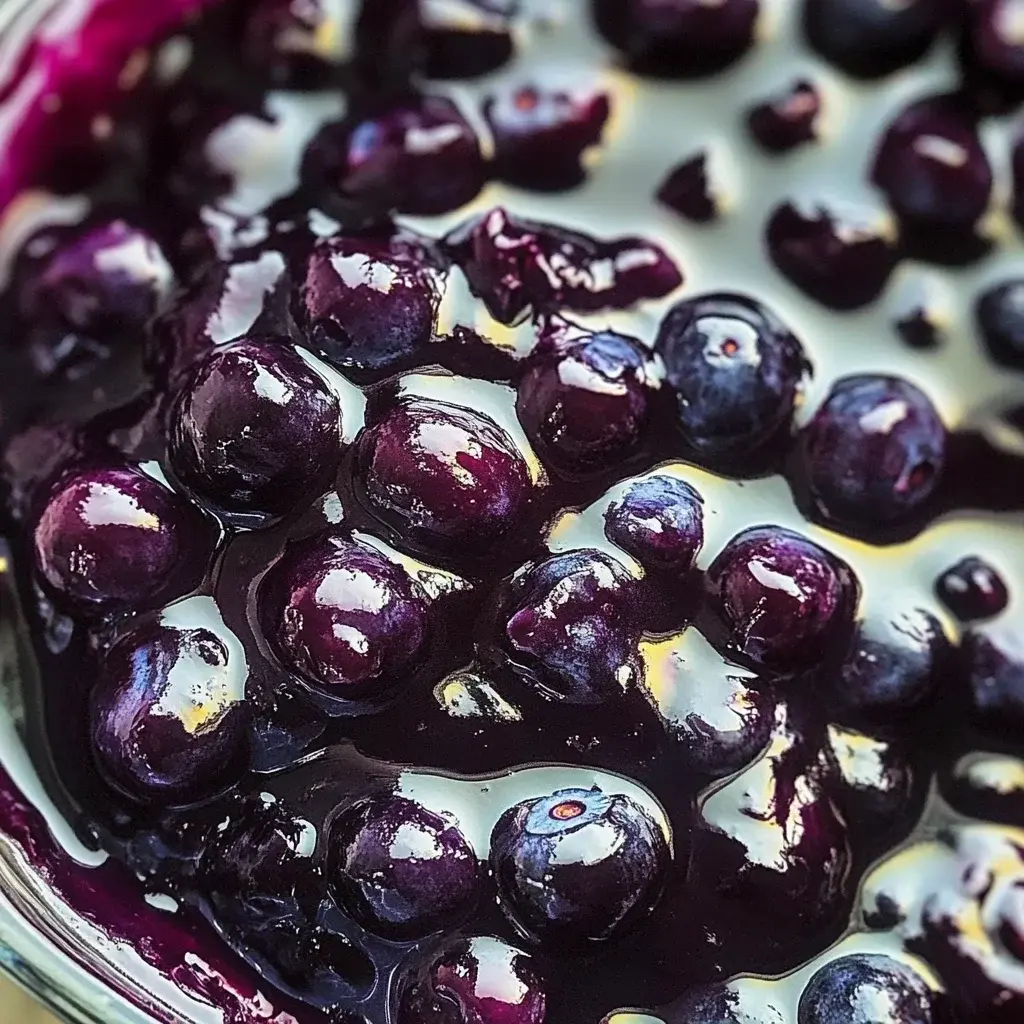
Best Homemade Blueberry Pie Filling

Create a delightful homemade Blueberry Pie Filling in just 30 minutes! This vibrant filling is perfect for enhancing your favorite desserts, from classic pies to cheesecakes and even breakfast treats like pancakes. With its sweet-tart flavor profile, this versatile filling will impress at any gathering or simply elevate your everyday confections. The combination of fresh blueberries and zesty lemon juice delivers a fresh burst of flavor, while the thickening agent ensures a smooth consistency that holds beautifully in baked goods. Easy to prepare and customizable to your taste, making this blueberry filling will quickly become a go-to recipe in your kitchen!
- 32 ounces blueberries (fresh or frozen)
- 2 ounces unsalted butter
- 12 ounces water or lemon juice
- 4 ounces white sugar
- 1/2 teaspoon salt
- 2 ounces Clear Jel or cornstarch
- 2 ounces cold water (for mixing)
- 4 tablespoons lemon juice
- Optional: 2 teaspoons lemon zest
- 1Combine blueberries, water (or lemon juice), and sugar in a saucepan over medium heat. Stir until coated.
- 2Bring the mixture to a gentle simmer for about 5–7 minutes until blueberries release juices.
- 3In a separate bowl, mix Clear Jel (or cornstarch) with cold water until smooth. Gradually add this to the simmering mixture while whisking continuously.
- 4Cook for an additional 3–5 minutes until thickened.
- 5Remove from heat and stir in butter, lemon juice, and optional lemon zest. Allow cooling before using as desired.
Keywords: blueberry pie filling, homemade blueberry filling, pie filling recipe, fruit filling, dessert topping, baking, quick recipe, easy recipe
- blueberries: 32 ounces, fresh or frozen (no need to thaw)
- unsalted butter: 2 ounces
- water or lemon juice: 12 ounces
- white sugar: 4 ounces
- salt: 1/2 teaspoon
- clear jel or cornstarch: 2 ounces
- cold water: 2 ounces (for mixing with thickener)
- lemon juice: 4 tablespoons
- lemon zest: 2 teaspoons (optional, for enhanced flavor)
The precise quantities for each ingredient are detailed within the provided recipe card above, ensuring you have all the information needed for perfect execution.
Variations
To further enhance the delightful nature of this blueberry filling, consider a few creative twists that can cater to different dietary needs or flavor preferences. These variations ensure that everyone can enjoy the deliciousness of homemade blueberry goodness.
For a vegan-friendly option, simply swap the unsalted butter for a high-quality vegan butter alternative. Many vegan butters offer a similar richness and creaminess that will integrate beautifully into the filling. Ensure your sugar is also vegan-certified if this is a strict requirement for your diet. This simple substitution allows for a decadent vegan dessert topping that’s indistinguishable from the original.
If you’re aiming for a low-carbohydrate version, you can experiment with sugar substitutes. Erythritol or xylitol are often good choices for baking, offering sweetness without the carbohydrate impact. Start with a smaller amount of sweetener and gradually add more to taste, as the sweetness levels can vary. Be mindful that sugar substitutes may affect the final consistency slightly, so you might need to adjust the thickener by a small margin.
Another exciting variation involves infusing additional flavors. Consider adding a pinch of cinnamon or a touch of nutmeg for a warm, autumnal twist, especially if you’re pairing it with spiced baked goods. A splash of vanilla extract towards the end of cooking can also add a subtle depth of flavor that complements the berries beautifully. For an extra zing, a small amount of ginger or even a hint of cardamom can create a wonderfully complex and aromatic filling.
How to Prepare homemade thick blueberry filling
Step 1: Prepare Your Ingredients and Equipment
Begin by gathering all the necessary ingredients and ensuring they are measured accurately. Having everything ready before you start cooking is crucial for a smooth process, especially when dealing with thickening agents that require immediate attention. This preparation step minimizes any last-minute searching or measuring, preventing potential errors or rushed decisions during the cooking phase.
You will need a good-quality medium-sized saucepan for cooking the filling, ensuring even heat distribution to prevent scorching. Have your measuring cups and spoons readily available for precise ingredient measurements. A whisk is essential for incorporating the thickening agent smoothly, preventing lumps, and a sturdy spoon or spatula will be needed for stirring the ingredients as they cook. If using lemon zest, a microplane or fine grater will be your best friend.
Carefully measure out your blueberries, sugar, salt, and liquids. If using fresh blueberries, give them a gentle rinse and pat them dry. For frozen blueberries, no thawing is necessary; they can go straight from the freezer into the saucepan, which actually helps them maintain their shape better during cooking. The act of preparing your workspace and ingredients beforehand sets a solid foundation for a successful outcome, allowing you to focus entirely on the cooking process.
Step 2: Combine Blueberries, Sugar, and Liquid
In your chosen saucepan, combine the 32 ounces of blueberries, whether fresh or frozen, with the measured white sugar and the 12 ounces of water or lemon juice. Gently stir these ingredients together until the blueberries are evenly coated with the sugar. This initial coating helps the berries begin to release their natural juices as they heat up, which is the first step in creating that luscious filling consistency.
Ensure the blueberries are not crushed at this stage; a gentle stir is all that’s needed. The sugar will start to draw moisture out of the blueberries, creating a syrupy base that will form the foundation of your filling. This step is deceptively simple but incredibly important for the overall flavor development and texture of the final product. The mixture should look vibrant and ready to begin its transformation.
Allowing the sugar to interact with the blueberries for a few moments before applying heat ensures a more uniform release of juices and a better sugar dissolution. This brief maceration period is a small but effective technique that contributes to a more homogenous and flavorful blueberry filling.
Step 3: Heat the Mixture to a Gentle Simmer
Place the saucepan containing the blueberry, sugar, and liquid mixture over medium heat. Stir the contents occasionally as the mixture begins to heat up. The goal here is to bring the mixture to a gentle simmer, not a rolling boil. This process typically takes about 5 to 7 minutes, depending on your stove’s heat settings and whether you are using fresh or frozen blueberries.
As the mixture simmers, you will notice the blueberries starting to soften and release their vibrant juices. This is exactly what you want to happen; the heat helps to break down some of the berry walls, allowing their natural pectin and color to meld with the sugary liquid. Continue stirring gently to prevent the sugar from sticking to the bottom of the pan and to ensure the heat is distributed evenly throughout the mixture.
Observe the changes in the blueberries; they will begin to look plumper and slightly more translucent as they cook. The liquid in the pan will start to take on a beautiful deep purple-blue hue. This stage is crucial for developing the foundational flavor and color of your blueberry filling before you introduce the thickening agent. Resist the urge to stir too vigorously, as you don’t want to completely obliterate the berries; some texture is desirable.
Step 4: Thicken with Clear Jel or Cornstarch Slurry
While the blueberry mixture is simmering, prepare your thickening agent. In a small, separate bowl, combine the 2 ounces of Clear Jel or cornstarch with the 2 ounces of cold water. Whisk these two ingredients together thoroughly until they form a smooth, lump-free slurry. It’s imperative that this mixture is completely smooth before adding it to the hot blueberries; any lumps of thickener will result in an unevenly thickened or lumpy filling.
Once the blueberry mixture has reached a gentle simmer and the blueberries have started to release their juices (approximately 5–7 minutes of simmering), it’s time to add the slurry. Slowly pour the Clear Jel or cornstarch mixture into the simmering blueberries while whisking constantly and vigorously. The constant whisking is key to distributing the thickener evenly and preventing it from clumping. This is where the magic happens, transforming the thin berry liquid into a rich, glossy filling.
Continue to cook the mixture over medium heat, still whisking almost constantly, for an additional 3 to 5 minutes. You will notice the filling gradually begin to thicken. It should reach a consistency that coats the back of your spoon smoothly and holds its shape. Clear Jel tends to thicken almost immediately upon heating, while cornstarch might require the full 3-5 minutes to reach its optimal thickness. The filling will continue to thicken further as it cools.
Step 5: Incorporate Final Flavors and Richness
Once the blueberry filling has reached your desired thickness and consistency, remove the saucepan from the heat. It’s important to take it off the heat promptly to prevent overcooking, which can lead to a gummy texture or break down the thickening agent. At this stage, the filling should be glossy and thick enough to coat the back of a spoon.
Now, stir in the 2 ounces of unsalted butter. The butter melts into the hot filling, adding a subtle richness and a beautiful sheen that enhances the overall luxuriousness of the texture. It also helps to mellow any sharp edges of flavor and contributes to a smoother mouthfeel. Make sure the butter is fully incorporated until no streaks remain.
Next, add the 4 tablespoons of lemon juice and, if you are using it, the 2 teaspoons of lemon zest. The lemon juice provides a crucial element of brightness, cutting through the sweetness of the sugar and the richness of the butter, while also enhancing the natural tartness of the blueberries. The lemon zest, if used, adds an aromatic citrus note that elevates the fruity flavor profile. Stir these additions in thoroughly until everything is well combined, ensuring the flavors are evenly distributed throughout the filling.
Step 6: Cool Down and Set
Allow your freshly made blueberry pie filling to cool in the saucepan for a bit before transferring it to a storage container or using it in your dessert. This initial cooling period helps the filling to begin setting up properly. As it cools, the thickening agent will continue to work its magic, and the flavors will meld together more harmoniously.
Once it has cooled slightly, transfer the blueberry filling to a clean, airtight container. You can use glass jars, plastic containers with tight-fitting lids, or even a bowl covered tightly with plastic wrap pressed directly onto the surface of the filling to prevent a skin from forming. Storing it in the refrigerator is essential for maintaining its freshness and preventing spoilage.
This homemade blueberry filling can be stored in the refrigerator for up to one week. Before using it in a pie or other baked goods, ensure it has cooled sufficiently. If it seems too stiff after refrigeration, you can gently warm it up by placing the container in a warm water bath or briefly microwaving it at a low setting, stirring frequently. Proper cooling and storage are key to enjoying this delicious filling at its best.
Pro Tips for homemade thick blueberry filling
Use Quality Blueberries: For the most vibrant flavor and best texture, opt for fresh, firm blueberries. If fresh aren’t available, high-quality frozen blueberries work wonderfully and require no thawing. This ensures the berries maintain some integrity during cooking.
Don’t Skip the Lemon: The lemon juice is essential for balancing the sweetness of the sugar and enhancing the natural tartness of the blueberries. Without it, the filling can taste overly sweet and flat. Lemon zest adds an extra layer of bright, aromatic citrus flavor.
Master the Slurry: Always mix your Clear Jel or cornstarch with COLD water. This prevents the thickener from clumping. Whisk the slurry until it is completely smooth before adding it to the hot blueberry mixture. This step is critical for achieving a silky-smooth, lump-free filling.
Watch the Heat: Medium heat is ideal for simmering the blueberries and then cooking the thickened filling. Avoid high heat, which can cause the berries to break down too much and can lead to scorching. Gentle, consistent heat is your friend here.
Taste and Adjust: Before removing the filling from the heat, take a small taste (carefully, as it’s hot!). Adjust sweetness or tartness as needed. You might want a little more sugar, a touch more lemon juice, or even a pinch of salt to enhance all the flavors. The optional lemon zest can be added at the end for a fresher citrus punch.
Serving Suggestions for homemade thick blueberry filling
Decoration
This luscious blueberry filling is a star in its own right, but it can also be used to adorn other desserts beautifully. A generous spoonful dolloped on top of a slice of vanilla cheesecake provides an immediate visual and flavor upgrade. It can also be artfully drizzled over a simple pound cake or angel food cake, creating elegant streaks of vibrant color.
For a truly stunning presentation, consider using the filling as a vibrant topping for ice cream sundaes. A swirl of whipped cream alongside the blueberry topping makes for a classic and appealing dessert. You can even pipe small dollops of the filling around the edge of a cake or tart as a decorative element before serving. This adds a homemade charm and an extra burst of berry flavor.
Another idea is to use it as a filling for macarons. Once the macarons are baked and cooled, pipe a ring of buttercream on one cookie half and then fill the center with your blueberry filling for a delightful surprise. The contrast between the crisp shell, creamy filling, and fruity blueberry center is simply divine.
Side Dishes
While fantastic on its own, this blueberry filling pairs exceptionally well with a variety of accompaniments that complement its sweet and tart profile. A classic choice is a scoop of creamy vanilla bean ice cream; the cool, smooth ice cream offers a perfect contrast to the slightly warm or room-temperature filling.
Consider serving it alongside fluffy buttermilk pancakes or golden-brown waffles. The light, airy texture of these breakfast staples provides an excellent canvas for the rich blueberry topping. A side of Greek yogurt or a dollop of crème fraîche can also offer a tangy, creamy counterpoint that balances the sweetness.
For a more sophisticated pairing, try serving the blueberry filling with slices of almond cake or a delicate lemon shortbread cookie. The nutty notes of the almond cake and the crisp, buttery texture of the shortbread create delightful flavor and textural harmonies. Even a simple bowl of plain oatmeal can be instantly elevated with a generous spoonful of this homemade filling.
Creative Serving Ideas
Beyond traditional pies and pancakes, this homemade blueberry filling unlocks a world of creative dessert possibilities. Try using it as a filling for thumbprint cookies, creating a sweet, fruity center that bursts with flavor as you bite into them. The vibrant color also makes them incredibly appealing.
Another exciting application is to swirl it into muffin batter before baking. The pockets of warm, gooey blueberry filling within a tender muffin create a delightful surprise. This technique works wonderfully for both breakfast muffins and dessert-style muffins.
Consider using the filling to create individual parfaits. Layer the blueberry filling with granola, yogurt, or whipped cream in glasses for a beautiful and easy-to-serve dessert. This is perfect for parties or when you want a lighter, yet still indulgent, treat. You can also use it as a component in a trifle, alternating layers of cake, custard, and the blueberry filling for a show-stopping dessert.
Preparation & Storage
Storing Leftovers
Once your delicious homemade blueberry filling has been prepared and cooled, proper storage is key to maintaining its freshness and quality. Always ensure the filling has cooled down completely before transferring it to a storage container. If stored while still warm, condensation can form inside the container, potentially leading to a less desirable texture or even promoting spoilage.
Use an airtight container for storing any leftover filling. This helps to prevent it from absorbing odors from other foods in the refrigerator and keeps it from drying out. Glass containers with tight-fitting lids are excellent options, as are high-quality plastic containers. If you don’t have an airtight container, you can cover a bowl tightly with plastic wrap, pressing the wrap directly onto the surface of the filling to create a seal.
Stored correctly in the refrigerator, this homemade blueberry filling will typically remain fresh and delicious for up to 5 days. It’s a good idea to label the container with the date it was made, so you can keep track of its freshness. Enjoy using it in various ways throughout the week!
Freezing
If you’ve made a larger batch of blueberry filling or simply want to have some on hand for future baking projects, freezing is an excellent option. Ensure the filling has cooled completely before proceeding with the freezing process. Proper cooling is the first step in preventing ice crystals from forming excessively.
Choose a freezer-safe container or a heavy-duty resealable plastic bag for freezing. If using a container, leave a little headspace at the top, as liquids expand when frozen. If using a plastic bag, press out as much air as possible before sealing to prevent freezer burn. Some people prefer to freeze the filling in smaller portions, which makes it easier to thaw only what you need for a particular recipe.
Labeled containers with the date of preparation are invaluable for tracking your frozen goods. Homemade blueberry filling can be frozen for up to 3 months. Beyond this timeframe, while it may still be safe to consume, its quality, flavor, and texture might begin to degrade.
Reheating
When you’re ready to use your refrigerated or frozen blueberry filling, reheating is a simple process. If the filling has been refrigerated and has become quite firm, you might want to gently warm it. Place the desired amount in a small saucepan over low heat. Stir continuously to ensure it heats evenly and doesn’t scorch on the bottom. This method is excellent for achieving a smooth, pourable consistency.
Alternatively, you can reheat small portions in the microwave. Place the filling in a microwave-safe dish and heat in short intervals, typically 30 seconds at a time. Stir well between each interval. Be cautious not to overheat, as this can cause the filling to become too thin or even break down the thickener. Microwaving is a quick and convenient option for immediate use.
If reheating frozen blueberry filling, it’s best to thaw it in the refrigerator overnight first. Once thawed, you can follow the stovetop or microwave methods described above. If you need to reheat directly from frozen, the stovetop method is often preferred, as it allows for more controlled heating and stirring to ensure even warming and prevent texture issues.
Frequently Asked Questions
-
What is the best way to ensure my blueberry pie filling is thick and not runny?
The key to a perfectly thick blueberry pie filling lies in using the correct amount of a suitable thickening agent, such as Clear Jel or cornstarch, and ensuring it’s properly activated. Always mix your chosen thickener with cold water to create a smooth slurry before adding it to the hot blueberry mixture. Whisk continuously while adding the slurry and continue to cook for at least 3-5 minutes after it begins to thicken. Clear Jel is often preferred by bakers as it provides a more stable and glossy thickness that holds up exceptionally well, even after cooling or freezing. Ensure you are using the specified amounts; too little thickener will result in a runny filling, while too much can make it gummy.
-
Can I use fresh lemon juice instead of store-bought, and does the type of sugar matter?
Absolutely, fresh lemon juice is highly recommended for the best flavor in your blueberry pie filling. Squeezing fresh lemons will provide a brighter, more vibrant citrus note that artificial lemon juice often lacks. If you don’t have fresh lemons, a good quality bottled lemon juice can be used as a substitute, but the flavor may be slightly less nuanced. Regarding sugar, standard white granulated sugar is ideal because it dissolves easily and provides pure sweetness without adding extra color or flavor that could interfere with the blueberries. While you can experiment with other sugars like brown sugar for a different flavor profile, white sugar is the classic choice for a clean, bright blueberry filling. Ensure you measure your sugar accurately as it plays a crucial role in both flavor and the filling’s consistency.
-
How can I prevent my blueberries from breaking down too much and becoming mushy in the filling?
To maintain some integrity in your blueberries and prevent them from turning into complete mush, several techniques can be employed. Starting with frozen blueberries, rather than thawed fresh ones, helps them hold their shape better as they cook. Avoid over-stirring the mixture, especially during the initial heating phase; use a gentle approach to coat them with sugar and liquid. Cook the filling just until the blueberries soften and release their juices, and the mixture thickens. Overcooking will inevitably lead to a mushier consistency. If you desire a smoother filling but still want some berry pieces, you can gently mash a small portion of the berries with your spoon after the initial cooking stage, then proceed with thickening. The goal is to cook them until tender but not completely disintegrated.