Cheesy Stuffed Mushrooms: 7 Irresistible Flavor Explosions

Are you searching for the perfect bite-sized treat that bursts with flavor and is remarkably easy to assemble? Look no further than these sensational Cheesy Stuffed Mushrooms, a recipe designed to delight your senses and impress your guests. This delightful dish masterfully combines the earthy goodness of fresh mushrooms with a heavenly, creamy cheesy filling, making them an ideal appetizer or a satisfying snack for virtually any occasion you can imagine. Picture yourself hosting a lively gathering, confidently presenting these savory delights, each one a miniature explosion of creamy richness that will undoubtedly leave everyone craving more of their exquisite taste.
What truly elevates this recipe from simply good to absolutely unforgettable? Foremost, its astonishingly simple preparation process is a major draw; you certainly don’t need to possess the skills of a seasoned chef to successfully whip up these delectable mushrooms, ensuring culinary success for everyone. The inherent simplicity of the required ingredients allows for the creation of a dish that feels genuinely gourmet without demanding excessive time or complicated techniques. Furthermore, this recipe offers a fantastic canvas for culinary creativity, allowing you to effortlessly customize the stuffing to perfectly align with your unique palate and preferences. Whether you feel inspired to introduce an extra dash of your favorite spices or experiment with a different medley of cheeses, the potential for delightful variations is truly boundless and exciting.
Why You Will Love This Recipe
- Irresistible Flavor: The harmonious blend of creamy cheeses, savory garlic, and fresh herbs creates an unforgettable taste experience that will captivate your palate.
- Effortless Preparation: With straightforward ingredients and a user-friendly step-by-step process, you can have these delightful appetizers ready to enjoy in a surprisingly short amount of time.
- Remarkable Versatility: This recipe serves as a fantastic base, inviting you to personalize the filling with your preferred herbs, spices, or even additional ingredients for a truly unique creation.
- Perfect for Any Gathering: Whether you’re hosting a formal party, a casual get-together, or enjoying a cozy night in, these cheesy stuffed mushrooms are guaranteed to be a show-stopping hit.
- Crowd-Pleasing Appeal: Universally loved by both adults and children, these cheesy bites are an excellent way to ensure everyone at your table is satisfied and happy.
Ingredients You Need
The magic of these Cheesy Stuffed Mushrooms lies in the quality and simplicity of the ingredients used, each playing a crucial role in achieving that perfect balance of flavor and texture. Selecting fresh, firm mushrooms is paramount, as they form the edible vessel for the rich, creamy filling. The combination of cream cheese, Parmesan, and mozzarella provides a luxurious, decadent base that melts beautifully during baking. Fresh garlic and parsley add aromatic depth, while a touch of salt and pepper ensures every element is perfectly seasoned.
Cheesy Stuffed Mushrooms: 7 Irresistible Flavor Explosions

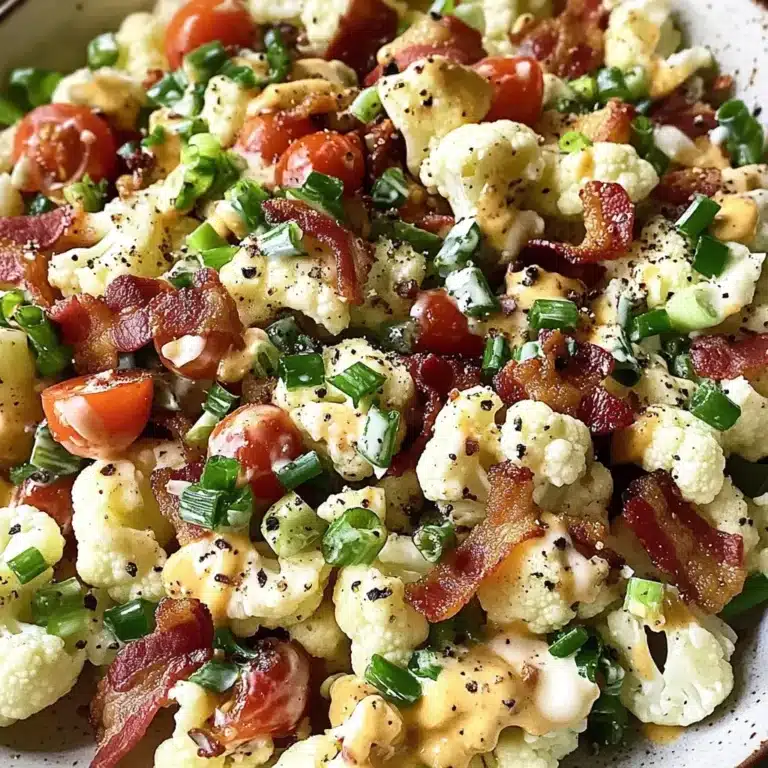
These Cheesy Stuffed Mushrooms are a flavor-packed appetizer that combines fresh mushrooms with a creamy cheese filling, perfect for any occasion. They are easy to make, family-friendly, and a guaranteed crowd-pleaser.
- 12 large mushrooms
- 1 cup cream cheese, softened
- 1/2 cup grated Parmesan cheese
- 1/2 cup shredded mozzarella cheese
- 2 cloves garlic, minced
- 1/4 cup breadcrumbs
- 2 tablespoons fresh parsley, chopped
- Salt and pepper to taste
- 1Preheat your oven to 375°F (190°C).
- 2Clean the mushrooms gently with a damp cloth and twist off the stems.
- 3In a mixing bowl, combine cream cheese, Parmesan, and mozzarella until smooth.
- 4Stir in minced garlic, chopped parsley, salt, and pepper.
- 5Fold in finely chopped mushroom stems.
- 6Generously stuff each mushroom cap with the cheese mixture.
- 7Arrange stuffed mushrooms on a baking sheet lined with parchment paper.
- 8Sprinkle breadcrumbs on top of each mushroom.
- 9Bake in the preheated oven for about 20 minutes until golden brown.
- 10Allow to cool slightly before serving.
- 11Garnish with extra parsley if desired and serve warm.
Keywords: Cheesy Appetizer, Easy Recipe, Family-Friendly, Party Food, Stuffed Mushrooms
- large mushrooms: choose fresh and firm mushrooms for the best texture and flavor.
- cream cheese, softened: this forms the luxurious, creamy base of your filling.
- grated Parmesan cheese: adds a sharp, nutty, and savory dimension to the cheese blend.
- shredded mozzarella cheese: contributes to the gooey, melty texture and mild cheesy flavor.
- cloves garlic, minced: provides a pungent, aromatic kick that complements the cheese wonderfully.
- breadcrumbs: offers a delightful textural contrast, adding a slight crispness to the topping.
- fresh parsley, chopped: brings a bright, fresh, herbaceous note that cuts through the richness.
- salt and pepper: essential for enhancing and balancing all the flavors in the filling.
The specific quantities for these delightful ingredients are readily available within the provided recipe card, ensuring you have all the precise measurements needed for success.
Variations
For those seeking a plant-based delight, transform these mushrooms into a vegan masterpiece by substituting the dairy cheeses with a high-quality vegan cream cheese alternative. Nutritional yeast can be whisked in to replicate the savory, cheesy notes typically provided by Parmesan cheese. For a delightful gluten-free version, simply swap out the regular breadcrumbs for their gluten-free counterparts, or consider using finely ground nuts like almonds or walnuts for an added layer of texture and flavor.
A particularly exciting variation involves infusing a Tex-Mex flair into the classic recipe. Imagine stirring in some finely diced jalapeños for a gentle warmth, a pinch of chili powder, and a blend of Monterey Jack and cheddar cheese for an irresistible melty goodness. This approach transforms the humble mushroom into a zesty, flavorful bite, perfect for game days or casual gatherings where a little kick is appreciated.
Another delicious avenue to explore is a Mediterranean-inspired rendition. Here, the creamy cheese base can be enriched with sautéed spinach, crumbled feta cheese for a briny tang, and a sprinkle of dried oregano. This variation offers a lighter yet equally flavorful profile, showcasing the beautiful synergy between earthy mushrooms and bright, fresh Mediterranean ingredients.
How to Prepare Cheesy Stuffed Mushrooms
Step 1: Prepare Your Workspace and Preheat the Oven
Begin this culinary adventure by ensuring your kitchen environment is ready for action, which starts with preheating your oven to the optimal temperature. An oven set to 375°F (190°C) ensures that your mushrooms will bake evenly and achieve that perfect golden-brown hue and tender texture. Simultaneously, take this moment to line a baking sheet with parchment paper. This crucial step not only prevents the stuffed mushrooms from adhering to the pan, making for an effortless cleanup, but also helps in distributing heat more evenly for consistent baking.
Once the oven is preheating, turn your attention to the star of the show: the mushrooms. Select large, firm mushrooms, as they will provide a sturdy vessel for the generous filling and will not become overly watery during the baking process. Gently clean each mushroom using a slightly damp paper towel or a soft brush to meticulously remove any traces of soil or debris. Avoid washing them under running water, as mushrooms can absorb too much moisture, which can negatively impact their texture when cooked. The goal is a clean exterior that will bake to perfection.
Next, carefully remove the stems from the mushroom caps. This is typically done by gently twisting them until they detach. These stems are not discarded; rather, they are a valuable component of the flavorful filling. Set the caps aside, ensuring they are clean and ready for stuffing, while you prepare to finely chop the reserved stems. This initial preparation ensures that all components are ready to be combined and assembled efficiently, setting you up for a smooth and enjoyable cooking process.
Step 2: Crafting the Irresistible Creamy Filling
Now it’s time to bring together the ingredients that will create the heart of your Cheesy Stuffed Mushrooms. In a medium-sized mixing bowl, combine the softened cream cheese, the grated Parmesan cheese, and the shredded mozzarella cheese. Ensure the cream cheese is genuinely softened to room temperature, as this will make it significantly easier to achieve a smooth, lump-free consistency when mixing. Use a sturdy spoon or a spatula to thoroughly blend these cheeses together until they form a homogenous, creamy mass. This is the foundational layer of flavor and texture for your delicious stuffing.
The quality of your cheese blend is paramount here; a good ratio ensures a balance of richness, saltiness, and meltiness. Take your time with this step to ensure a cohesive mixture, as any uneven distribution of cheese could lead to pockets of less flavor or an inconsistent texture in the final product. Aim for a consistency that is easily spreadable and holds its shape when scooped, but is not overly stiff. This smooth, well-combined base is what will envelop the other flavors and hold the stuffing together beautifully within the mushroom caps.
The resultant creamy mixture should be smooth and luscious, ready to receive the aromatic additions that will elevate its flavor profile. This step is fundamental to the success of the entire dish, so pay close attention to achieving that perfect, decadent consistency. The base is now prepared, setting the stage for the infusion of herbs and spices that will truly make the filling sing with flavor and entice anyone who gets a whiff.
Step 3: Infusing Flavor with Garlic, Herbs, and Seasoning
With the creamy cheese base successfully prepared, the next vital step involves infusing this luxurious mixture with aromatic elements that will awaken the palate. Add the minced fresh garlic to the bowl containing the cheese blend. The pungent aroma and sharp flavor of garlic are essential in cutting through the richness of the cheese and adding a layer of complexity. If you prefer a milder garlic flavor or have a sensitivity, you can reduce the amount or even opt for garlic powder, though fresh garlic generally provides a more vibrant taste.
Next, incorporate the freshly chopped parsley into the cheese mixture. Parsley not only contributes a beautiful vibrant green color, adding visual appeal to the filling, but also provides a fresh, herbaceous note that brightens the overall flavor profile. Be sure to use fresh parsley for the best flavor; dried parsley can be used in a pinch, but it lacks the same bright zestiness. Season the mixture generously with salt and freshly ground black pepper to taste. It’s highly recommended to taste a small amount of the filling at this stage and adjust the seasoning as needed, as personal preference for saltiness and pepper can vary significantly.
Ensure all these additional ingredients are thoroughly mixed into the cheese base. Use your spoon or spatula to fold and stir until the garlic, parsley, salt, and pepper are evenly distributed throughout the creamy mixture. This meticulous blending ensures that every bite of your stuffed mushrooms will be bursting with balanced and harmonious flavors. A well-seasoned filling is key to transforming simple ingredients into an extraordinary dish that truly tantalizes the taste buds and leaves a lasting impression.
Step 4: Incorporating the Reserved Mushroom Stems
This is a brilliant step that maximizes flavor and minimizes waste, truly embodying a resourceful approach to cooking. Take the reserved mushroom stems that you carefully set aside earlier and finely chop them. The goal is to mince them into very small pieces, ensuring they integrate seamlessly into the creamy filling without creating large, unwelcome chunks. The texture of the finely chopped stems will add a subtle earthiness and a pleasant chewiness to the stuffing, enhancing its overall complexity and depth of flavor.
Once the stems are finely chopped, add them directly into the bowl with the cheese mixture, minced garlic, and parsley. Gently fold these chopped stems into the filling using your spoon or spatula. Ensure they are evenly distributed throughout the creamy base. This step is crucial because it not only adds an extra layer of mushroom flavor but also utilizes the entire mushroom, reducing food waste and making the recipe even more economical. The natural moisture and flavor of the stems will complement the richness of the cheese beautifully.
Take your time to mix thoroughly, making sure the finely chopped stems are well incorporated into every part of the filling. This ensures that every stuffed mushroom will contain a delightful, subtle mushroom essence within its cheesy core. This thoughtful inclusion of the stems demonstrates a refined culinary technique that elevates the dish beyond a simple stuffed mushroom. It’s these kinds of details that truly set a recipe apart, creating a more satisfying and well-rounded flavor experience.
Step 5: Generously Stuffing the Mushroom Caps
With your flavorful, creamy filling complete and your mushroom caps prepped, it’s time for the satisfying act of stuffing. Take a teaspoon or a small spoon and generously scoop the cheese mixture into each mushroom cap. Aim to fill each cap until it is brimming with the delicious stuffing, and then pile a little bit more on top. You want a generous mound of filling that slightly overflows, as this ensures that the mushrooms will be packed with flavor and look appealing once baked. Don’t be shy; this is where the true indulgence lies.
Ensure that the filling is packed in firmly enough to stay put during baking but not so densely that it prevents the mushroom from cooking through. As you fill each cap, press the filling gently into place. The slightly mounded top will brown beautifully in the oven and create an inviting texture. If you find the filling is too soft to manage, you can chill it in the refrigerator for about 15-20 minutes, which will make it firmer and easier to handle for stuffing. However, a slightly softer filling often bakes into a creamier texture.
Continue this process for all the prepared mushroom caps, ensuring an even distribution of the delectable filling. The visual appeal of perfectly stuffed mushrooms is undeniable; they look like little edible jewels ready to be baked. This careful stuffing process is a tactile part of cooking that allows you to appreciate the creation of each individual appetizer, setting the stage for the final touches and the anticipation of tasting these delightful morsels.
Step 6: Preparing for the Oven and Adding a Crispy Topping
Now that your mushroom caps are lovingly stuffed to overflowing, it’s time to arrange them for their transformation in the oven. Carefully place the stuffed mushrooms onto the prepared baking sheet, ensuring they are spaced slightly apart. This spacing allows for even air circulation around each mushroom, promoting uniform baking and preventing them from steaming rather than roasting. The parchment paper underneath will prevent any delightful cheesy overflow from sticking, simplifying the post-baking cleanup process considerably.
For an extra layer of texture and visual appeal, sprinkle a small amount of additional breadcrumbs over the top of the filling in each mushroom cap. This breadcrumb topping will toast and become golden brown in the oven, providing a delightful crunch that contrasts beautifully with the soft mushroom and creamy filling. If you are making a gluten-free version, ensure you are using gluten-free breadcrumbs here for consistency with the ingredient modifications. A light, even sprinkle is all that’s needed; you don’t want to overpower the cheesy goodness with too much breadcrumb.
Take a moment to admire your handiwork; the stuffed mushrooms should look plump, inviting, and ready for their final cooking stage. This visual appeal is part of the enjoyment of preparing and serving food. By taking these final preparatory steps, you are ensuring that the mushrooms will bake perfectly, developing a tender texture, a golden topping, and an irresistible aroma that will fill your kitchen. The stage is now perfectly set for the magic of the oven to work its wonders.
Step 7: Baking to Golden Perfection
With your stuffed mushrooms meticulously arranged on the baking sheet and lightly sprinkled with breadcrumbs, they are ready to enter the heat of the oven. Carefully transfer the baking sheet into the preheated oven, placing it on the middle rack to ensure even heat distribution. The oven temperature of 375°F (190°C) is ideal for cooking the mushrooms through while simultaneously melting the cheese to a luscious, gooey consistency and toasting the breadcrumb topping to a delightful golden brown.
Bake for approximately 20 to 25 minutes. During this time, keep a watchful eye on them, as oven temperatures can vary. You are looking for specific visual cues that indicate they are perfectly done: the mushroom caps should have softened considerably, and the cheese filling should be bubbling enticingly. The breadcrumbs on top should have transformed into a beautiful golden-brown hue, signaling that they have achieved a pleasing crispness. Avoid overbaking, as this can lead to the mushrooms becoming watery or the filling drying out.
The aroma filling your kitchen during this baking period will be absolutely divine, a tantalizing blend of earthy mushrooms, savory cheese, and aromatic garlic. Once they reach this state of golden perfection, carefully remove the baking sheet from the oven using oven mitts. The sight of these bubbly, golden-brown stuffed mushrooms is incredibly rewarding and a testament to the simple yet delicious ingredients you’ve brought together. They are almost ready to be served and enjoyed, promising a burst of flavor in every bite.
Step 8: Cooling and Garnishing for Presentation
As soon as the Cheesy Stuffed Mushrooms emerge from the oven, radiating warmth and an irresistible aroma, it’s important to exercise a little patience. While the temptation to dive in immediately is strong, allowing them to cool slightly is a crucial step for both safety and enjoyment. The molten cheese filling will be extremely hot, and a brief cooling period will prevent any unfortunate burns and allow the flavors to meld even further. Aim for a cooling time of about 5 to 10 minutes directly on the baking sheet.
During this brief cooling period, you have the opportunity to enhance their visual appeal. A simple yet effective garnish can elevate the presentation from good to stunning. Finely chop a little extra fresh parsley and sprinkle it delicately over the tops of the warm stuffed mushrooms. The vibrant green of the parsley against the golden-brown cheese creates a beautiful contrast, adding a fresh pop of color and a hint of visual sophistication. This small addition makes the appetizer look even more appealing and professionally prepared.
Alternatively, you could drizzle a tiny bit of balsamic glaze or a light dusting of smoked paprika for a different visual and flavor dimension. The key is to keep it simple, letting the inherent deliciousness of the stuffed mushrooms speak for themselves. Once they have cooled sufficiently to be handled comfortably, they are ready to be transferred from the baking sheet to your serving platter. This thoughtful final step ensures they are presented beautifully and safely, ready to be savored by your eagerly awaiting guests.
Step 9: The Joyful Moment of Enjoyment
The culmination of your culinary efforts has arrived, and it’s time to experience the delectable rewards of your preparation. Gather your family and friends, arrange these warm, inviting Cheesy Stuffed Mushrooms on a beautiful serving platter, and present them with pride. The rich aroma and appealing golden-brown appearance are sure to capture everyone’s attention and excitement, setting the stage for a truly delightful gastronomic experience.
As your guests take their first bite, anticipate the smiles and murmurs of appreciation. Each mouthful should offer a perfect harmony of textures and tastes: the tender, slightly earthy mushroom cap, the luxuriously creamy and savory cheese filling, and the satisfying, subtle crunch from the breadcrumb topping. The hint of garlic and fresh parsley will dance on the palate, creating a complex yet perfectly balanced flavor profile that is utterly irresistible. This is more than just an appetizer; it’s an experience designed to bring people together and create joyful culinary memories.
Watch as these delightful morsels disappear quickly from the platter, a sure sign of their immense popularity and deliciousness. This recipe is designed to be a crowd-pleaser, a go-to dish that consistently satisfies and impresses. So, savor the moment, enjoy the compliments, and relish the satisfaction of having created something truly special that brings so much pleasure to those you share it with. The journey from raw ingredients to these delightful stuffed mushrooms is a testament to the joy and fulfillment found in home cooking.
Pro Tips for Cheesy Stuffed Mushrooms
Select the Right Mushrooms: Always opt for firm, fresh mushrooms of a good size. Cremini or white button mushrooms work exceptionally well, providing a sturdy base for the filling and a pleasant, mild earthy flavor. Avoid any that appear bruised or overly soft, as they might release too much moisture during baking.
Don’t Overstuff: While it’s tempting to pack as much filling as possible into each mushroom cap, overstuffing can lead to the filling spilling out during baking. Aim for a generous mound that fills the cap but doesn’t reach excessive heights, ensuring a neat presentation and even cooking.
Achieve Perfect Crispness: For an extra layer of texture, consider toasting the breadcrumbs lightly in a dry skillet before adding them to the filling or sprinkling them on top. This ensures they add a delightful crunch rather than a chewy texture to your finished mushrooms.
Taste and Adjust Seasoning: Before stuffing the mushrooms, always taste a small amount of the cheese filling. Adjust the salt and pepper as needed to ensure the flavors are perfectly balanced. Personal preferences vary, and this step guarantees a delicious result tailored to your palate.
Consider Pre-Baking Caps: If you find your mushrooms tend to release a lot of water, you can lightly bake the mushroom caps for about 5-7 minutes before stuffing them. This helps to dry them out slightly, resulting in a firmer texture and preventing a watery filling.
Serving Suggestions for Cheesy Stuffed Mushrooms
Decoration
Elevate the visual appeal of your Cheesy Stuffed Mushrooms with simple yet effective garnishes. A sprinkle of finely chopped fresh parsley or chives over the molten cheese topping adds a vibrant splash of green and a hint of freshness. For a touch of sophistication, a light drizzle of balsamic glaze can provide a glossy finish and a subtle sweet-tart counterpoint to the savory filling.
Side Dishes
These delightful morsels pair wonderfully with a variety of dishes, making them a versatile addition to any meal. Serve them alongside a crisp green salad with a light vinaigrette to balance the richness of the cheese. They also make an excellent accompaniment to pasta dishes or grilled meats, acting as a flavorful and satisfying appetizer or side.
Creative Serving Ideas
Beyond the traditional appetizer presentation, get creative with how you serve these stuffed mushrooms. Arrange them attractively on a rustic wooden board for a charming buffet-style offering. They can also be incorporated into a larger charcuterie or cheese board, providing a warm, savory element among cured meats, artisanal cheeses, and crackers. For a more substantial meal, pair a larger portion with a hearty soup, like a creamy lobster bisque, transforming them into a delightful light entrée.
Preparation & Storage
Storing Leftovers
If you happen to have any leftover Cheesy Stuffed Mushrooms, proper storage is key to maintaining their deliciousness. Allow the cooled mushrooms to come to room temperature completely before placing them in an airtight container. They can be stored in the refrigerator for up to 3 days. Ensure the container is well-sealed to prevent them from drying out or absorbing odors from other foods in the fridge.
Freezing
These delightful mushrooms freeze exceptionally well, making them a fantastic candidate for make-ahead meal preparation. Arrange the stuffed mushrooms in a single layer on a baking sheet and freeze until they are firm to the touch, which typically takes about 1-2 hours. Once frozen solid, transfer them into a freezer-safe bag or airtight container, removing as much air as possible before sealing. Frozen stuffed mushrooms can be stored for up to 2 months.
Reheating
Reheating is straightforward and ensures you can enjoy these savory bites again. If reheating refrigerated mushrooms, place them on a baking sheet and bake in a preheated oven at 350°F (175°C) for about 10-15 minutes, or until they are heated through and the cheese is bubbly again. If reheating from frozen, there is no need to thaw them first; simply place them on a baking sheet and bake at the same temperature, increasing the baking time slightly to about 20-25 minutes, or until thoroughly heated.
Frequently Asked Questions
-
Can I prepare the stuffing ahead of time and assemble just before baking?
Absolutely! Preparing the stuffing a day in advance is a fantastic time-saving strategy. You can make the entire cheese filling, cover it tightly with plastic wrap, and store it in the refrigerator. When you’re ready to bake, simply take the filling out, give it a quick stir if needed, and stuff your mushroom caps. This makes serving these delicious appetizers much easier, especially when entertaining guests.
-
What are the best substitutions if I have dietary restrictions, such as being vegan or gluten-free?
For a vegan rendition, replace the cream cheese with a high-quality vegan cream cheese alternative, and swap the Parmesan and mozzarella for your favorite vegan shredded cheeses. Nutritional yeast can be added to the filling for an extra cheesy, umami flavor. To make the dish gluten-free, substitute regular breadcrumbs with gluten-free breadcrumbs, crushed gluten-free crackers, or even finely ground almonds or seeds for a delightful crunch. Always ensure all other ingredients used, such as spices and herbs, are also certified gluten-free if necessary.
-
How can I ensure my stuffed mushrooms don’t become watery or mushy during baking?
To combat excess moisture, start by selecting firm, fresh mushrooms and clean them gently with a damp cloth rather than washing them under running water. Another effective technique is to lightly pre-bake the mushroom caps for about 5-7 minutes in a moderately hot oven before stuffing them; this helps to dry them out slightly. Additionally, avoid overstuffing, as this can sometimes push moisture from the mushroom into the filling, and ensure you are baking them at the correct temperature and for the appropriate duration, not excessively long.