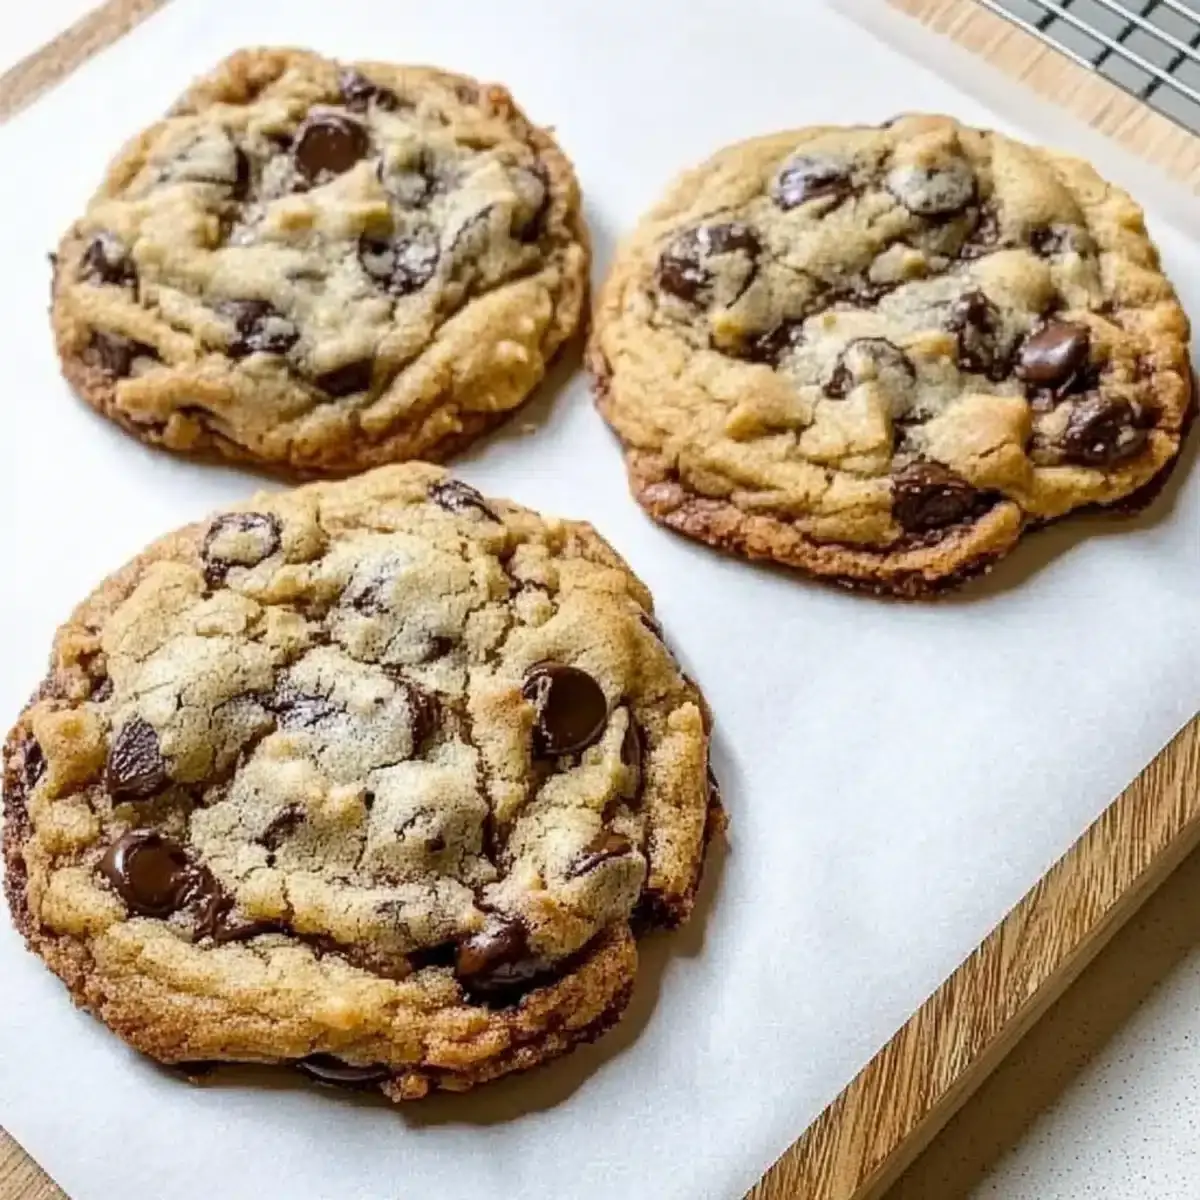
NYC-Style Thick Chocolate Chip Cookies: The Ultimate Indulgent Treat
As I pulled open the warm oven door, the delightful aroma of chocolate and caramelized sugar wafted through my kitchen, instantly transporting me to a bustling New York bakery.
These NYC-style thick chocolate chip cookies are not just a treat; they are an experience, boasting perfectly crispy edges and gooey, soft centers that satisfy that deep craving for dessert without any fuss.
The use of cold butter and a hint of instant coffee creates a rich, decadent flavor that will leave your taste buds singing, making them a crowd-pleasing indulgence perfect for sharing or savoring solo.
Why You Will Love This Recipe
- Gooey, Chewy Centers: These cookies deliver an irresistibly soft and delightful texture that keeps you coming back for more with every bite.
- Quick and Easy Preparation: With simple ingredients and straightforward steps, you can whip up these scrumptious cookies any day of the week, making dessert accessible.
- Bold Flavor Enhancements: The addition of instant coffee elevates the chocolate experience, making each bite intensely rich and wonderfully indulgent.
- Perfect for Sharing: Whether it’s a family gathering or a cozy night at home, these cookies are ideal for pleasing a crowd or satisfying your sweet tooth.
- Versatile Variations: Feeling adventurous? Feel free to swap in your favorite chocolate type or add nuts for a personal twist on this beloved classic dessert.
With these mouthwatering cookies, you’ll never want to reach for store-bought again!
Ingredients You Need
The foundation of any great cookie lies in the quality of its ingredients, and for these NYC-style thick chocolate chip cookies, selecting the best will truly make a difference in the final outcome.
NYC-Style Thick Chocolate Chip Cookies

Experience the ultimate indulgence with these NYC-style thick chocolate chip cookies, featuring perfectly crispy edges and a gloriously gooey, soft center. Enhanced with a hint of instant coffee for a rich, decadent flavor, these cookies are a delightful treat for any occasion.
- For the Cookie Base:
- 2 cups All-purpose flour (Substitute with gluten-free flour for a gluten-free version.)
- 1 teaspoon Baking powder (Ensure it's fresh for the best results.)
- 1 teaspoon Baking soda (Essential for the right texture.)
- 2 tablespoons Cornstarch (Omit for a chewier texture.)
- 1 tablespoon Instant coffee (Optional but recommended for depth.)
- 1 teaspoon Salt (Use sea salt for an extra flavor boost.)
- 1 cup Unsalted butter (cold and cubed) (Avoid margarine for the best experience.)
- For the Sweetness:
- 1 cup Dark brown sugar (Light brown sugar can be a substitute.)
- 0.5 cup Granulated sugar (Consider maple sugar for a unique twist.)
- For Binding:
- 2 large Eggs (cold) (Avoid room temperature for optimal results.)
- 1 teaspoon Vanilla bean paste or vanilla extract (Use pure extract for the best taste.)
- For the Chocolate:
- 1 cup Semi-sweet chocolate chips (Can be swapped for dark chocolate.)
- 1 cup Milk chocolate chunks (Substitute with more semi-sweet chocolate if desired.)
- 1Cream Butter and Sugars: In a large stand mixer, combine cold, cubed unsalted butter, dark brown sugar, and granulated sugar. Beat on high speed for 2–3 minutes until the mixture becomes light and fluffy, turning a pale golden color.
- 2Add Wet Ingredients: Incorporate one cold large egg, an additional yolk, and either vanilla bean paste or vanilla extract into the creamed mixture. Continue mixing on high speed for 3–4 minutes until the batter appears smooth and well-combined.
- 3Mix Dry Ingredients: In a separate mixing bowl, whisk together all-purpose flour, baking powder, baking soda, cornstarch, instant coffee, and salt.
- 4Combine Mixtures: Slowly add the dry ingredients to the wet mixture on low speed to avoid overmixing. Mix just until everything is combined, allowing the dough to stay thick and slightly crumbly.
- 5Fold in Chocolate: Using a spatula, gently fold in semi-sweet chocolate chips and milk chocolate chunks until they're just integrated.
- 6Portion and Freeze: Divide the dough into generous 6-ounce balls, stacking them to maximize thickness. Place the dough balls on a parchment-lined baking sheet, cover tightly, and freeze for 2 hours.
- 7Bake: Preheat your oven to 350°F (175°C). Arrange the frozen dough balls on another lined baking tray, ensuring they are spaced about 4 inches apart. Bake for 16–18 minutes, until the edges are golden brown and the centers are set but still soft.
- 8Cool and Serve: Allow the cookies to cool on the baking tray for 10 minutes before transferring them to a wire rack.
Keywords: chocolate chip cookies, thick cookies, NYC style, chewy cookies, gooey center, bakery style, dessert, cookies, baking
- all-purpose flour: provides structure; substitute with gluten-free flour for a gluten-free version.
- baking powder: helps cookies rise; ensure it’s fresh for the best results.
- baking soda: assists in browning and spreading; essential for the right texture.
- cornstarch: adds tenderness; omit for a chewier texture.
- instant coffee: enhances chocolate flavor; optional but recommended for depth.
- salt: balances sweetness; use sea salt for an extra flavor boost.
- unsalted butter (cold and cubed): vital for texture; avoid margarine for the best experience.
- dark brown sugar: provides moisture and a rich depth of flavor; light brown sugar can be a substitute.
- granulated sugar: adds sweetness and texture; consider maple sugar for a unique twist.
- large eggs (cold): binds ingredients together; avoid room temperature for optimal results.
- vanilla bean paste or vanilla extract: adds a rich flavor; use pure extract for the best taste.
- semi-sweet chocolate chips: the primary chocolate component; can be swapped for dark chocolate for a richer taste.
- milk chocolate chunks: adds sweetness; you can substitute with more semi-sweet chocolate to dial down the sweetness.
The precise quantities for each ingredient are conveniently listed in the recipe card above, ensuring accuracy for your baking endeavors.
Variations
Embracing creativity with these cookies allows for delightful adaptations, catering to various tastes and dietary needs, making them universally enjoyable.
For a gluten-free option, simply substitute the all-purpose flour with a high-quality 1:1 gluten-free flour blend. This ensures your cookies maintain that perfect structure and chewy texture without compromising on taste or consistency.
Adding chopped nuts like walnuts or pecans introduces a wonderful crunch and a complementary nutty flavor profile to the already rich cookie base. This textural contrast enhances the overall cookie experience significantly.
If you desire a sweeter twist, consider replacing the semi-sweet chocolate chips with white chocolate chunks. The creamy sweetness of white chocolate offers a different yet equally delicious dimension to these already indulgent treats.
How to Prepare NYC-Style Thick Chocolate Chip Cookies
Step 1: Cream Butter and Sugars
In a large stand mixer, combine the cold, cubed unsalted butter with the dark brown sugar and granulated sugar. Beat these ingredients together on high speed for approximately 2 to 3 minutes.
The goal is to achieve a mixture that becomes light, fluffy, and noticeably paler in color, resembling a creamy, almost whipped consistency. This crucial step is fundamental for developing the characteristic thick and chewy texture of authentic NYC-style cookies.
This process aerates the butter and sugar, creating tiny air pockets that contribute to the cookie’s structure and spread during baking, ensuring they remain delightfully thick and soft in the center.
Step 2: Add Wet Ingredients
Next, incorporate one cold large egg, along with an additional egg yolk, into the creamed butter and sugar mixture. Add your chosen vanilla flavoring, whether it’s vanilla bean paste for specks of vanilla bean or pure vanilla extract for its intense aroma.
Continue mixing on high speed for an extended period, about 3 to 4 minutes, until the batter appears uniformly smooth and all the wet ingredients are thoroughly combined. This thorough incorporation helps to emulsify the mixture, contributing to the cookie’s richness and tender crumb.
The additional yolk adds extra fat and binding power, contributing to a more tender and cohesive cookie dough that bakes up beautifully, ensuring that your cookies are neither dry nor crumbly but perfectly moist.
Step 3: Mix Dry Ingredients
In a separate, medium-sized mixing bowl, take the time to whisk together all your dry ingredients: the all-purpose flour, baking powder, baking soda, cornstarch, instant coffee granules, and salt. Whisking ensures that all these components are evenly distributed.
This careful combination of dry ingredients is absolutely essential for achieving the desired structured yet tender texture that defines your NYC-style thick chocolate chip cookies. An even distribution prevents pockets of leavening agents or salt, leading to consistent results in every cookie.
Ensuring the baking powder and baking soda are fresh is also key here; stale leaveners will result in flat, unappealing cookies that lack the necessary lift and texture.
Step 4: Combine Mixtures
Now, it’s time to bring the wet and dry components together, but with caution. Gradually add the thoroughly whisked dry ingredients to the wet mixture in your stand mixer. It’s important to do this on a low speed to avoid overmixing the dough.
Mix just until everything is combined, meaning you no longer see streaks of dry flour. The dough should maintain a thick consistency and might appear slightly crumbly, which is exactly what you are aiming for at this stage. Overmixing can develop the gluten too much, leading to tough cookies.
The objective here is to incorporate the dry ingredients just enough to form a cohesive dough without overworking it. This careful balance ensures the cookies will be tender and melt-in-your-mouth, rather than dense or chewy in an undesirable way.
Step 5: Fold in Chocolate
Using a sturdy spatula or a large wooden spoon, gently fold in the semi-sweet chocolate chips and the milk chocolate chunks into the cookie dough. The key word here is ‘fold,’ which means to incorporate them without vigorous mixing.
Continue folding just until the chocolate pieces are evenly distributed throughout the dough, ensuring that each cookie will be packed with pockets of gooey chocolate goodness. The goal is to see the chocolate pieces embedded, not pulverized into the dough itself.
This ensures that each bite of your perfectly baked cookies will yield that signature satisfying experience of melting chocolate, making them truly irresistible and authentically NYC-style. Visible chunks are a hallmark of a quality chocolate chip cookie.
Step 6: Portion and Freeze
This is a pivotal step for achieving the signature thickness. Divide the cookie dough into generous portions, aiming for approximately 6-ounce balls per cookie. You can weigh them to ensure consistency across your batch.
Stacking these substantial dough balls slightly or ensuring they are densely packed can also contribute to their height and thickness. Place these substantial dough balls onto a baking sheet lined with parchment paper, ensuring they have some space between them for easy handling.
Cover the baking sheet tightly with plastic wrap and place it in the freezer for at least 2 hours. This freezing period is critical, as it firms up the dough, preventing excessive spreading and ensuring the cookies bake up thick and chewy in the center.
Step 7: Bake
Preheat your oven to 350°F (175°C) while the dough is chilling. Once the oven is at temperature, arrange the frozen dough balls onto another parchment-lined baking tray. Ensure they are spaced about 4 inches apart.
This generous spacing is important because even when frozen, the cookies will spread to a certain extent during baking, and you want to avoid them merging into one giant cookie. The frozen state helps control this spread, leading to thicker cookies.
Bake for 16 to 18 minutes, or until the edges of the cookies are beautifully golden brown, but the centers still appear set but slightly soft. They will continue to bake and firm up as they cool, achieving that perfect gooey texture.
Step 8: Cool and Serve
Once baked, resist the temptation to move them immediately. Allow the cookies to cool on the baking tray for at least 10 minutes. This resting period is crucial as it allows the cookies to set up properly, firming slightly while retaining their soft, gooey centers.
After this initial cooling period on the tray, carefully transfer the cookies to a wire rack to cool completely, or serve them warm if you can’t wait. This transition helps prevent the bottoms from becoming soggy and ensures even cooling.
Enjoy these warm or at room temperature for a true taste of the indulgent, chewy, and delightfully thick NYC-style thick chocolate chip cookies you’ve just created. The texture contrast is simply divine.
Pro Tips for NYC-Style Thick Chocolate Chip Cookies
Cold Ingredients Matter: For those incredibly thick and chewy cookies, always ensure your butter is very cold and cubed, and your eggs are also straight from the refrigerator. This helps the cookies maintain their shape and prevents them from spreading too much, resulting in that coveted thick texture.
Mind the Baking Time: Achieving perfectly gooey centers means you should slightly underbake the cookies. Watch them closely, and as soon as the edges are golden and the centers look set but still soft, remove them from the oven. They will continue to cook and firm up as they cool.
Stack for Thickness: Don’t be shy when shaping your dough! Create substantial 6-ounce balls. For even more thickness and a rustic look, you can gently stack two smaller balls of dough on top of each other before baking. This technique significantly contributes to the decadent, towering height you desire in NYC-style cookies.
Flavor Boost: A little sprinkle of flaky sea salt on top of the cookies immediately after they come out of the oven can make a world of difference. This simple addition enhances the sweetness of the cookie and beautifully rounds out the rich chocolate flavor, creating a more complex taste profile.
Weigh Your Ingredients: For truly consistent results, especially with flour, using a kitchen scale is highly recommended. Accurate measurements ensure that the ratio of wet to dry ingredients is perfect, which is key to preventing excessive spreading and achieving that ideal cookie texture every single time you bake.
Serving Suggestions for NYC-Style Thick Chocolate Chip Cookies
Decoration
While these cookies are stunning on their own, a few decorative touches can elevate them further. Consider a light dusting of powdered sugar for a snowy effect, or a drizzle of melted chocolate or caramel sauce for added decadence. Edible glitter can also add a festive sparkle for special occasions.
Side Dishes
These cookies are a star, but they can shine even brighter with complementary pairings. A tall glass of cold milk is a classic for a reason, offering a refreshing contrast. For a more sophisticated pairing, a rich espresso or a dark roast coffee can beautifully complement the chocolate and coffee notes within the cookie.
Creative Serving Ideas
Transform your cookie experience by serving them warm with a scoop of high-quality vanilla bean ice cream, creating an instant cookie a la mode. Alternatively, stack two cookies with a thick layer of buttercream or cookie dough frosting in between for an impressive cookie sandwich. For a playful presentation, arrange them on a tiered stand with assorted dessert items.
Preparation & Storage
Storing Leftovers
To best preserve the delightful texture of your NYC-style thick chocolate chip cookies, store them in an airtight container at room temperature for up to 5 days. This method helps maintain their soft centers and slightly crisp edges.
If you prefer a firmer cookie, they can be stored in the refrigerator for up to a week. Just remember to let them come back to room temperature before enjoying them to regain their optimal chewiness.
Avoid storing them in direct sunlight or near heat sources, as this can cause them to become greasy or lose their intended texture.
Freezing
Unbaked cookie dough balls can be frozen for up to 2 months, making impromptu cookie baking a breeze. Wrap each individual dough ball tightly in plastic wrap, then place them in a resealable freezer bag or airtight container for best preservation.
Baked cookies can also be frozen for up to 1 month to ensure you always have a treat on hand. Ensure they are completely cooled before packaging them in an airtight container to prevent freezer burn.
Freezing is an excellent way to maintain the freshness and quality of both the dough and the baked cookies, ensuring they are as delicious as when they were first made.
Reheating
To enjoy your NYC-style thick chocolate chip cookies warm and gooey, microwave a cookie for about 10 to 15 seconds. Be careful not to overheat, as this can make them tough.
Alternatively, you can place them in a preheated oven at 350°F (175°C) for a few minutes until warmed through. This method often yields a result closer to freshly baked cookies.
Reheating brings back that wonderful freshly baked taste and texture, making your cookies irresistible all over again, whether they were baked yesterday or last week.
Frequently Asked Questions
-
How do I choose the right chocolate for these cookies?
Absolutely! For those indulgent cookies, I recommend using semi-sweet chocolate chips or chunks for a classic sweetness that balances perfectly with the cookie dough. If you prefer a richer, more intense chocolate flavor that complements the coffee notes, opt for dark chocolate; it provides a more profound cocoa experience.
You can also mix both semi-sweet and dark chocolate for a delightful balance of sweetness and depth, ensuring every bite offers a varied chocolate experience. For an even more luxurious touch, consider using a blend of high-quality chocolate chips and chunks for a mix of textures.
-
What’s the best way to store leftover cookies?
To maintain their fresh, chewy goodness and prevent them from becoming stale, store your NYC-style thick chocolate chip cookies in an airtight container at room temperature. This method is ideal for keeping them tasting wonderfully soft for up to 5 days. Avoid leaving them exposed to air, which is the primary enemy of cookie freshness.
If you prefer a firmer texture or live in a very warm climate, you can refrigerate them for up to a week. Just remember to let them come back to room temperature for about 15-20 minutes before enjoying again, as the cold can make them hard.
Proper storage is key to enjoying these delicious cookies over several days, ensuring each bite is as satisfying as the first.
-
Can I freeze the cookie dough?
Definitely! Freezing unbaked cookie dough is a fantastic strategy for having delicious cookie treats ready at a moment’s notice, perfect for unexpected cravings or impromptu dessert needs. Simply shape the dough into 6-ounce balls as instructed and wrap each one tightly in plastic wrap to prevent freezer burn and maintain moisture.
Place the wrapped dough balls in a resealable freezer bag or an airtight container, and they will stay perfectly fresh and ready to bake for up to 2 months. When you’re ready to bake, you can pop them straight into the oven directly from the freezer—no thawing required, which saves precious time.
This make-ahead method ensures you can enjoy freshly baked, warm, and gooey cookies whenever the mood strikes, just like they were made from scratch that very moment.