Ultimate Healthy Tuna Melt Wrap – Delicious and Easy!
The scent of toasted tortillas sizzling on the stove always brings a wave of nostalgia over me, a comforting reminder of carefree weekends filled with laughter and hearty meals. If you’re tired of the same old takeout options and looking for a delicious yet wholesome alternative, this Healthy Tuna Melt Wrap is poised to become your new culinary champion.
Imagine this: a long day concludes, and the last thing you desire is a rushed trip to a fast-food restaurant. Instead, envision crafting a delightful meal in under fifteen minutes. This wrap is a brilliant way to incorporate nutritious ingredients, masterfully balancing creamy tuna, zesty garlic, and satisfying corn within a warm, cheesy embrace.
Why You Will Love This Recipe
- Quick Preparation: This recipe is a lifesaver for busy weeknights, coming together in less than 15 minutes for a satisfying meal without the fuss.
- Nutrient-Rich Filling: Packed with lean protein from skipjack tuna and the creamy goodness of Greek yogurt, it ensures you stay full and satisfied while making healthier choices.
- Flavorful Combination: Experience a delightful symphony of textures and tastes, with the creamy tuna, sweet corn, sharp onion, and melty cheese creating an irresistible bite.
- Highly Customizable: Easily adapt this recipe to your personal preferences by swapping out cheeses, adding your favorite vegetables, or adjusting seasonings for a truly bespoke wrap.
- Effortless Meal Prep: The tuna mixture can be made ahead of time, significantly reducing your active cooking time when hunger strikes during the week.
Ingredients You Need
The foundation of any great dish lies in the quality of its ingredients, and this Healthy Tuna Melt Wrap is no exception. Opting for fresh, vibrant components will elevate the final taste and texture, transforming a simple wrap into a culinary delight. Each element plays a crucial role in creating the balanced flavor profile that makes this recipe so appealing.
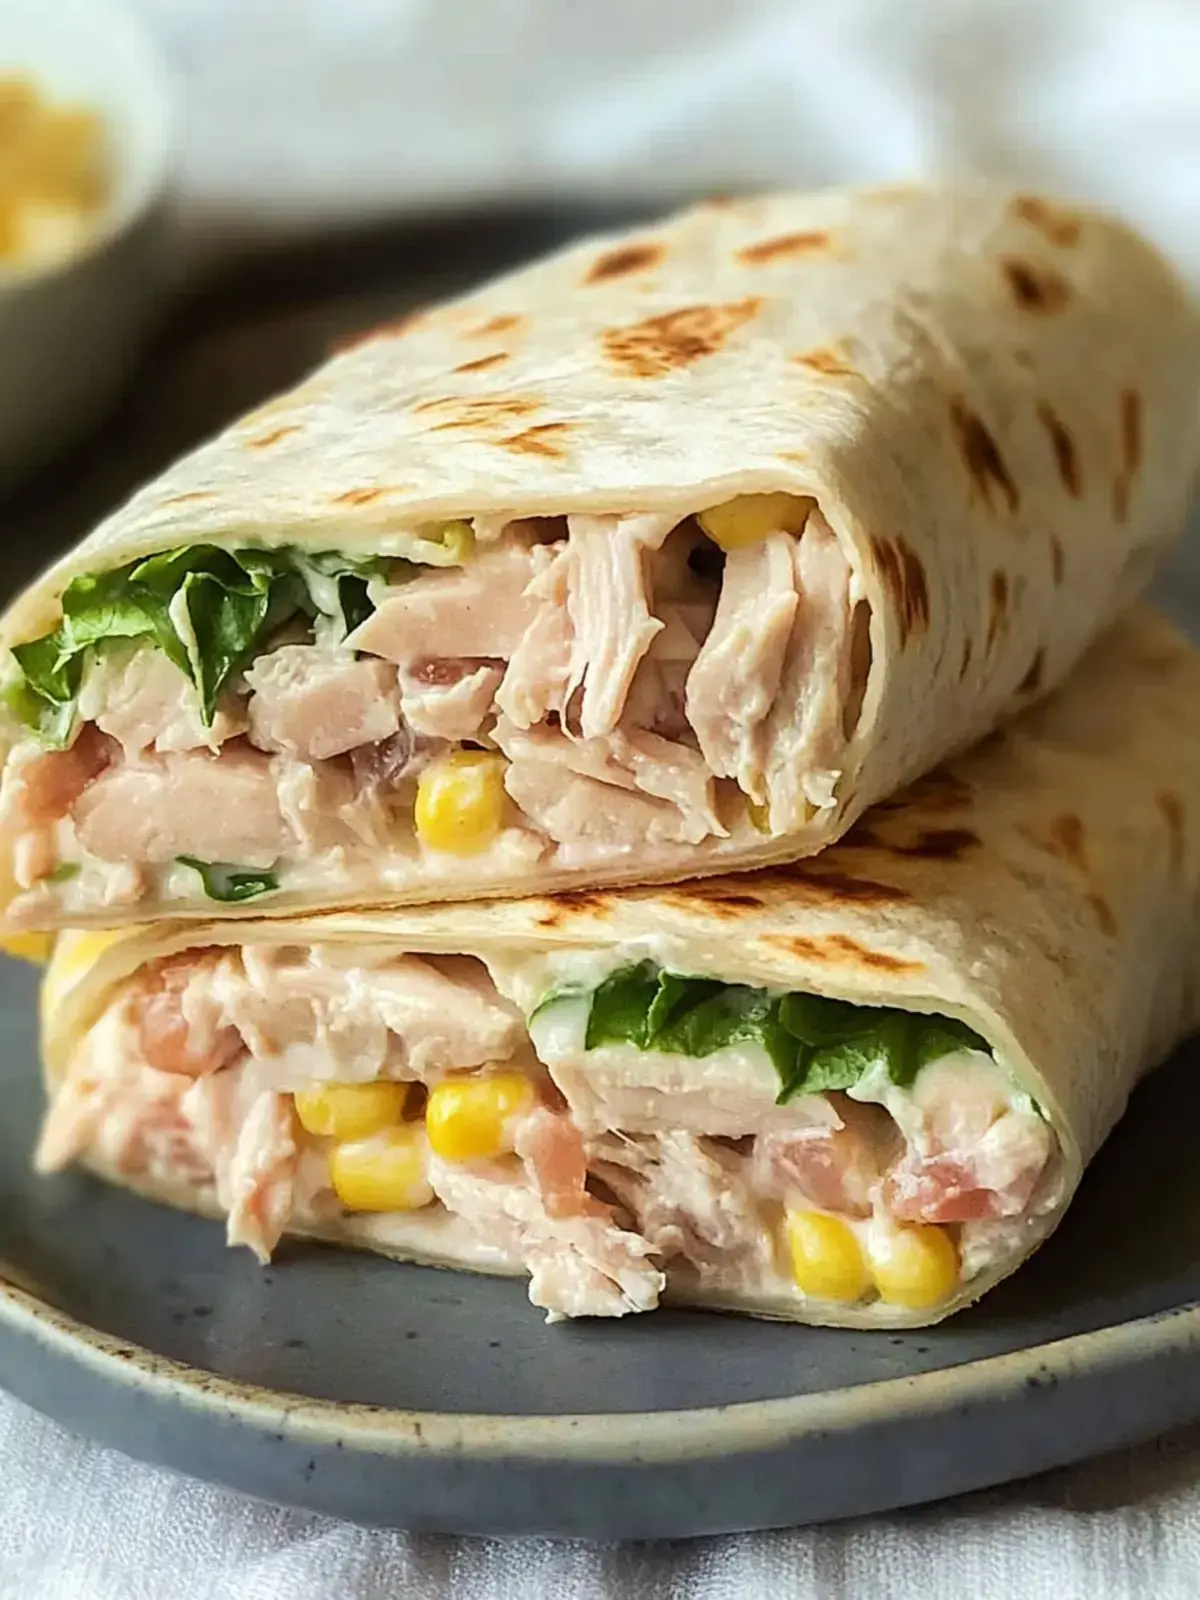
Healthy Tuna Melt Wrap

Satisfy your cravings with this quick, easy, and nutritious Healthy Tuna Melt Wrap. Packed with protein and flavor, it's a perfect go-to meal for busy days.
- 1 can Skipjack tuna, drained
- 1/4 cup Greek yogurt
- 1 tbsp Dijon mustard
- 1 tbsp Lemon juice
- 1/2 cup Corn (fresh, frozen, or canned)
- 1/4 cup Red onion, finely chopped
- 2 tbsp Dill relish
- 1/2 tsp Garlic powder
- 1/4 tsp Black pepper
- 1 cup Shredded mozzarella cheese
- 2 Burrito-sized wraps
- 1Drain the tuna. In a medium bowl, combine the drained tuna with Greek yogurt, Dijon mustard, lemon juice, corn, red onion, dill relish, garlic powder, and black pepper. Mix until well blended.
- 2Warm the burrito-sized wraps in the microwave for about 10-20 seconds, covered with a damp paper towel, then lay them on a clean surface.
- 3On one end of each wrap, sprinkle a layer of shredded cheese, leaving about an inch of space on the sides and bottom edge. Spoon the tuna mixture evenly over the cheese.
- 4Fold in the sides of each wrap toward the center. Then, pull the bottom edge of the tortilla up, tuck the edges in, and roll it away from you until you reach the end.
- 5Heat a skillet or grill pan over medium heat with a splash of olive oil. Place each wrap seam side down on the hot surface. Grill for 3-4 minutes, gently pressing, then flip and heat for another 2-3 minutes until golden brown. If it cooks too fast, lower the heat to medium-low.
Keywords: tuna melt, wrap, healthy, quick, easy, lunch, dinner, protein, comfort food
These are the essential components to create your delicious tuna melt wrap. Exact quantities are detailed within the provided recipe card for your convenience.
Variations
Embracing culinary creativity can lead to delightful discoveries, and this Healthy Tuna Melt Wrap is a perfect canvas for experimentation. Whether you’re catering to specific dietary needs or simply seeking to expand your flavor horizons, numerous exciting modifications await your exploration.
For a completely plant-based option, transform this into a Vegan Tuna Melt Wrap. Simply substitute the skipjack tuna with mashed chickpeas, which mimic the flaky texture remarkably well. Then, swap the Greek yogurt for a creamy vegan mayonnaise or a cashew-based spread to achieve the desired richness. This adaptation maintains the comforting essence of the wrap while adhering to vegan principles.
If you’re following a low-carbohydrate lifestyle, consider using a low-carb tortilla or large lettuce leaves as your wrap base. You can also reduce or omit any corn if it doesn’t fit within your carb goals. Additionally, incorporating finely chopped celery or bell peppers can add a satisfying crunch without significantly impacting the carbohydrate count, ensuring a flavorful and diet-friendly meal.
To inject a fiery kick, infuse the tuna mixture with a dash of sriracha or a pinch of cayenne pepper for a spicy tuna melt experience. Alternatively, you could introduce some finely diced jalapeños for a fresh, zesty heat. This variation is perfect for those who enjoy a bit of spice to awaken their palate.
How to Prepare Healthy Tuna Melt Wrap
Step 1: Prepare the Tuna Mixture
The initial step involves meticulously draining the canned skipjack tuna to remove any excess liquid, ensuring the final mixture has the perfect creamy consistency without being watery. This preparation is crucial for the overall texture of your wrap.
In a medium-sized mixing bowl, combine the drained tuna with the Greek yogurt, which serves as a healthier alternative to mayonnaise, adding creaminess and a subtle tang. Introduce the Dijon mustard for a touch of sharpness, and a squeeze of fresh lemon juice to brighten all the flavors. The addition of corn brings a delightful sweetness and a pleasant crunch, contrasting beautifully with the tuna’s savory notes. Finely diced red onion introduces a mild, pungent bite, while the dill relish contributes a classic, briny zest that is characteristic of a great tuna salad.
Season this flavorful ensemble with garlic powder for depth and complexity, and a generous pinch of freshly ground black pepper to enhance the overall taste profile. Gently mix all these ingredients together until they are thoroughly combined, ensuring that every spoonful offers a harmonious blend of flavors. Take a moment to taste and adjust seasonings if necessary; a little extra pepper or lemon juice can make a significant difference.
Step 2: Warm and Prepare the Wrap
The key to a pliable and easy-to-handle wrap lies in its preparation before filling. A cold, stiff tortilla can lead to cracking during the rolling process, so a brief warming is essential.
To achieve the ideal flexibility, place your burrito-sized wrap or tortilla on a microwave-safe plate. Cover it with a damp paper towel; this traps moisture and gently steams the tortilla, making it pliable. Microwave for approximately 10 to 20 seconds, just until the tortilla is warm and feels soft and flexible to the touch. Be careful not to overheat it, as this can make it tough or gummy.
Once warmed, carefully lay the flexible wrap flat on a clean, dry surface, such as a cutting board or a clean countertop. This provides a stable foundation for assembling your wrap, allowing you to build the layers without the risk of tearing. The warmth will also help the cheese melt more effectively when the wrap is grilled.
Step 3: Layer the Cheese and Tuna Mixture
This step is where the magic of the “melt” truly begins, as the cheese acts as a delicious binder and a barrier for the hearty filling. Strategic placement is key to achieving that perfect, gooey center.
On the section of the warmed wrap closest to you, begin by evenly sprinkling a generous layer of shredded mozzarella cheese. It’s important to leave about an inch of space around the sides and the bottom edge of the wrap. This border allows for easier folding and prevents the filling from seeping out excessively during the grilling process. The cheese will melt beautifully and create a creamy base for the tuna.
Next, carefully spoon the prepared tuna mixture directly over the layer of cheese. Distribute it evenly, ensuring you have a good amount in the center, but avoid overstuffing the wrap, which can make it difficult to roll and prone to breaking. The combination of the creamy tuna and melted cheese is the heart of this delicious meal.
Step 4: Fold and Roll the Wrap
Mastering the art of rolling a wrap is fundamental to its success, creating a neat package that holds all the delicious ingredients securely. This technique ensures everything stays in place during cooking and eating.
Begin the rolling process by folding in the two sides of the wrap towards the center, creating neat edges. Think of it as tucking in the ends of an envelope. This step helps to enclose the filling and prevent it from escaping from the sides.
Once the sides are folded in, take the bottom edge of the tortilla, the edge closest to you, and pull it upwards. Gently tuck the folded sides in further as you begin to roll the wrap away from you. Continue rolling tightly and evenly until you reach the end of the wrap, creating a compact and secure cylinder. A well-rolled wrap ensures a satisfying eating experience.
Step 5: Grill the Wrap to Golden Perfection
The final cooking stage transforms the soft wrap into a crispy, golden-brown delight with a perfectly melted cheesy interior. This grilling process adds a wonderful texture and depth of flavor.
Heat a skillet or a grill pan over medium heat. Add a small splash of olive oil to the pan; this helps to create a beautifully crisp exterior and prevents sticking. Once the pan is hot, carefully place the rolled wrap into the skillet, ensuring it lands seam-side down first. This helps to seal the seam and create an even cooking surface.
Grill the wrap for approximately 3 to 4 minutes on the first side. Gently press down on the wrap with a spatula as it cooks; this ensures even contact with the heat and helps to crisp the surface beautifully. After 3-4 minutes, carefully flip the wrap and grill the other side for another 2 to 3 minutes, or until it’s golden brown and the cheese inside is thoroughly melted and gooey. If the wrap starts to brown too quickly, reduce the heat to medium-low to prevent burning while allowing the cheese to melt completely.
Step 6: Serve and Enjoy
The culmination of your culinary efforts has arrived – a perfectly grilled Healthy Tuna Melt Wrap, ready to be savored. The aroma alone is enough to make your mouth water.
Carefully remove the finished wrap from the skillet. You can slice it in half diagonally for a more appealing presentation, revealing the melted cheese and hearty tuna filling within. This presentation makes it easy to handle and showcases the delicious contents.
Serve your warm and delightful wrap immediately. It is best enjoyed fresh off the skillet, with the cheese still perfectly melted and the wrap delightfully crisp. This ensures the optimal texture and flavor experience for you and anyone lucky enough to share this meal.
Pro Tips for Healthy Tuna Melt Wrap
Elevating this simple wrap into a culinary masterpiece requires a few insider secrets and thoughtful considerations. These tips, honed through practice and experience, will ensure your Healthy Tuna Melt Wrap is consistently delicious and perfectly executed.
Thorough Mixing is Key: Don’t underestimate the power of a well-combined filling. Ensure that the Greek yogurt, mustard, lemon juice, and seasonings are fully integrated into the tuna. This prevents any dry pockets and guarantees a uniform, delightful flavor in every bite. A gentle but firm mixing ensures all ingredients meld beautifully.
The Art of the Warm Wrap: A cold tortilla is a recipe for disaster, leading to cracks and tears during the rolling process. A quick 10-20 second microwave with a damp paper towel makes the wrap pliable and forgiving, allowing for a much smoother and neater roll. This small step makes a significant difference in the final presentation.
Strategic Layering for Success: Place the shredded cheese strategically on the side of the wrap closest to you. This not only creates a luscious melted barrier but also helps to bind the tuna mixture, preventing it from spilling out. The cheese acts as a delightful adhesive, holding everything together.
Mastering the Grill Heat: Keep a watchful eye on your wrap as it grills. The pan’s heat can fluctuate, and if your wrap is browning too rapidly, don’t hesitate to lower the heat to medium-low. This allows the cheese to melt thoroughly without the exterior burning, achieving that perfect balance of crispiness and molten goodness.
Personalization is Paramount: This recipe is incredibly versatile. Feel empowered to add your personal touch by incorporating extra vegetables like finely chopped bell peppers or spinach for added crunch and nutrients. Experiment with different spices or herbs to tailor the flavor profile precisely to your liking, making it uniquely yours.
Serving Suggestions for Healthy Tuna Melt Wrap
Decoration
While the Healthy Tuna Melt Wrap is a star on its own, a few thoughtful decorative touches can enhance its visual appeal. Consider garnishing the plate with a sprig of fresh dill or parsley, which complements the tuna’s flavor beautifully and adds a pop of green.
A drizzle of sriracha or a swirl of plain Greek yogurt on the side can also serve as a colorful accent. These additions not only look attractive but also offer an optional flavor boost for those who desire it.
Side Dishes
To create a complete and satisfying meal, the Healthy Tuna Melt Wrap pairs wonderfully with a variety of side dishes. A crisp, fresh green salad with a light vinaigrette offers a refreshing contrast to the wrap’s richness, cleansing the palate with every bite.
Roasted vegetables like sweet potato wedges, broccoli florets, or bell peppers bring a savory depth and a delightful textural element. For a heartier option, consider a small serving of quinoa salad or a cup of creamy tomato soup, which harmonizes perfectly with the cheesy tuna filling. These accompaniments ensure a well-rounded and enjoyable dining experience.
Creative Serving Ideas
Beyond traditional plating, think outside the box to present your Healthy Tuna Melt Wrap in innovative ways. Cut the wrap into pinwheels after grilling; this makes for a fantastic appetizer or a fun, finger-food option for gatherings.
Serve a deconstructed version, with the grilled wrap pieces alongside a bowl of the tuna mixture and a selection of toppings like avocado slices, shredded lettuce, and diced tomatoes, allowing guests to build their own mini wraps. You could also serve the warm tuna and cheese filling over toasted whole-grain bread for an open-faced sandwich, offering a different take on the classic melt concept.
Preparation & Storage
Storing Leftovers
Should you find yourself with any leftover Healthy Tuna Melt Wrap, proper storage is key to maintaining its quality and flavor. Ensure the wrap has cooled down completely before attempting to store it, as warm food can create condensation and affect the crispness.
Place the cooled wrap in an airtight container or wrap it tightly in plastic wrap followed by aluminum foil. This method helps to prevent the wrap from drying out and protects it from absorbing any odors from other foods in the refrigerator. Stored correctly, leftovers can be enjoyed for up to two days.
Freezing
For longer-term storage, freezing the Healthy Tuna Melt Wrap is an excellent option, allowing you to have this delicious meal on hand whenever a craving strikes. It’s best to freeze the wraps *before* grilling them, as the grilling process is best done fresh.
Individually wrap each ungrilled wrap tightly in plastic wrap, ensuring no air is trapped. Then, for added protection against freezer burn, wrap each individual package again in aluminum foil or place them inside a freezer-safe bag. Properly frozen, these wraps can maintain their quality for up to two months.
Reheating
Reheating your Healthy Tuna Melt Wrap involves a few simple steps to bring back its delicious appeal. If reheating from the refrigerator, you can either use a skillet or the microwave.
For the best texture, place the leftover wrap in a non-stick skillet over medium-low heat. Grill it gently for a few minutes on each side until heated through and the cheese is re-melted and gooey. Alternatively, you can microwave it for about 30-60 seconds, though the wrap may be less crispy using this method. If reheating from frozen, thaw the wrap overnight in the refrigerator, then proceed with skillet or microwave reheating.
Frequently Asked Questions
-
How do I choose the right type of tuna for my wrap, and what are the best options for flavor and health?
Absolutely! Skipjack tuna is often recommended for its rich flavor and firm texture, making it an excellent choice for this recipe. Yellowfin is another great option if you prefer a milder taste and is readily available. Look for cans labeled “chunk light” for a budget-friendly choice that still delivers good flavor, or “solid white” (albacore) for a more premium option with a denser texture. Always opt for tuna packed in water, as this significantly reduces the overall calorie and fat content compared to tuna packed in oil, making your wrap a healthier choice without sacrificing taste.
-
What is the best way to store leftover Healthy Tuna Melt Wraps to maintain their texture and taste, and how long are they safe to consume?
The Healthy Tuna Melt Wrap can be kept in the fridge for up to 3 days when stored properly in an airtight container. To ensure the best taste and texture upon reheating, it’s recommended to reheat it in a skillet or microwave until warmed through; the skillet method will help revive some of the crispiness lost during storage. If the wrap becomes soggy, you can sometimes revive it with a quick toast in a dry skillet.
-
Can I freeze the Healthy Tuna Melt Wrap, and if so, what is the most effective method for freezing and reheating to ensure the best results?
Yes, you can absolutely freeze it! For optimal results and to best preserve the quality, it’s recommended to wrap the ungrilled Healthy Tuna Melt Wrap individually in plastic wrap, followed by a layer of aluminum foil or placing it in a freezer-safe bag. This double layer of protection helps prevent freezer burn and maintain freshness. This way, they can last in the freezer for up to 2 months. When you’re ready to enjoy, thaw it overnight in the fridge, then reheat gently in a skillet over medium-low heat until the cheese is melty and the wrap is heated through.