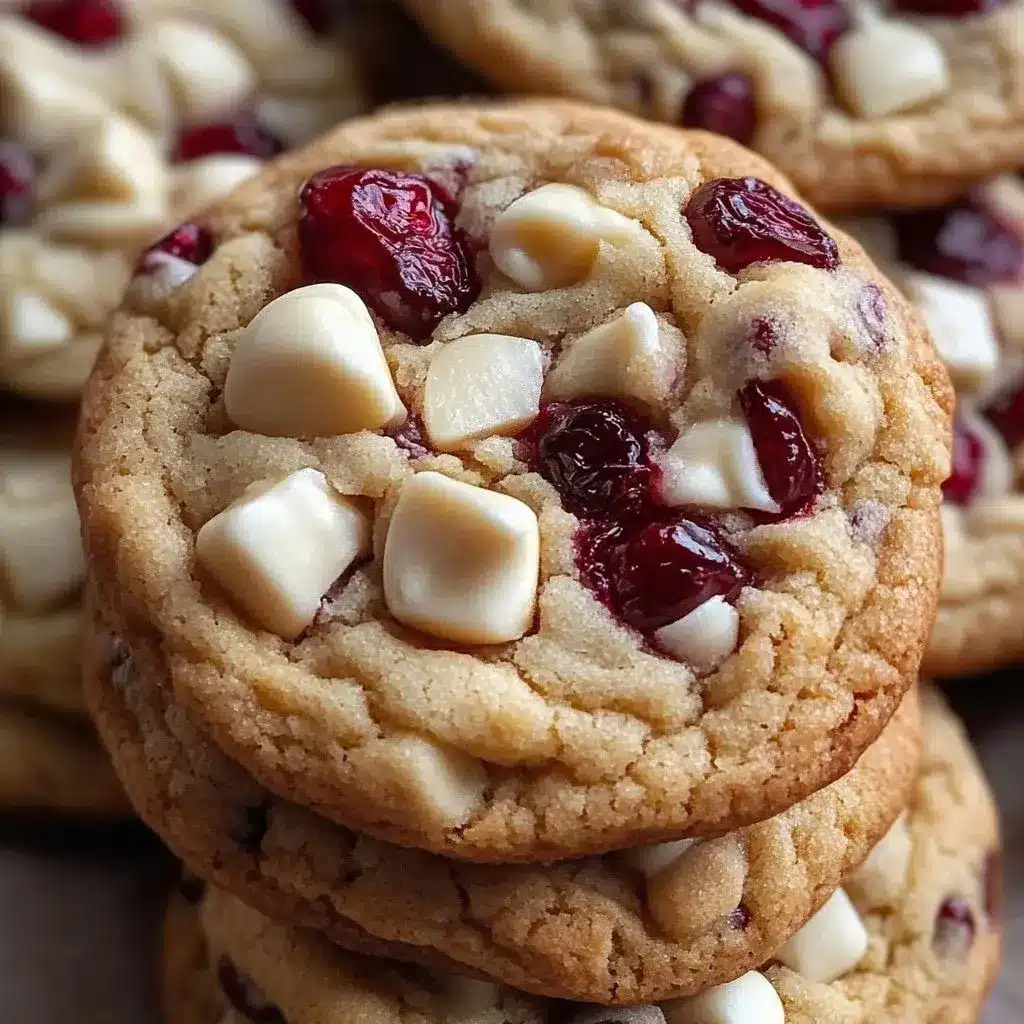
Ultimate White Chocolate Chip Cranberry Cookies
Baking can be one of the most comforting and rewarding activities, offering a sense of accomplishment and a delicious outcome. There’s something incredibly satisfying about mixing together a few simple ingredients and transforming them into sweet, delicious treats that bring smiles to faces. If you’re looking for a cookie that strikes the perfect balance between sweet and tart, look no further than White Chocolate Chip Cranberry Cookies, a delightful addition to any dessert spread.
Have you ever tasted a cookie that was both chewy and crisp, perfectly baked with a hint of fruity goodness that dances on your palate? That’s exactly what you’ll find with our White Chocolate Chip Cranberry Cookies, a testament to how simple ingredients can create something truly special. The combination of flavors is not only enjoyable but also eye-catching, making them perfect for all occasions and a star on any dessert table.
Why You Will Love This Recipe
- Flavorful Combination: The harmonious blend of creamy white chocolate and tangy dried cranberries creates a delightful contrast in every single bite. This interplay of sweet and tart is what makes these cookies so uniquely appealing and memorable for anyone who tries them.
- Effortless Preparation: This recipe is designed for ease, featuring straightforward steps that even beginner bakers can follow with confidence. You’ll spend less time in the kitchen and more time enjoying your freshly baked creations, making it an ideal choice for busy weeknights or spontaneous baking sessions.
- Crowd-Pleasing Appeal: These cookies are universally loved, appealing to both children and adults with their comforting texture and delightful taste. They are a guaranteed hit at parties, family gatherings, or any event where you want to share a little bit of homemade joy.
- Versatile for Any Event: Whether it’s a holiday gathering, a birthday celebration, a casual afternoon tea, or simply a desire for a sweet treat, these cookies fit perfectly. Their festive appearance and delicious flavor make them suitable for both special occasions and everyday indulgence.
- Customizable Nature: You have the freedom to tailor these cookies to your exact preferences by adjusting the ratio of chocolate to cranberries or even incorporating other delightful additions. This flexibility ensures you can create a cookie that is uniquely yours, every single time you bake them.
Ingredients You Need
The quality of your ingredients plays a crucial role in the final outcome of your baked goods, and these White Chocolate Chip Cranberry Cookies are no exception. Opting for good-quality butter, fresh cranberries, and premium white chocolate chips will significantly elevate the flavor and texture of your cookies, making each bite an experience to savor. The careful selection of each component ensures a well-balanced and delicious cookie that will be requested time and time again.
White Chocolate Chip Cranberry Cookies

A delightful blend of sweet white chocolate and tart cranberries, these cookies offer a perfect balance of flavors and textures, making them an ideal treat for any occasion. They are easy to make, yielding perfectly chewy and crisp cookies with a hint of fruity goodness.
- 3/4 cup Butter, Softened (Essential for richness and texture.)
- 3/4 cup Brown Sugar (Adds depth of flavor and moisture.)
- 1/4 cup Sugar (Balances sweetness.)
- 1 Egg (Acts as a binding agent.)
- 2 tsp Vanilla (Enhances the overall flavor.)
- 2 cups Flour (Provides the structure of the cookie.)
- 2 tsp Cornstarch (Helps achieve a soft, chewy texture.)
- 1 tsp Baking Soda (For leavening and lift.)
- 3/4 cup White Chocolate Chips (The main sweet element.)
- 1 cup Cranberries, Dried (Offers a delightful tartness.)
- 1Prepare Ingredients: Gather all ingredients. Ensure butter is softened but not melted. Pre-measure dried cranberries and white chocolate chips.
- 2Cream Butter and Sugars: In a large bowl, beat softened butter, brown sugar, and white sugar until creamy and well combined (2-3 minutes).
- 3Add Egg and Vanilla: Beat in the egg and vanilla extract until thoroughly incorporated.
- 4Mix Dry Ingredients: In a separate bowl, whisk together flour, cornstarch, and baking soda.
- 5Combine Mixtures: Gradually add the dry mixture to the wet mixture. Mix on low speed until just combined; do not overmix.
- 6Fold in Add-ins: Gently fold in white chocolate chips and dried cranberries using a spatula until evenly distributed.
- 7Chill Dough: Cover the bowl and chill the dough in the refrigerator for at least one hour.
- 8Preheat Oven and Prepare Baking Sheet: Preheat oven to 350°F (175°C). Line a baking sheet with parchment paper.
- 9Scoop Cookie Dough: Once chilled, form 1.5-inch dough balls using a cookie scoop or spoon. Place them on the prepared baking sheet, leaving space for spreading.
- 10Bake and Cool: Bake for 11-12 minutes until edges are set and slightly golden. Let cookies cool on the baking sheet for a few minutes before transferring to a wire rack to cool completely.
Keywords: Baking, Cookies, Cranberry, Dessert Recipe, White Chocolate, Sweet Treat, Easy Baking, Holiday Cookies
- butter, softened: This is the creamy base that provides richness and helps create a tender cookie texture.
- brown sugar: Adds moisture, chewiness, and a lovely caramel note that complements the other flavors beautifully.
- sugar: Contributes to sweetness and helps achieve that perfect crispness on the edges while keeping the center soft.
- egg: Acts as a vital binder, holding all the ingredients together and contributing to the cookie’s structure and richness.
- vanilla: An essential aromatic, it enhances the overall sweetness and adds a warm depth of flavor that makes the cookies irresistible.
- flour: This is the structural foundation of the cookie, providing the necessary substance for it to hold its shape.
- cornstarch: A secret ingredient for achieving that coveted soft and chewy texture, preventing the cookies from becoming too cakey.
- baking soda: The leavening agent that gives cookies their lift and spread, creating those delightful textures we all love.
- white chocolate chips: These melt into luscious pockets of creamy sweetness, perfectly balancing the tartness of the cranberries.
- cranberries, dried: The star of the tart flavor, these chewy jewels add a burst of fruity tang that cuts through the sweetness of the chocolate.
The precise quantities for each ingredient can be found within the comprehensive recipe card above, ensuring you have all the necessary details for a flawless baking experience.
Variations
To elevate these classic cookies, consider introducing a nutty crunch. Chopped walnuts or pecans, when folded into the dough, add a delightful textural contrast and a rich, earthy flavor that pairs wonderfully with both white chocolate and cranberries. This simple addition transforms the cookies into a more complex and satisfying treat, perfect for those who enjoy a bit of bite in their baked goods. Ensure the nuts are toasted for an even more pronounced flavor profile.
For those who appreciate a warmer, more autumnal profile, infusing the dough with a hint of spice can be truly magical. A teaspoon of ground cinnamon or a pinch of nutmeg, when added alongside the dry ingredients, imparts a cozy aroma and a subtle warmth that complements the fruity and sweet elements. This variation makes the cookies exceptionally well-suited for cooler weather and holiday gatherings, offering a comforting depth of flavor.
If you’re aiming for a heartier cookie with a bit more substance, incorporating rolled oats is an excellent choice. Mixing in about half a cup of old-fashioned oats can provide a pleasing chewiness and a slightly rustic texture. This variation gives the cookies a more wholesome feel while still maintaining that delightful balance of sweet and tart, making them a fantastic snack for any time of day. It also adds a lovely golden hue to the baked cookie.
Dietary adjustments can also lead to exciting new versions of this beloved cookie. For a vegan delight, substitute the butter with your favorite plant-based alternative, like coconut oil or vegan butter sticks, and use a flax egg (1 tablespoon ground flaxseed mixed with 3 tablespoons water, let sit for 5 minutes) in place of the chicken egg. For those who need to avoid gluten, a high-quality gluten-free all-purpose flour blend will work beautifully, ensuring that everyone can partake in the joy of these delicious treats.
How to Prepare White Chocolate Chip Cranberry Cookies
Step 1: Gathering and Preparing Ingredients
The initial step in creating these delightful cookies involves meticulously gathering all your necessary ingredients. Ensure that your butter has softened to the ideal consistency; it should be pliable enough to cream easily but not so warm that it has begun to melt, which can affect the cookie’s structure. Having your butter at the right temperature is crucial for achieving a light and airy cookie dough base.
Simultaneously, it’s highly beneficial to pre-measure your dried cranberries and white chocolate chips. This preparation allows for their swift incorporation into the dough at the appropriate stage, preventing the dough from sitting out too long, which could compromise its texture. Having everything ready to go streamlines the baking process and ensures a more consistent result, making your baking experience smoother and more enjoyable.
This preparatory phase also includes preheating your oven to the specified temperature, typically around 350°F (175°C). Accurately preheating the oven ensures that once the cookies are ready to bake, they enter an environment of consistent heat, promoting even baking and the development of the perfect cookie texture. A properly preheated oven is fundamental for achieving those golden edges and tender centers.
Step 2: Creaming Butter and Sugars for a Light Base
In a large mixing bowl, commence the process by creaming together the softened butter, along with both the brown sugar and granulated sugar. Utilize an electric mixer or a sturdy whisk to beat these ingredients until the mixture becomes exceptionally creamy, light in color, and thoroughly combined. This creaming action is vital as it incorporates air into the dough, which contributes significantly to the cookies’ tender and fluffy texture.
Continue this process for approximately 2 to 3 minutes, ensuring that the sugars are fully dissolved into the butter, creating a smooth, cohesive mass. The resulting mixture should have a pale, almost fluffy appearance, indicating that sufficient air has been incorporated. This foundation is essential for the overall success of your cookie recipe, setting the stage for the other ingredients to blend harmoniously.
The texture achieved at this stage is a key indicator of the final cookie’s chewiness and overall crumb. A well-creamed butter and sugar mixture will yield cookies that are less dense and have a more delicate mouthfeel. This step is not merely about mixing; it’s about developing the crucial texture that defines a superior cookie.
Step 3: Incorporating the Egg and Vanilla Extract
Once you have achieved a perfectly creamed butter and sugar mixture, it’s time to introduce the wet ingredients that will further bind and enrich the dough. Gently beat in the egg until it is fully incorporated into the creamy mixture. The egg adds moisture, fat, and acts as a crucial emulsifier, helping to bind all the components of the dough together.
Following the addition of the egg, stir in the vanilla extract. Vanilla is more than just a flavor enhancer; it adds a subtle complexity and warmth that rounds out the sweetness of the sugars and white chocolate. Ensure that both the egg and vanilla are thoroughly blended, aiming for a uniform batter consistency before moving on to the dry ingredients. This ensures an even distribution of flavor and moisture throughout the cookie dough.
The goal here is to create a smooth, cohesive batter that shows no streaks of egg or vanilla. If you notice any separation, continue mixing gently until the batter appears homogenous. This careful integration of wet ingredients sets up the dough for the dry components, ensuring a well-balanced and consistent cookie texture in the end. This meticulous approach guarantees that every bite will be equally delightful.
Step 4: Whisking Dry Ingredients for Even Distribution
In a separate, medium-sized bowl, combine your flour, cornstarch, and baking soda. Use a whisk to thoroughly mix these dry ingredients together. This step is paramount because it ensures that the leavening agent (baking soda) and the cornstarch are evenly distributed throughout the flour. Even distribution is key to preventing pockets of bitterness from the baking soda or an uneven rise in your cookies.
The whisking action aerates the flour slightly and breaks up any small clumps, leading to a lighter dough. Cornstarch, in particular, is essential for achieving that signature soft and chewy cookie texture that many people adore. It helps to tenderize the flour and absorb excess moisture, resulting in a cookie that is wonderfully pliable rather than crumbly.
This simple yet critical step guarantees that your baking soda will work uniformly, leading to consistent lift and spread across all your cookies. A well-mixed dry ingredient base is a cornerstone of successful cookie baking, setting the stage for the perfect texture and a delightful baking experience. Properly prepared dry ingredients minimize the risk of any unwanted surprises during baking.
Step 5: Gently Combining Wet and Dry Mixtures
Now, it’s time to bring together the wet and dry components of your cookie dough. Gradually add the whisked dry ingredients to the large bowl containing your creamed butter, sugars, egg, and vanilla mixture. It is advisable to do this in two or three additions, mixing on a low speed with your electric mixer or gently by hand with a spatula after each addition.
The most crucial instruction here is to mix only until the ingredients are just combined. Overmixing the dough at this stage can develop the gluten in the flour excessively, leading to tough and dense cookies instead of the desired chewy texture. You should still see a few streaks of flour; this is perfectly fine as the folding in of add-ins will help to incorporate everything evenly without overworking the dough.
Pay close attention to the consistency of the dough. It should be thick and slightly sticky, but not overly wet or dry. This careful combination ensures that the cookies will bake up beautifully with the right balance of chewiness and structure, avoiding the pitfalls of over-processing that can compromise the final product. This delicate balance is key to achieving cookie perfection.
Step 6: Folding in the Star Ingredients
With the main dough base prepared, it’s time to introduce the delightful stars of this recipe: the white chocolate chips and dried cranberries. Using a rubber spatula or a wooden spoon, gently fold these additions into the cookie dough. The term “fold” implies a gentle mixing motion, where you are essentially lifting the dough from the bottom and folding it over the add-ins, rather than vigorous stirring.
The objective is to distribute the white chocolate chips and cranberries evenly throughout the dough without breaking them up too much or overmixing the entire mixture. Ensure that every part of the dough gets a good share of these flavorful morsels. This careful distribution promises a burst of flavor and texture in every single cookie. This is where the cookie truly begins to take its unique form.
The visual appeal of the dough at this stage is quite enticing, with the creamy white chocolate chips nestled amongst the ruby-red dried cranberries, all suspended in the rich cookie base. This step not only adds flavor and texture but also contributes to the beautiful appearance of the finished cookies, making them as pleasing to the eye as they are to the palate. It’s a vibrant mix that signals deliciousness.
Step 7: Chilling the Dough for Optimal Results
Before scooping and baking, it is highly recommended to chill the cookie dough. Cover the bowl securely with plastic wrap or a lid and place it in the refrigerator for at least one hour, or ideally for a few hours. Chilling the dough allows the fats to firm up, which helps the cookies spread less dramatically during baking, resulting in thicker, chewier cookies with better shape retention.
Beyond texture, chilling also allows the flavors to meld and deepen. The sugars have more time to dissolve fully into the fat, and the ingredients develop a more complex and integrated taste profile. This resting period is crucial for achieving that perfect balance of sweet, tart, and creamy flavors that defines these cookies. It truly elevates the final cookie from good to exceptional.
If you are short on time, you can skip the chilling, but the cookies will spread more and may not achieve the same chewy texture. For the best possible outcome, especially if you are aiming for those perfectly shaped, delightfully chewy cookies, this chilling step is a non-negotiable element of the process. It’s a small effort for a significant reward in cookie quality.
Step 8: Preheating the Oven and Preparing the Baking Sheet
While your cookie dough is chilling to perfection in the refrigerator, take this time to preheat your oven to the correct temperature, typically 350°F (175°C). Ensuring the oven is fully preheated before you place the cookies inside is critical for even baking and proper texture development. An oven that hasn’t reached its target temperature can lead to undercooked centers and overcooked edges.
Next, prepare your baking sheets by lining them with parchment paper or silicone baking mats. This simple step is invaluable for preventing the cookies from sticking to the baking sheet, which not only makes for easier cleanup but also ensures that your cookies can be removed cleanly without breaking. Parchment paper creates a non-stick surface that allows the cookies to bake evenly without burning on the bottom.
Having your baking sheets ready to go will allow you to quickly transfer the scooped cookie dough to the oven as soon as it’s preheated. This efficiency helps maintain the optimal baking temperature and ensures that the cookies start baking immediately upon entering the oven, contributing to their consistent shape and texture. Prepared baking sheets are a small detail that makes a big difference in the final presentation and ease of handling.
Step 9: Scooping Cookie Dough for Uniformity
Once the cookie dough has chilled sufficiently and your baking sheets are prepared, it’s time to portion the dough. Using a cookie scoop, preferably a medium-sized one (about 1.5 to 2 tablespoons), scoop out portions of the chilled dough. This ensures that each cookie is roughly the same size, which is essential for even baking.
Roll each scoop of dough gently between your palms to form smooth, uniform balls. Place these dough balls onto the prepared baking sheets, leaving ample space between each one—at least 2 inches. This spacing is vital because the cookies will spread as they bake, and overcrowding the baking sheet can lead to misshapen cookies that merge together, or unevenly baked cookies.
The goal is to create perfectly rounded mounds of dough that will transform into beautifully formed cookies. If the dough becomes too soft to scoop easily, you can return it to the refrigerator for another 15-20 minutes to firm up before continuing. A consistent shape at this stage directly translates to a beautiful presentation of your finished cookies.
Step 10: Baking and Cooling for Perfect Texture
Place the baking sheets into the preheated oven and bake for approximately 11 to 12 minutes. The cookies are ready when the edges appear set and are beginning to turn a light golden brown, while the centers may still look slightly soft and underbaked. This visual cue is important, as the cookies will continue to cook and firm up on the hot baking sheet after being removed from the oven.
Once baked, remove the baking sheets from the oven and let the cookies cool on the sheets for about 5 minutes. This crucial resting period allows the cookies to set further, preventing them from falling apart when you try to move them. The residual heat from the baking sheet will gently finish the cooking process in the center.
After the initial cooling period on the baking sheet, carefully transfer the cookies to a wire rack to cool completely. Cooling on a wire rack allows air to circulate around the cookies, preventing the bottoms from becoming soggy and ensuring they achieve their final crisp-chewy texture. This final cooling stage is essential for their perfect texture and for them to be ready to enjoy or store.
Pro Tips for White Chocolate Chip Cranberry Cookies
- Don’t Overmix the Dough: Once you add the dry ingredients to the wet ingredients, mix only until just combined. Overmixing develops gluten, resulting in tough cookies instead of the desired chewy texture.
- Chill the Dough: For best results, especially if you want thicker cookies that spread less, chill the dough for at least an hour. This firms up the butter and allows the flavors to meld, leading to a superior cookie.
- Use Quality Ingredients: The flavor of your cookies will directly reflect the quality of your ingredients. Opt for good-quality butter, white chocolate, and dried cranberries for the best taste experience.
- Watch the Baking Time Closely: Ovens vary, so keep an eye on your cookies during the last few minutes of baking. They should be golden at the edges and slightly soft in the center when removed to finish setting on the hot baking sheet.
- Room Temperature is Key: Ensure your butter and eggs are at room temperature before starting. This helps them emulsify properly with the sugar, creating a smoother dough and a better cookie texture.
Serving Suggestions for White Chocolate Chip Cranberry Cookies
Decoration
For an extra touch of elegance, consider a simple drizzle of melted white chocolate over the cooled cookies. This adds another layer of sweetness and a beautiful visual appeal, making them look even more gourmet. You can also sprinkle a few extra white chocolate chips or dried cranberries on top of the cookies immediately after they come out of the oven, while they are still soft. This creates a lovely, artisanal finish that enhances both the look and the flavor distribution.
Side Dishes
These cookies are a perfect accompaniment to a warm mug of coffee or tea, offering a sweet contrast to the beverage’s bitterness or warmth. They also pair wonderfully with a cold glass of milk, a classic pairing that is beloved by all ages and adds a creamy smoothness to each bite. For a more decadent treat, serve them warm with a scoop of vanilla bean ice cream, creating an irresistible combination of hot and cold, chewy and melting goodness.
Creative Serving Ideas
Present these cookies on a festive platter during the holidays, perhaps garnished with a few fresh cranberries and sprigs of rosemary for a pop of color and aroma. They make a thoughtful and delicious gift, packaged in decorative tins or boxes tied with a ribbon. For a fun twist, create mini cookie sandwiches by spreading a thin layer of cream cheese frosting or even a dollop of whipped cream between two cooled cookies.
Preparation & Storage
Storing Leftovers
To keep your White Chocolate Chip Cranberry Cookies fresh for as long as possible, store them in an airtight container at room temperature. Ensure that the container is well-sealed to prevent air from drying out the cookies. Properly stored, they should maintain their delicious texture and flavor for up to a week, making them readily available for snacking.
Freezing
If you’ve baked a larger batch or want to have these delightful cookies on hand for future cravings, freezing is an excellent option. First, allow the cookies to cool completely. Then, place them in a single layer on a baking sheet and freeze until they are firm. Once frozen solid, transfer the cookies into a freezer-safe bag or airtight container, separating layers with parchment paper if stacking.
Reheating
For that freshly baked warmth and softness, gently reheat your cookies. A quick 10-15 second zap in the microwave can often do the trick, especially if you prefer a chewier texture. Alternatively, you can place them in a preheated oven at around 300°F (150°C) for a few minutes until warmed through. This method helps to revive their crisp edges and soft centers, making them taste almost as good as when they were first baked.
Frequently Asked Questions
-
Can I make the cookie dough in advance and bake it later?
Absolutely! The cookie dough can be prepared a day or two in advance and stored in the refrigerator. This is an excellent way to get ahead on your baking preparations. Just ensure it’s covered tightly to prevent it from drying out. When you’re ready to bake, you may need to let it sit at room temperature for a few minutes to make it scoopable, or you can bake it directly from the fridge, though it might require a slightly longer baking time due to being colder.
-
What are the best substitutes for dried cranberries and white chocolate chips if I have dietary restrictions or can’t find them?
If you need to avoid dried cranberries, you can substitute them with other dried fruits like dried cherries, blueberries, or even chopped apricots for a different but equally delicious flavor profile. For white chocolate chips, you can opt for milk or dark chocolate chips for a richer taste, or use dairy-free or sugar-free chocolate chips to accommodate specific dietary needs. Consider adding chopped nuts like pecans or walnuts for an alternative texture and flavor boost if you are unable to use chocolate chips.
-
Why are my cookies spreading too much, and how can I prevent this in future batches?
Excessive spreading in cookies is often due to a few common culprits. Using melted butter instead of softened butter is a primary reason, as it doesn’t cream with the sugar to create the necessary structure. Overmixing the dough after adding the flour can also contribute to spreading. Crucially, not chilling the dough adequately before baking is a major factor; chilled dough contains firmer fats that melt more slowly in the oven, controlling the spread. Always ensure your baking sheets are cool before placing new dough balls on them, as hot sheets can cause immediate spreading.