Irresistible Mini Cheesecake Bites That Melt in Your Mouth

As I rummaged through my fridge looking for a sweet escape, I stumbled upon some fresh strawberries that were just begging to be transformed into something delightful. That’s when these No-Bake Strawberry Mini Cheesecakes came to mind—an effortless treat that brings a splash of joy to any occasion without needing to turn on the oven! If you’ve been searching for an easy dessert that can be whipped up in no time, then look no further.
These mini cheesecake bites are perfect for impressing guests or simply treating yourself, and the best part? They can be customized with your favorite toppings! So, ready to dive into a dessert that’s as beautiful as it is delicious? Trust me, your taste buds will thank you!
Why You Will Love This Recipe
- Effortless Preparation: These mini cheesecakes are no-bake, meaning you can achieve that decadent cheesecake flavor without ever preheating your oven.
- Quick Assembly: With just a few simple steps, you can have these delightful treats ready for chilling in under 30 minutes, perfect for spontaneous cravings or last-minute entertaining.
- Customizable Delights: The base recipe is wonderfully adaptable; feel free to swap out the strawberries for other fruits, add different flavorings, or get creative with toppings to suit any preference.
- Perfect Portions: Served in individual mini sizes, these cheesecakes are ideal for portion control and make for an elegant presentation at parties or potlucks.
- Make-Ahead Magic: Prepare these beauties a day in advance, allowing flavors to meld and ensuring you have a ready-to-serve dessert when your guests arrive.
Ingredients You Need
To create these wonderfully easy No-Bake Strawberry Mini Cheesecakes, it’s crucial to use ingredients that are fresh and of good quality. This ensures the best flavor and texture for your delightful dessert. Using ripe strawberries, for instance, will bring out a natural sweetness that complements the creamy filling perfectly.
No-Bake Strawberry Mini Cheesecakes
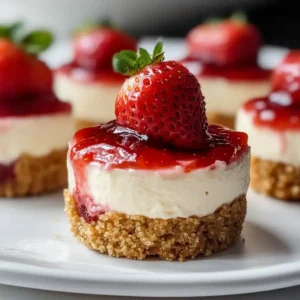
Effortless no-bake strawberry mini cheesecakes that are creamy, delicious, and perfect for any occasion. Easy to make and customizable with your favorite toppings!
- 1 cup Graham Cracker Crumbs
- 5 tablespoons Melted Butter
- 8 oz Cream Cheese, softened
- 0.5 cup Heavy Cream, cold
- 0.5 cup Powdered Sugar
- 1 teaspoon Vanilla Extract
- 1.5 cups Fresh Strawberries, chopped
- 2 tablespoons Strawberry Jam
- 1Combine graham cracker crumbs and melted butter until sandy. Press evenly into dessert cups or a lined muffin tray to form a crust.
- 2Beat softened cream cheese until smooth. Add powdered sugar and vanilla extract, mix well. Gradually add cold heavy cream and beat until light and fluffy.
- 3Spoon the cheesecake filling over the prepared crusts, smoothing the tops.
- 4In a small bowl, combine chopped strawberries with strawberry jam. Stir to coat.
- 5Cover and chill in the refrigerator for 3-4 hours, or until set. Overnight chilling is recommended for the best texture.
Keywords: cheesecake, mini cheesecake, no-bake, strawberry, dessert, easy, simple, party, crowd-pleaser
- graham cracker crumbs: This forms the delicious, crumbly base for our mini cheesecakes, providing a classic texture and flavor that pairs wonderfully with cream cheese.
- melted butter: Essential for binding the graham cracker crumbs together, ensuring the crust holds its shape and doesn’t crumble apart.
- cream cheese: The star of the filling, it needs to be softened to room temperature to achieve a perfectly smooth and lump-free consistency when mixed.
- heavy cream: Whipped to fluffy peaks, this adds lightness and an airy texture to the cheesecake filling, making it incredibly luscious.
- powdered sugar: This sweetens the filling and also contributes to its velvety smooth texture, dissolving easily without any grittiness.
- vanilla extract: A simple yet potent flavor enhancer that rounds out the sweetness and adds a classic cheesecake aroma and taste.
- fresh strawberries: These provide a burst of fresh, fruity flavor and a beautiful pop of color, serving as the perfect topping for our mini cheesecakes.
- strawberry jam: Used to coat the fresh strawberries, this adds an extra layer of intense strawberry flavor and a glossy sheen, elevating the overall presentation.
The specific quantities for each ingredient can be found within the recipe card, ensuring you have exactly what you need for perfect results every time.
Variations
Imagine transforming these delightful mini cheesecakes into a vegan masterpiece. For a dairy-free crust, you could finely chop and mix gluten-free vegan cookies with melted coconut oil, pressing this into your molds. The filling could then be crafted from soaked cashews, blended until super smooth with coconut cream, a touch of maple syrup for sweetness, and a hint of lemon juice for that signature tanginess.
For those following a low-carb lifestyle, the crust can be reimagined using almond flour or finely ground pecans mixed with melted butter and a sugar substitute like erythritol. The filling remains similar, using cream cheese and heavy cream, but sweetened with your preferred keto-friendly sweetener and a touch of vanilla. Top with fresh berries sparingly, or perhaps a sugar-free chocolate drizzle.
Consider a flavor explosion by infusing the filling with other tastes. What about a swirl of raspberry puree for a vibrant pink hue and tartness? Or perhaps a hint of peppermint extract for a festive twist, perfect around the holidays. You could even incorporate finely chopped dark chocolate into the filling for a decadent chocolate cheesecake bite. The possibilities are truly endless, allowing you to tailor these mini treats to any occasion or craving.
How to Prepare No-Bake Strawberry Mini Cheesecakes
Step 1: Prepare the Crust
Begin by gathering your graham cracker crumbs and ensuring they are fine enough for a smooth crust. In a medium mixing bowl, combine the graham cracker crumbs with the melted butter. Stir thoroughly until all the crumbs are evenly moistened, resembling wet sand that clumps together when squeezed. This is a critical step for ensuring your crust holds its form.
Next, take your chosen dessert cups or a muffin tray lined with paper or silicone liners. Spoon the graham cracker mixture into each cup or liner. Use the back of a spoon, a small tamper, or even your fingers to press the crumbs down firmly and evenly. This compaction is essential for creating a sturdy base that won’t break when you add the filling or when serving.
Aim for a crust that is about ¼ to ½ inch thick, providing a satisfying base for the creamy filling. Ensure the sides are also pressed up slightly if you are using muffin liners, creating a small “well” for the filling. The goal is a solid foundation that complements the richness of the cheesecake. Take your time with this step, as a well-formed crust makes all the difference in the final presentation and eating experience of your no-bake strawberry mini cheesecakes.
Step 2: Make the Filling
In a clean, large mixing bowl, add your softened cream cheese. Using an electric mixer, beat the cream cheese on medium speed until it is completely smooth, creamy, and free of any lumps. This usually takes about 2 to 3 minutes. Scrape down the sides of the bowl occasionally to ensure all the cream cheese is incorporated and has a uniform texture. The smoother the cream cheese, the smoother your final filling will be.
Gradually add the powdered sugar and vanilla extract to the beaten cream cheese. Continue to mix on medium speed until these ingredients are thoroughly combined and the mixture becomes even more smooth and slightly lighter in color. Be sure to mix until there are no visible streaks of sugar left, ensuring a consistent sweetness throughout the filling. This gradual incorporation helps prevent the sugar from clumping.
Now, pour in the cold heavy cream. Increase the mixer speed to high and beat the mixture until it becomes light, fluffy, and holds soft peaks. This process can take another 3 to 4 minutes. The heavy cream aerates the filling, giving it that signature light and airy cheesecake texture that melts in your mouth. Avoid overmixing at this stage, as it can cause the filling to become grainy.
Step 3: Assemble the Cheesecakes
With your crusts prepared and your filling beautifully whipped, it’s time to bring them together. Carefully spoon generous amounts of the creamy cheesecake filling over the prepared graham cracker crust in each dessert cup or muffin liner. Fill them to your desired level, ensuring a good ratio of filling to crust for each bite. The creamy texture of the filling should be evident as you spoon it.
Once the filling is in place, use a small offset spatula or the back of a spoon to gently smooth the tops. This creates a clean, appealing surface for your toppings. Aim for an even layer across each mini cheesecake. The goal is an aesthetically pleasing dessert that looks as good as it tastes. Don’t worry if it’s not perfectly smooth; a slight swirl can add character.
The filling should sit snugly atop the crust, creating a cohesive dessert. This step is where the individual nature of the mini cheesecakes really shines, making them perfect for grab-and-go enjoyment or elegant plating. Ensure each mini cheesecake has a substantial layer of filling to truly capture that delightful cheesecake essence. This is the foundation upon which the final strawberry topping will rest, completing the visual appeal.
Step 4: Prepare the Topping
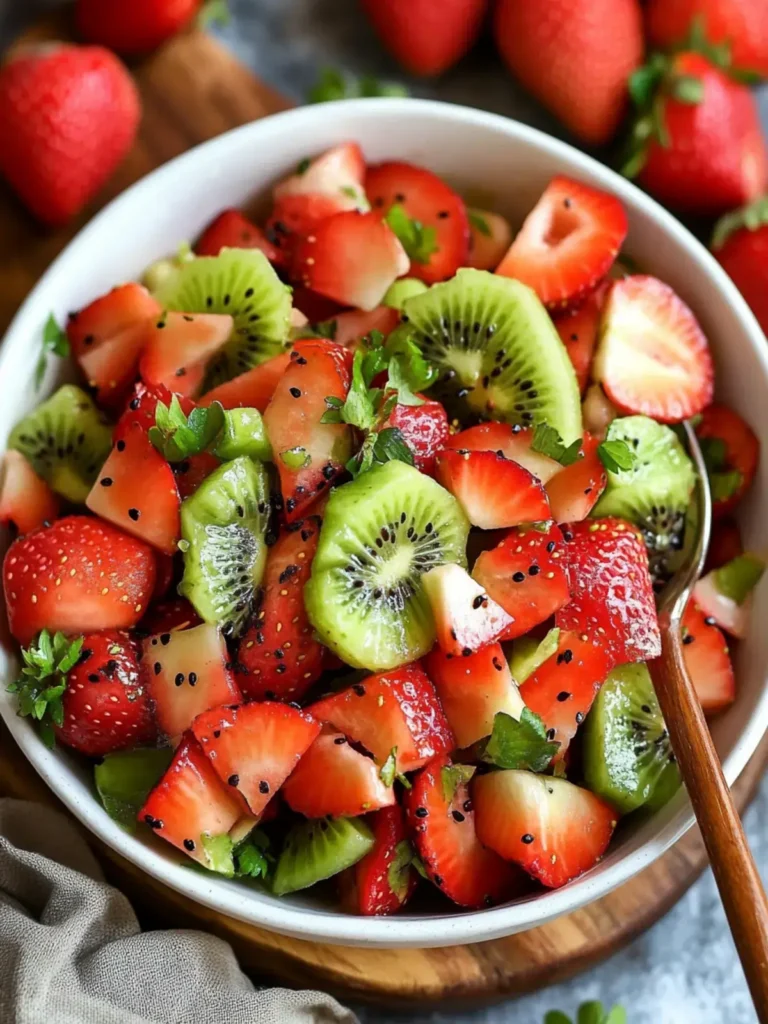
In a separate small bowl, combine your freshly chopped strawberries with the strawberry jam. Gently stir them together until all the strawberry pieces are evenly coated with the jam. This coating not only enhances the strawberry flavor but also gives the topping a lovely glossy finish that looks incredibly appealing.
Take a moment to ensure that each piece of strawberry is well-covered. The jam acts as a binder and intensifies the natural sweetness and fruitiness of the strawberries. This simple combination creates a burst of fresh flavor that beautifully contrasts with the rich, creamy cheesecake filling.
This topping is designed to be vibrant and bursting with fruitiness, offering a delightful textural and flavor contrast. It’s the final touch that makes these no-bake strawberry mini cheesecakes irresistible. The sweetness of the jam combined with the slight tartness of the berries is a perfect harmony for this dessert.
Step 5: Chill and Set
Once your mini cheesecakes are assembled and topped, it’s time for the crucial chilling process. Cover each dessert cup or muffin tray tightly with plastic wrap or place them in an airtight container. This prevents the cheesecakes from absorbing any odors from the refrigerator and helps them set properly.
Place the covered cheesecakes in the refrigerator for at least 3 to 4 hours. This duration allows the cheesecake filling to firm up to the perfect creamy yet set consistency. For the absolute best texture, it is highly recommended to chill them overnight, allowing the flavors to meld together beautifully and the filling to become perfectly smooth and stable.
You will know they are ready when the filling is firm to the touch but still retains a delightful creaminess. This chilling period is essential for no-bake desserts, as it’s what solidifies the ingredients and transforms them into a sliceable or scoopable treat. Patience here will be rewarded with a dessert that is both delightful to look at and incredibly satisfying to eat.
Pro Tips for No-Bake Strawberry Mini Cheesecakes
Cream Cheese Temperature: Always ensure your cream cheese is fully softened to room temperature before you begin. Cold cream cheese will result in a lumpy, uneven filling, no matter how long you whip it. Letting it sit on the counter for about 30-60 minutes should do the trick.
Press the Crust Firmly: Don’t be timid when pressing down the graham cracker crust mixture. A firm press ensures the crust holds together well and won’t crumble apart when you serve your mini cheesecakes. Use the flat bottom of a glass or a measuring cup to get an even, compact layer.
Don’t Overwhip the Cream: While you want your heavy cream to be whipped to soft peaks for a fluffy filling, be careful not to overwhip. Overwhipped cream can turn buttery or grainy, which will negatively affect the texture of your cheesecake filling. Stop as soon as you achieve light, fluffy peaks.
Chill Time is Key: Resist the urge to serve them too early! Adequate chilling time is what allows the fats in the cream cheese and cream to solidify, giving the cheesecakes their structure. At least 4 hours is minimum, but overnight chilling yields the best, most decadent texture.
Flavor Enhancements: For an extra layer of flavor, consider adding a teaspoon of lemon zest to the filling for a bright, citrusy note. You could also experiment with different extracts like almond or lemon, or even a touch of orange zest for a unique twist.
Serving Suggestions for No-Bake Strawberry Mini Cheesecakes
Decoration
For a stunning visual appeal, top each mini cheesecake with a few extra fresh strawberry slices, perhaps fanned out artfully. A delicate dusting of powdered sugar can add an elegant touch, reminiscent of freshly fallen snow. You could also add a few fresh mint leaves for a pop of green and a hint of freshness, which beautifully complements the red strawberries.
Consider a drizzle of chocolate sauce or a caramel sauce over the top for added decadence. If you’ve used a different fruit for the topping, a complementary garnish would be ideal; for instance, a sprig of mint or a sliver of lime zest. The key is to create a look that is as delightful as the flavors within.
Side Dishes
These mini cheesecakes are often enjoyed as a standalone dessert, but they can also be part of a larger dessert spread. They pair wonderfully with other desserts that offer different textures and flavors, such as a light fruit salad or a rich chocolate lava cake. Their individual portions make them easy to incorporate into any dessert buffet.
For a beverage pairing, a crisp sparkling water with a slice of lemon or lime, a chilled glass of iced tea, or even a warm cup of coffee can provide a refreshing balance to the sweetness of the cheesecake. If serving after a meal, they can act as a palate cleanser and a sweet conclusion to a delicious dinner.
Creative Serving Ideas
Arrange these mini cheesecakes on a tiered stand for an impressive dessert display that’s perfect for parties. You could also serve them in small individual clear cups or glasses, allowing guests to see the distinct layers of crust and filling. This presentation adds an elegant touch, making them suitable for more formal gatherings.
For a whimsical touch, especially for children’s parties, consider adding a small edible flower or a tiny candy decoration to each cheesecake. You might also serve them alongside a small bowl of whipped cream for guests to add an extra dollop. They are also an excellent addition to a brunch spread, offering a sweet counterpoint to savory breakfast items, making them versatile enough for any occasion.
Preparation & Storage
Storing Leftovers
To keep your delicious no-bake strawberry mini cheesecakes fresh, store any leftovers in an airtight container in the refrigerator. This prevents them from drying out and maintains their creamy texture. Ensure the lid is securely fastened to keep out air and other refrigerator smells. They are best enjoyed within 2-3 days of preparation.
If you have individual cups, you can simply cover the top of each cup tightly with plastic wrap before placing them in the container. This ensures maximum freshness for each portion. Avoid leaving them at room temperature for extended periods, as the dairy content requires refrigeration to remain safe and maintain its quality.
Freezing
These mini cheesecakes can be frozen for longer storage, but it’s best to do so before adding the fresh strawberry topping. Place the cheesecakes on a baking sheet in a single layer and freeze until solid, which usually takes about 1-2 hours. Once frozen, wrap each individual cheesecake tightly in plastic wrap, then transfer them to a freezer-safe airtight container or a heavy-duty freezer bag.
Frozen cheesecakes can be stored for up to 1 month. Proper wrapping is essential to prevent freezer burn and maintain the best possible texture upon thawing. Make sure to label the container with the date to keep track of freshness.
Reheating
These no-bake mini cheesecakes are designed to be served chilled and do not require reheating. In fact, reheating would compromise their delicate texture and cause the filling to melt or become watery. They are best enjoyed directly from the refrigerator or after thawing from frozen.
If you have frozen your cheesecakes, the best way to enjoy them is to transfer them from the freezer to the refrigerator the night before. Allow them to thaw slowly and completely in the fridge. This method ensures that they retain their ideal creamy consistency. Once thawed, you can add your fresh strawberry topping if you didn’t freeze it with them.
Frequently Asked Questions
-
Can I make the crust with something other than graham crackers?
Absolutely! You can achieve a delightful variety by using crushed digestive biscuits, shortbread cookies, or even chocolate sandwich cookies like Oreos for a richer, chocolatey crust. For a gluten-free option, finely ground almonds, pecans, or a mixture of gluten-free cookie crumbs can work beautifully. Whichever you choose, ensure you bind it well with melted butter or coconut oil so it holds its shape when pressed into the molds.
-
Why is my cheesecake filling not setting properly or still too soft?
Several factors can contribute to a cheesecake filling not setting as firmly as desired. Firstly, ensure you used full-fat cream cheese and heavy cream; lower-fat versions have less fat content, which is crucial for setting. Secondly, the cream cheese must be fully softened to room temperature to incorporate smoothly; cold cream cheese can lead to a lumpy and less stable filling. Thirdly, make sure you didn’t overmix the heavy cream after it reached soft peaks, as this can break down its structure. Finally, adequate chilling time is non-negotiable; allowing the cheesecakes to chill for at least 4 hours, and preferably overnight, is essential for them to firm up properly.
-
How can I ensure my mini cheesecakes are visually appealing and evenly portioned?
For even portions, using a standard-sized muffin tin with liners or dedicated mini cheesecake molds is ideal. Measure your crust mixture consistently for each mold, pressing it down firmly and evenly to create a level base. When adding the filling, use a spoon or a piping bag to distribute it evenly, aiming for the same height in each mini cheesecake. For smoothing the tops, an offset spatula or the back of a small spoon works wonders, creating a neat surface. When adding toppings like fresh fruit or drizzles, aim for consistency across all the mini cheesecakes to create a uniform and attractive presentation.