Homemade Vanilla Bean Frappucino – Easy Starbucks Copycat Recipe!
Craving that creamy, dreamy vanilla bean flavor reminiscent of your favorite coffee shop? This homemade vanilla bean frappuccino recipe brings that delightful experience right to your kitchen, using simple ingredients for an easy and utterly delicious treat.
Forget the long drive-thru lines and high prices; you can whip up this refreshing beverage in mere minutes. It’s perfect for a morning pick-me-up, an afternoon indulgence, or even a sweet dessert to end your day.
Why You Will Love This Recipe
- Quick and Easy Preparation: This delightful drink comes together in under 5 minutes, making it an ideal choice when you need a fast and satisfying treat without any fuss.
- Customizable Sweetness: Adjust the vanilla bean powder or ice cream to perfectly suit your palate, ensuring every sip is exactly how you like it.
- Creamy, Not Icy Texture: Unlike some homemade blended drinks, this recipe achieves a luxuriously smooth and creamy consistency, akin to a thick milkshake.
- Caffeine-Free Option: Enjoy the pure vanilla bean flavor without any caffeine, making it suitable for any time of day or for those sensitive to stimulants.
- Starbucks Copycat Potential: With a simple adjustment, you can replicate the classic Starbucks experience, offering a fantastic at-home alternative to their popular Frappuccino.
Ingredients You Need
Using the freshest and highest quality ingredients will elevate your vanilla bean frappuccino from good to absolutely extraordinary. The richness of real vanilla bean ice cream and the subtle floral notes of authentic vanilla bean powder are key to achieving that signature coffeehouse flavor and aroma. You can find excellent vanilla bean powder online or at specialty spice shops, and choosing a premium vanilla bean ice cream will make a noticeable difference in the final taste.
Vanilla Bean Frappuccino

A delicious and creamy copycat Starbucks Vanilla Bean Frappuccino recipe made at home with simple ingredients. You can make it with vanilla bean ice cream for extra richness or use a homemade Frappuccino base for a more authentic Starbucks-style drink.
- 1 cup whole milk (or 2% milk)
- 2 tablespoons vanilla bean powder (or vanilla powder)
- 1 scoop (about ⅓ cup) vanilla bean ice cream
- 1 cup ice
- whipped cream, for topping
- 1Combine the ingredients: Add the milk, vanilla bean powder, ice cream, and ice to a blender.
- 2Blend: Blend until smooth and creamy.
- 3Serve: Pour into a glass and top with whipped cream. Serve immediately.
Keywords: vanilla bean frappuccino, copycat starbucks, homemade frappuccino, iced drink, dessert drink, vegetarian
These ingredients, when combined, create a perfectly balanced and incredibly satisfying beverage that rivals any made by your favorite barista. Remember that the exact quantities can be fine-tuned to your personal preference, but these are the foundational elements for a truly divine vanilla bean frappuccino experience.
Variations
This vanilla bean frappuccino is wonderful as is, but for those seeking to explore different flavor profiles or dietary needs, a few creative twists can transform it into something entirely new and exciting. These variations ensure there’s a perfect version for everyone, no matter their preferences or restrictions.
Consider a Vegan Delight: For a completely plant-based option, swap the whole milk for a creamy alternative like oat milk or cashew milk. Replace the vanilla bean ice cream with a high-quality vegan vanilla ice cream or a thick, dairy-free yogurt. Ensure your whipped topping is also plant-based for a guilt-free, dairy-free indulgence that maintains that signature creamy texture.
Another exciting avenue is a Low-Carb Sweetness: To reduce the sugar content, opt for an unsweetened almond milk or coconut milk. Use a sugar-free vanilla bean ice cream or a blend of your favorite low-carb sweetener mixed with a touch of vanilla extract and a thickening agent like xanthan gum. This version is ideal for those watching their carbohydrate intake but still craving a decadent, sweet treat.
Finally, think about an Espresso Boost: For those who love a caffeinated kick, adding a shot of espresso is a game-changer. You can blend a cooled shot of espresso directly into the mixture for a mocha-vanilla fusion. Alternatively, pour a fresh, hot shot of espresso over the top of the finished frappuccino, creating a beautiful affogato-style drink that offers a delightful contrast in temperatures and flavors.
How to Prepare vanilla bean frappuccino recipe
Step 1: Gather Your Ingredients and Tools
Before you embark on crafting your homemade vanilla bean frappuccino, the first crucial step is to assemble all the necessary components and ensure you have the right equipment ready. This preparation phase ensures a smooth and efficient blending process, minimizing any potential interruptions once you start mixing.
You will need a high-powered blender, as this is essential for effectively crushing ice and achieving that perfectly smooth, creamy consistency without any gritty ice shards. Make sure your blender is clean and in good working order. Beyond the blender, have your measuring cups and spoons readily accessible to ensure accurate proportions of each ingredient. This precision is key to replicating that signature coffeehouse taste and texture you’re aiming for.
The core ingredients, including your milk of choice (whole milk is recommended for the richest texture, but any milk or dairy-free alternative will work), vanilla bean powder or extract, vanilla bean ice cream (or a suitable substitute for the Starbucks-style version), and ice cubes, should all be measured out and within easy reach of your blender. Having everything prepared beforehand allows you to focus on the blending and serving, making the entire process more enjoyable and less stressful.
Step 2: Combining the Base Ingredients
Once all your ingredients are measured and your blender is prepped, the next step is to carefully add the liquid and solid components into the blender jar. The order in which you add ingredients can sometimes impact the blending efficiency, especially with less powerful blenders, though for most high-powered machines it’s less critical.
Start by pouring your chosen milk into the blender. This liquid base will help the blades catch and begin the blending process smoothly. Following the milk, add the vanilla bean powder or vanilla extract, ensuring it gets distributed evenly from the start. This is where the signature vanilla flavor truly begins to infuse the drink.
Next, add the scoop of vanilla bean ice cream. If you are making the Starbucks-style version without ice cream, you would add your prepared Frappuccino base syrup at this stage. The ice cream contributes significantly to the creaminess and richness of the final beverage, so don’t skimp on this component if you’re using it.
Step 3: Adding the Ice and Blending
With the liquid and creamy elements in place, it’s time to introduce the element that will give your frappuccino its characteristic icy, blended texture. The amount of ice can be adjusted to your preference; more ice will result in a thicker, more frozen drink, while less will yield a lighter, more milkshake-like consistency.
Carefully add the measured cup of ice cubes into the blender, on top of the other ingredients. Ensure the lid of your blender is securely fastened before you begin the blending process. This prevents any accidental splashes and ensures all the ingredients are contained within the blender for optimal mixing.
Begin blending on a low speed to initially break down the ice and combine the ingredients, then gradually increase the speed to high. Blend until the mixture is completely smooth and creamy, with no discernible ice chunks remaining. This typically takes about 30-60 seconds in a high-powered blender, but monitor the consistency to ensure it reaches your desired texture. The goal is a homogeneous, luxuriously thick drink.
Step 4: Achieving the Perfect Texture
The distinction between a mediocre blended drink and an exceptional one often lies in its texture. For a vanilla bean frappuccino, the ideal texture is one that is thick, creamy, and utterly smooth, without any hint of iciness or graininess. Achieving this requires careful attention during the blending stage and the right balance of ingredients.
If your frappuccino appears too thin after the initial blend, don’t despair. You can easily thicken it by adding a few more ice cubes and blending again for a few more seconds. Alternatively, if you have extra vanilla bean ice cream, a small additional scoop can also enhance creaminess and thickness without diluting the flavor. Ensure you are blending until the added ice is fully incorporated and the mixture achieves that desirable thick, pourable consistency.
Conversely, if the mixture is too thick and your blender is struggling, you can add a tablespoon or two of milk at a time and blend again until it reaches a more manageable consistency. The key is to blend incrementally, tasting and adjusting as you go, until you achieve that perfect, velvety texture that is characteristic of a premium, coffeehouse-quality drink. Patience during this stage is rewarded with superior results.
Step 5: Serving and Presentation
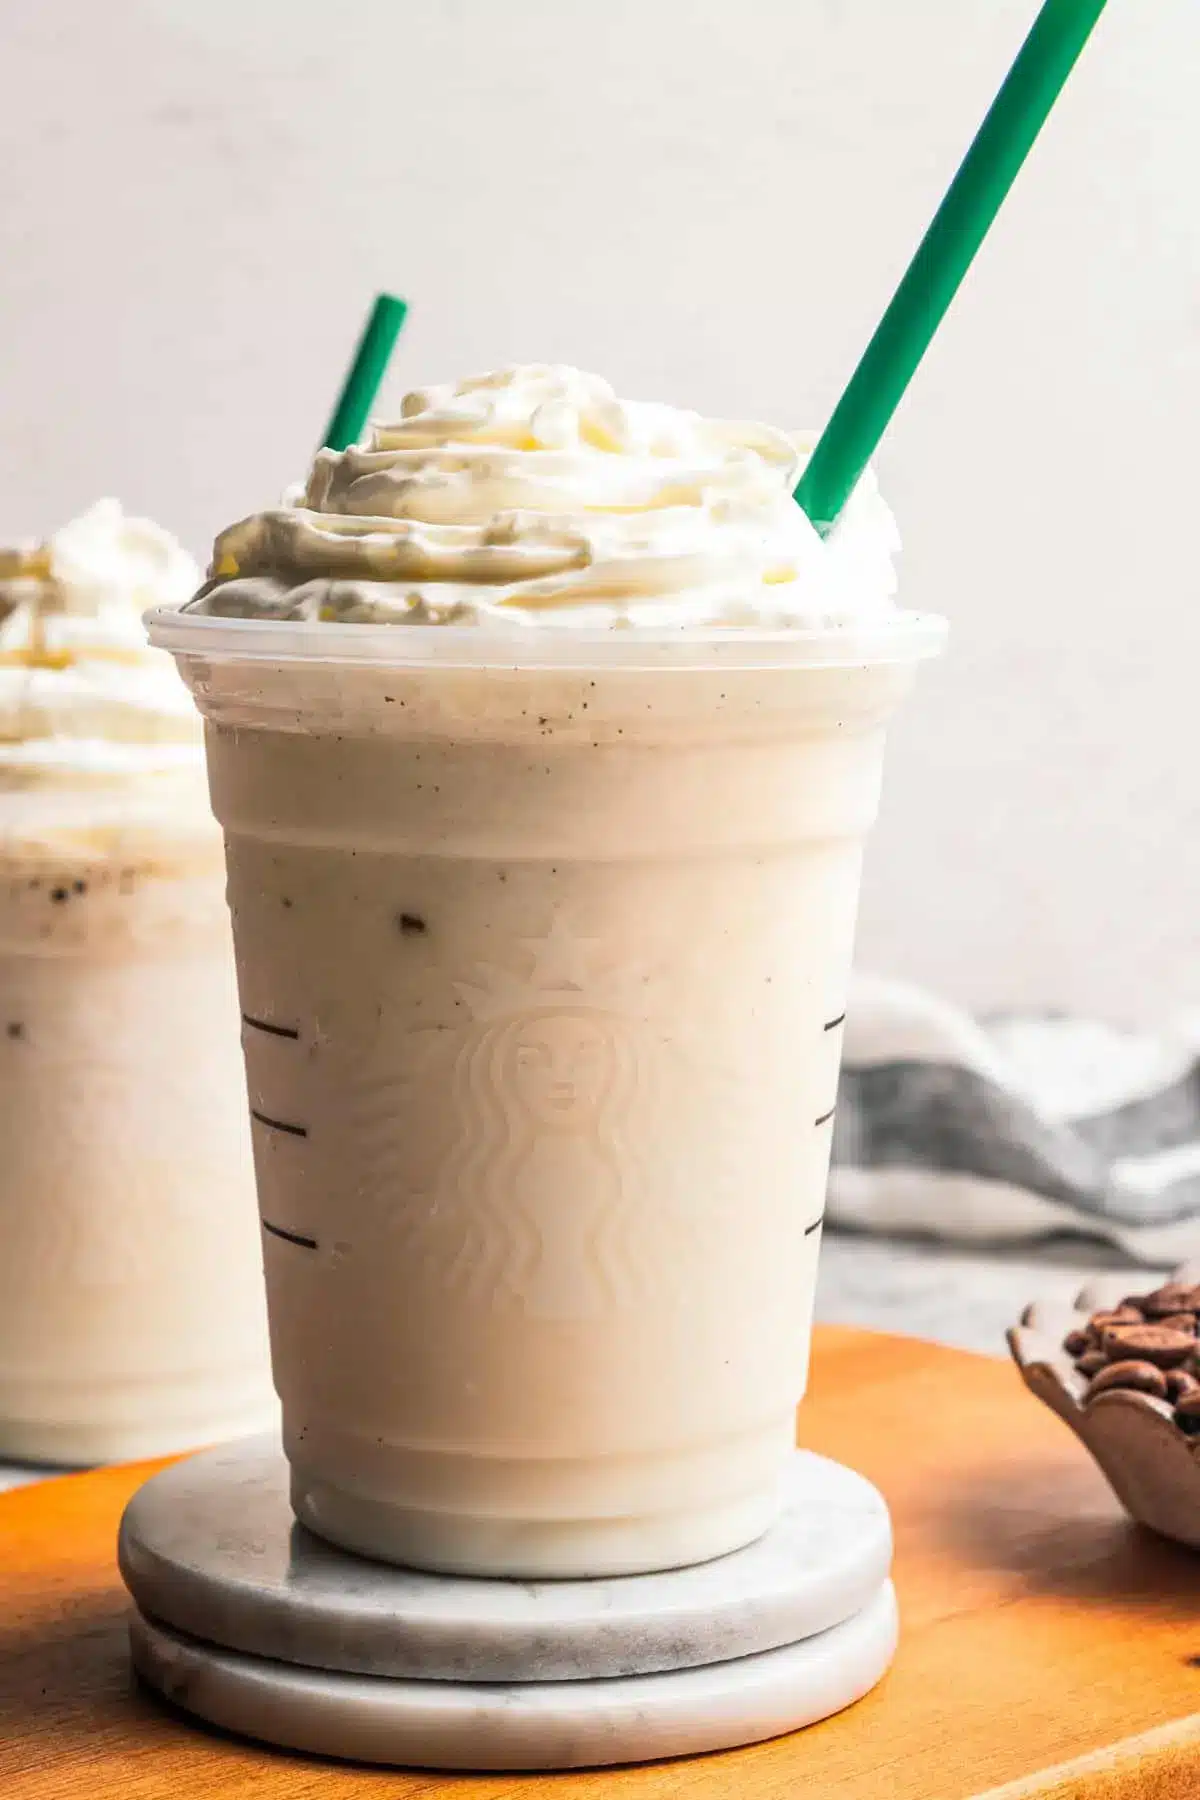
Once your vanilla bean frappuccino has reached its perfect smooth and creamy consistency, it’s time to pour it into your serving glass and add those finishing touches that elevate it from a simple drink to a delightful treat. Presentation is a significant part of the enjoyment, making the experience feel truly special.
Carefully pour the blended frappuccino into a tall, chilled glass. Using a chilled glass helps to keep the drink colder for longer, enhancing the refreshing quality. As you pour, you’ll notice the thick, luxurious texture that you worked so hard to achieve. This is the moment your efforts become visually apparent, promising a delicious reward.
The classic topping for a vanilla bean frappuccino is a generous swirl of whipped cream. If you have homemade whipped cream, even better! You can pipe it artfully or simply spoon a generous dollop on top. For an extra touch of elegance and flavor, consider dusting the whipped cream with a pinch of cinnamon, a sprinkle of vanilla bean powder, or even a few chocolate shavings. Serve immediately with a wide straw for the best sipping experience.
Step 6: Optional Additions and Enhancements
While the base vanilla bean frappuccino is undeniably delicious on its own, there are numerous ways to customize and enhance it further to suit individual tastes and preferences. These optional additions allow you to experiment and create your unique signature blended beverage, making each preparation an opportunity for creative expression.
For those who enjoy a coffee kick, consider adding a shot of cooled espresso directly into the blender during Step 3. This transforms your creamy vanilla drink into a delightful coffeehouse-style blended latte, offering a rich, complex flavor profile. Alternatively, you can pour a freshly brewed shot of hot espresso over the top of the whipped cream, creating a beautiful and flavorful affogato-style finish that offers a delightful contrast of temperatures.
Other exciting enhancements include adding a swirl of caramel sauce inside the glass before pouring the frappuccino, or blending in a tablespoon of cookie crumbs for added texture and flavor. A drizzle of chocolate syrup or a sprinkle of edible glitter can also add a festive touch. Feel free to experiment with different extracts like almond or hazelnut to create unique flavor fusions. The possibilities are truly endless, limited only by your imagination and culinary adventurousness.
Pro Tips for vanilla bean frappuccino recipe
To ensure your homemade vanilla bean frappuccino is consistently delicious and perfectly textured, a few expert tips can make all the difference. These insights are born from experience and aim to help you achieve that coveted coffeehouse quality with ease.
Use High-Quality Vanilla: The “vanilla bean” in the name is crucial. While vanilla extract works, using genuine vanilla bean powder or even scraping the seeds from a vanilla bean pod will provide a far more authentic and nuanced flavor. Look for products that clearly state “vanilla bean” rather than just “vanilla flavor” for the best results.
Chill Your Glass: A simple step that significantly enhances the experience. Place your serving glass in the freezer for at least 15-20 minutes before you start blending. This keeps your frappuccino colder for longer, preventing it from becoming watery too quickly and maintaining that refreshing chill from the first sip to the last.
Adjust Ice Level for Texture: The amount of ice is your primary control for thickness. If you prefer a very thick, almost spoonable consistency, use slightly more ice. For a thinner, more drinkable consistency akin to a milkshake, reduce the ice. Always err on the side of slightly less ice initially; you can always add more if needed, but it’s harder to fix an overly icy drink.
The Frappuccino Base Hack: If you’re aiming for the exact Starbucks texture without using ice cream, the key is a homemade Frappuccino base. This typically involves blending water, sugar, and xanthan gum. Xanthan gum is a natural thickener that creates that signature smooth, emulsified texture. A small amount goes a long way, so use it sparingly to avoid an overly gummy consistency. You can often find xanthan gum in the baking aisle of well-stocked grocery stores or online.
Don’t Over-Blend: While you need to blend enough to crush the ice and emulsify the ingredients, over-blending can sometimes melt the ice too much and make the drink watery. Blend until smooth, but avoid prolonged blending cycles once the desired consistency is reached. Listen to your blender; when the mixture starts to flow smoothly and evenly, it’s usually ready.
Serving Suggestions for vanilla bean frappuccino recipe
Decoration
The visual appeal of a vanilla bean frappuccino is just as important as its taste and texture. Thoughtful decoration transforms a simple blended drink into an appealing, indulgent treat that looks as good as it tastes. Start with a generous swirl of whipped cream on top, making sure it’s light and airy for the best presentation.
For an extra touch of gourmet flair, dust the whipped cream with a fine layer of vanilla bean powder or a sprinkle of finely grated white chocolate. A drizzle of caramel sauce in a zig-zag pattern over the whipped cream adds both visual interest and another layer of flavor. Consider adding a maraschino cherry on top for a pop of color, reminiscent of classic diner milkshakes.
If you’re feeling particularly creative, you can even rim the glass with crushed graham crackers or cookie crumbs before pouring the frappuccino. This adds a delightful crunch and visual texture. Some people also enjoy adding edible glitter or edible gold stars for a truly celebratory and whimsical presentation. These decorative elements make your homemade frappuccino feel like a special occasion.
Side Dishes
While a vanilla bean frappuccino is a decadent treat on its own, pairing it with complementary side dishes can elevate the experience into a complete dessert or a delightful afternoon tea. The key is to choose items that either echo the vanilla flavor or provide a contrasting element that enhances the overall enjoyment.
Consider serving your frappuccino alongside a slice of light and zesty lemon bread or a moist vanilla pound cake. These baked goods offer a slightly more substantial treat and their citrus or pure vanilla notes beautifully complement the creamy sweetness of the drink. Homemade berry tart or some delicate shortbread cookies would also be wonderful choices, offering a contrast in textures and flavors.
For a simpler pairing, a small bowl of fresh berries like strawberries, raspberries, or blueberries provides a refreshing, palate-cleansing element. The tartness of the berries cuts through the richness of the frappuccino, creating a balanced flavor profile. Alternatively, a few funfetti cookies can add a playful touch, especially if serving to children or for a festive gathering.
Creative Serving Ideas
Move beyond the standard glass and straw to unlock even more enjoyment from your vanilla bean frappuccino. Creative serving ideas can make this delightful drink suitable for a wider range of occasions, from casual gatherings to more formal dessert settings. Think about how you can make the serving experience as memorable as the drink itself.
For a party or a special brunch, consider serving individual frappuccinos in mason jars, adorned with striped paper straws and a small tag for personalization. You could also present them in clear, stemless wine glasses for a more sophisticated dessert course, perhaps with a tiny biscotti perched on the rim. This adds an element of elegance to the presentation.
Another fun idea is to create a “build-your-own” frappuccino bar. Set out the base frappuccino and offer a variety of toppings like different flavored syrups, sprinkles, crushed cookies, whipped cream, and cherries. Guests can then customize their drinks to their heart’s content. This interactive approach is always a hit and encourages guests to engage with their food and drinks.
Preparation & Storage
Storing Leftovers
A fresh vanilla bean frappuccino is at its absolute peak of flavor and texture. Because it contains ice and dairy (or dairy alternatives), it doesn’t store particularly well over extended periods. If you find yourself with a bit left over, the best approach is to consume it as soon as possible.
Ideally, you should aim to make only what you can consume in one sitting. If you anticipate having extra, consider halving the recipe from the start. However, if you do have leftovers, pour them into an airtight container and store them in the refrigerator. Be aware that the texture will change; it will become more melted and less frothy.
Do not attempt to refreeze a melted frappuccino, as this will result in a watery, icy mess that won’t resemble the original creamy beverage. For the best results, enjoy your homemade frappuccino fresh from the blender.
Freezing
Freezing a prepared vanilla bean frappuccino is generally not recommended for optimal results. The nature of the blended ice means that once thawed, the drink loses its smooth, creamy consistency and tends to become watery and separated. Unlike a solid frozen dessert, a frappuccino is meant to be consumed immediately after blending.
If you wish to prepare a portion of the ingredients ahead of time, you can pre-portion the dry ingredients and ice into freezer-safe bags. Then, when you’re ready to make a frappuccino, simply add the milk and ice cream (or base) to the blender along with the pre-portioned frozen mix. This ensures you can still make a fresh drink quickly, but it’s not quite the same as freezing the final product.
The beauty of this drink lies in its immediate preparation and consumption, capturing the perfect balance of chill and creaminess that is lost with freezing and thawing. For the best experience, always blend your frappuccino right before you plan to enjoy it, making it a delightful ritual rather than a make-ahead item.
Reheating
Reheating a vanilla bean frappuccino is not a suitable or recommended method for enjoying this beverage. Frappuccinos are designed to be served cold and are made from frozen ingredients, primarily ice and ice cream. The process of blending them creates a specific, chilled texture that is lost upon warming.
Attempting to reheat a frappuccino, whether by microwaving or stovetop, would essentially melt all the frozen components, turning it into a sweet, milky vanilla liquid. This would completely alter the texture and eliminate the refreshing, icy quality that makes a frappuccino so appealing, especially on a warm day. It would no longer be a frappuccino but simply a chilled vanilla drink.
If you have leftovers, as mentioned previously, they are best consumed chilled from the refrigerator, understanding that the texture will have changed. For a warm beverage, you would be better off preparing a hot vanilla latte or a steamed vanilla milk. The concept of “reheating” a frappuccino defeats its very purpose as a cold, blended treat.
Frequently Asked Questions
-
Can I make this vanilla bean frappuccino recipe vegan?
Absolutely! To make this recipe vegan, you’ll need to make a few simple substitutions. Replace the whole milk with your favorite non-dairy milk, such as oat milk, almond milk, or soy milk, for a creamy base. For the vanilla bean ice cream, opt for a high-quality vegan vanilla ice cream or a thick, dairy-free vanilla yogurt. Ensure your whipped cream topping is also plant-based, and you’ll have a delicious vegan vanilla bean frappuccino that is just as satisfying.
-
How can I achieve the authentic Starbucks-style texture without using ice cream?
Starbucks uses a specific Frappuccino base syrup to achieve its signature thick, creamy, and emulsified texture without relying on ice cream. You can replicate this at home by preparing your own base. A common method involves blending 1 cup of water with 1 cup of sugar and 1 teaspoon of xanthan gum until smooth. Use approximately ¼ cup of this homemade syrup in place of the vanilla bean ice cream called for in this recipe. This xanthan gum-based syrup will provide that smooth, non-icy consistency characteristic of their blended beverages.
-
Is it possible to make this vanilla bean frappuccino caffeine-free, and if so, how?
Yes, the recipe as written is naturally caffeine-free, which is one of its many appealing qualities! This version relies on vanilla bean ice cream and vanilla bean powder for its flavor, neither of which contains caffeine. It’s perfect for enjoying any time of day without worrying about stimulating effects. If you prefer a caffeinated version, you can easily add a shot of cooled espresso or a shot of hot espresso poured over the top like an affogato. But for a purely vanilla bean experience without caffeine, this recipe is ideal.