Delicious Kiwi Sorbet: A Refreshing Homemade Treat

As I was slicing into a perfectly ripe kiwi, the vibrant green flesh caught the light, and I couldn’t help but think of warm summer days and the sheer joy of a refreshing dessert. This Kiwi Sorbet isn’t just a treat; it’s a simple tropical delight that’s incredibly easy to whip up in your kitchen.
With its delightful balance of sweetness and tang, this dessert offers a cooling sensation perfect for hot afternoons or festive gatherings. Plus, it’s a guilt-free, low-calorie option loaded with vitamin C that’s sure to impress your friends and family. Curious to uncover the magic behind this delectable sorbet? Let’s dive into the recipe!
Why You Will Love This Recipe
- Effortless Preparation: This sorbet comes together with just a few simple steps, making it an ideal recipe for home cooks of all skill levels. You’ll be enjoying a delightful frozen treat in no time at all.
- Vibrant Tropical Flavor: Each spoonful bursts with the refreshing, tangy-sweet essence of ripe kiwis, transporting your taste buds to a sunny paradise. It’s a true celebration of natural fruit flavors.
- Health-Conscious Indulgence: Packed with vitamin C from the kiwis, this sorbet is a fantastic way to satisfy your sweet cravings guilt-free. It’s a delicious dessert that aligns with healthier eating habits.
- Remarkable Versatility: Enjoy this sorbet on its own as a palate cleanser or a standalone dessert. It also serves beautifully as an accompaniment to various cakes and pastries, enhancing any dessert spread.
- Quick Assembly: With minimal ingredients and a straightforward process, you can create this delightful sorbet without spending hours in the kitchen. It’s perfect for those spontaneous dessert cravings or when entertaining guests unexpectedly.
Ingredients You Need
Crafting this delightful Kiwi Sorbet relies on a few key, high-quality ingredients to ensure the best possible flavor and texture. The star of the show, the kiwi, should be at its peak ripeness, offering a natural sweetness and vibrant color. Selecting good quality sugar, fresh lemon juice, and pure water will allow the kiwi’s unique taste to truly shine through. Remember, the foundation of any great dessert lies in the simplicity and quality of its components.
Kiwi Sorbet
This Kiwi Sorbet is a simple tropical delight that’s incredibly easy to whip up in your kitchen. With its delightful balance of sweetness and tang, this dessert offers a cooling sensation perfect for hot afternoons or festive gatherings. Plus, it’s a guilt-free, low-calorie option loaded with vitamin C that’s sure to impress your friends and family.
- 3-4 pieces Kiwi (ripe, soft)
- 1 tablespoon Lemon Juice (fresh-squeezed)
- 1Peel and chop 3 to 4 ripe kiwis into small pieces.
- 2In a blender, combine the chopped kiwis with ¾ cup of sugar, the juice of 1 lemon, and ½ cup of water. Pulse until the mixture becomes completely smooth.
- 3Pour the smooth kiwi mixture into a shallow dish, spreading it evenly throughout. Place the dish in the freezer and let it freeze for about 4 to 5 hours or until solid. Stir gently with a fork every couple of hours to prevent ice crystals.
- 4Once fully frozen, use a fork to scrape the kiwi sorbet, creating a fluffy and light texture. Serve immediately.
Keywords: kiwi, sorbet, dessert, refreshing, tropical, healthy, vitamin C
- ripe, soft kiwi: the foundation of our sorbet, providing natural sweetness and a beautiful green hue.
- sugar: balances the tartness of the kiwi, ensuring a perfectly sweet and refreshing flavor profile.
- fresh-squeezed lemon juice: adds a bright, zesty counterpoint that elevates the kiwi’s tropical notes.
- water: helps to create the perfect smooth consistency for freezing.
You can find the precise quantities for each ingredient within the accompanying recipe card, ensuring your sorbet turns out just right.
Variations
To truly make this dessert your own, consider these exciting variations that cater to different dietary preferences and flavor profiles. The inherent simplicity of the kiwi sorbet base makes it a perfect canvas for culinary creativity, allowing you to tailor it to your specific tastes and needs with ease and confidence. Experimenting with these ideas can lead to delightful new creations that are both unique and incredibly satisfying.
For a delightful vegan twist, simply substitute the granulated sugar with an equal amount of agave nectar or maple syrup. These natural sweeteners not only provide the necessary sweetness but also add a subtle depth of flavor that complements the kiwi beautifully. Ensure the chosen sweetener is liquid or easily dissolved to maintain the smooth texture of the sorbet. This modification ensures that everyone can enjoy this refreshing treat, regardless of dietary choices.
If you’re aiming for a low-carb option, consider using a sugar substitute like erythritol or stevia. You might need to adjust the amount slightly, as the sweetness intensity can vary between different substitutes. Taste the mixture frequently as you add the sweetener to achieve your desired level of sweetness without compromising the delightful kiwi flavor. This adaptation makes the sorbet accessible for those managing their sugar intake.
Another fantastic variation involves infusing the sorbet with complementary flavors. Try adding a handful of fresh mint leaves or a small piece of fresh ginger to the blender along with the kiwi. These additions bring a wonderful layer of complexity – mint offers a cooling freshness, while ginger provides a gentle, warming spice that contrasts beautifully with the sorbet’s icy nature. Both can be easily blended into the kiwi puree for an integrated flavor experience.
How to Prepare Kiwi Sorbet
Step 1: Preparing the Kiwis for Blending
Begin by gathering your ripe kiwis; ideally, you should aim for three to four medium-sized fruits. The riper the kiwi, the sweeter and more flavorful your sorbet will be, so select fruits that yield gently to pressure. Using a sharp paring knife, carefully peel away the fuzzy skin from each kiwi. It’s best to work on a stable cutting board to ensure safety and efficiency during this initial preparation stage.
Once peeled, slice the kiwis into smaller, manageable pieces. Aim for roughly quarter-inch to half-inch chunks. This size is optimal for ensuring that the kiwis blend smoothly and quickly in your blender. The goal here is to break down the fruit effectively, making it easier to achieve a completely smooth puree in the next step. Discard any overly soft or bruised parts, focusing on the vibrant green flesh.
As you prepare the kiwi pieces, take a moment to appreciate their vibrant green color and subtle, fresh aroma. This visual and olfactory preview is a promise of the delightful, refreshing taste that awaits. Set these prepared kiwi chunks aside in a bowl, ready to be combined with the other essential ingredients for your sorbet base.
Step 2: Creating the Smooth Kiwi Puree
Now, it’s time to bring all the main components together in your blender. Carefully add the chopped kiwi pieces into the blender jar. Following this, measure out your sugar; the recipe typically calls for about three-quarters of a cup, but you can adjust this slightly based on the natural sweetness of your kiwis and your personal preference. If you find your kiwis exceptionally sweet, you might lean towards slightly less sugar.
Next, pour in the fresh-squeezed lemon juice; one tablespoon is usually sufficient to provide that crucial bright, tangy note. The lemon juice is vital for cutting through the sweetness and enhancing the overall flavor profile of the kiwi. Finally, add half a cup of cold water. This liquid helps the blender process the ingredients efficiently and contributes to the final smooth consistency of the sorbet mixture.
Secure the lid on your blender and begin to process the mixture. Start on a low speed, gradually increasing to high. Blend for approximately 30 to 60 seconds, or until the mixture is entirely smooth and homogenous, with no visible chunks of kiwi remaining. You should have a vibrant, uniformly green puree. Pause to taste a small amount and adjust the sweetness or tartness if necessary before proceeding to the freezing stage.
Step 3: The Freezing Process
Once you have achieved a perfectly smooth kiwi puree, it’s time to begin the crucial freezing process. Select a shallow, freezer-safe dish or container. A metal or glass dish often works best as it conducts cold more efficiently, speeding up the freezing time. Pour the entire contents of the blender into this shallow dish.
Spread the kiwi mixture evenly across the bottom of the dish using a spatula or spoon. This even distribution ensures that the sorbet freezes uniformly and facilitates easier scraping later on. Aim for a layer that is no more than one to one-and-a-half inches thick. This relatively thin layer will allow the sorbet to freeze more quickly and consistently.
Carefully place the dish into the coldest part of your freezer. Allow it to freeze for an initial period of about two hours. After this initial freezing period, it is critical to stir the mixture. Use a fork to scrape and break up any ice crystals that have begun to form, especially around the edges. This stirring action is essential for achieving a creamy, smooth sorbet texture rather than a solid block of ice. Repeat this stirring process every hour or so for the next two to three hours, until the sorbet is firm and has reached your desired consistency, typically taking around four to five hours in total for complete freezing.
Step 4: Achieving the Perfect Sorbet Texture
After the sorbet has frozen for the recommended duration and has become firm to the touch, it’s time to transform it into the delightful, fluffy sorbet we all know and love. Remove the frozen kiwi mixture from the freezer.
Using a fork, begin to scrape the surface of the frozen sorbet. Work your way through the entire dish, breaking up any larger frozen chunks and incorporating them into a lighter, fluffier texture. This scraping motion aerates the sorbet and ensures a wonderfully light and scoopable consistency, preventing it from becoming too dense or icy. It’s similar to how you might prepare shaved ice, but on a sorbet scale.
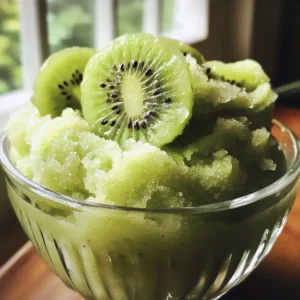
Once you have scraped the entire dish to achieve the desired fluffy texture, the kiwi sorbet is ready to be served. Scoop the sorbet into chilled bowls or glasses immediately. The vibrant green color is visually appealing, and the refreshing aroma is inviting. For an extra touch of elegance and visual appeal, consider garnishing your sorbet with a fresh slice of kiwi, a sprig of mint, or even a few edible flowers. This final flourish can elevate a simple homemade treat into a restaurant-quality presentation that will impress your guests and enhance the overall dining experience.
Step 5: Taste and Adjust Sweetness
Before embarking on the freezing journey, a crucial step is to taste the kiwi puree mixture. This is your prime opportunity to ensure the sorbet will have the perfect balance of sweetness and tartness. Use a clean spoon to sample a small amount of the blended ingredients.
Consider the natural sweetness of the kiwis you used. If they were particularly ripe and sweet, you might find that the current amount of sugar is just right. However, if the kiwis were on the tarter side, or if you generally prefer a sweeter dessert, this is the moment to add a little more sugar. Gradually add more sugar, a tablespoon at a time, blending briefly after each addition until you reach your desired taste. Remember that freezing can slightly mute flavors, so aim for a taste that is just a touch sweeter than you might ideally want it.
Similarly, assess the tartness. If you desire a brighter, more zesty flavor, you can add a tiny bit more lemon juice. Be cautious with additional lemon juice, as too much can overpower the kiwi flavor. This iterative tasting and adjusting process ensures that the final sorbet will be perfectly calibrated to your palate, making it a truly personalized and delicious treat.
Step 6: Enhancing Creaminess with Stirring
The process of achieving a smooth, creamy sorbet texture, rather than one dominated by large ice crystals, hinges on a technique called “churning” or, in this home-kitchen context, regular stirring. After the initial few hours of freezing, the mixture will start to solidify around the edges.
At this stage, take the dish out of the freezer and use a sturdy fork or a whisk to thoroughly break up any ice crystals that have formed. Scrape down the sides and bottom of the dish, incorporating the frozen parts into the still-liquid center. This action is vital because it prevents the water molecules from forming large, unpleasant ice crystals, instead encouraging the formation of smaller, finer ones that contribute to a smoother mouthfeel.
Continue this process every 45-60 minutes for the next 2-3 hours. As the sorbet becomes more solid, this stirring will become more vigorous. The goal is to incorporate air and disrupt ice crystal formation repeatedly until the sorbet is firm throughout but still has that desirable creamy consistency. This consistent attention during the freezing phase is the secret to superior homemade sorbet texture, making it well worth the effort.
Pro Tips for Kiwi Sorbet
Elevate your homemade Kiwi Sorbet from good to absolutely exceptional with these expert tips. These little adjustments can make a significant difference in the final texture, flavor, and overall enjoyment of your frozen treat. They are designed to help you overcome common sorbet-making challenges and achieve a professional-quality result right in your own kitchen.
Select the Ripest Kiwis: The key to a naturally sweet and intensely flavorful sorbet lies in the quality of your kiwis. Always opt for kiwis that are soft to the touch and have a fragrant aroma. Underripe kiwis will result in a tart and less satisfying sorbet, even with added sugar. Conversely, overripe kiwis might have a slightly mushy texture or unpleasant brown spots that you’ll want to avoid.
Sweetness Adjustment is Key: Don’t skip the tasting step before freezing! The sweetness of kiwis can vary significantly. Taste the blended mixture and adjust the sugar content to your preference. Remember that cold temperatures tend to dull sweetness, so make sure it tastes slightly sweeter than you think it needs to be. This ensures the final sorbet hits the perfect sweet spot.
Combat Ice Crystals Diligently: The enemy of smooth sorbet is large ice crystals. To combat this, stir the sorbet vigorously every hour or so during the freezing process. This breaks up nascent crystals and incorporates air, leading to a creamier texture. If you have an ice cream maker, this is the perfect recipe to use it for its churning function.
Serve at the Right Temperature: For the best texture and ease of scooping, allow the sorbet to soften slightly before serving. Take it out of the freezer about 5-10 minutes before you plan to serve it. This brief resting period at room temperature makes it much easier to scoop and enhances its melt-in-your-mouth quality.
Garnish for Presentation: A little visual flair goes a long way. Garnish your Kiwi Sorbet with fresh kiwi slices, a sprig of fresh mint, or even a delicate edible flower. This not only makes the dessert more appealing but also hints at the fresh, natural ingredients used, enhancing the overall sensory experience.
Serving Suggestions for Kiwi Sorbet
Decoration
To make your Kiwi Sorbet visually as delightful as it is to eat, consider a few simple yet effective decorative touches. Freshness is key, so think about complementing the sorbet’s vibrant green hue with other colors and textures. A thin slice of fresh kiwi, artfully placed on the rim of the serving bowl or atop the sorbet, immediately signals the main flavor. A small sprig of fresh mint can add a pop of contrasting green and an inviting aroma, hinting at the cool, refreshing nature of the dessert.
For a more sophisticated presentation, a light dusting of finely grated lime or lemon zest can add visual interest and a hint of citrus aroma. Edible flowers, such as violas or pansies, offer a delicate and colorful flourish that can transform a simple sorbet into a gourmet creation. If you’re serving a larger portion or creating a dessert platter, a drizzle of a complementary sauce, like a light raspberry coulis or a simple syrup infused with vanilla, can add another layer of visual appeal and flavor complexity.
Side Dishes
Kiwi Sorbet serves beautifully as a palate cleanser or a light, refreshing end to a meal, and it pairs wonderfully with a variety of side dishes. Its tangy sweetness makes it an excellent counterpoint to richer desserts, helping to balance out heavier flavors. Consider serving it alongside a slice of light, airy angel food cake or a delicate berry tart, where the sorbet cuts through the sweetness and richness.
For a more substantial dessert experience, the sorbet can be paired with subtly flavored baked goods. Thin, crisp cookies, such as shortbread or biscotti, offer a delightful textural contrast. A small portion of a creamy panna cotta or a very light crème brûlée can also be an elegant pairing, with the sorbet providing a refreshing acidic balance. Avoid overly rich or intensely flavored baked goods that might compete with or overpower the sorbet’s delicate kiwi notes.
Creative Serving Ideas
Move beyond the basic bowl with these creative serving ideas that will make your Kiwi Sorbet truly memorable. For a fun, family-friendly option, freeze the sorbet mixture in popsicle molds to create refreshing kiwi sorbet pops, perfect for a warm day or a party treat. This is especially popular with children and makes for easy, mess-free enjoyment.
Another delightful presentation is a layered sorbet parfait. Alternate scoops of kiwi sorbet with layers of other complementary sorbets, such as coconut, lime, or even a vibrant berry sorbet, in a tall glass. You can also add layers of fresh fruit, whipped cream, or a light granola for added texture and flavor. For an adult twist, serve a scoop of kiwi sorbet in a champagne flute and top it with a splash of chilled Prosecco or champagne for a sophisticated dessert cocktail that is both elegant and refreshing.
Preparation & Storage
Storing Leftovers
Should you be fortunate enough to have any leftover Kiwi Sorbet, proper storage is key to maintaining its delightful texture and flavor. Transfer any remaining sorbet into an airtight container. This prevents the sorbet from absorbing any odors from the freezer and, more importantly, minimizes exposure to air, which can lead to freezer burn.
Before sealing the container, press a piece of plastic wrap directly onto the surface of the sorbet. This creates an additional barrier against air and moisture. While it can be stored in the refrigerator for a very short period, sorbet is best kept in the freezer. When you’re ready to enjoy the leftovers, you might need to re-scrape the surface with a fork to restore some of its original fluffy texture before scooping and serving. It’s best consumed within a few days for optimal quality.
Freezing
For longer-term storage of your delicious Kiwi Sorbet, the freezer is your best friend. Ensure the sorbet is completely frozen and has achieved a firm consistency before transferring it to its long-term storage container. As mentioned, an airtight container is crucial for this purpose. Again, pressing plastic wrap directly onto the sorbet’s surface before sealing the lid is a highly recommended step to prevent ice crystal formation and maintain the best possible texture.
When stored correctly in the freezer, Kiwi Sorbet can retain its quality for up to a week. However, for the absolute best eating experience, it is advisable to consume it within the first 3 to 4 days. While it might remain safe to eat for longer, the texture can gradually degrade over time, becoming icier. Proper sealing and storing in the coldest part of your freezer will help to prolong its enjoyable lifespan.
Reheating
The term “reheating” isn’t quite accurate for sorbet, as it’s meant to be served frozen. However, if your Kiwi Sorbet has become excessively hard or difficult to scoop after prolonged freezing, a gentle softening period is required. Simply remove the container from the freezer and let it sit at room temperature for about 5 to 10 minutes.
This brief period allows the sorbet to soften just enough to be easily scooped without melting completely. Avoid leaving it out for too long, as it will quickly turn into a liquid. If it softens too much, you can always pop it back into the freezer for a short while to firm it up again. This “reheating” process is more about achieving the ideal scooping consistency than actual warming.
Frequently Asked Questions
-
What are the best kiwis for making Kiwi Sorbet?
For the most flavorful and naturally sweet Kiwi Sorbet, it’s essential to select ripe, soft kiwis. You can tell a kiwi is ripe when it yields slightly to gentle pressure, similar to how you’d check an avocado or peach. Avoid kiwis that are rock hard, as they will be too tart and difficult to blend smoothly, even with added sugar. Also, steer clear of kiwis with significant dark spots or wrinkles, as these may indicate they are overripe and past their prime for a vibrant sorbet.
-
How do I store leftovers of Kiwi Sorbet?
To store leftover Kiwi Sorbet and preserve its delightful texture, transfer it into an airtight container. It’s highly recommended to press a layer of plastic wrap directly onto the surface of the sorbet before sealing the container. This helps to minimize air exposure and prevent the formation of ice crystals, which can lead to a less creamy consistency. Store the container in the coldest part of your freezer. While it can last for about a week, for the best taste and texture, aim to consume it within 3 to 4 days of storage. Upon retrieval, you may need to re-scrape the top layer with a fork to revive its fluffy texture.
-
Can I freeze Kiwi Sorbet for longer periods?
Yes, you can certainly freeze your Kiwi Sorbet for extended periods, but it requires careful attention to packaging to maintain quality. For storage beyond a week, ensure it is in a truly airtight container, and again, pressing plastic wrap directly onto the surface before sealing is crucial. In this scenario, the sorbet can potentially last for up to 3 months. However, be aware that the texture might become somewhat icier over such a long duration compared to shorter storage periods. When you decide to enjoy it after extended freezing, allow it to sit at room temperature for about 5-10 minutes to soften slightly before attempting to scoop it, which makes it more manageable and enjoyable.
-
What should I do if my Kiwi Sorbet is too icy?
If your Kiwi Sorbet has turned out too icy, it’s often due to insufficient stirring during the freezing process or a high water content. To rectify this, you can try letting the sorbet sit at room temperature for 5-10 minutes to soften it slightly, then vigorously re-scrape it with a fork to break up the ice crystals and incorporate more air, which can improve the texture. For a more thorough fix, you could even briefly blend the softened sorbet again before refreezing, ensuring to stir it more frequently during the subsequent freezing period. Using very ripe kiwis also helps due to their natural sugars, which can lower the freezing point slightly and contribute to a smoother texture.
-
Is this Kiwi Sorbet suitable for children and those with allergies?
This Kiwi Sorbet is generally very suitable for children and individuals with common allergies, as its core ingredients are simple fruits, sugar, and lemon. It is naturally free from dairy and gluten, making it a safe option for many. However, it’s important to note that some individuals can have allergic reactions to kiwis themselves, though this is less common. Always consider any specific dietary restrictions or known sensitivities of your guests. If you are making it for someone with very severe or unusual allergies, a small taste test first is always a prudent step to ensure there are no adverse reactions to the kiwi.
-
Can I substitute any ingredients in the Kiwi Sorbet recipe?
Absolutely, the recipe is quite flexible! For a vegan option or a different flavor profile, you can substitute the granulated sugar with natural liquid sweeteners like agave nectar or maple syrup; adjust the amount to taste as these can vary in sweetness. If you’re aiming for a lower-sugar version, sugar substitutes like erythritol or stevia can be used, but be mindful of their potency and adjust accordingly. For an extra flavor boost, consider adding a small amount of vanilla extract or a pinch of ginger to the puree before freezing. The lemon juice can also be slightly increased for a more pronounced tartness if desired, but do so cautiously.