Pupusas Recipe – Authentic Pupusas with Curtido!
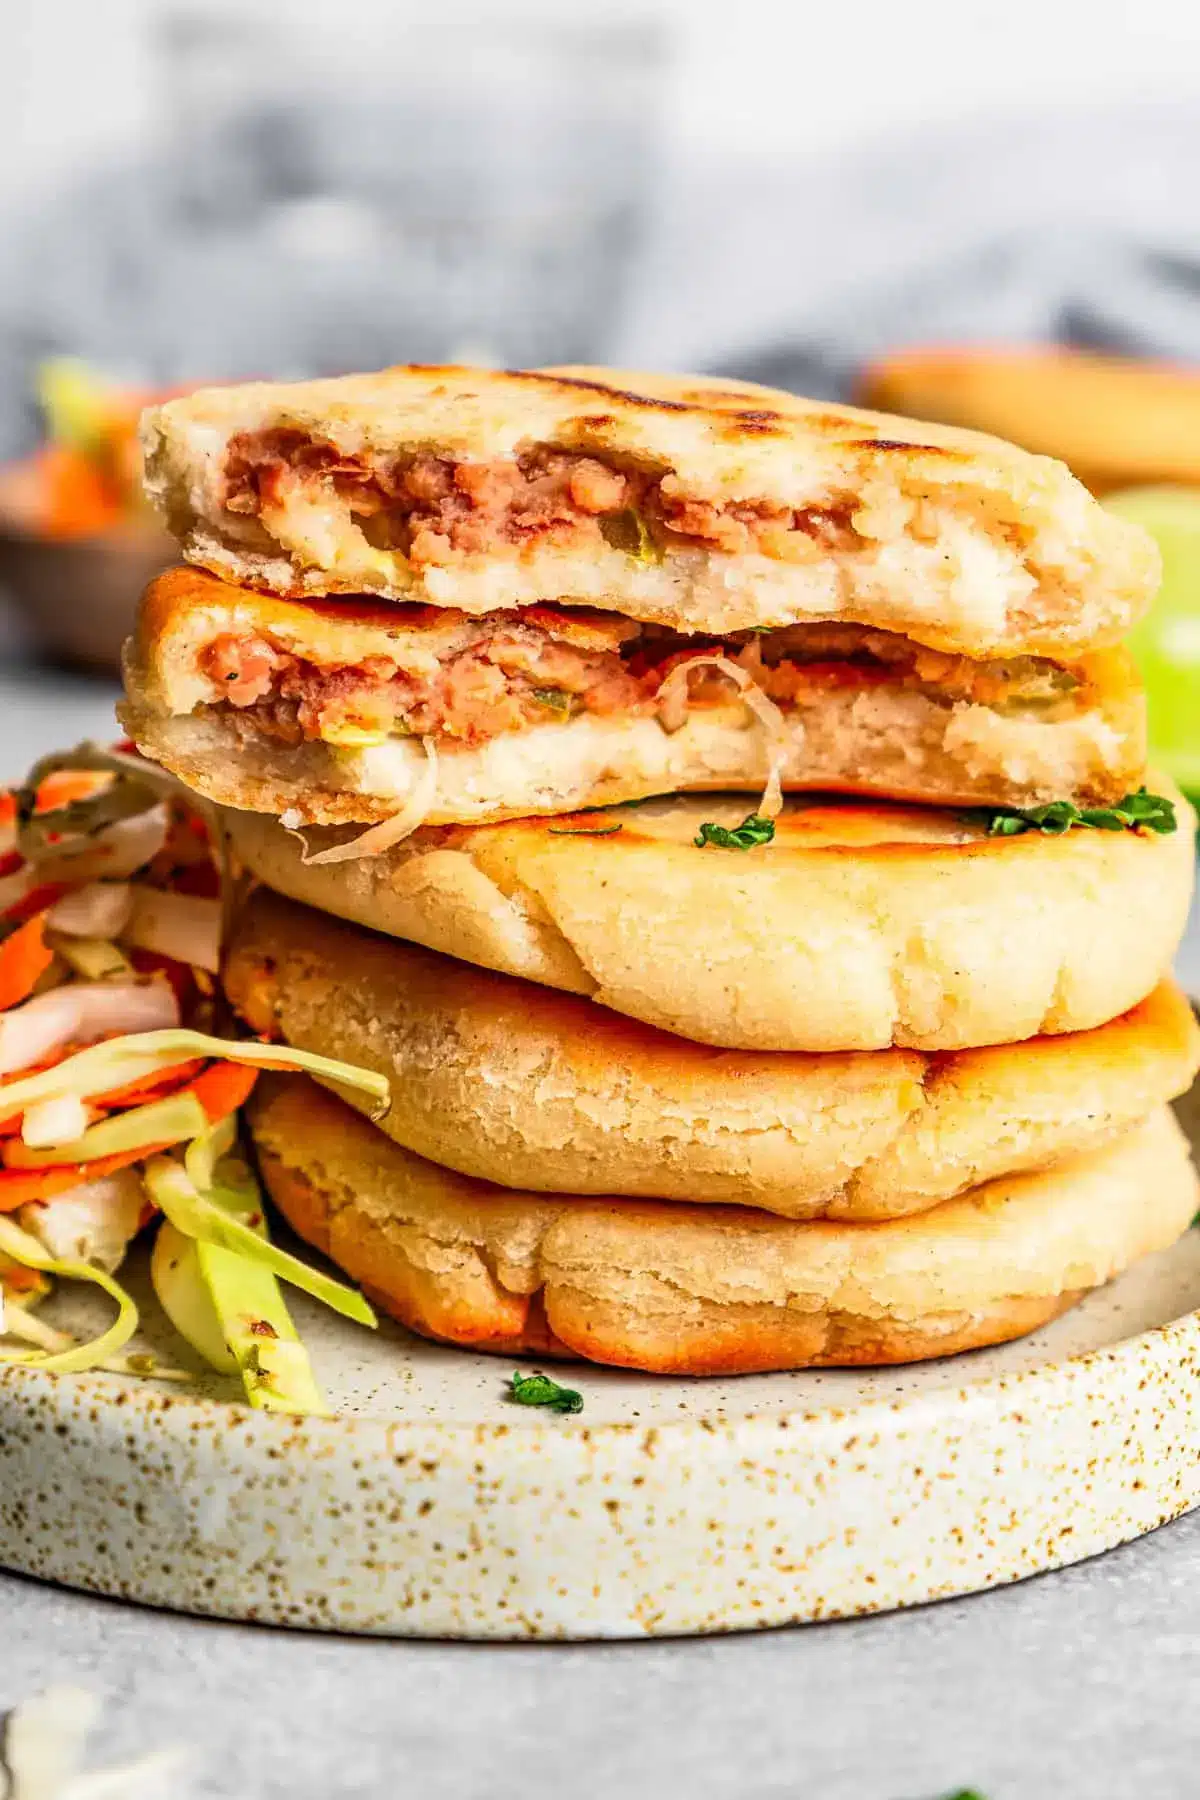
Embark on a culinary adventure to El Salvador with this authentic pupusas recipe, a delightful journey for your taste buds that brings vibrant street food flavors right into your kitchen. These crispy, stuffed masa cakes are a testament to simple ingredients transformed into something truly extraordinary and satisfying.
Imagine biting into a warm, golden-brown disc, its exterior perfectly crisp, giving way to a delightfully tender interior that’s generously filled with savory refried beans, tangy pickled jalapeños, and gooey, melted cheese. Paired with a bright and zesty cabbage slaw, known as curtido, these pupusas are more than just a meal; they’re an experience, perfect for any occasion from a casual snack to a memorable light dinner.
Why You Will Love This Recipe
- Authentic Flavor: Crafted to capture the true essence of Salvadoran pupusas, using traditional masa harina for that signature taste and texture that transports you straight to the streets of San Salvador.
- Quick to Assemble: While the curtido benefits from chilling, the pupusas themselves come together swiftly, making them an ideal choice for weeknight dinners or spontaneous gatherings.
- Incredibly Versatile: The beauty of pupusas lies in their customizability; easily adapt the fillings to your preference, from different cheeses and meats to a variety of vegetables and beans.
- Fun & Engaging: The process of shaping and filling the pupusas is an interactive and enjoyable cooking experience, perfect for getting the whole family involved in the kitchen.
- Satisfyingly Delicious: With their crispy exterior, warm, cheesy, and flavorful filling, pupusas are deeply satisfying and always a crowd-pleaser, offering a comforting yet exciting meal.
Ingredients You Need
The magic of these pupusas lies in their simplicity, relying on readily available ingredients that come together to create an explosion of flavor. We’ll start with authentic masa harina, the cornerstone of many Latin American cuisines, which provides that essential corn flavor and perfect texture for the dough.
Pupusas Recipe
Pupusas are a traditional Salvadoran dish made from crispy masa dough stuffed with refried beans, pickled jalapeños, and melted cheese. Serve them with a zesty cabbage slaw called curtido!
- For the curtido:
- 1 cup shredded cabbage
- 1 small carrot, thinly sliced or grated
- 2 teaspoons dried oregano
- ½ cup apple cider vinegar
- ½ cup hot water
- ½ teaspoon salt
- ½ teaspoon cane sugar
- For the pupusas:
- 1½ cups + 2 tablespoons masa harina
- 1⅓ cup water
- 1 teaspoon salt
- ½ cup shredded mozzarella cheese
- ¼ cup refried beans
- ¼ cup pickled jalapenos, finely chopped
- 1Make the curtido: Combine shredded cabbage, carrots, and oregano in a bowl. In a separate bowl, whisk apple cider vinegar with hot water, salt, and sugar until dissolved. Pour over the cabbage mixture and stir. Cover and refrigerate for at least 4 hours.
- 2Make the pupusas: Combine masa harina, water, and salt in a bowl. Stir with a spatula, then knead until a soft dough forms. Divide dough into 8 equal balls.
- 3Wet hands with water to prevent sticking. Flatten each ball into a ¼-inch thick disc.
- 4Spoon about ½ tablespoon of refried beans, mozzarella cheese, and pickled jalapeños onto the center of each disc.
- 5Pinch and fold the edges of the dough over the filling to enclose it, then gently reshape into a ball. Flatten to a ½-inch thick disc. Repeat with remaining ingredients.
- 6Heat 2 tablespoons of oil in a skillet over medium heat. Fry pupusas for 4-5 minutes per side, until golden brown and crispy.
- 7Serve warm with curtido on the side.
Sticky dough: If the dough is too sticky, add a little oil to the water or use oil to coat your hands.
Cookie scoop: A 2-ounce cookie scoop can help portion the dough evenly.
Parchment paper: Place shaped pupusas on parchment paper or a greased surface to prevent sticking.
Storing and Reheating: Refrigerate leftovers in an airtight container for 2-3 days. Reheat in a lightly oiled skillet or toaster oven to maintain crispiness. Pupusas can also be frozen unbaked for up to 4 months.
Keywords: pupusas, El Salvador, side dish, masa harina, vegetarian, cheese, beans, jalapenos, curtido, street food
For the pupusas, you’ll need masa harina, water, and salt to create the dough, ensuring a pliable yet firm base for your fillings. The heart of the pupusa is its stuffing, which in this classic recipe, includes creamy refried beans, sharp pickled jalapeños for a hint of spice, and a generous amount of shredded mozzarella cheese that melts into gooey perfection. The accompanying curtido, a vibrant cabbage slaw, is made with shredded cabbage, a touch of carrot for sweetness, dried oregano for herbaceous notes, and a tangy dressing of apple cider vinegar, hot water, salt, and sugar. Full quantities for all ingredients are detailed within the recipe card for your convenience.
Variations
While the classic combination of refried beans, cheese, and jalapeños is utterly divine, the world of pupusas is vast and inviting, ripe for exploration through exciting variations. Consider embracing a hearty dinner option by incorporating savory shredded meats like slow-cooked pernil or flavorful chicken mole into the filling. The richness of these proteins beautifully complements the masa, offering a more substantial and complex bite.
For those seeking a lighter or meat-free alternative, a delightful lunch variation can be achieved by using roasted butternut squash or acorn squash pureed with a hint of spice. This sweet and earthy filling provides a wonderful contrast to the savory dough and tangy curtido. Alternatively, explore the creamy depth of other bean varieties by pureeing black beans or white beans, perhaps seasoned with a touch of cumin and cilantro for an extra layer of flavor.
A particularly interesting and flavorful twist comes from substituting the traditional refried beans with a hearty lentil filling, seasoned with smoked paprika and a pinch of cayenne pepper. This offers a wonderfully hearty, almost meaty texture and a deep, satisfying flavor profile. You could also experiment with different cheese blends, perhaps incorporating a smoky gouda or a sharp cheddar alongside the mozzarella for added complexity. Each variation offers a unique way to experience the beloved pupusa, making it a truly adaptable dish for any palate or occasion.
How to Prepare pupusas recipe
Step 1: Prepare the Curtido
The vibrant and zesty curtido is essential for balancing the richness of the pupusas, acting as a refreshing counterpoint to the warm, cheesy filling. It’s best to prepare this component ahead of time to allow the flavors to meld beautifully in the refrigerator.
Start by combining your finely shredded cabbage, grated or thinly sliced carrot, and dried oregano in a medium-sized mixing bowl. This medley forms the crunchy, fresh base of your slaw. Ensure the vegetables are uniformly cut so they marinate evenly and offer a pleasing texture in every bite.
In a separate, smaller bowl, whisk together the apple cider vinegar, hot water, salt, and sugar until the sugar is completely dissolved. This creates a bright, tangy dressing that will tenderize the cabbage and infuse it with delightful acidity. The hot water helps the sugar and salt dissolve quickly, ensuring a smooth marinade.
Pour this vinaigrette over the cabbage and carrot mixture. Toss everything thoroughly to ensure each strand of cabbage and sliver of carrot is coated in the dressing. The key to a great curtido is allowing it ample time to chill and marinate; cover the bowl tightly and refrigerate for at least 4 hours, or ideally, overnight.
This extended chilling period is crucial for softening the cabbage and allowing the flavors to deepen and harmonize. The vinegar will lightly pickle the vegetables, giving the curtido its characteristic tang and crisp-tender texture. This step truly elevates the final pupusas, providing that essential fresh element.
Step 2: Make the Pupusa Dough
While the curtido is chilling, you can turn your attention to the heart of the pupusa: the masa dough. This dough is quite forgiving, but achieving the right consistency is key for easy shaping and a tender final product. Authenticity calls for masa harina, a finely ground corn flour specifically treated for cooking.
In a large mixing bowl, combine the masa harina and salt. This dry blend ensures the seasoning is evenly distributed throughout the dough. Masa harina is the foundation, providing that characteristic corn flavor and slightly gritty texture that is so beloved in this dish.
Gradually add the water, mixing first with a spatula or wooden spoon until the ingredients begin to come together. Continue to mix until a soft, pliable dough forms. The amount of water needed can vary slightly depending on the humidity and the specific brand of masa harina you use, so it’s important to add it incrementally.
Once the dough has formed, knead it gently with your hands for a minute or two on a clean surface until it is smooth and cohesive. The dough should be soft and slightly sticky, but not unmanageably so. If it feels too dry, add a tablespoon more water; if too sticky, a sprinkle of masa harina. This ensures the dough is supple and easy to work with for stuffing.
Divide the dough into 8 equal portions. Roll each portion into a smooth ball. These balls will serve as the individual casings for your delicious fillings, and uniform size will ensure even cooking. Keep them covered with a damp cloth or plastic wrap to prevent them from drying out as you work.
Step 3: Portion and Fill the Dough
This is where the pupusa truly comes to life, transforming simple dough into a vessel for deliciousness. Having a small bowl of water nearby is a chef’s best friend for this step, as it helps keep your hands from sticking to the masa.
Take one dough ball and flatten it between your palms. Aim for a thickness of about ¼ inch, creating a circular base. Dip your fingers lightly in the water if the dough starts to feel sticky. The goal is to create a well in the center without tearing the dough.
Spoon about ½ tablespoon of refried beans into the center of the flattened dough circle. Don’t overfill, or it will be difficult to seal the pupusa. This savory bean layer forms the first part of the rich filling.
Next, add a sprinkle of shredded mozzarella cheese over the beans. The cheese is crucial for that delightful, gooey pull that makes pupusas so irresistible. Ensure the cheese is distributed evenly for consistent meltiness.
Finally, add a small amount of finely chopped pickled jalapeños. These add a wonderful kick of acidity and heat. Adjust the quantity based on your preference for spice; a little goes a long way in providing that signature tang.
Step 4: Seal and Shape the Pupusas
The sealing process is critical for ensuring your delicious filling stays contained within the masa casing. This technique requires a gentle but firm hand to create a seamless pocket.
Carefully gather the edges of the flattened dough upwards, bringing them together over the filling. Pinch and seal the seams tightly, ensuring no gaps remain. This action effectively encloses all the delicious ingredients.
Once sealed, gently roll the dough back into a ball. The seams should now be on the inside. This step ensures the filling is evenly distributed within the masa and creates a smooth exterior for cooking.
Now, gently flatten the ball between your palms, rotating it as you go, to form a disc about ½-inch thick. Be careful not to press too hard, as this can cause the filling to burst through. The goal is a uniformly thick patty that will cook evenly.
Repeat this entire process—flattening, filling, sealing, and shaping—for the remaining 7 dough balls. As you shape each pupusa, place it on a piece of parchment paper or a lightly greased surface to prevent sticking. This organized approach ensures all your pupusas are ready for frying.
Step 5: Fry the Pupusas to Golden Perfection
The final cooking stage is where the magic truly happens, transforming these stuffed discs into crispy, golden treasures. A hot skillet and a bit of oil are all you need for this satisfying transformation.
Heat about 2 tablespoons of cooking oil in a large skillet over medium-high heat. You want the oil to be hot enough to sizzle when a pupusa is added, but not so hot that it burns them immediately. A good test is to drop a tiny piece of dough into the oil; if it sizzles vigorously, it’s ready.
Carefully place 2-3 pupusas into the hot skillet, making sure not to overcrowd the pan. Overcrowding will lower the oil temperature and result in less crispy pupusas. Give them ample space to fry evenly.
Cook the pupusas for 4-5 minutes per side, or until they are beautifully golden brown and crispy. The exterior should have a satisfying crunch, and the cheese inside should be fully melted and gooey. You’ll see the edges firming up and developing a lovely char in places.
Use a spatula to gently flip the pupusas, checking for that perfect golden hue. Continue cooking for another 4-5 minutes on the second side. If the pupusas are browning too quickly, reduce the heat slightly. If they are not browning fast enough, increase the heat.
Once cooked, remove the pupusas from the skillet and place them on a wire rack set over a baking sheet. This allows any excess oil to drain off, keeping them wonderfully crisp. This method prevents them from becoming soggy at the bottom.
Step 6: Serve and Enjoy
The moment of truth has arrived! Serve your freshly fried pupusas immediately while they are still warm and wonderfully crisp. The combination of the crispy masa, melted cheese, and the zesty curtido is truly sublime.
Arrange the pupusas on a platter and serve them alongside the chilled curtido. The bright, acidic slaw cuts through the richness of the pupusas, creating a perfectly balanced bite. Offer additional toppings like salsa or a dollop of sour cream if desired.
These pupusas are a fantastic starter, a light dinner, or even a delightful brunch item. They are best enjoyed hot off the skillet, allowing you to experience the full textural contrast and flavor explosion they offer. This dish is a celebration of simple, honest ingredients coming together to create something truly special. You can find more dinner inspiration on our site.
Pro Tips for pupusas recipe
Master the Masa: The consistency of your masa dough is paramount. It should be soft, pliable, and slightly sticky. If it’s too dry, the pupusas will crack; if too wet, they’ll be difficult to handle. Keep a small bowl of water nearby to wet your hands – this is the secret to preventing sticking and shaping them smoothly.
Don’t Overfill: While it’s tempting to load up your pupusas with as much delicious filling as possible, resist the urge. Overfilling makes sealing the dough incredibly difficult and increases the risk of the filling bursting out during cooking. A moderate amount ensures a neat presentation and even cooking.
Consistent Thickness is Key: Aim for a uniform thickness of about half an inch when flattening your filled pupusas. This ensures that the masa cooks through evenly and the cheese melts completely without the masa burning. Uneven thickness can lead to some parts being undercooked while others are overcooked.
The Right Heat for Frying: Medium-high heat is your sweet spot for frying. Too low, and the pupusas will absorb too much oil and become greasy. Too high, and the outside will burn before the inside is cooked through and the cheese has melted. Listen for that gentle sizzle when the pupusa hits the pan.
Keep Them Warm and Crispy: To serve a batch without them cooling down or losing their crispness, place a wire rack over a baking sheet and keep it in a warm oven (around 200°F or 95°C). As each batch is fried, transfer them to the wire rack. This allows air to circulate, maintaining their delightful crisp texture.
Serving Suggestions for pupusas recipe
Decoration
The natural golden-brown hue of a perfectly fried pupusa is often its most beautiful decoration. However, for an added touch, a light scattering of fresh cilantro leaves over the top of the pupusas just before serving can provide a pop of vibrant green and a hint of fresh herbaceousness. Alternatively, a tiny drizzle of crema or a small dollop of mild salsa on top can add visual appeal and an extra layer of flavor.
Side Dishes
The quintessential accompaniment to pupusas is, of course, curtido, the tangy and refreshing cabbage slaw. Its bright acidity and crisp texture cut through the richness of the pupusa beautifully. Beyond curtido, consider offering a simple pico de gallo for an extra burst of freshness, or a mild salsa verde. For a more substantial meal, a side of black beans or a light, citrusy salad can complement the pupusas perfectly. These additions create a well-rounded and satisfying dining experience.
Creative Serving Ideas
Think of pupusas as delightful edible vessels, perfect for a casual gathering or a fun family meal. Serve them as appetizers at a party, with each guest able to customize their own toppings. They also make an excellent component of a Latin American-inspired tapas or small plates spread, alongside other favorites like easy lobster bisque recipe or Peruvian chicken. For a unique brunch, serve them with a fried egg on top and a side of avocado slices. Consider them a foundation for a “build-your-own” pupusa bar, allowing guests to select from various fillings and toppings.
Preparation & Storage
Storing Leftovers
Leftover pupusas can be stored in an airtight container in the refrigerator for up to 2-3 days. While they are undoubtedly best enjoyed fresh and hot from the skillet, proper storage will help preserve their flavor and texture for later enjoyment. Ensure they have cooled completely before sealing them in the container to prevent condensation from making them soggy.
Freezing
Pupusas freeze exceptionally well, making them an excellent candidate for make-ahead meal preparation. Arrange the filled, uncooked pupusas in a single layer on a parchment-lined baking sheet and freeze until solid. Once frozen, transfer them to a freezer-safe bag or container, where they can be stored for up to 4 months. This allows you to have homemade pupusas ready to cook at a moment’s notice.
Reheating
To reheat pupusas, the best method to restore their crispness is by pan-frying them in a lightly oiled skillet over medium heat until golden and heated through. Alternatively, a toaster oven can also yield good results, crisping up the exterior nicely. Avoid reheating in the microwave, as this tends to make the masa soft and gummy, diminishing their desirable texture.
Frequently Asked Questions
-
What is the difference between pupusas and arepas?
While both pupusas and arepas are corn-based dough dishes popular in Latin America, they have distinct differences. Arepas are typically made from precooked corn flour (masarepa) and are often grilled, baked, or fried into a patty that is then split open and stuffed. Pupusas, on the other hand, are made from masa harina (corn flour treated with lime) and are stuffed with fillings *before* being flattened and pan-fried into a thicker disc. The texture of the dough also differs slightly, with pupusas often being softer and more pliable due to the masa harina.
-
Can I use regular cornmeal instead of masa harina for pupusas?
Yes, you can use regular cornmeal or corn flour as a substitute for masa harina in a pinch, but the texture and flavor will be slightly different. Masa harina is specifically processed (nixtamalized) in a way that gives it a unique flavor, smooth texture, and pliability crucial for pupusas. Regular cornmeal can be coarser and may result in a dough that is less cohesive and a finished pupusa that is more crumbly or dense. If using cornmeal, you might need to adjust the liquid content slightly to achieve a workable dough.
-
How can I make pupusas spicier or milder?
Adjusting the spice level of your pupusas is quite straightforward and primarily depends on the jalapeños used. For a milder pupusa, use fewer jalapeños or ensure you remove all the seeds and membranes, as these are where most of the heat resides. For a spicier kick, you can add more finely chopped jalapeños, or even incorporate a pinch of cayenne pepper or a small amount of a hotter chili pepper into the filling. You can also offer hot sauces on the side for individuals to customize their spice preference after serving.