Kalua Pork Recipe – The Best Hawaiian Pulled Pork!
Embarking on a culinary journey to the Hawaiian Islands has never been more accessible, right from your own kitchen. This Kalua pork recipe captures the essence of traditional Hawaiian luau feasting, transforming a humble pork shoulder into an incredibly tender and flavorful shredded delight. It’s a dish that evokes sunshine, celebration, and the spirit of aloha, perfect for gathering loved ones.
The aroma that fills your home as this pork slowly roasts is nothing short of magical, reminiscent of island breezes and open-fire cooking. While an underground imu oven is the authentic method, this adaptation brings that coveted smoky, melt-in-your-mouth texture to your everyday cooking with remarkable ease.
Why You Will Love This Recipe
- Authentic Flavor Profile: Captures the smoky, savory essence of traditional Kalua pork using readily available ingredients and techniques.
- Incredibly Tender Texture: The slow roasting process breaks down the pork shoulder, resulting in a fall-apart tender texture that shreds effortlessly.
- Simple Preparation: Despite its complex flavor, the active preparation time is minimal, allowing the oven to do most of the work.
- Versatile Serving Options: Whether piled high on a bun, served over rice, or incorporated into other dishes, this pulled pork is incredibly adaptable.
- Crowd-Pleasing Potential: This recipe is ideal for parties, family gatherings, or any occasion where you want to impress with minimal fuss.
Ingredients You Need
Crafting exceptional Kalua pork hinges on selecting the right components, with quality being paramount for achieving that signature depth of flavor and melt-in-your-mouth tenderness. The pork shoulder, with its generous marbling, is the star, while aromatic reinforcements like fresh garlic and ginger work their magic from within.
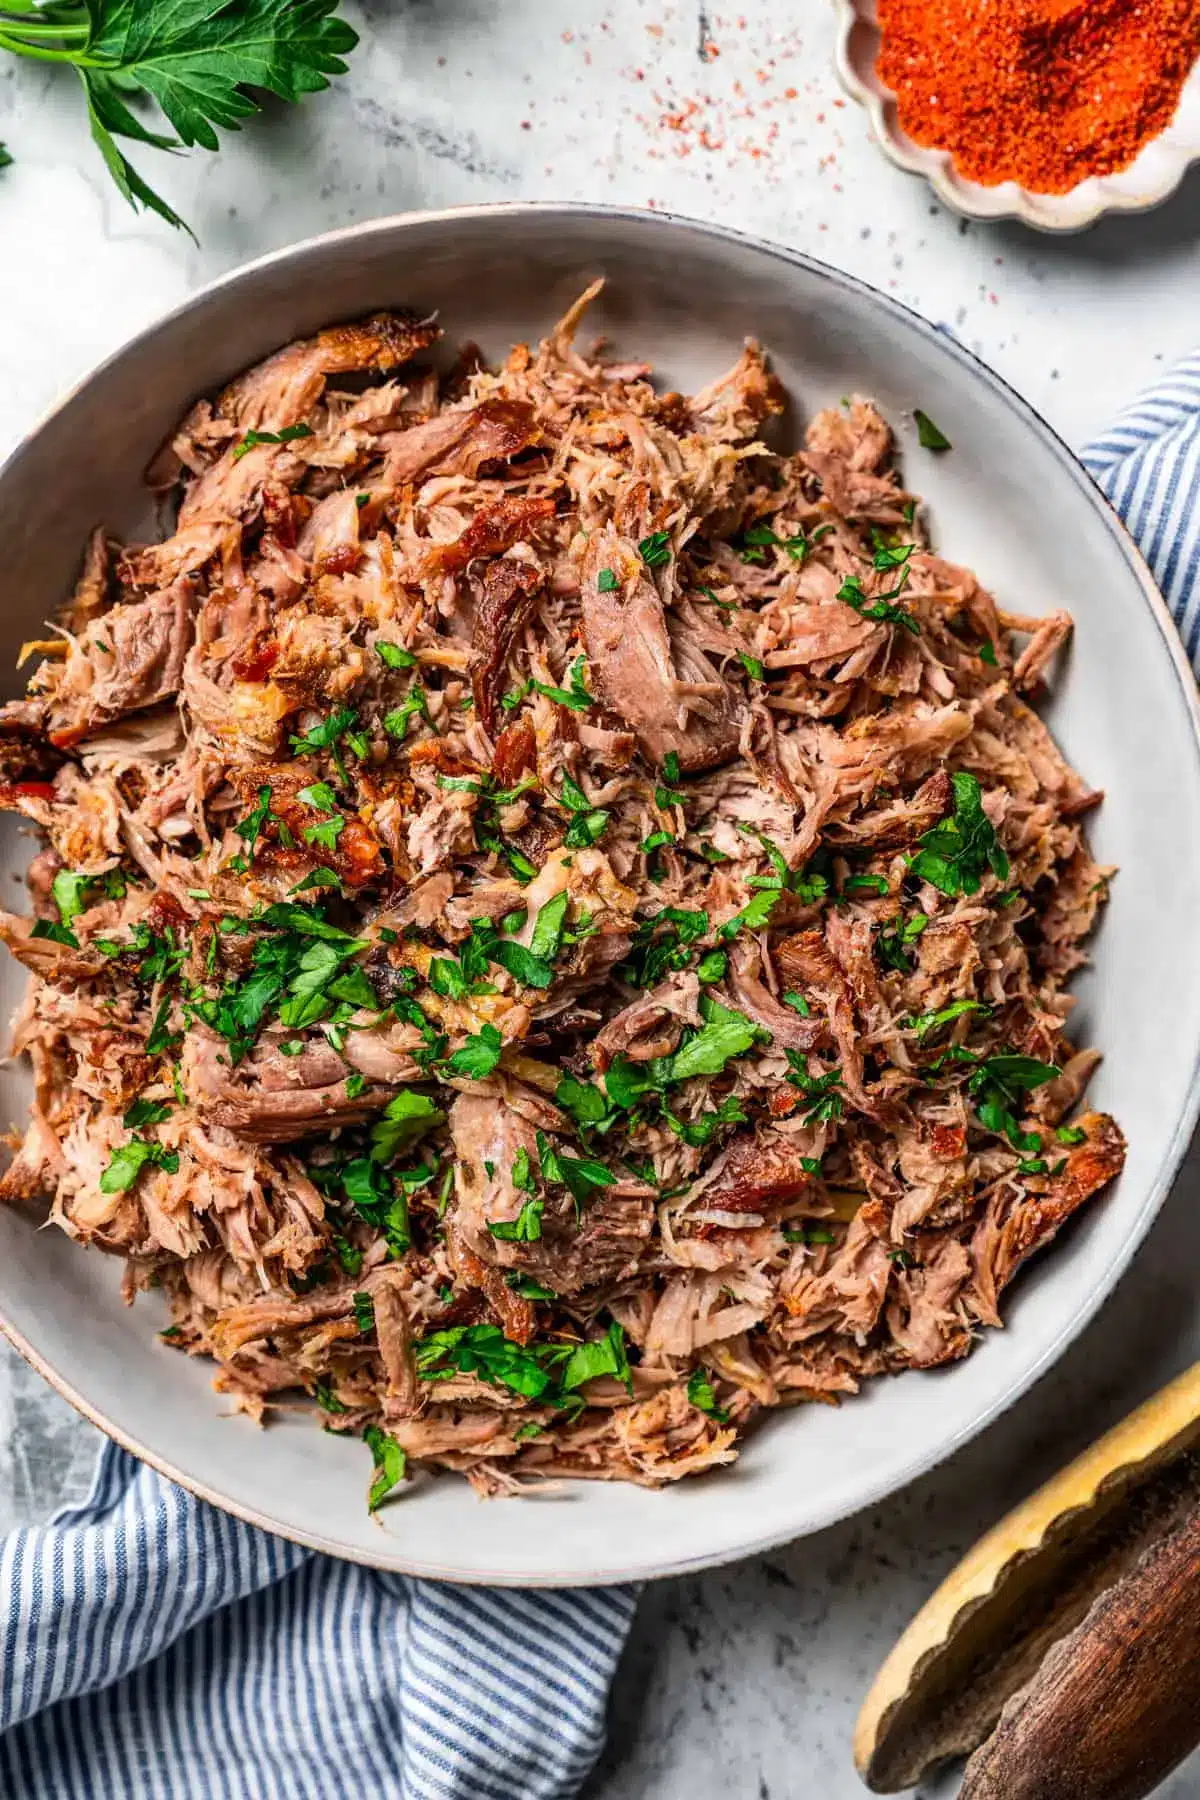
Kalua Pork (Hawaiian Pulled Pork)

This slow-roasted Hawaiian kalua pork is made from juicy pork shoulder rubbed with sea salt and seasonings and baked until it's fall-apart tender. Pile this flavorful pulled pork into sandwiches or over rice, topped with a fried egg.
- 1 tablespoon olive oil
- 3 pounds pork shoulder, cut into 3 pieces
- 5 cloves garlic, halved
- 1 inch piece of fresh ginger, cut into sticks
- 3/4 tablespoon Hawaiian sea salt
- 1/2 tablespoon liquid hickory smoke
- chopped fresh parsley, for serving
- 1Preheat your oven to 325°F.
- 2Pierce the pork all over with a carving fork. Insert ginger and garlic into the holes you made with the fork. Rub the pork with Hawaiian salt and then with liquid smoke.
- 3Heat the olive oil in a large pan over medium-high heat. Sear the pork on all sides.
- 4Place the pork on a large piece of parchment paper and wrap it around. Then, wrap the meat with aluminum foil, sealing it tightly. Place the pork on a rimmed baking sheet.
- 5Bake the pork for 3-4 hours or until the inner temperature reaches 165°F and the meat shreds easily.
- 6Remove the pork from the oven. Carefully open the aluminum foil and parchment paper and collect all the cooking juices. Shred the pork with meat claws or two forks. Then add it to a large bowl or serve it on a baking tray. Drizzle and toss the pork with the cooking juices.
- 7Just before serving, garnish the pulled pork with chopped parsley.
Keywords: Kalua Pork, Hawaiian Pulled Pork, Slow Cooked Pork, Pork Shoulder, Sea Salt, Liquid Smoke, German
The specific quantities for each ingredient can be found within the detailed recipe card below. This ensures precision and guides you perfectly through the cooking process for optimal results.
Variations
While this recipe aims for authentic Hawaiian flavors, the beauty of pulled pork lies in its adaptability. You can easily tailor it to different dietary preferences or flavor profiles, making it a truly versatile dish for any occasion.
For a vegan or vegetarian twist, consider using hearty jackfruit as a substitute for the pork. The shredded texture of young jackfruit mimics pulled meat remarkably well. Simmer it in a flavorful broth seasoned with liquid smoke, Hawaiian sea salt, and a touch of soy sauce or tamari until tender, then shred and mix with the cooking liquids.
If you’re following a low-carb or ketogenic lifestyle, this Kalua pork is already a fantastic option, as it’s naturally very low in carbohydrates. Serve it atop cauliflower rice, in lettuce wraps, or alongside a fresh, vibrant dinner salad instead of traditional rice or buns.
For those who enjoy a spicier kick, consider adding a pinch of red pepper flakes to the rub before searing, or serve the finished pork with a side of sriracha or a spicy Hawaiian chili sauce. This small addition can elevate the savory notes with a delightful warmth that complements the richness of the pork beautifully.
How to Prepare kalua pork hawaiian pulled pork
Step 1: Preparing the Pork for Flavor Infusion
The foundation of a truly spectacular Kalua pork begins with meticulous preparation of the pork shoulder. This isn’t just about seasoning; it’s about creating pathways for flavor to penetrate deeply into the meat. Start by ensuring your pork shoulder is clean and patted dry with paper towels; this helps the seasonings adhere better and promotes a good sear.
The recipe calls for cutting the pork shoulder into three manageable pieces. This strategic division serves a dual purpose: it significantly reduces the overall cooking time compared to a single large roast, and it increases the surface area exposed to the heat, allowing for more even cooking and browning. Aim for pieces that are roughly similar in size to ensure they cook at a comparable rate, preventing some pieces from becoming overcooked while others remain underdone.
Once divided, it’s time to introduce the aromatics and seasonings. Use a carving fork or a skewer to pierce the pork all over. These small incisions act as little wells, ready to receive the pungent flavors of fresh garlic and ginger. Push halved garlic cloves and ginger sticks deep into these holes, ensuring they are nestled snugly within the pork. This technique is crucial for infusing the meat with their distinct, earthy aromas and subtle spice.
Step 2: The Aromatic Rub and Searing Ritual
With the garlic and ginger nestled within, the next critical step is applying the flavorful rub that will form the external flavor crust. This rub consists of Hawaiian sea salt and liquid hickory smoke, two key components that define the classic Kalua pork taste. The Hawaiian sea salt, particularly the red alaea variety, imparts a unique mineral complexity and a satisfying crunch, but any good quality coarse sea salt will suffice if alaea salt is unavailable.
Generously rub the sea salt all over the surface of the pork pieces, making sure to get into all the nooks and crannies created by the piercings. Follow this with the liquid hickory smoke. This ingredient is a crucial shortcut to achieving the smoky essence typically derived from an imu. It provides that distinct, campfire-like aroma and flavor that is so characteristic of authentic Kalua pork, without requiring hours of traditional smoking.
After the pork has been thoroughly seasoned, it’s time for the searing process. Heat a tablespoon of olive oil in a large, heavy-bottomed pan or Dutch oven over medium-high heat. The oil should be shimmering but not smoking. Carefully place the seasoned pork pieces into the hot pan, searing them on all sides until a deep golden-brown crust forms. This searing step is vital for developing rich flavor through the Maillard reaction and helps to lock in the juices, contributing to a more succulent final product.
Step 3: The Patient Slow Roast
Once perfectly seared, the pork is ready for its transformative slow roast. This stage is where patience truly pays off, as low and slow cooking is the secret to achieving that unparalleled tenderness. Carefully remove the seared pork pieces from the pan and place them onto a large sheet of parchment paper. The parchment paper acts as a helpful barrier and makes the subsequent foil wrapping easier.
Wrap each piece of pork snugly within the parchment paper, ensuring it’s fully encased. Then, for an extra layer of protection and to aid in steaming and moisture retention, wrap the parchment-wrapped pork tightly in aluminum foil. Make sure the foil is sealed securely around the pork, creating a packet that will prevent moisture from escaping during the long cooking process. This double-wrapping technique ensures the pork steams in its own juices, becoming incredibly tender.
Place the foil-wrapped pork onto a rimmed baking sheet. The rim is important to catch any potential leaks from the foil packet. Preheat your oven to 325°F (160°C). This lower temperature is key for slow cooking, allowing the connective tissues in the pork shoulder to break down gradually over several hours. Bake the pork for 3 to 4 hours, or until an instant-read thermometer inserted into the thickest part of the meat registers an internal temperature of 165°F (74°C).
Step 4: Checking for Doneness and Rest
The moment of truth arrives as the Kalua pork approaches its finishing time. The primary indicators of doneness are the internal temperature and the ease with which the meat shreds. While the 165°F (74°C) internal temperature is a good guideline, the ultimate test for pulled pork is its tenderness.
After the initial 3-hour cooking period, it’s wise to check the pork. Insert an instant-read thermometer into the thickest part of one of the pork pieces. If it has reached 165°F (74°C) and the meat feels incredibly tender when poked with a fork (it should offer very little resistance), it’s likely ready. If it hasn’t reached the target temperature or doesn’t feel tender enough, re-wrap the foil packet securely and continue cooking, checking again every 30-45 minutes.
The total cooking time can vary depending on the size and density of your pork pieces and the individual characteristics of your oven. Don’t be afraid to let it cook for an extra hour or even two if needed; the low temperature ensures it won’t dry out, but rather become even more succulent. Once the pork is fork-tender and has reached the desired temperature, carefully remove the baking sheet from the oven.
Step 5: The Art of Shredding and Juicing
This is where the magic truly happens, transforming a large roast into the beloved pulled pork. Once removed from the oven, let the foil-wrapped pork rest for about 15-20 minutes. This resting period allows the juices to redistribute throughout the meat, ensuring maximum moisture and flavor when shredded. Do not skip this crucial step, as it contributes significantly to the final texture.
After resting, carefully unwrap the aluminum foil and the parchment paper. Be cautious, as steam will escape, and there will be a generous amount of flavorful cooking juices collected in the foil. It’s imperative to save these juices; they are liquid gold and are essential for moistening and enhancing the flavor of the shredded pork. Pour these collected juices into a large bowl or back into the baking pan.
Now, for the shredding. You can use two forks, inserting one into the meat and the other to pull it apart, or specialized meat claws for a more efficient and impressive shredding experience. Work the meat while it’s still warm; it shreds much more easily this way. Shred all the pork pieces directly into the bowl containing the reserved cooking juices. This ensures that as you shred, the pork is immediately coated and infused with that rich, savory liquid.
Step 6: Finishing Touches and Serving Presentation
Once the pork is fully shredded and mixed with its own cooking juices, it’s nearly ready to be enjoyed. The goal is for the pork to be thoroughly coated and glistening, with a moist, tender consistency. Toss the shredded pork gently with the juices to ensure every strand is infused with that delicious flavor.
For a final touch of freshness and visual appeal, garnish the finished Kalua pork with freshly chopped parsley. The bright green flecks provide a lovely contrast to the rich color of the pork and add a subtle herbaceous note. This simple garnish elevates the presentation, making the dish ready to impress.
Serve immediately while warm. This versatile pulled pork can be piled high onto toasted brioche buns for delicious sliders, served alongside fluffy white rice for a classic Hawaiian meal, or used as a filling for tacos or wraps. The possibilities are truly endless, and the comforting, savory flavors are sure to be a hit with everyone at your table.
Pro Tips for kalua pork hawaiian pulled pork
Don’t Rush the Roast: The absolute key to achieving that legendary fall-apart tender Kalua pork is patience. Resist the temptation to crank up the oven temperature to speed up the cooking process. Low and slow is the mantra here; the extended cooking time at a moderate temperature allows the tough connective tissues in the pork shoulder to break down into gelatin, resulting in that incredibly moist and shreddable texture.
Seal in the Flavor: The double wrapping of parchment paper and then aluminum foil is crucial. This creates a steamy environment within the packet, essentially braising the pork in its own juices. This not only ensures tenderness but also concentrates the flavors from the salt, garlic, and ginger, making every bite intensely savory. Ensure your foil seams are tight to prevent any precious moisture from escaping.
Save the Cooking Juices: Never discard the liquid that accumulates during the roasting process. This “pot liquor” is packed with rendered pork fat, salt, and the essence of the aromatics. Stirring these juices back into the shredded pork is what keeps it moist and amplifies its flavor profile. It’s the secret to preventing dry, bland pulled pork and achieving that rich, succulent finish.
Embrace the Sear: While the slow roast is paramount, don’t underestimate the importance of the initial sear. Browning the pork shoulder pieces on all sides before wrapping creates a depth of flavor through the Maillard reaction. This caramelization adds a complex, slightly savory, and nutty undertone to the final dish that simply cannot be replicated by just slow roasting alone.
Utilize a Meat Thermometer: While visual cues and tenderness are important, a meat thermometer provides the most accurate way to determine doneness. Aim for an internal temperature of at least 165°F (74°C), but often, for pulled pork, you’ll find it’s even more tender when it reaches temperatures closer to 195-205°F (90-96°C). This ensures all the collagen has broken down.
Serving Suggestions for kalua pork hawaiian pulled pork
Decoration
A simple yet elegant garnish can elevate the presentation of your Kalua pork. Freshly chopped parsley offers a vibrant splash of green that contrasts beautifully with the rich, earthy tones of the shredded pork. Other options include a sprinkle of toasted sesame seeds for added texture and nutty flavor, or a few finely sliced green onions for a mild, fresh bite.
Side Dishes
Kalua pork is incredibly versatile and pairs well with a wide array of accompaniments. For a classic Hawaiian experience, serve it with fluffy white rice, perfect for soaking up the delicious juices. A side of homemade coleslaw, with its crisp texture and tangy dressing, provides a refreshing counterpoint to the rich pork. Grilled pineapple rings offer a sweet and tangy contrast, bringing a taste of the tropics to your plate.
Creative Serving Ideas
Think beyond the bun! Kalua pork is fantastic when used as a filling for tacos, burritos, or even quesadillas, perhaps with a dollop of sour cream and a sprinkle of cheese. It also makes a spectacular topping for loaded sweet potato fries or a flavorful addition to mac and cheese for a comfort food masterpiece. For a lighter option, serve it over a bed of mixed greens or in lettuce cups, perhaps with an avocado salsa.
Preparation & Storage
Storing Leftovers
Properly stored Kalua pork will remain delicious for several days. Once the pork has cooled to room temperature, transfer any leftovers to an airtight container. Ensure the container is sealed tightly to prevent moisture loss and contamination.
Refrigerate the leftovers promptly. Stored this way, the Kalua pork should stay fresh and safe to consume for approximately 3 to 4 days. It’s a great dish to have on hand for quick and flavorful meals throughout the week.
Freezing
For longer storage, freezing is an excellent option. Allow the shredded Kalua pork to cool completely before packaging it for the freezer. Divide it into portion sizes that suit your needs, which can make reheating more convenient.
Place the cooled pork into freezer-safe bags or airtight containers. Remove as much air as possible from the bags before sealing to prevent freezer burn. Frozen Kalua pork can be stored for up to 2 months. It’s advisable to label the bags or containers with the date of freezing.
Reheating
Reheating Kalua pork is straightforward and ensures it retains its moist and flavorful qualities. The microwave is a quick method; place a portion of the pork in a microwave-safe dish, add a tablespoon or two of water or reserved cooking juices if available, cover loosely, and heat on medium power until thoroughly warmed through, stirring occasionally.
Alternatively, you can reheat the pork in a skillet over medium-low heat, stirring frequently, or cover it with foil and place it in a preheated oven at around 300°F (150°C) until hot. Adding a splash of broth or water during reheating can help maintain its moisture.
Frequently Asked Questions
- What is the best cut of pork to use for authentic Kalua pork?
The most traditional and recommended cut for authentic Kalua pork is pork shoulder, also known as pork butt or Boston butt. This cut is ideal because it has a generous amount of marbling and connective tissue, which breaks down during the long, slow cooking process. This breakdown results in the incredibly tender, succulent, and fall-apart texture that is the hallmark of Kalua pork. While other cuts like pork loin might seem leaner and healthier, they lack the necessary fat and collagen to achieve the same melt-in-your-mouth results and can easily become dry and tough when cooked low and slow.
- Can I make Kalua pork without liquid smoke? What are the best alternatives?
Yes, you can absolutely make delicious Kalua pork without liquid smoke, although it will impart a slightly different smoky nuance. The most direct substitute for liquid smoke in this recipe is smoked paprika. Use about 1 to 1.5 teaspoons of smoked paprika mixed with the Hawaiian sea salt. This will provide a smoky flavor and a hint of color. Another excellent alternative is to use a combination of bacon grease rendered from a few strips of bacon, or to add a small amount of chipotle powder for a smoky and slightly spicy profile. If you have access to a smoker or grill, you could also try smoking the pork shoulder for an hour or two before transferring it to the oven for the slow roast, though this adds significant time and complexity.
- How can I ensure my Kalua pork is extra moist and flavorful when reheating leftovers?
The key to reheating Kalua pork while maintaining its moisture and flavor is to reintroduce moisture and heat it gently. Before reheating, whether in a skillet, oven, or microwave, mix the shredded pork with a small amount of liquid. This could be water, chicken broth, pork broth, or ideally, any reserved cooking juices from the original batch that you might have saved and frozen. When microwaving, cover the dish loosely to trap steam. In the oven, cover the pork tightly with foil. When reheating on the stovetop, use low to medium-low heat and stir frequently, adding a splash of liquid as needed to prevent drying out. The goal is to heat the pork through without overcooking it, which can lead to dryness.