Delicious 15-Minute Quick Protein Balls recipe
Have you ever found yourself craving a quick snack that satisfies your hunger without compromising on nutrition? Look no further than Quick Protein Balls! These delightful treats are not only simple to make, but they also pack a powerful punch of protein and energy, making them ideal for a post-workout snack or a midday pick-me-up.
What sets Quick Protein Balls apart is their versatility and delicious flavor profile. You can easily customize them to suit your taste preferences or dietary restrictions, allowing for endless variations and creative adaptations. Whether you opt for the classic, comforting taste of peanut butter or explore the subtle richness of almond butter, these bite-sized delights consistently offer a deeply satisfying flavor experience in every single morsel.
Moreover, there’s an undeniable sense of accomplishment and satisfaction that comes from preparing your own snacks at home from scratch. With Quick Protein Balls, you maintain complete control over every single ingredient, ensuring you can conscientiously avoid any unnecessary additives, artificial flavors, or added sugars that are often found in commercially produced options. This homemade touch not only contributes to a healthier outcome but also imbues each batch with a distinctive, personal flair that elevates the simple act of snacking.
So, why not embark on your own enjoyable culinary adventure and enthusiastically whip up a batch of these incredibly versatile Quick Protein Balls? They are guaranteed to reward you with wholesome, nutritious goodness, remarkable and consistent taste, and a beautifully simple recipe that effortlessly keeps convenience right at its very heart, making healthy snacking accessible and enjoyable for everyone.
Why You Will Love This Recipe
- Quick Preparation: This recipe is designed for speed, allowing you to have delicious protein balls ready in under 15 minutes of active preparation time, perfect for those with busy schedules.
- High Protein Content: Packed with protein powder and nut butter, these balls provide sustained energy and help keep you feeling full and satisfied for longer periods, curbing those between-meal cravings effectively.
- Exceptional Versatility: The base recipe is a fantastic starting point, but the real magic lies in its adaptability; you can easily swap ingredients, add new flavors, or tailor it to specific dietary needs, ensuring endless possibilities.
- Ideal for Meal Prep: Prepare a large batch at the beginning of the week and store them properly; they become your go-to healthy snack, readily available for busy mornings, after-school fuel, or pre-workout boosts.
- No-Bake Convenience: Forget the oven! This recipe requires no baking, making it an incredibly simple and hassle-free process that can be done in your kitchen with minimal equipment and effort.
- Kid-Friendly Appeal: Children often adore the texture and taste of these protein balls, making them a fantastic and nutritious snack option that kids will happily request, encouraging healthier eating habits from a young age.
Ingredients You Need
When crafting these Quick Protein Balls, prioritizing the quality of your ingredients can significantly elevate the final taste and texture of your snack. Opting for fresh, high-quality nut butter, for instance, will impart a richer flavor, while using a protein powder you genuinely enjoy the taste of is crucial for overall enjoyment. Remember, these components are the foundation of your delicious creation, so a little attention to their selection goes a long way.
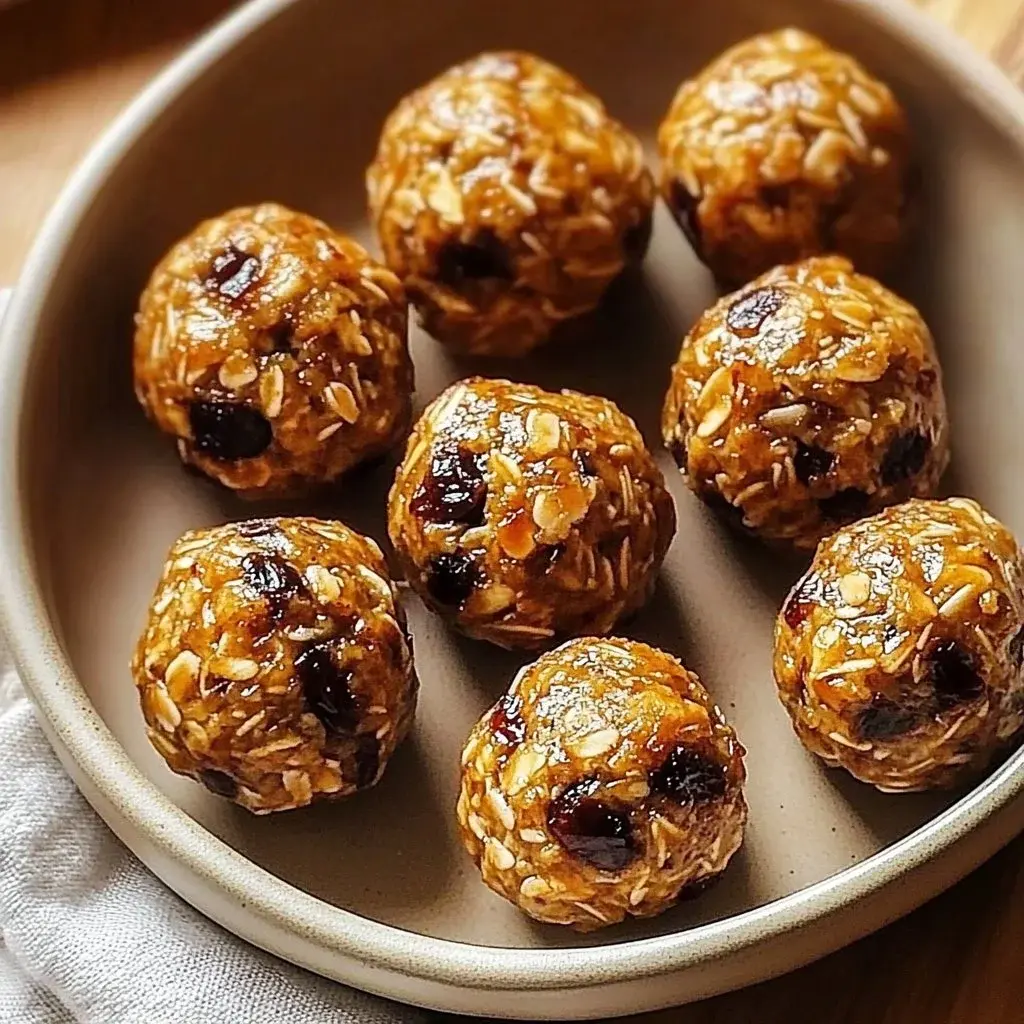
Quick Protein Balls

Quick Protein Balls are delicious, customizable snacks packed with protein and energy, perfect for post-workout or a midday pick-me-up.
- 1 cup protein powder (any kind) (Use flavored protein powder for extra taste.)
- 1/2 cup nut butter (peanut or almond) (Can substitute with sunflower seed butter for nut-free option.)
- 1/4 cup honey or maple syrup (Use sugar-free syrup for lower sugar option.)
- 1/2 cup rolled oats (Ensure they are gluten-free if needed.)
- 1/4 cup chocolate chips or dried fruit (optional) (Add for extra flavor.)
- 1/4 cup shredded coconut (optional) (For added texture.)
- 1Measure out all dry ingredients: protein powder, rolled oats, and optional add-ins like chocolate chips or coconut. Gather wet ingredients: nut butter and honey or maple syrup.
- 2In a large mixing bowl, add protein powder, rolled oats, nut butter, and honey (or maple syrup). Stir with a spatula to mix. Continue mixing until completely blended. If too dry, add an extra spoonful of nut butter or honey.
- 3Scoop portions of the mixture and roll them into balls approximately one inch in diameter. Line a baking sheet with parchment paper and place the balls on it, spacing them out evenly.
- 4Refrigerate for about 30 minutes until firm. Transfer to an airtight container once firm.
- 5Enjoy your Quick Protein Balls whenever you need a boost of energy!
Keywords: Healthy Snacks, Meal Prep Snacks, No-Bake Treats, Nutritious Recipes, Quick Protein Balls
- protein powder: Choose your favorite kind, whether it’s whey, casein, soy, pea, or rice-based, for a protein boost that aligns with your dietary preferences.
- nut butter: Creamy peanut butter or almond butter forms the delicious base, providing healthy fats and binding the ingredients together.
- honey or maple syrup: A natural sweetener that also helps bind the ingredients, offering a touch of sweetness to balance the flavors.
- rolled oats: These provide a satisfying chewy texture and contribute to the overall substance of the protein balls.
- chocolate chips or dried fruit: An optional, but highly recommended, addition for bursts of sweetness and texture.
- shredded coconut: Another optional ingredient that adds a lovely subtle flavor and a delicate chewiness to the balls.
The specific quantities for each ingredient are detailed within the accompanying recipe card, ensuring you have a precise guide for perfect results every time.
Variations
For those seeking a completely plant-based option, transforming these protein balls into a vegan delight is remarkably straightforward. Simply swap out the honey for maple syrup, a natural liquid sweetener that is entirely plant-derived, and ensure your chosen protein powder is also vegan-friendly, such as pea, soy, or a blend of plant proteins. This substitution maintains the binding properties and sweetness while adhering to vegan dietary principles.
Individuals focusing on a low-carbohydrate lifestyle can easily adapt this recipe. Consider using a low-carb protein powder and a sugar-free liquid sweetener like erythritol or stevia-based syrup instead of honey or maple syrup. Additionally, you might opt for almond flour or a blend of nut flours in place of oats to further reduce the carbohydrate count, creating a guilt-free, keto-friendly treat.
To elevate the flavor and nutritional profile, think about incorporating a variety of seeds into your mix. Chia seeds, flaxseeds, or even hemp seeds can be added for an extra boost of omega-3 fatty acids, fiber, and a pleasant textural contrast. These tiny powerhouses not only enhance the health benefits but also contribute a subtle crunch and earthy note that complements the other ingredients beautifully.
How to Prepare Quick Protein Balls
Step 1: Gather and Measure Your Ingredients
Begin by laying out all the necessary components for your Quick Protein Balls on a clean workspace. This initial step is crucial for a smooth and efficient preparation process. You will need to precisely measure out your dry ingredients: the protein powder, ensuring it’s a type you enjoy, and the rolled oats, which provide a wonderful texture and substance. Don’t forget to measure any optional dry add-ins like chocolate chips or shredded coconut at this stage, setting them aside to be incorporated later.
Simultaneously, prepare your wet ingredients. Measure out your chosen nut butter, ensuring it’s creamy and easy to mix, and your liquid sweetener, whether that’s honey or maple syrup. Having all ingredients measured and ready before you start combining them will prevent any hurried steps or forgotten additions. This organized approach ensures that the mixture comes together harmoniously, leading to the perfect consistency for rolling.
Pro Tip: If you’re using nut butter that has separated, give it a good stir before measuring to ensure it’s smooth and consistent. This will help in achieving an even distribution of fats and flavor throughout your protein balls. It’s also beneficial to have a clear understanding of the moisture content of your protein powder, as some absorb liquid differently than others.
Step 2: Combine the Dry and Wet Components
In a large, sturdy mixing bowl, begin by adding your measured protein powder and rolled oats. These dry ingredients form the structural base of your protein balls. Next, introduce your chosen nut butter, which acts as a binder and adds richness, followed by the liquid sweetener, such as honey or maple syrup, that contributes sweetness and helps bind everything together. The order of addition can be flexible, but combining the dry first often makes it easier to incorporate the wet.
Once all the ingredients are in the bowl, start the mixing process. Use a sturdy spatula or a wooden spoon to gently combine everything. Initially, it might seem like the ingredients aren’t coming together, but as you continue to mix, the nut butter and sweetener will start to coat the dry ingredients, creating a cohesive mass. This initial mixing phase is about getting everything acquainted and starting the transformation from separate components to a unified dough-like mixture.
The Texture Goal: You are aiming for a mixture that is sticky enough to hold together when pressed, yet not overly wet or gooey. It should resemble a thick cookie dough in consistency, making it pliable and easy to shape into balls. If you find that your mixture is stubbornly dry and crumbly, resist the urge to add a lot of extra liquid all at once; small additions are key.
Step 3: Achieve the Perfect Dough Consistency
Continue the vigorous mixing process until all the ingredients are thoroughly and evenly incorporated. This means no dry pockets of protein powder or oats should remain visible, and the nut butter and sweetener should be fully distributed, creating a uniform color and texture throughout the mass. You might need to use your hands to really work the mixture together at this stage, ensuring every particle is bound with the wet ingredients. This thorough mixing is essential for the structural integrity of the final protein balls.
Observe the consistency closely. The ideal mixture should be slightly tacky to the touch but should hold its shape when squeezed. If the mixture feels too dry and is not clumping together, it’s time to make a slight adjustment. Add an extra teaspoon of nut butter or a drizzle of your liquid sweetener. It’s better to add these binding agents incrementally, mixing well after each addition, rather than overwhelming the mixture with too much at once, which could lead to a mushy outcome.
Troubleshooting Tip: If, by chance, you’ve added a bit too much liquid and the mixture becomes too soft or sticky, don’t despair. You can often correct this by adding a tablespoon or two more of rolled oats or protein powder. Mix them in thoroughly until the dough reaches that perfect, moldable consistency. Patience here will pay dividends in the final product.
Step 4: Form the Protein Balls
Once you have achieved that perfect, pliable dough consistency, it’s time for the fun part: shaping the protein balls. Using a small spoon or a cookie scoop, portion out the mixture. Aim for a size of about one inch in diameter, similar to a small truffle or a large marble. This uniform size ensures consistent texture and flavor in each bite, and makes for an attractive presentation.
Take each portion and roll it between your palms. Apply gentle but firm pressure to create a smooth, round ball. If the mixture is sticking to your hands, you can slightly dampen your palms with water or lightly coat them with a tiny amount of coconut oil. This simple trick will help the dough release easily, allowing you to create perfectly formed spheres without frustration. This is a wonderful step to involve children in, as they often love the tactile experience of rolling the dough.
Make it Fun: Encourage everyone to create their own unique shapes if they wish, or have a friendly competition to see who can roll the smoothest ball. The process of shaping is where the raw ingredients truly transform into the recognizable form of a snack, making it a rewarding stage of the recipe.
Step 5: Prepare for Chilling and Firming
After you have meticulously shaped all your protein balls, the next critical step is to prepare them for chilling. This involves selecting an appropriate storage surface that will prevent them from sticking. Line a baking sheet or a large plate with parchment paper or wax paper. This non-stick barrier is essential to ensure that your beautifully formed balls don’t adhere to the surface as they firm up in the refrigerator, maintaining their perfect spherical shape.
Carefully arrange the rolled protein balls on the prepared baking sheet. Ensure that each ball has a little bit of space around it. Avoid overcrowding the sheet; place them in a single layer, leaving about an inch of space between each one. This separation allows for even air circulation around each ball, which is important for uniform chilling and firming. It also makes them easier to remove individually once they are ready to be stored or served.
Why Parchment Paper?: Parchment paper is highly recommended because it is naturally non-stick and food-safe, preventing any unwanted transfer of flavors or residue. It also makes cleanup significantly easier, as any minor sticking is contained on the paper itself, which can then be discarded.
Step 6: Chill to Perfection
Now, it’s time to let the magic of refrigeration work its wonders. Gently transfer the baking sheet containing the shaped protein balls into your refrigerator. Allow them to chill for a minimum of 30 minutes. This crucial chilling period is what firms up the nut butter and other ingredients, transforming the slightly soft, moldable dough into firm, satisfyingly chewy balls that are easy to handle and delightful to eat.
The 30-minute chilling time is generally sufficient for most mixtures, but you can extend it if you prefer a firmer texture. The goal is for the balls to be solid to the touch, not squishy or sticky. This firming process is what gives them their signature bite and ensures they hold their shape when you take them out for snacking or packing. Don’t rush this step; it’s as important as the mixing and rolling.
Observing the Change: You’ll notice a significant difference in texture after refrigeration. The slight tackiness will dissipate, replaced by a firm exterior and a satisfyingly dense interior. This transformation is what makes them perfect for grabbing and going, or for packing into lunchboxes without worrying about them melting or falling apart.
Step 7: Store for Future Enjoyment
Once your Quick Protein Balls have achieved that perfect firm consistency from their chilling period, it’s time to store them properly to maintain their freshness and deliciousness. Transfer the firmed-up balls from the baking sheet into an airtight container. An airtight container is paramount for preserving their texture and preventing them from absorbing any unwanted odors from other foods in your refrigerator.
Ensure the container is clean and dry before adding the protein balls. You can stack them carefully within the container, as they are now firm enough to withstand gentle stacking without deforming. If you have a particularly large batch, using multiple containers or a larger, shallow container can help keep them organized and prevent them from being crushed. Proper storage is key to ensuring they remain a convenient and tasty snack option for days to come.
Maximizing Shelf Life: By using an airtight container, you create a barrier against moisture and air, which are the primary culprits in staleness and spoilage. This simple step will significantly extend the enjoyable lifespan of your homemade protein balls, making them a reliable go-to snack.
Step 8: Indulge and Energize
Your delicious and nutritious Quick Protein Balls are now fully prepared and ready to be savored. Grab one or two whenever you feel a craving strike, need a quick energy boost to power through your day, or are looking for a healthy way to satisfy your sweet tooth. They are the perfect companion for a busy lifestyle, offering a convenient and satisfying snack that fuels your body with essential protein and goodness.
Enjoy them as is, or perhaps pair them with a refreshing glass of water, a cup of herbal tea, or a smoothie for a more complete snack experience. The satisfaction of enjoying a homemade, healthy treat that you’ve prepared yourself is truly unparalleled. These protein balls are a testament to how simple ingredients can combine to create something truly wonderful and beneficial for your well-being.
The Ultimate Reward: The true joy of making these protein balls lies not just in their preparation, but in the delicious and guilt-free enjoyment they provide. They are a small but mighty way to nourish your body and treat yourself kindly, one tasty bite at a time.
Pro Tips for Quick Protein Balls
Enhance Flavor with Protein Powder Choice: The type of protein powder you select is foundational to the overall taste. Experiment with different flavors like vanilla, chocolate, or even coffee to complement your other ingredients and create distinct flavor profiles. For instance, chocolate protein powder paired with peanut butter and a few extra chocolate chips creates a decadent, dessert-like experience. This simple substitution can dramatically alter the snacking experience without adding complexity to the recipe.
Incorporate Seeds for Texture and Nutrition: For an added layer of texture and a significant nutritional boost, consider incorporating a variety of seeds into your mixture. Chia seeds, flaxseeds, and hemp seeds are excellent choices, providing valuable omega-3 fatty acids, fiber, and plant-based protein. These tiny additions not only contribute a pleasant crunch but also enhance the overall health benefits of each protein ball, making them even more of a powerhouse snack.
Elevate Presentation with Coatings: While perfectly rolled balls are appealing on their own, a final flourish can elevate their appearance and taste. Before chilling, consider rolling the balls in a coating of shredded coconut, finely chopped nuts, cocoa powder, or even a sprinkle of extra seeds. This not only adds visual appeal but also introduces an extra dimension of flavor and texture, making your homemade protein balls look as good as they taste and feel like a gourmet treat.
Adjust Nut Butter Texture: The consistency of your nut butter can significantly impact the dough. If your nut butter is very stiff, you might need to warm it slightly (by placing the jar in warm water or microwaving for a few seconds) to make it more pliable and easier to mix. Conversely, if it’s too runny, you might need to slightly increase the amount of oats or protein powder to achieve the desired moldable consistency. Finding that perfect balance is key for easy rolling.
Serving Suggestions for Quick Protein Balls
Decoration
For a visually appealing presentation, consider a light dusting of cocoa powder or cinnamon over the finished protein balls. You can also sprinkle them with a few extra chocolate chips or finely chopped nuts before they fully set. A drizzle of melted dark chocolate or a swirl of yogurt icing can also transform these simple snacks into elegant mini desserts, perfect for sharing or special occasions.
Another delightful decorative option is to roll the finished balls in shredded coconut, finely chopped pistachios, or even edible glitter for a festive touch. This not only enhances the visual appeal but also adds an extra layer of flavor and texture. Presentation can truly make these protein balls feel like a special treat, turning an everyday snack into a small culinary creation.
The choice of decoration can also hint at the flavor profile within. For instance, rolling them in shredded coconut suggests a tropical note, while a topping of crushed almonds might indicate a nutty richness. This subtle signaling can enhance the enjoyment and anticipation for those about to indulge.
Side Dishes
Quick Protein Balls are wonderfully versatile and pair exceptionally well with a variety of beverages. A tall glass of cold, unsweetened almond milk or a refreshing iced green tea makes for a perfect accompaniment, providing hydration and complementing the snack’s flavors. For a warmer option, a soothing cup of herbal tea or a mild coffee can also be a delightful pairing.
They also make an excellent addition to a balanced breakfast or brunch spread. Serve them alongside a bowl of fresh berries, a dollop of Greek yogurt, or even as a sweet element on a charcuterie board. Their compact size and satisfying nature make them a welcome component of a more elaborate meal, offering a burst of energy and flavor.
For a truly satisfying snack, consider pairing them with a piece of fruit, like an apple or a banana. This combination provides a mix of carbohydrates, fiber, and protein, creating a well-rounded and energizing mini-meal that can sustain you through your day. The natural sweetness of the fruit often complements the richness of the protein balls.
Creative Serving Ideas
Transform your Quick Protein Balls into an impressive dessert by artfully arranging them on a platter and drizzling them with melted chocolate. You can even create patterns or designs with the chocolate drizzle for an added artistic touch. Serve them alongside a scoop of your favorite low-calorie ice cream or a light whipped topping for a truly indulgent experience.
For a fun and interactive serving idea, set up a “protein ball bar” where guests can choose their own coatings or add-ins before they are rolled. This allows for maximum customization and ensures everyone gets exactly the flavor and texture combination they desire. It’s a fantastic way to engage guests and make your gathering memorable.
Consider using them as a creative topping for yogurt parfaits or smoothie bowls. Crumbled or halved, they add a delightful chewy texture and a protein boost that makes breakfast or snack time more substantial and exciting. Their portability also makes them ideal for packed lunches, where they can be a fun surprise.
Preparation & Storage
Storing Leftovers
To ensure your delicious Quick Protein Balls remain fresh and enjoyable for as long as possible, proper storage is key. The best method is to place them in an airtight container and store them in the refrigerator. This will help maintain their firm texture and prevent them from drying out or absorbing unwanted odors from other foods within the fridge.
An airtight container creates a seal that limits exposure to air, which is the primary cause of staleness. Ensure the container is completely dry before transferring the balls to avoid introducing excess moisture. You can stack the protein balls carefully within the container, as they are firm enough at this stage to withstand gentle stacking without losing their shape.
Shelf Life Expectation: Properly stored in the refrigerator, your Quick Protein Balls should remain fresh and retain their desirable texture for up to one week. This makes them an excellent candidate for weekly meal prep, ensuring you always have a healthy snack readily available.
Freezing
If you’ve made a larger batch of Quick Protein Balls than you anticipate consuming within a week, freezing is an excellent option for long-term preservation. They freeze remarkably well and can retain their quality for an extended period, providing a convenient stash of snacks for future enjoyment.
To freeze them, place the firm protein balls into a freezer-safe container or a heavy-duty zip-top bag. Ensure that the container or bag is sealed tightly to prevent freezer burn, which can affect the texture and taste. You can place them in a single layer on a baking sheet to freeze individually before transferring them to a bag, which prevents them from clumping together into one large mass.
Freezing Duration: When stored correctly in the freezer, your Quick Protein Balls can last for up to three months. This makes them an ideal item to prepare in bulk during less busy periods and then have on hand whenever a craving strikes or a quick snack is needed.
Reheating
Quick Protein Balls are designed to be enjoyed chilled, as refrigeration enhances their texture and makes them delightfully firm. Therefore, reheating is generally not necessary and often not recommended, as it can alter the intended consistency and make them too soft or mushy.
However, if you personally prefer a slightly softer or warmer texture, you can opt for a very brief microwaving session. Place one or two protein balls on a microwave-safe plate and heat them on low power for just a few seconds – think 5 to 10 seconds at most. The goal is a subtle warming, not cooking.
Thawing Frozen Balls: If you are retrieving your protein balls from the freezer, the best method for thawing is to simply transfer them from the freezer to the refrigerator the night before you plan to eat them. This allows them to thaw gradually and retain their optimal texture. Avoid thawing them at room temperature, as this can lead to condensation and a softer consistency.
Frequently Asked Questions
-
How long will Quick Protein Balls last, and what are the best storage practices to maintain their freshness and texture?
Quick Protein Balls can be stored in an airtight container in the refrigerator for up to one week, ensuring they remain fresh and flavorful. The airtight seal is crucial to prevent them from drying out or absorbing any unwanted odors from other foods. For longer storage, they freeze exceptionally well; place them in a freezer-safe container or zip-lock bag, and they can be kept for up to three months. When ready to enjoy frozen balls, the best method is to thaw them overnight in the refrigerator for optimal texture.
-
Can I substitute the nut butter and honey in this recipe, and what are the best alternatives for individuals with allergies or specific dietary needs like vegan or low-carb diets?
Absolutely! For nut allergies, sunflower seed butter or soy nut butter are excellent substitutes, providing a similar creamy texture and binding properties without the allergens. To make the recipe vegan, swap honey for maple syrup or agave nectar and ensure your protein powder is plant-based. For a low-carb or keto-friendly version, use a sugar-free liquid sweetener (like erythritol-based syrup) and consider using almond flour or a nut-based flour blend instead of oats, along with a low-carb protein powder. These substitutions allow the recipe to cater to a wide range of dietary requirements while maintaining its deliciousness and ease of preparation.
-
What is the ideal consistency for the protein ball mixture, and how can I adjust it if it becomes too dry or too sticky during preparation?
The ideal consistency for the protein ball mixture is a thick, moldable dough that holds its shape when squeezed, similar to cookie dough. It should be slightly tacky but not overly wet or sticky. If your mixture appears too dry and crumbly, gradually add more nut butter or liquid sweetener, a teaspoon at a time, mixing thoroughly after each addition until it reaches the desired consistency. Conversely, if the mixture becomes too sticky or runny, you can correct it by adding a little more rolled oats or protein powder, again, incrementally and with thorough mixing, until it becomes firm enough to roll easily. Patience and small adjustments are key to achieving the perfect texture.