3 2 1 Ribs
The allure of perfectly cooked ribs is undeniable, and the 3-2-1 method stands as a testament to achieving unparalleled tenderness and flavor. This systematic approach breaks down the smoking process into manageable stages, ensuring that even novice pitmasters can produce barbecue that rivals the best. Prepare yourself for an expedition into the heart of smoking, where patience and precise timing unlock the secrets to succulent, fall-off-the-bone ribs that will undoubtedly become a legend in your culinary repertoire.
From the initial smoky embrace to the final sweet glaze, each phase of the 3-2-1 technique is designed to build layers of deliciousness. It’s a journey that transforms humble racks of ribs into a centerpiece worthy of any celebration. Embrace the challenge, and let the irresistible aroma of slow-cooked perfection guide you through this rewarding cooking adventure.
Why You Will Love This Recipe
- Melt-in-Your-Mouth Tenderness: The strategic 3-2-1 method ensures ribs are cooked to an exquisite tender state, making them incredibly enjoyable with every bite.
- Explosion of Flavor: A thoughtful combination of savory rubs and sweet barbecue sauces creates a complex and deeply satisfying taste profile that will leave you craving more.
- Impressive Results, Simple Process: Despite the sophisticated outcome, the 3-2-1 technique is straightforward, making it accessible for home cooks seeking to elevate their BBQ game.
- Versatile Crowd-Pleaser: These ribs are universally loved, making them the ideal choice for everything from casual backyard gatherings to significant holiday feasts.
- Customizable to Your Taste: Easily adapt the recipe by experimenting with different rubs, sauces, or wood chips to perfectly match your personal flavor preferences.
Ingredients You Need
The foundation of exceptional 3-2-1 Ribs lies in the quality of the ingredients you select. Opting for fresh, well-marbled racks of ribs will significantly contribute to the final texture and moisture content. Similarly, choosing a robust beef rub and a complementary barbecue sauce can elevate the overall flavor profile to extraordinary heights. Remember, the best results often stem from starting with the best components, so invest a little extra in sourcing premium ingredients for a truly memorable culinary experience.
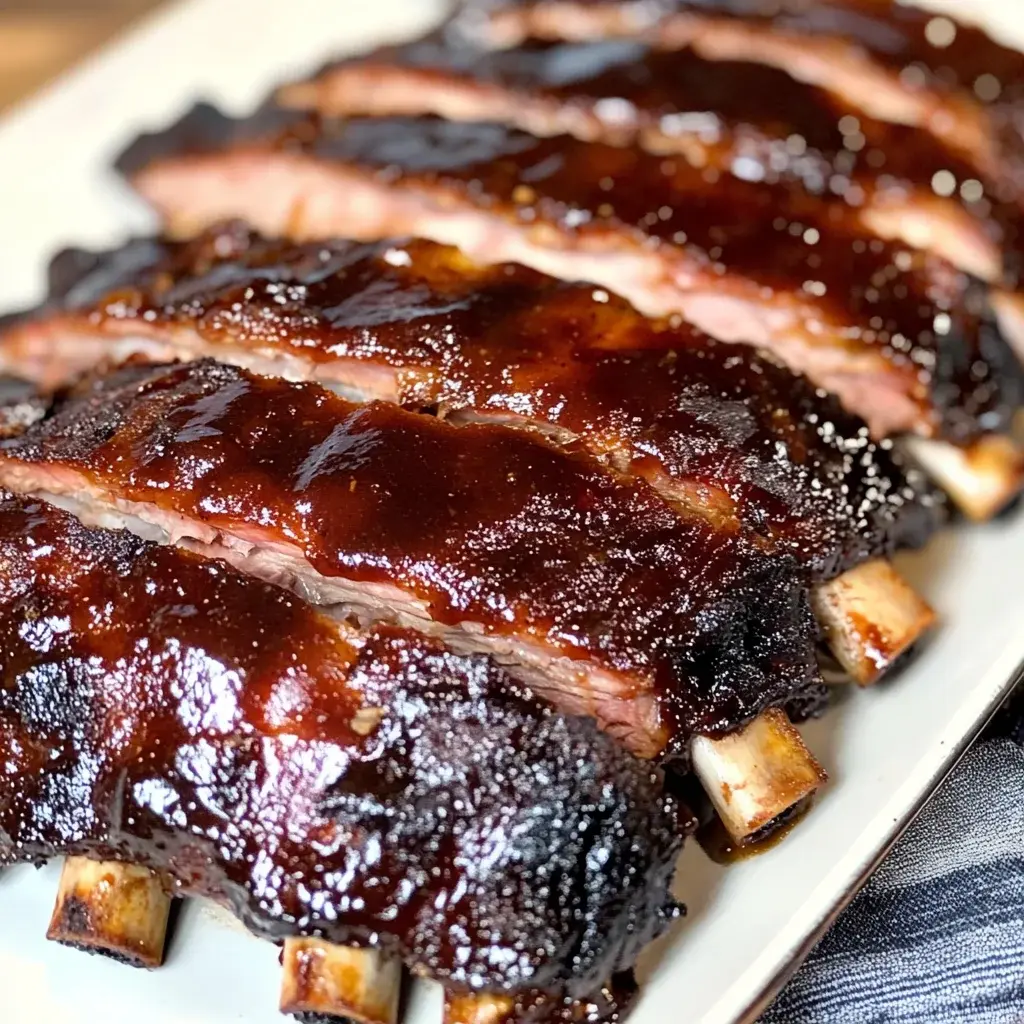
3-2-1 Ribs Recipe

3-2-1 Ribs are a crowd-pleasing delight, perfect for any gathering. This method transforms ribs into tender, juicy morsels that practically melt in your mouth. With a unique smoking technique and the right blend of flavors, these ribs deliver an unforgettable experience at your next barbecue or family dinner. Whether you prefer a sweet and tangy BBQ sauce or a spicy twist, this recipe allows for customization to suit every palate. Get ready to impress your guests with these succulent ribs that are sure to be the star of the show!
- 2 racks baby back ribs
- 1/4 cup prepared yellow mustard
- 1/2 cup beef rub
- 1 cup sweet and tangy BBQ sauce
- 1Preheat your smoker or grill to 225°F using hickory or pecan wood chips.
- 2Pat dry the ribs and apply yellow mustard generously on the meat side.
- 3Evenly sprinkle your favorite beef rub over the ribs.
- 4Smoke the ribs meat side up for 3 hours.
- 5Wrap each rack tightly in butcher paper or aluminum foil and return them to the smoker for another 2 hours.
- 6Unwrap the ribs, brush on BBQ sauce, and cook for an additional hour to meld flavors.
- 7Let rest for 10 minutes before slicing.
Keywords: ribs, barbecue, smoked, grilling, dinner, party, meat, pork
- baby back ribs: two racks for a generous serving.
- prepared yellow mustard: about 1/4 cup, acting as a binder for the rub.
- beef rub: approximately 1/2 cup, choose your favorite blend for a savory crust.
- sweet and tangy bbq sauce: 1 cup, for that irresistible sticky glaze at the end.
Detailed quantities for these essential components can be found within the provided recipe card, ensuring accuracy and ease of preparation.
Variations
To truly personalize your 3-2-1 Ribs, consider exploring a variety of flavor profiles and dietary adaptations. For instance, a vegan variation can be achieved by substituting the ribs with large king oyster mushrooms, prepared using a similar smoking and wrapping technique, and coated in a smoky, savory sauce. This allows plant-based eaters to enjoy the essence of barbecue without compromise.
A low-carb approach can be implemented by carefully selecting sugar-free barbecue sauces and ensuring your beef rub contains no added sugars or starches. You might also consider pairing these low-carb ribs with side dishes that align with this dietary preference, such as cauliflower mash or a crisp green salad with a vinaigrette dressing.
For a spicy kick, don’t shy away from incorporating a spicier rub and a hot-and-spicy barbecue sauce during the final hour of cooking. You can even add a few sliced jalapeños or a dash of cayenne pepper to the foil packet during the second stage for an extra layer of heat that permeates the meat. Each variation offers a unique way to enjoy the beloved 3-2-1 method.
How to Prepare 3 2 1 Ribs
The journey to perfect 3-2-1 Ribs begins with meticulous preparation of your cooking environment. This crucial first step ensures a stable and optimal temperature for the entire smoking duration. Without this foundational control, the delicate balance of the 3-2-1 method can be easily disrupted, leading to less-than-ideal results.
Step 1: Prepare Your Smoker
Before any ribs touch the heat, it’s imperative to get your smoker or grill ready. Aim to preheat your smoker to a consistent temperature of 225°F (107°C). This moderate temperature is key to slow-cooking the ribs, allowing the connective tissues to break down gradually and render the fat, resulting in unparalleled tenderness. For that authentic barbecue flavor, incorporate your preferred smoking wood chips, such as hickory or pecan, which impart a rich, smoky aroma and taste.
The choice of wood can significantly influence the final flavor, so experiment to find your favorite. Ensuring your smoker maintains this temperature for the entire initial three-hour phase is paramount. A reliable smoker thermometer is an invaluable tool for this, as fluctuations can negatively impact the cooking process. Patience at this stage is rewarded tenfold in the final product.
The preparation of the smoker also involves ensuring it’s clean and free from any old ash or debris that could impart unwanted flavors. Give your smoker a thorough cleaning before each use to guarantee the purest smoky essence. It is a small step that makes a significant difference in the overall quality of your smoked ribs. Mastering temperature control is perhaps the most critical skill in barbecue, and the 3-2-1 method offers a structured way to practice it.
Step 2: Prepare the Ribs
Once your smoker is humming at the perfect temperature, it’s time to turn your attention to the star of the show: the ribs. Carefully remove the baby back ribs from their packaging. It’s essential to pat them thoroughly dry with paper towels. This step might seem minor, but it’s crucial for creating a surface that allows the rub to adhere properly and develop a beautiful, flavorful bark during the smoking process.
Moisture on the surface of the ribs can prevent the rub from sticking, leading to uneven seasoning and a less desirable crust. Take your time to ensure every inch of the ribs is dry to the touch. This attention to detail in the initial preparation is a hallmark of successful barbecue. Do not skip this step, as it directly impacts the texture and flavor development.
Beyond drying, consider whether to remove the membrane on the back of the ribs. This thin, papery layer can sometimes become tough and chewy after cooking. You can easily remove it by sliding a knife under the membrane at one end and then using a paper towel to grip and pull it off. Some pitmasters prefer to leave it on, believing it adds to the richness, but for ultimate tenderness, removal is often recommended for baby back ribs.
Step 3: Apply Mustard and Rub
With the ribs prepped and dried, it’s time to build the flavor base. Generously coat the meat side of each rack of ribs with prepared yellow mustard. Don’t worry; the mustard flavor doesn’t overpower the ribs; instead, it acts as a binder for the dry rub and adds a subtle tanginess that complements the smoky notes. Ensure an even and thorough coating across the entire surface of the meat.
Next, liberally apply your chosen beef rub over the mustard-coated ribs. The goal here is to create a thick, even layer of seasoning that will form a delicious crust, or “bark,” during the smoking process. Ensure that all sides of the ribs, where applicable, are well-covered with the rub. Don’t be shy; a good amount of rub is essential for developing deep flavor.
The combination of mustard and a robust beef rub is what lays the groundwork for the complex flavor profile of 3-2-1 ribs. The rub should contain a blend of spices like paprika, chili powder, garlic powder, onion powder, and perhaps a touch of brown sugar or cayenne pepper for a little heat. Allow the rubbed ribs to sit for at least 15-30 minutes, or even longer if time permits, to let the rub penetrate the meat slightly and begin to work its magic.
Step 4: Smoke the Ribs
This is where the magic of the 3-2-1 method truly begins. Carefully place your seasoned ribs onto the preheated smoker grate, ensuring they are positioned meat-side up. The initial three-hour phase is dedicated to allowing the ribs to absorb the smoky essence and begin the tenderizing process at a low and slow temperature of 225°F. This extended period of gentle cooking is fundamental to achieving that signature melt-in-your-mouth texture.
Resist the urge to open the smoker lid too frequently during these first three hours, as each opening releases precious heat and smoke, prolonging the cooking time and potentially hindering the development of a good bark. Trust the process and the temperature you’ve set. The low and slow cooking breaks down the tough collagen in the ribs, transforming it into gelatin, which adds moisture and richness.
Monitor your smoker’s temperature periodically to ensure it remains stable within the desired 225°F range. If you’re using wood chunks or logs, you might need to add more to maintain the smoke. The goal is a consistent, gentle stream of smoke throughout this phase. The appearance of the ribs at the end of this stage will likely be a deep reddish-brown, with a tacky surface from the rub.
Step 5: Wrap the Ribs
After the initial three hours of smoking, it’s time for the second crucial phase of the 3-2-1 technique: the wrap. Carefully remove the ribs from the smoker. The ribs will likely have a good color and texture, but they need more tenderizing. This stage is vital for pushing the ribs towards that fall-off-the-bone consistency without drying them out.
Lay out a large piece of peach butcher paper or heavy-duty aluminum foil for each rack of ribs. Place each rack onto its respective wrapping material. At this point, many pitmasters like to add a little extra moisture to the ribs to ensure they remain exceptionally juicy during the next cooking phase. A common practice is to sprinkle a bit of apple juice, beef broth, or even a touch of barbecue sauce over the ribs before sealing them.
Some recipes suggest adding a thin layer of butter as well. Tightly wrap each rack of ribs, ensuring there are no gaps where steam can escape. The goal is to create a steamy environment that will further break down the connective tissues and render the fat, making the ribs incredibly tender. Peach butcher paper is often preferred by professionals as it allows for some breathability, contributing to a slightly better bark than foil, but foil is also highly effective and readily available.
Step 6: Continue Cooking
Once snugly wrapped, return the foil or butcher paper-bound ribs back into the smoker or grill. Maintain the same cooking temperature of 225°F. This second phase of cooking lasts for two hours, during which the ribs steam within their protective wrapping. This steaming process is what really drives the tenderness to new heights, ensuring the meat is exceptionally soft and yielding.
During these two hours, the ribs will continue to absorb flavor and tenderize. The internal temperature will rise, and the collagen will continue to convert into gelatin. This is a critical stage where you are essentially braising the ribs in their own juices and the added liquid, intensifying the moisture and melt-in-your-mouth quality that the 3-2-1 method is famous for. Keep an eye on your smoker’s temperature to ensure it stays consistent.
The wrapped ribs will likely feel significantly softer when gently squeezed compared to their state before wrapping. This is a good indicator that the tenderizing process is on track. Avoid unwrapping them prematurely, as this can disrupt the steamy environment that is crucial for this stage. The anticipation builds as you approach the final stage of cooking.
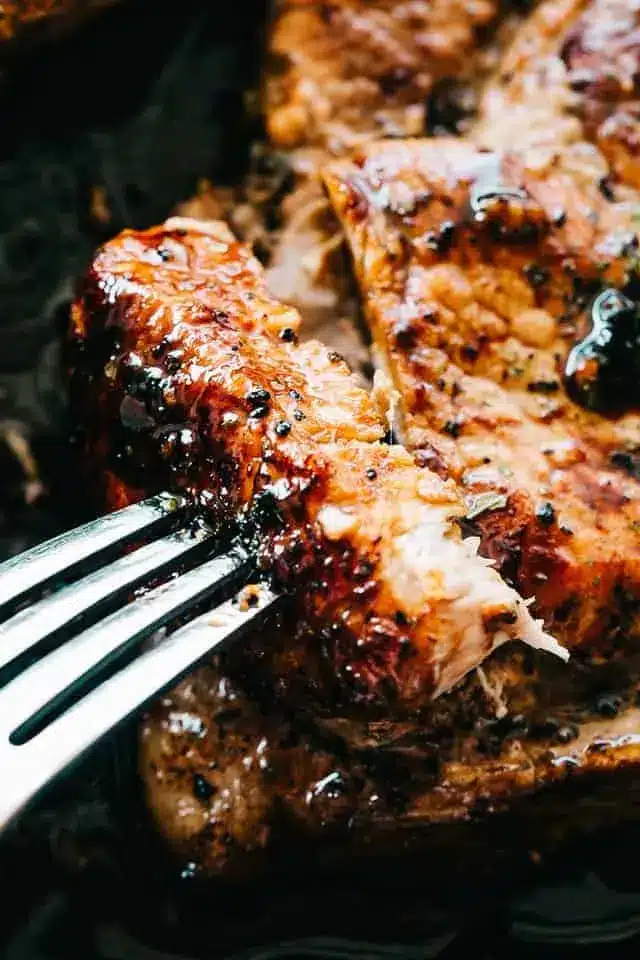
Step 7: Saucing Time
The final hour is all about flavor infusion and creating that signature sticky, glazed finish. After the two-hour wrapped cooking period, carefully remove the ribs from the smoker. Unwrap them gently, being mindful of the hot steam that will be released. The ribs should now be incredibly tender, almost at the point where they could fall off the bone.
Now, it’s time to apply your favorite barbecue sauce. Generously brush an even layer of your chosen sauce over the entire surface of the ribs. Ensure complete coverage, as this sauce will caramelize and create that delectable sticky coating. For enhanced flavor, consider using a homemade sauce or a high-quality store-bought option. Some people like to apply two thin layers of sauce, allowing each layer to set slightly before applying the next.
Return the sauced ribs to the smoker, uncovered, for the final hour at 225°F. This allows the sauce to thicken, caramelize, and adhere beautifully to the ribs. This is where the magic happens, transforming the tender ribs into a visually appealing and incredibly flavorful finished product. The sweet glaze combined with the smoky, savory notes creates an unforgettable taste experience.
Step 8: Serve
Once the final hour of saucing and glazing is complete, carefully remove the magnificent 3-2-1 ribs from the smoker. Resist the temptation to cut into them immediately, as they need a brief resting period. Place the ribs on a clean cutting board or a sheet pan and let them rest for approximately 10 minutes. This resting period is crucial for allowing the juices to redistribute throughout the meat, ensuring every slice is as moist and flavorful as possible.
After resting, it’s time to slice the ribs into individual portions. A sharp knife and a steady hand are your best tools here. You’ll notice how easily the meat separates from the bone, a testament to the success of the 3-2-1 method. Serve them hot and enjoy the applause from your delighted guests.
Pro Tips for 3 2 1 Ribs
Generous Rub Application: Don’t be shy with your dry rub. A thick, even coating is essential for developing a flavorful bark. Allowing the rub to sit on the ribs for at least 30 minutes before smoking helps it adhere and meld with the meat.
Consistent Smoker Temperature: Maintaining a steady temperature of 225°F is critical throughout the entire smoking process. Use a reliable thermometer and make adjustments as needed to avoid fluctuations that can lead to dry or undercooked ribs.
Proper Wrapping Technique: When wrapping the ribs in butcher paper or foil, ensure a tight seal. This traps the moisture and steam, which is key to achieving that incredibly tender, fall-off-the-bone texture during the second phase of cooking.
Don’t Overcook the Final Stage: While the last hour is for glazing, keep an eye on the ribs to prevent the sauce from burning. The goal is a caramelized glaze, not a scorched mess. Remove them once the sauce is sticky and slightly set.
Resting is Essential: Always allow the ribs to rest for at least 10 minutes after removing them from the smoker. This crucial step lets the juices redistribute throughout the meat, ensuring maximum moisture and flavor in every bite.
Serving Suggestions for 3 2 1 Ribs
Decoration
Elevate the presentation of your 3-2-1 Ribs with thoughtful garnishes. A sprinkle of fresh, finely chopped parsley or cilantro adds a vibrant splash of green and a hint of freshness. Consider a few thinly sliced green onions for a mild oniony bite and visual appeal. If you’ve opted for a spicier sauce, a small mound of pickled jalapeño slices on the side can offer a visually striking contrast and a hint of daring.
For a truly rustic barbecue look, a small sprig of rosemary or thyme placed strategically can add an aromatic touch and visual depth. Even a light dusting of your favorite rub powder over the top of the glazed ribs can enhance their visual texture and hint at the flavors within. The key is to add elements that complement, rather than overpower, the rich color and texture of the ribs themselves.
Side Dishes
The perfect accompaniments can transform a plate of 3-2-1 Ribs into an unforgettable feast. Classic creamy coleslaw provides a refreshing crunch and tangy contrast to the rich meat. Fluffy, slightly sweet cornbread is ideal for soaking up any delicious barbecue sauce that remains on the plate.
Baked beans, slow-cooked with a hint of smoky bacon, offer a hearty and traditional pairing. For a lighter option, a crisp Caesar salad with its zesty dressing cuts through the richness of the ribs beautifully. Alternatively, grilled corn on the cob, perhaps brushed with butter and chili powder, adds a touch of sweetness and char that complements the smoky notes of the ribs.
Consider a robust macaroni and cheese, its creamy texture and savory flavor offering a comforting counterpoint to the savory ribs. Potato salad, whether creamy or vinaigrette-based, is another barbecue staple that pairs wonderfully. For a refreshing twist, a simple cucumber and dill salad provides a cool, crisp balance.
Creative Serving Ideas
Move beyond the traditional platter with some creative serving ideas for your 3-2-1 Ribs. Consider deconstructing the ribs slightly by slicing them into smaller, bite-sized pieces and serving them in a cast-iron skillet or a rustic wooden bowl. This makes them perfect for sharing as an appetizer or for a more casual, grazing-style meal.
Another idea is to create a “rib slider” bar. Prepare small slider buns and offer a selection of toppings such as pickled onions, extra barbecue sauce, and a creamy slaw, allowing guests to build their own mini rib sandwiches. You could also serve the ribs family-style on a large butcher paper-lined platter, allowing everyone to dig in directly.
For a more refined presentation, plate individual portions with a carefully arranged side dish and a drizzle of extra sauce. You might also consider serving them with a side of grilled pineapple slices; the sweet and slightly acidic fruit offers a fantastic counterpoint to the savory, smoky ribs. This allows for a more cohesive and visually appealing dining experience.
Preparation & Storage
Storing Leftovers
Properly storing any leftover 3-2-1 Ribs is key to maintaining their delicious quality for future enjoyment. Once the ribs have cooled down to room temperature, transfer them into an airtight container. This prevents them from drying out and absorbing odors from other foods in the refrigerator. Ensure the lid is sealed tightly before placing them in the fridge.
Leftover ribs will typically remain fresh and safe to eat for up to 4 days when stored correctly in the refrigerator. It’s always a good practice to label your containers with the date they were stored, helping you keep track of freshness. Avoid leaving cooked ribs at room temperature for more than two hours to prevent bacterial growth.
Freezing
If you anticipate having more leftovers than you can consume within a few days, freezing is an excellent option. For the best results, wrap individual portions or smaller sections of ribs tightly in plastic wrap. This initial layer helps to prevent freezer burn. Once securely wrapped, place the individual portions into a heavy-duty freezer bag or an airtight freezer-safe container.
Removing as much air as possible from the freezer bag before sealing will further enhance the quality of the frozen ribs. Properly frozen, these 3-2-1 Ribs can maintain their optimal texture and flavor for up to 3 months. Beyond this period, while still safe to eat, their quality might begin to decline.
Reheating
Reviving your leftover 3-2-1 Ribs can be done using several methods, each offering slightly different results. For the oven, preheat it to a moderate temperature of 250°F (120°C). Arrange the ribs on a baking sheet and cover them tightly with aluminum foil. This traps moisture and prevents them from drying out during reheating. Heat for approximately 20-30 minutes, or until the ribs are warmed through to your desired temperature.
The microwave offers a quick reheating option, but it can sometimes result in less consistent texture. Place the ribs on a microwave-safe plate and cover them with a damp paper towel to help retain moisture. Heat in short intervals, checking frequently to avoid overcooking. For a stovetop method, gently heat the ribs in a skillet over low heat. Add a splash of water, broth, or a bit of extra barbecue sauce to keep them moist, flipping occasionally until heated through.
Frequently Asked Questions
-
What exactly does the “3-2-1” in 3-2-1 Ribs refer to, and why is this method so effective?
The “3-2-1” in 3-2-1 Ribs precisely describes the cooking timeline: the ribs are smoked uncovered for three hours, then wrapped and cooked for two more hours, and finally unwrapped and glazed for one final hour. This method is incredibly effective because each stage serves a specific purpose in achieving optimal tenderness and flavor. The initial three hours allow the ribs to absorb smoke and begin the tenderization process at a low temperature. The subsequent two hours of wrapping create a steamy environment that breaks down connective tissues and renders fat, resulting in a fall-off-the-bone texture without drying out the meat. The final hour allows the barbecue sauce to caramelize and adhere to the ribs, creating that signature sticky glaze and intense flavor.
-
How can I ensure my ribs are as flavorful as possible, and what are some ways to customize the taste profile beyond the basic recipe?
To maximize flavor, start with high-quality ingredients and a well-balanced dry rub. Apply the rub generously and allow it to adhere to the ribs for at least 30 minutes before smoking. For customization, experiment with different types of wood for smoking; hickory and pecan are classics, but mesquite or applewood offer distinct notes. When it comes to the barbecue sauce, choose one that complements your palate – whether it’s a sweet and tangy, spicy, or smoky variety. You can also inject the ribs with a flavorful liquid like beef broth or apple juice before smoking, or add a pat of butter and a splash of brown sugar to the foil packet during the second stage for extra richness.
-
Can this 3-2-1 method be adapted for different types of ribs, or even other meats, and what adjustments might be necessary?
Absolutely! While this recipe is optimized for baby back ribs, the 3-2-1 principle can be adapted for other cuts and meats, though timings may need adjustment. St. Louis-style ribs, which are larger and fattier, might benefit from a slightly longer initial smoking phase or a more extended wrapping period. Beef ribs, particularly short ribs or plate ribs, are also excellent candidates for the 3-2-1 method, often requiring a longer overall cooking time due to their denser muscle structure. For pork spare ribs, you might increase the wrapping time by an hour. When using beef ribs, consider a beef broth injection or a more robust beef-based rub. Always use a meat thermometer to ensure the internal temperature reaches a safe and tender point, typically around 195-205°F (90-96°C) for pork ribs and potentially higher for beef ribs.