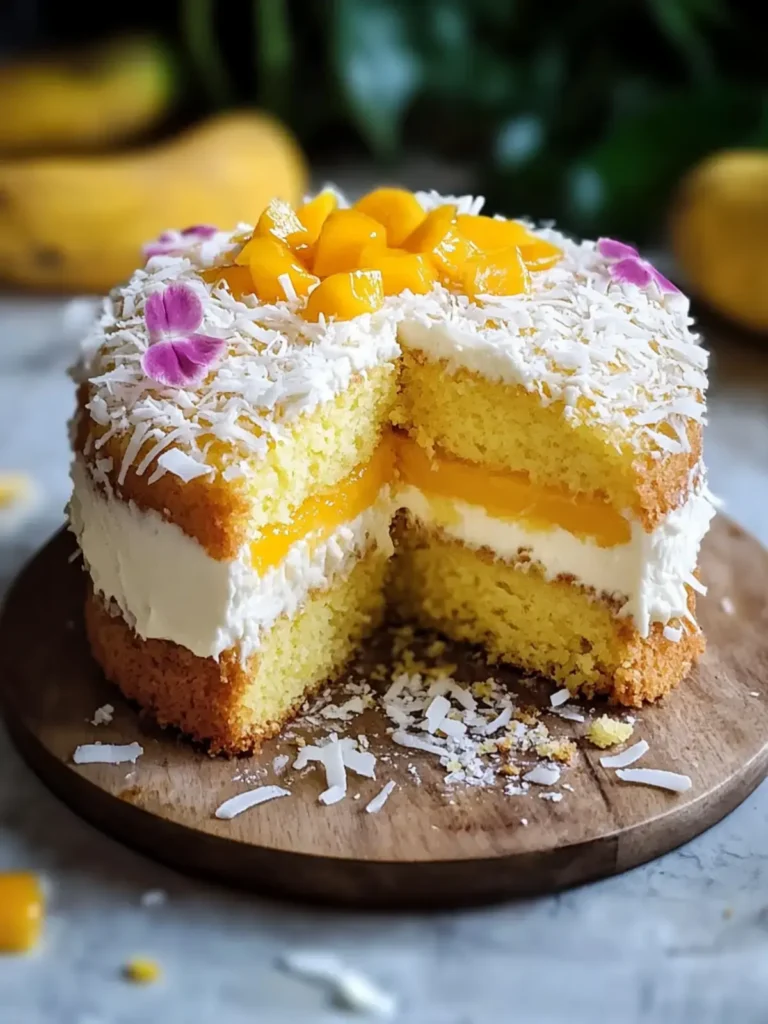
Yuzu Coconut Layer Cake
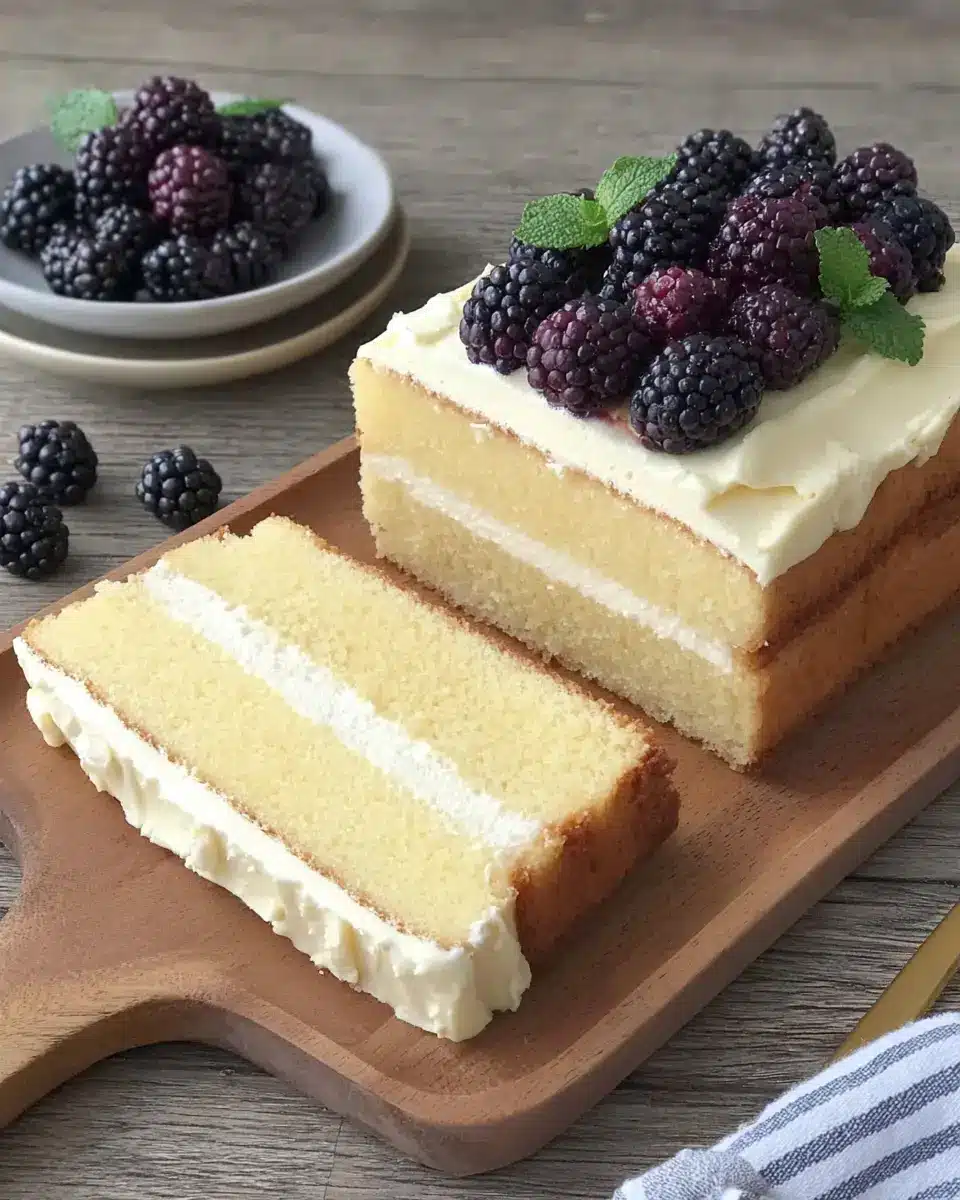
Creamy, bright, and make-ahead friendly, Yuzu Coconut Cake brings together airy citrus sponge, cool coconut mascarpone cream, and a light fruit finish for a dessert that feels elegant without being overly heavy.
This is the kind of cake that fits beautifully into spring gatherings, birthdays, or any meal where you want something soft, chilled, and a little different from the usual vanilla or chocolate option. The yuzu note keeps the sponge lively, while the coconut cream gives every slice a mellow, silky finish.
Why You Will Love This Recipe
- Effortless Elegance: This cake presents beautifully with its layered structure and fresh garnish, making it perfect for special occasions without requiring advanced pastry skills.
- Delicate Flavors: The zesty yuzu pairs wonderfully with the subtle sweetness of coconut, creating a sophisticated and refreshing taste profile that isn’t overwhelmingly rich.
- Make-Ahead Convenience: Many components can be prepared in advance, allowing for a stress-free assembly and ensuring the cake is perfectly chilled and set for serving.
- Versatile Appeal: Its bright flavors and light texture make it suitable for a wide range of events, from casual brunches to more formal celebrations.
- Texture Paradise: Enjoy the delightful contrast between the airy sponge, the smooth, creamy filling, and the slight crunch from the toasted coconut garnish.
Ingredients You Need
The quality of your ingredients will significantly impact the final flavor and texture of your Yuzu Coconut Cake. Opting for fresh, high-quality components ensures that the delicate yuzu and coconut notes shine through beautifully. Using good mascarpone cheese and cold, heavy whipping cream is essential for achieving that perfect, smooth, and stable filling. Pay attention to the freshness of your yuja cha, as it is the star citrus flavor in this delightful dessert.
Yuzu Coconut Layer Cake

A light yuzu sponge cake layered with a chilled coconut mascarpone cream and finished with blackberries and toasted coconut for contrast in flavor and texture. This creamy, bright, and make-ahead friendly cake brings together airy citrus sponge, cool coconut mascarpone cream, and a light fruit finish.
- For the sponge cake: 53 g cake flour (sifted)
- 3 tsp yuja cha (Korean citron tea marmalade)
- 10 g brown sugar
- 30 g brown sugar
- 3 egg whites (at room temperature)
- 10 ml whole milk
- 3 egg yolks
- For the coconut mascarpone cream: 50 g superfine sugar
- 35 ml water
- 2 large egg yolks
- 180 g cold mascarpone cheese
- 2 tsp unsweetened grated coconut
- 135 g cold whipping cream
- 4.8 g powdered gelatin (bloomed in the water)
- For the garnish: 2 tbsp shredded coconut (toasted)
- 10 frozen blackberries (thawed)
- 1Prepare the yuzu sponge cake using your preferred basic sponge cake method with the listed sponge ingredients. After baking, leave the cake to cool fully before continuing, as a warm cake may cause the cream to soften.
- 2For the coconut mascarpone cream, scatter the powdered gelatin over the cold water in a small bowl. Set it aside so the gelatin can absorb the liquid and soften.
- 3Pour the whipping cream into a chilled mixing bowl and beat on high speed until it reaches a very soft ribbon stage. Do not whip it to peaks. Transfer it to the refrigerator while the remaining filling components are prepared.
- 4Bring a small amount of water to a boil in a saucepan, then lower the heat to a gentle simmer. In a separate heatproof bowl, whisk together the egg yolks, the measured water, and the superfine sugar. Set the bowl over the simmering water and whisk continuously until the mixture reaches at least 74°C. Remove it from the heat once the temperature is reached.
- 5Whisk the softened gelatin into the warm yolk mixture until thoroughly incorporated. Add the mascarpone and mix until the texture is smooth and free from lumps. Stir in the grated coconut to complete the base of the filling.
- 6Remove the softly whipped cream from the refrigerator and fold it gently into the mascarpone mixture. Continue folding until the cream is evenly combined and reaches a soft-peak consistency. Refrigerate the coconut mascarpone cream for about 30 minutes so it can firm slightly.
- 7Slice the cooled sponge cake into two layers. Spread a generous portion of the chilled coconut mascarpone cream over one layer, then place the second layer on top and press lightly. Additional cream may be spread over the top, or reserved for serving.
- 8Finish the cake with the thawed blackberries and a scattering of toasted shredded coconut before serving.
Keywords: Yuzu Coconut Cake, Citrus Cake, Coconut Cream Cake, Make-ahead Dessert, Spring Baking, Birthday Cake, German Fusion Dessert
The specific quantities for each ingredient are detailed within the recipe card for your convenience. Please refer to it for precise measurements to ensure the success of your Yuzu Coconut Cake.
Variations
For those seeking a completely plant-based dessert, transforming this Yuzu Coconut Cake into a vegan delight is entirely achievable with a few smart substitutions. You can replace the eggs in the sponge with a suitable egg replacer like a flax egg or commercial vegan egg mix, and use a dairy-free milk such as almond or soy milk. For the coconut mascarpone cream, opt for a high-quality vegan cream cheese and coconut cream (the thick part from a chilled can of full-fat coconut milk) instead of mascarpone and whipping cream, ensuring everything is kept very cold during the whipping process. While gelatin is key for the filling’s structure, agar-agar can be used as a vegan alternative, though its gelling properties may require slight adjustments in quantity and preparation.
Embracing a low-carb lifestyle doesn’t mean you have to miss out on this exquisite cake. To adapt it, you would need to make several key changes to the sweetener and flour components. For the sponge, consider using almond flour or coconut flour in place of cake flour, adjusting the liquid content as needed, and sweeten with erythritol, xylitol, or a monk fruit blend. The filling can be made keto-friendly by using a sugar-free mascarpone alternative if available, or by focusing on a rich coconut cream base sweetened with a low-carb sweetener. Ensure any gelatin used is also sugar-free and always check the carb count of your yuja cha, as some varieties can be higher in sugar; a pure yuzu juice and a sugar-free sweetener might be a better option.
If yuzu is not readily available or you’re looking for a different citrus profile, the cake can be delightfully modified with other fruits. A substitution with Meyer lemon would lend a sweeter, more floral citrus note than regular lemons, while a blend of lime and orange zest could offer a vibrant, complex tang. For an even more exotic twist, consider passionfruit pulp or pureed mango, which would introduce tropical sweetness and a slightly different texture to the sponge, creating an entirely new flavor experience. Whichever citrus or fruit you choose, the fundamental light sponge and creamy filling structure will adapt beautifully, offering a refreshing and unique dessert every time.
How to Prepare Yuzu Coconut Cake
Step 1: Crafting the Bright Yuzu Sponge
The foundation of this exquisite cake is its light and airy yuzu-infused sponge. Begin by meticulously separating your eggs, ensuring no trace of yolk contaminates the whites, as this is crucial for achieving optimal volume. In a medium bowl, gently whisk together the egg yolks with the larger portion of brown sugar until the mixture becomes noticeably paler in color and achieves a slightly thickened, ribbon-like consistency. This process, known as creaming, incorporates air and sugar, which contributes significantly to the cake’s tender crumb and structure.
In a separate small saucepan, gently warm the whole milk with the yuja cha (Korean citron tea marmalade) and the smaller amount of brown sugar over low heat. Stir continuously until the sugar has completely dissolved and the yuja cha is well incorporated into the milk, creating a fragrant, citrus-infused liquid base. Avoid bringing the mixture to a boil, as this can affect the delicate flavors and textures. Once heated and combined, remove from heat and let it cool slightly to a lukewarm temperature before proceeding to the next stage.
Next, in a scrupulously clean and dry bowl, whip the egg whites with an electric mixer on medium speed until they become frothy and opaque. Gradually introduce the remaining brown sugar, a tablespoon at a time, while continuing to beat on medium-high speed. Continue whipping until stiff, glossy peaks form, meaning the meringue will hold its shape when the beaters are lifted, and it has a shiny appearance. This stability is paramount for lifting the cake batter and creating that characteristic lightness.
Gently pour the cooled yuzu-infused milk mixture into the creamed egg yolk mixture, whisking until just combined. Then, carefully add about a third of the whipped egg whites to the yolk mixture and fold them in gently to lighten the base. This initial incorporation makes the subsequent folding of the remaining whites much easier. Sift the cake flour directly over the combined yolk and white mixture. Using a spatula, gently fold the flour into the batter using an under-and-over motion, taking care not to overmix; stop as soon as no dry streaks of flour remain. The goal is to maintain as much air as possible within the batter, resulting in a delicate crumb.
Prepare your cake pan by greasing and lining it with parchment paper to prevent sticking. Pour the prepared batter into the pan, spreading it evenly with your spatula. Bake in a preheated oven at the temperature specified in your recipe until a skewer inserted into the center comes out clean. The baking time will vary depending on your oven and pan size, so keep a close eye on it. Once baked, let the cake cool in the pan for about 10-15 minutes before inverting it onto a wire rack to cool completely. Ensure the cake is thoroughly cooled before slicing, as a warm cake can be fragile and difficult to handle.
The aroma of the yuzu should be evident as the cake cools, a subtle yet distinct citrus perfume that promises a bright flavor. This cooling period is not just for structural integrity; it allows the flavors to meld and deepen, setting the stage for the creamy filling. Proper cooling ensures that when you slice the cake later, you achieve clean, even layers without any crumbling or tearing, which is essential for a professional-looking finished product.
Step 2: Preparing the Silky Coconut Mascarpone Cream Base
To achieve the luxurious texture of the coconut mascarpone cream, it’s essential to start with perfectly chilled ingredients. Place your mixing bowl and whisk attachment for your electric mixer into the freezer for at least 15-20 minutes before you begin. This extreme cold is key to whipping the cream to the correct consistency without it becoming grainy or separating. Pour the cold whipping cream into the chilled bowl.
Begin whipping the cream on medium speed, gradually increasing to medium-high. You are aiming for a soft ribbon stage, not stiff peaks. This means when you lift the whisk, the cream should fall back into itself, creating soft, flowing ribbons that slowly disappear. Over-whipping at this stage will result in a grainy texture that is difficult to incorporate smoothly. Once the soft ribbon stage is achieved, immediately transfer the whipped cream to a clean bowl and refrigerate it while you prepare the other components of the filling. Keeping it cold is paramount.
In a small bowl, sprinkle the powdered gelatin evenly over the measured cold water. Allow it to sit undisturbed for about 5-10 minutes, or until it has fully absorbed the water and appears softened and jelly-like. This process is called “blooming” and is crucial for ensuring the gelatin dissolves properly without clumps, which is vital for a smooth filling. If the gelatin is not properly bloomed, it can lead to an uneven set and a less appealing texture in your final cream.
Next, prepare a double boiler by filling a saucepan with about an inch of water and bringing it to a gentle simmer over low to medium heat. In a heatproof bowl that fits snugly over the saucepan without touching the water, combine the egg yolks, superfine sugar, and the measured small amount of water. Whisk these ingredients together thoroughly before placing the bowl over the simmering water. Continuously whisk the mixture over the gentle heat until it reaches a temperature of at least 74°C (165°F) on an instant-read thermometer. This pasteurization process cooks the egg yolks, removes any risk of salmonella, and also helps to thicken the mixture into a light custard base, known as a pâte à bombe when sweetened.
Once the yolk mixture has reached the desired temperature and consistency, remove the bowl from the heat. Add the bloomed gelatin to the hot yolk mixture and whisk vigorously until the gelatin is completely dissolved and no grainy particles remain. The heat from the yolk mixture will melt the gelatin seamlessly. Following this, add the cold mascarpone cheese to the warm mixture. Using a whisk or the electric mixer on low speed, gently beat the mascarpone into the yolk and gelatin mixture until it is smooth, creamy, and thoroughly combined, with no lumps of cheese visible. Ensure that you are not overmixing, as mascarpone can become oily if agitated too much.
Stir in the unsweetened grated coconut into the mascarpone base. This will add a subtle, delightful coconut flavor and aroma throughout the cream, enhancing the overall profile of the cake without making it too overtly coconutty. The goal here is a delicate infusion that complements the yuzu sponge. Once thoroughly mixed, set this base aside briefly. It should still be warm enough to keep the gelatin dissolved but not so hot that it will melt the whipped cream when you combine them. This carefully constructed base is the soul of the creamy filling.
Step 3: Assembling the Yuzu Coconut Cake
With your yuzu sponge cake completely cooled and the coconut mascarpone cream base prepared, it’s time for the assembly of your beautiful Yuzu Coconut Cake. Take your thoroughly cooled sponge cake and, using a long serrated knife or a cake leveler, carefully slice it horizontally into two equal layers. The precision of this step is important for a well-balanced cake with even proportions of sponge and cream. If your cake has domed significantly, you might need to gently trim the top to create a flat surface before slicing; this trimmed portion can be enjoyed as a baker’s treat.
Retrieve the chilled whipped cream from the refrigerator. It should still be at a soft ribbon stage. Now, gently fold the softly whipped cream into the mascarpone base. Do this in two or three additions, using a large spatula and a light hand. The technique is to scoop from the bottom of the bowl and fold it over the top, rotating the bowl as you go. This gentle folding motion is crucial for incorporating the airy whipped cream without deflating it, preserving the lightness and fluffiness of the final filling. Continue folding until the mixture is just combined and has a uniform, smooth, and creamy texture. Avoid overmixing, as this can compromise the airy quality.
Once the filling is fully combined and has achieved a luscious, spreadable consistency, place the bowl back into the refrigerator for approximately 30 minutes. This brief chilling period allows the gelatin to begin setting and the mixture to firm up slightly, making it much easier to spread evenly onto the cake layers without it running or being too liquid. The consistency should be thick enough to hold its shape when spread but still yielding and smooth.
Place the bottom layer of the yuzu sponge cake onto your serving plate or cake stand. Spread a generous and even layer of the chilled coconut mascarpone cream over the entire surface of this bottom layer, extending almost to the edges. Ensure the layer of cream is consistent in thickness to provide a pleasant mouthfeel and balance with the cake layers. This creamy layer is where much of the magic happens, melding the bright citrus with the subtle coconut.
Carefully place the second layer of sponge cake on top of the cream-filled bottom layer. Gently press down on the top layer with your hands to ensure the cake is level and the layers are well-seated. If there’s any significant overhang of cream, you can gently spread it to be flush with the cake’s edge or leave it as is, knowing it will be covered by the final garnish. Some bakers prefer to reserve a small amount of the cream to artfully spread over the top of the cake for an added touch of elegance.
The final step in assembly is to adorn your creation. Scatter the thawed blackberries evenly over the top layer of the cake. The vibrant purple of the blackberries will provide a beautiful visual contrast against the pale cream and yellow sponge. Next, sprinkle the toasted shredded coconut over the blackberries and the exposed edges of the cake. This toasted coconut not only adds a delightful crunch and nutty aroma but also complements the coconut flavor within the cream. Ensure an even distribution for both aesthetic appeal and textural balance. Once garnished, the cake is ready to be chilled thoroughly before serving, allowing all the flavors to meld and the cream to fully set.
Step 4: Chilling and Setting
After the cake has been assembled and beautifully garnished, it is crucial to allow it ample time to chill and set in the refrigerator. This chilling period is not just about cooling the cake; it’s a vital step that allows the gelatin in the mascarpone cream to fully activate and firm up, giving the cake its structure and making it easy to slice cleanly. Aim for a minimum of 2-3 hours in the refrigerator, though chilling it overnight is often ideal for the best results, as it allows the flavors to meld and deepen.
During this chilling phase, the cake layers will absorb some of the moisture from the cream, creating a cohesive dessert where the sponge and filling become one harmonious entity. The cold temperature also solidifies the fats in the mascarpone and cream, resulting in a filling that is firm enough to hold its shape when sliced, preventing it from oozing out or becoming messy. The blackberries will also lightly perfume the cream as they sit atop it, adding another layer of flavor complexity.
Ensure the cake is covered loosely with plastic wrap or a cake dome to protect it from absorbing any odors from other foods in the refrigerator, while also allowing for some air circulation to prevent condensation from forming on the surface. Avoid wrapping it too tightly, as this can trap moisture and lead to a soggy top. The anticipation of the perfect slice is well worth the wait during this critical setting period.
Before serving, take the cake out of the refrigerator. Allow it to sit at room temperature for about 10-15 minutes. This brief resting period softens the cream ever so slightly, enhancing its smooth texture and making it more palatable, without compromising the cake’s structure. It ensures that the cake is not served ice-cold, which can mute the flavors, but rather at an optimal temperature for enjoying its delicate taste and creamy consistency.
The final presentation of the Yuzu Coconut Cake is as important as its preparation. The bright yellow sponge, the creamy white filling, the deep purple of the blackberries, and the golden hue of the toasted coconut all come together to create a visually stunning dessert. Serve each slice carefully, ensuring you capture a bit of everything in each portion: the airy sponge, the rich yet light cream, and the burst of fruit and crunch from the garnishes.
Enjoying this Yuzu Coconut Cake is an experience that engages multiple senses. From the initial citrus aroma to the first bite that reveals layers of texture and balanced flavor, it’s a testament to thoughtful ingredient selection and careful preparation. It truly is a showstopper that offers a delightful departure from more traditional cake flavors, making it a memorable addition to any dessert repertoire.
Pro Tips for Yuzu Coconut Cake
Temperature is Key: For the coconut mascarpone cream to achieve its best texture, ensure your mascarpone cheese and whipping cream are thoroughly chilled. This is non-negotiable for a stable and silky filling that won’t become greasy or curdle when combined. Cold ingredients whip better and maintain their structure throughout the assembly process. Keep them in the refrigerator until the very moment you need them.
Gentle Folding Technique: When combining the whipped cream with the mascarpone base, use a gentle folding motion with a large spatula. Overmixing will deflate the air incorporated into the whipped cream, leading to a denser, heavier filling. Fold just until no streaks remain, preserving the lightness that makes this cake so delightful. This technique ensures an airy, cloud-like consistency for your cream.
Toast Coconut for Flavor Depth: Toasting the shredded coconut for the garnish significantly enhances its flavor and aroma. Spread the coconut in a thin layer on a baking sheet and toast in a preheated oven at a low temperature (around 150°C/300°F) or in a dry skillet over medium-low heat, stirring frequently, until it’s fragrant and lightly golden brown. Watch it carefully, as it can burn quickly. This step adds a wonderful nutty depth that complements the yuzu and coconut cream beautifully.
Accurate Gelatin Measurement: Ensure you measure your powdered gelatin accurately. Too little, and the cream may not set properly, leading to a runny filling. Too much, and the cream can become too stiff or rubbery. Follow the recipe precisely for the gelatin quantity, and make sure it’s fully bloomed and dissolved in the warm liquid to guarantee a smooth and perfectly set cream.
Cool Sponge Completely: Resist the temptation to assemble the cake while the sponge is still warm. A warm cake is fragile and can cause the mascarpone cream to melt or become unstable, leading to a cake that slides apart or has a soupy filling. Patience here is a virtue that will be rewarded with a beautifully structured and delicious cake. Allow ample cooling time on a wire rack.
Don’t Overbake the Sponge: While it’s important to bake the sponge thoroughly, overbaking can lead to a dry cake that doesn’t absorb moisture from the filling as well. Keep an eye on the cake during the last few minutes of baking and perform the skewer test frequently. A cake that is just cooked through will be moist and tender, providing the perfect canvas for the creamy filling.
Serving Suggestions for Yuzu Coconut Cake
Decoration
The visual appeal of the Yuzu Coconut Cake can be enhanced with thoughtful decoration. A final dusting of powdered sugar over the entire cake can create a soft, snowy effect, especially when served during cooler months or holidays. For a more vibrant look, a few fresh yuzu segments or thin curls of yuzu zest can be placed artfully around the edges or in the center, reinforcing the cake’s signature flavor. Edible flowers, such as pansies or violets, can also add a delicate, natural beauty, especially if you’ve chosen a lighter cream for the topping.
If you’ve opted for a slightly more elaborate topping than the specified blackberries and toasted coconut, consider a light drizzle of yuzu-flavored glaze made from yuzu juice and powdered sugar. This can add a glossy sheen and an extra layer of citrus flavor. Alternatively, small dollops of plain whipped cream or piped rosettes can be strategically placed on top, interspersed with the berries, to add visual height and dimension. The goal is to create a balanced aesthetic that hints at the delightful flavors within without overwhelming the cake itself.
For an even more sophisticated presentation, particularly for special occasions, you could consider creating delicate tempered chocolate garnishes. Thin chocolate curls or shards, perhaps white chocolate infused with a hint of coconut extract, can be inserted into the top of the cake. Another idea is to create a chocolate ganache drip around the edges of the cake, allowing it to cascade down slightly for a dramatic effect. This should be done just before serving, as the ganache can set quite firmly.
Side Dishes
When it comes to pairing side dishes with the Yuzu Coconut Cake, the principle is to complement its delicate flavors without overpowering them. A simple, refreshing fruit salad featuring berries, melon, and perhaps some kiwi or starfruit, can offer a pleasant textural contrast and an additional burst of freshness. The natural sweetness and slight tartness of the fruits will harmonize beautifully with the yuzu and coconut notes of the cake.
For a more substantial accompaniment, particularly if the cake is served as part of a larger meal or dessert buffet, consider serving it alongside a light, crisp shortbread cookie or a delicate almond tuile. These pastries offer a subtle sweetness and a satisfying crunch that enhances the overall sensory experience. Avoid overly rich or heavily flavored cookies, as they can compete with the cake’s nuanced profile.
If you are looking for a beverage pairing, a high-quality green tea, such as a sencha or matcha, works exceptionally well. The slightly grassy and vegetal notes of green tea can cut through the richness of the mascarpone cream and highlight the citrusy tang of the yuzu. A clear, unsweetened sparkling water infused with cucumber or mint is another refreshing option that cleanses the palate and enhances the cake’s subtle flavors without adding any competing tastes.
Creative Serving Ideas
Transform the Yuzu Coconut Cake into an individual dessert experience by serving it in elegant glasses or small dessert bowls. You can slice the cake into bite-sized portions and layer them in the glasses with additional portions of the coconut mascarpone cream and fresh berries. This deconstructed approach creates beautiful, layered parfaits that are easy to serve and visually appealing, making them perfect for buffets or individual servings at intimate gatherings.
Consider offering a “yuzu tasting” experience by serving small slices of the cake alongside a tiny cup of pure yuzu juice or a yuzu-infused syrup. This allows your guests to fully appreciate the unique flavor profile of yuzu in its various forms, highlighting its floral, tart, and slightly bitter characteristics. This elevates the dessert from a simple cake to an interactive culinary exploration.
For a truly memorable presentation, especially during brunch or a light afternoon tea, consider a “cake and tea pairing” event. Serve individual slices of the Yuzu Coconut Cake alongside a selection of fine teas, each chosen to complement different aspects of the cake. For example, a bright Darjeeling might enhance the citrus notes, while a creamy Earl Grey could echo the subtle floral undertones. This thoughtful pairing adds an extra layer of sophistication and enjoyment for your guests, turning a simple dessert into a curated experience.
Preparation & Storage
Storing Leftovers
To store leftover Yuzu Coconut Cake, it’s essential to maintain its freshness and texture by keeping it properly covered in the refrigerator. Due to the presence of mascarpone cheese and whipped cream in the filling, this cake must be refrigerated at all times to prevent spoilage and maintain the cream’s stability. Use an airtight cake container if you have one; this is the ideal solution as it protects the cake from drying out and prevents it from absorbing any unwanted odors from other foods in the fridge.
If an airtight container is not available, you can cover the cake loosely with plastic wrap, ensuring that it drapes over the sides of the cake and seals against the plate or serving platter as much as possible. You can also place a piece of parchment paper directly on the surface of the cake, especially if it has a frosting or garnish, before covering it with plastic wrap. This prevents the wrap from sticking to the toppings and helps maintain the integrity of the decoration. Leftovers are best consumed within 3 to 4 days for optimal flavor and texture.
When ready to serve the stored cake, it’s often best to let it sit at room temperature for about 10-15 minutes before slicing. This brief resting period allows the cream to soften slightly from its chilled state, making it more yielding and enhancing the overall creamy mouthfeel. Serving the cake too cold can mute its delicate flavors and make the texture seem firmer than intended. This small step can make a noticeable difference in the enjoyment of your leftover slices.
Freezing
Freezing the Yuzu Coconut Cake requires a slightly different approach depending on whether you are freezing the entire assembled cake or just the sponge layers. Freezing the fully assembled cake is generally not recommended, as the mascarpone cream and whipped cream filling can lose their delicate, silky texture upon thawing, potentially becoming watery or grainy. The berries might also release excess moisture, affecting the cake’s appearance and texture. However, if you must freeze the assembled cake, slice it first and freeze individual slices for easier thawing and consumption.
The sponge cake layers, on the other hand, freeze exceptionally well and are an excellent component to prepare ahead of time. Once the sponge layers have completely cooled, wrap each layer tightly and individually in a layer of plastic wrap, followed by a layer of aluminum foil or a freezer-safe bag. This double layer of protection prevents freezer burn and preserves the moisture within the cake. Properly wrapped sponge layers can be stored in the freezer for up to 1 month.
To thaw frozen sponge layers, unwrap them and place them on a wire rack at room temperature for several hours, or transfer them to the refrigerator overnight. Avoid microwaving them, as this can lead to uneven heating and a rubbery texture. Once thawed and brought back to room temperature, they can be assembled with freshly made coconut mascarpone cream to create a cake that tastes as if it was baked that day. This make-ahead strategy is perfect for busy schedules or for ensuring you always have a beautiful dessert on hand.
Reheating
Reheating is generally not applicable to the Yuzu Coconut Cake, as it is designed to be served chilled. The delicate mascarpone and whipped cream filling relies on cold temperatures to maintain its structure and creamy consistency. Attempting to reheat any part of the cake, especially the filling, would likely cause it to melt, separate, and lose its desired texture, rendering it unappetizing. The sponge itself is light and moist and does not benefit from reheating.
The goal for serving this cake is always to have it at an optimal chilled temperature. This means taking it directly from the refrigerator for serving or allowing it to rest at room temperature for a short period, as mentioned in the storage section. This ensures the cream is perfectly set, the flavors are vibrant, and the texture is smooth and pleasant. If the cake is accidentally too cold, the flavors might be suppressed, so the brief resting period is the closest it comes to “reheating,” but it’s more accurately described as tempering.
If, by chance, you have frozen individual slices and need to thaw them, the best method is to transfer them from the freezer to the refrigerator overnight. Once thawed in the fridge, allow them to sit at room temperature for about 10-15 minutes before serving. This gentle thawing process helps to preserve as much of the cream’s original texture as possible. Avoid any direct heat application, as it will compromise the integrity of the filling and potentially the sponge.
Frequently Asked Questions
-
Can I make the yuzu sponge cake gluten-free?
Yes, you can adapt the Yuzu Coconut Cake sponge to be gluten-free with a few key ingredient substitutions. The primary change involves replacing the cake flour with a high-quality gluten-free flour blend. Look for blends that are specifically designed for baking cakes and contain a mix of rice flour, tapioca starch, potato starch, and xanthan gum to mimic the texture of traditional cake flour. You may need to slightly adjust the liquid content of the batter, as gluten-free flours can absorb moisture differently. Ensure that all other ingredients, such as baking powder or any leavening agents, are also certified gluten-free. When mixing, be mindful not to overwork the batter, as this can still affect the texture even without gluten. Bake and cool the cake as directed, and it should provide a tender, delicious gluten-free base for your coconut mascarpone cream.
-
What is yuja cha and where can I find it?
Yuja cha, also known as yuzu tea or Korean citron tea, is a traditional Korean tea made from the rind and pulp of the yuzu fruit, typically mixed with sugar or honey to create a marmalade-like preserve. Yuzu is a citrus fruit that resembles a small grapefruit with a bumpy rind, and its flavor is a unique aromatic blend of lemon, grapefruit, and mandarin orange, possessing a distinct floral fragrance and a tart yet sweet profile. It’s prized for its refreshing taste and is often used in Korean cuisine and beverages, especially during colder months for its perceived health benefits.
You can typically find yuja cha in Asian grocery stores, both in the refrigerated section as a fresh preserve or in the pantry aisle as a bottled marmalade or concentrate. Many larger supermarkets with international food sections also carry it. If you can’t locate it in physical stores, it’s widely available online through various e-commerce platforms specializing in Asian foods or gourmet ingredients. When purchasing, look for brands that have a good proportion of fruit rind and pulp, as this will contribute more intense flavor and texture to your cake. Ensure the product is primarily made from yuzu and sweetener, avoiding excessive artificial additives if possible.
-
My mascarpone cream is too soft; what went wrong and how can I fix it?
A soft mascarpone cream is often a result of ingredient temperature or overmixing. The most common culprits are using mascarpone cheese or whipping cream that isn’t cold enough, or overbeating the mascarpone mixture, which can cause it to break down and become too liquid. Additionally, if the cream was whipped past the soft ribbon stage and then incorporated, it can lead to an unstable filling. Another factor could be insufficient gelatin or improper dissolution of the gelatin, which is crucial for setting the cream.
To fix a mascarpone cream that is too soft, the first step is to try chilling it for an extended period; sometimes, it just needs more time to set, especially if the gelatin has had time to bloom and dissolve properly. If it remains too loose after several hours in the refrigerator, you might consider gently re-warming a small portion of the mascarpone base (without the whipped cream added yet) to ensure the gelatin is reactivated, then add a little more bloomed gelatin if necessary, and then fold in the whipped cream again carefully. However, if the cream is completely broken (oily and separated), it may be difficult to fully salvage. For future attempts, ensure all dairy components are ice-cold, whip the cream only to a soft ribbon stage, and avoid overworking the mascarpone base. If the filling is still too soft after chilling, you can try using it as a sauce or a topping rather than a structural layer, perhaps serving the cake with it poured over.