Challah French Toast Recipe – Fluffy & Flavorful!

There’s something inherently comforting about waking up to the aroma of a delicious breakfast, and this challah French toast recipe delivers that cozy, indulgent feeling in spades. It’s a classic elevated, transforming simple ingredients into a brunch masterpiece that’s perfect for lazy weekend mornings or special occasions.
This recipe takes the beloved French toast and gives it a luxurious upgrade by using challah bread, known for its rich, eggy, and slightly sweet flavor. The result is a bread that soaks up the custard beautifully, leading to a wonderfully tender interior and a perfectly golden, slightly crisp exterior.
Why You Will Love This Recipe
- Unbeatable Texture: The unique structure of challah bread allows it to absorb the custard without becoming soggy, resulting in a perfectly tender and fluffy inside.
- Rich & Flavorful Custard: Infused with cinnamon, vanilla, and a hint of nutmeg, the eggy custard creates a decadent coating for the bread.
- Quick Preparation: Once your bread is prepped, the actual cooking process is surprisingly fast, making it ideal for busy mornings.
- Versatile Serving: This French toast is a fantastic base for a wide array of toppings, from classic maple syrup and fresh berries to more elaborate dessert-like creations.
- Perfect for Leftovers: While best enjoyed fresh, this recipe also holds up well for reheating, making it a great option for meal prep.
Ingredients You Need
The key to an exceptional challah French toast lies in the quality of your ingredients. Opting for fresh, high-quality challah bread and pure flavorings like real vanilla extract will significantly enhance the final taste. Don’t underestimate the power of good butter for that perfect golden-brown sear. You’ll find the complete ingredient list and precise measurements within the recipe card below.
Challah French Toast

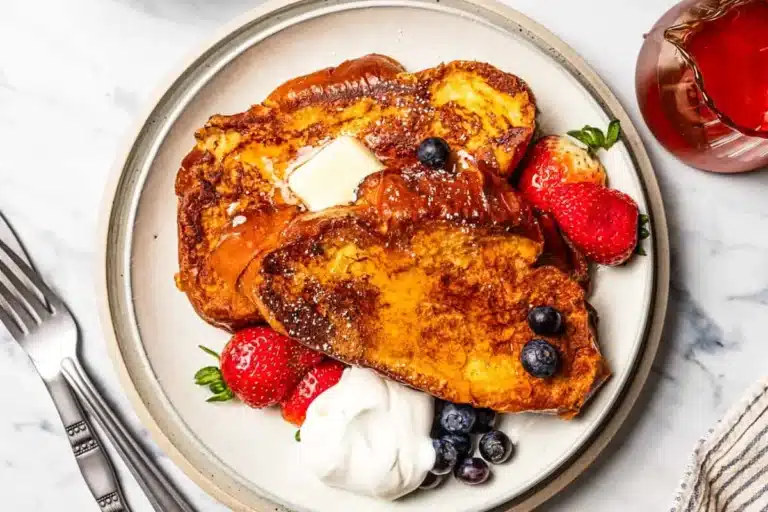
Thick, fluffy challah bread French toast soaked in an eggy custard with cinnamon, vanilla, and grated nutmeg. Using challah is an easy way to level up homemade French toast!
- 1 loaf of challah bread, stale
- 6 large eggs
- 2 cups half and half (milk or heavy cream are also okay to use)
- 2 teaspoons pure vanilla extract
- pinch of grated nutmeg
- pinch of ground cinnamon
- 3-4 tablespoons unsalted butter, for cooking
- French toast toppings of choice (such a maple syrup, whipped cream, fresh fruit, or confectioners' sugar)
- 1Slice the bread and leave out overnight. If your challah is fresh, cut it into thick slices and lay them out on a cooling rack to dry overnight.
- 2Prepare your tools. Position a drying rack over a cookie sheet lined with parchment paper. Preheat your oven to 190ºF and place a separate oven-safe drying rack over a cookie sheet lined with parchment paper in the oven. (So you will need two sets of drying racks set over lined baking sheets.)
- 3Make the custard. In a medium bowl, whisk the eggs, half & half, warm honey, salt, vanilla, nutmeg, and cinnamon until thoroughly combined, then pour into a 9x9 baking dish.
- 4Add the bread. Soak the dried bread slices in the custard, 2 slices at a time, for about 2 minutes per side. Then set the soaked bread on the wire rack (the one outside the oven) so any extra custard can drip off before cooking. Sprinkle each slice with a pinch or two of cinnamon to taste.
- 5Cook. After soaking for about 3 to 4 minutes, cook the soaked bread on a greased griddle or pan, buttered with 1 tablespoon of butter, over medium heat. Don’t overcrowd the pan/griddle (I cook two slices at a time). Cook the bread slices on each side for about 2 minutes. Check for doneness judging by color. Each side should be golden brown. Make sure the slices cook through and evenly (rotate them around if your pan or griddle has hot spots). Add 1/2 tablespoon of butter to the griddle after each batch of French toast has cooked, and let it foam and subside before adding the next batch.
- 6Keep warm in the oven. This is optional, but a great way to serve your toast warm. Once they are cooked, place them on the rack that's inside the oven, batch by batch, to keep warm.
- 7Serve. I like to serve French toast with homemade whipped cream, maple syrup, and blueberries.
Keywords: Challah, French Toast, Breakfast, Brunch, Eggy Custard, Cinnamon, Vanilla, Nutmeg
- challah bread: preferably day-old and cut into thick slices for optimal soaking.
- eggs: the foundation of the rich custard, providing structure and binding.
- half-and-half: contributes to the creamy texture of the custard, though milk or heavy cream can be substituted.
- honey: adds a natural sweetness and helps to warm the custard, with maple syrup or agave as alternatives.
- vanilla extract: essential for that classic warm and comforting flavor profile.
- nutmeg: freshly grated nutmeg offers a more vibrant and nuanced flavor compared to ground.
- cinnamon: complements the nutmeg and vanilla, adding a warm, spicy note.
- butter: used generously for cooking, ensuring a beautifully golden and flavorful crust.
- toppings: a world of possibilities from maple syrup and fresh fruits to whipped cream and powdered sugar.
Variations
While this classic challah French toast is undeniably delicious, feel free to explore creative variations to suit your palate or dietary needs. One popular adaptation is a lemon-infused challah French toast, where a touch of lemon zest is added to the custard for a bright, zesty counterpoint to the sweetness. This can be especially delightful when paired with fresh berries.
For those seeking a lighter, healthier option, consider a low-carb challah French toast. While true low-carb is challenging with bread, you can reduce the amount of honey significantly and focus on savory toppings like avocado or a sprinkle of herbs. Alternatively, experiment with almond flour or coconut flour-based batters for a gluten-free twist, though this will alter the texture considerably.
Another exciting avenue is a berry-centric challah French toast. This involves folding fresh berries directly into the custard before soaking the bread, or even creating a simple berry compote to serve alongside. Imagine plump blueberries or tart raspberries melting slightly into the warm, eggy bread – a truly delightful combination.
How to Prepare challah french toast recipe
Step 1: Prepare the Challah Bread
The most crucial step for achieving perfect challah French toast is ensuring your bread is properly dried. If your challah is fresh from the bakery, you’ll need to plan ahead. Slice the loaf into thick, approximately 1-inch slices. These slices should then be laid out in a single layer on a wire cooling rack, which allows for air circulation on all sides.
This drying process can be done overnight at room temperature. By leaving the bread out, it loses some of its moisture, making it more receptive to the custard without becoming waterlogged and mushy. The slightly stale texture is key to French toast’s success, allowing it to soak up all that delicious eggy goodness.
If you find yourself short on time and haven’t dried the bread overnight, there’s a quick fix. You can place the sliced challah on a baking sheet and bake it in a preheated oven at around 300°F (150°C) for 10-15 minutes. Flip the slices halfway through this process. The goal is to dry the bread out, not to toast it to a golden brown; it should feel firm but not brittle.
Step 2: Create the Flavorful Custard
While your challah bread is drying, or if you’re using pre-dried bread, it’s time to prepare the luxurious custard that will transform those humble bread slices. In a medium-sized mixing bowl, crack your large eggs. Whisk them thoroughly until the yolks and whites are completely combined and the mixture is a uniform pale yellow.
Next, pour in the half-and-half. This dairy component is vital for creating a rich and creamy texture. If you prefer a lighter version, whole milk can be used, but it won’t yield quite the same decadent mouthfeel. For an even richer experience, heavy cream can also be substituted, although it might make the custard quite thick.
Now, add the flavorings that make this French toast truly special. Gently warm your honey in a microwave-safe bowl for about 30 seconds; this makes it easier to incorporate. Stir in the warm honey, followed by the pure vanilla extract, a pinch of freshly grated nutmeg for that warm spice, and a touch of ground cinnamon. Whisk everything together until it’s perfectly smooth and all the ingredients are well distributed. Pour this luscious mixture into a shallow baking dish, like a 9×9 inch pan, which will make dipping the bread slices much easier.
Step 3: Soak the Challah Slices
This is where the magic truly begins, as the dry challah bread begins its transformation into a delectable breakfast treat. Carefully place the dried challah slices into the prepared custard bath. It’s best to do this in batches, usually two slices at a time, to ensure they are fully submerged without overcrowding the dish. You want the bread to absorb the custard evenly.
Allow each side of the challah slice to soak for approximately two minutes. The exact time might vary depending on how stale your bread is; you want it to become saturated but not so soft that it starts to fall apart. You’ll notice the bread begin to puff up slightly as it drinks in the creamy custard mixture.
Once the bread slices have had their ample soak, carefully remove them from the custard. It’s important to let any excess custard drip back into the dish. Transfer the soaked slices to a wire rack set over a baking sheet. This allows any extra liquid to drain away, preventing the French toast from becoming too heavy or soggy once it hits the pan.
Step 4: Season and Drain
As the soaked challah slices rest on the wire rack, allowing excess custard to drip off, you have a perfect opportunity to add another layer of flavor and visual appeal. Take a moment to lightly sprinkle the tops of the soaked bread slices with a pinch or two of ground cinnamon. This not only enhances the warm, spicy aroma and taste but also creates a beautiful speckled appearance on the finished French toast.
This resting period is crucial for the texture. It allows the custard to distribute evenly throughout the bread and gives the surface a chance to firm up slightly before cooking. The draining rack ensures that you won’t end up with a puddle of custard on your cooking surface, which can lead to uneven browning and a greasy finish. A few minutes on the rack is usually sufficient.
This brief draining time is also when you should ensure your cooking surface is ready. Whether you’re using a griddle or a non-stick frying pan, make sure it’s preheating over medium heat. A properly preheated pan is essential for achieving that perfect golden-brown crust without burning the delicate custard coating.
Step 5: Cook to Golden Perfection
Now it’s time to cook the challah French toast, bringing it to that irresistible golden-brown state. Place your buttered griddle or pan over medium heat. Add about a tablespoon of unsalted butter to the pan and let it melt and foam. Be careful not to overcrowd the pan; cooking two slices at a time is generally recommended to ensure even cooking and easy flipping.
Carefully lay the soaked and drained challah slices onto the hot, buttered surface. Let them cook for approximately two minutes per side. You’re looking for a beautiful, even golden-brown color, indicating that the custard has set and the bread has developed a lovely crisp exterior. Keep an eye on the heat; if it’s too high, the outside could burn before the inside is cooked through.
As each batch of French toast finishes cooking, add another half tablespoon of butter to the griddle before adding the next batch. This ensures a fresh, buttery surface for each round and helps maintain that consistent golden hue. Rotate the slices around the pan if you notice any hot spots that are cooking faster than others, ensuring uniform doneness.
Step 6: Keep Warm and Serve
To serve your challah French toast family-style, or to ensure every piece is perfectly warm when your guests are ready, you can utilize your oven. As each batch of French toast is cooked to golden perfection, transfer the slices to a separate oven-safe wire rack that is placed on a baking sheet. Place this entire setup into a gently preheated oven, typically around 190°F (88°C).
This low oven temperature is just enough to keep the French toast warm without continuing to cook it and dry it out. It acts as a holding station, allowing you to cook all the French toast without any pieces getting cold while you finish the last few slices. This is particularly helpful when serving a larger group, ensuring everyone enjoys their meal piping hot.
Once all the challah French toast has been cooked and kept warm, it’s ready to be served. Arrange the golden-brown slices on a platter. Garnish generously with your favorite toppings. Classic choices like warm maple syrup, a dollop of homemade whipped cream, or a scattering of fresh berries are always a hit. Consider a dusting of confectioners’ sugar for an elegant finish. Visit our Pinterest for more delicious breakfast inspiration!
Pro Tips for challah french toast recipe
Embrace the Day-Old Bread: The single most important tip for outstanding French toast, including this challah version, is to use day-old bread. Fresh bread is too soft and will absorb the custard too quickly, leading to a soggy mess. Slightly stale bread has lost enough moisture to soak up the custard beautifully without disintegrating. This dryness is the secret to that perfect spongy-yet-firm texture.
Don’t Over-Soak: While you want the bread to absorb the custard, there’s a fine line between perfectly soaked and overly saturated. Aim for about 2 minutes per side. Any longer, and the bread might start to break down. The draining rack step is also critical here; it allows excess custard to drip away, preventing sogginess and ensuring a cleaner sear on the griddle. Observe the bread; it should feel heavy with custard but not be dripping excessively.
Medium Heat is Your Friend: Cooking French toast over medium heat is crucial for achieving an even golden-brown exterior without burning the custard coating before the interior is cooked through. High heat will scorch the outside, leaving the inside still a bit raw and eggy. Low heat will take too long, potentially drying out the bread and resulting in a less desirable texture. Patience and medium heat yield the best results.
Butter is Better (Mostly): While cooking oil can be used in a pinch, butter provides unparalleled flavor and a beautiful golden crust. Ensure you add butter for each batch of French toast. If you notice your butter starting to brown or burn too quickly, consider adding a tiny splash of neutral oil to the pan along with the butter, as oil has a higher smoke point and can help prevent the butter from scorching prematurely while still imparting its delicious flavor.
Freshly Grated Nutmeg is a Game Changer: While ground nutmeg is convenient, the flavor difference between freshly grated and pre-ground is significant. Freshly grated nutmeg offers a brighter, more complex, and aromatic spice that truly elevates the custard. A microplane grater is perfect for this. A little goes a long way, so a pinch of freshly grated nutmeg will impart a wonderful warmth and depth that dried ground nutmeg simply can’t match.
Serving Suggestions for challah french toast recipe
Decoration
To elevate the visual appeal of your challah French toast, consider a few simple decorative touches. A light dusting of confectioners’ sugar, sifted through a fine-mesh sieve, creates a delicate snowfall effect that looks elegant and is not overly sweet. Fresh berries, such as raspberries, blueberries, or sliced strawberries, add vibrant pops of color and freshness. Edible flowers, if available, can also add a sophisticated and beautiful touch, making your breakfast look like it came straight from a gourmet cafe.
Side Dishes
While challah French toast is a star on its own, it pairs wonderfully with a variety of side dishes that complement its sweetness and richness. For a classic brunch pairing, consider serving it alongside crispy bacon or savory breakfast sausages. A light and fluffy egg white frittata or a spinach quiche offers a protein-rich counterpoint. For a healthier option, a side of fresh fruit salad or a small portion of home fries or breakfast potatoes provides a satisfying balance to the meal.
Creative Serving Ideas
Beyond the standard plate, get creative with how you serve your challah French toast. Stack two or three slices high and drizzle generously with a warm caramel sauce or a rich fudge sauce for a dessert-like experience. You could also create mini French toast bites by cutting the soaked slices into cubes and skewering them, serving them with dipping sauces like whipped cream or fruit coulis. Another idea is to make a “French Toast Bar” where guests can customize their own creations with a variety of toppings and sides, making the meal an interactive and fun experience.
Preparation & Storage
Storing Leftovers
Should you be fortunate enough to have leftover challah French toast, storing it properly will ensure it remains delicious for later enjoyment. Allow the cooked French toast slices to cool completely to room temperature before storing them. Once cooled, place them in an airtight container or a resealable plastic bag. Ensure no excess air is trapped in the bag or container, as this can lead to freezer burn or staleness.
Store the airtight container in the refrigerator. Properly stored, leftover challah French toast should remain fresh and enjoyable for up to 3 to 4 days. The key is to prevent moisture from entering the container, which can make the toast soggy. Always check for any signs of spoilage before reheating and consuming.
Freezing
For longer-term storage, freezing challah French toast is an excellent option. Again, ensure the slices have cooled completely before proceeding. You can freeze them in a single layer on a baking sheet lined with parchment paper until they are firm. This prevents them from sticking together when you pack them into a freezer-safe container or heavy-duty freezer bag.
Once frozen solid, transfer the individual slices or the entire batch into your chosen freezer container. Remove as much air as possible before sealing. Frozen challah French toast can maintain its quality for up to 2 months. Labeling the container with the date of freezing will help you keep track of your inventory.
Reheating
Reheating leftover challah French toast is straightforward and can be done using several methods. The oven or toaster oven is generally the preferred method for achieving a texture closest to freshly made. Place the refrigerated or thawed slices on a baking sheet and warm them in a preheated oven at around 350°F (175°C) for about 5-10 minutes, or until heated through and slightly crisped.
A microwave can also be used for quicker reheating, but be mindful that it can sometimes result in a softer, less crispy texture. Place the slices on a microwave-safe plate and heat in 30-second intervals, checking for warmth. If you’ve frozen your French toast, allow it to thaw in the refrigerator overnight before reheating using any of these methods for the best results.
Frequently Asked Questions
-
What makes challah bread ideal for French toast compared to other breads?
Challah bread’s unique composition makes it exceptionally well-suited for French toast. It is an enriched bread, meaning it’s made with a higher proportion of eggs, oil, and often honey or sugar, which gives it a tender crumb and a slightly sweet, rich flavor profile. This structure allows it to soak up the custard mixture deeply without becoming overly saturated or falling apart, resulting in a custardy interior and a wonderfully spongy texture. Unlike leaner breads such as a baguette or sourdough, challah’s inherent richness contributes a luxurious mouthfeel and flavor that is highly desirable in French toast. Its ability to absorb liquid without becoming mushy is its greatest asset in this application. -
Can I use a different type of bread if I can’t find challah?
Absolutely! While challah is fantastic, many other types of bread can be used to make delicious French toast, provided they are suitable for soaking. Brioche is a very close alternative, as it is also an enriched bread with a similar texture and flavor profile. Sturdy, day-old white bread, French bread, or even Texas toast (which is typically thicker cut) can work well. The most critical factor, regardless of the bread type, is that it should be slightly stale or dried out. This ensures the bread can absorb the custard effectively without disintegrating. Avoid very soft, fresh sandwich bread, as it will likely become too soggy, and steer clear of breads with large, airy holes, which can lead to uneven custard absorption. -
How can I prevent my French toast from becoming soggy or dry?
Achieving the perfect balance is key to preventing soggy or dry French toast. To avoid sogginess, use day-old or slightly dried-out bread, and be mindful of the soaking time – typically 2 minutes per side is sufficient. Allowing the soaked bread to drain on a wire rack for a few minutes before cooking also helps remove excess custard. Crucially, cook the French toast over medium heat; high heat will burn the outside before the inside is cooked, while very low heat can dry it out. Ensure your cooking surface is properly buttered for each batch, as this promotes even browning and prevents sticking. For dryness, the initial soak and the cooking temperature are paramount; if it’s too dry to begin with, you might need to slightly increase the soaking time or the liquid ratio in your custard, ensuring you still use medium heat for cooking.