Pupusas Recipe – Authentic Pupusas with Curtido!
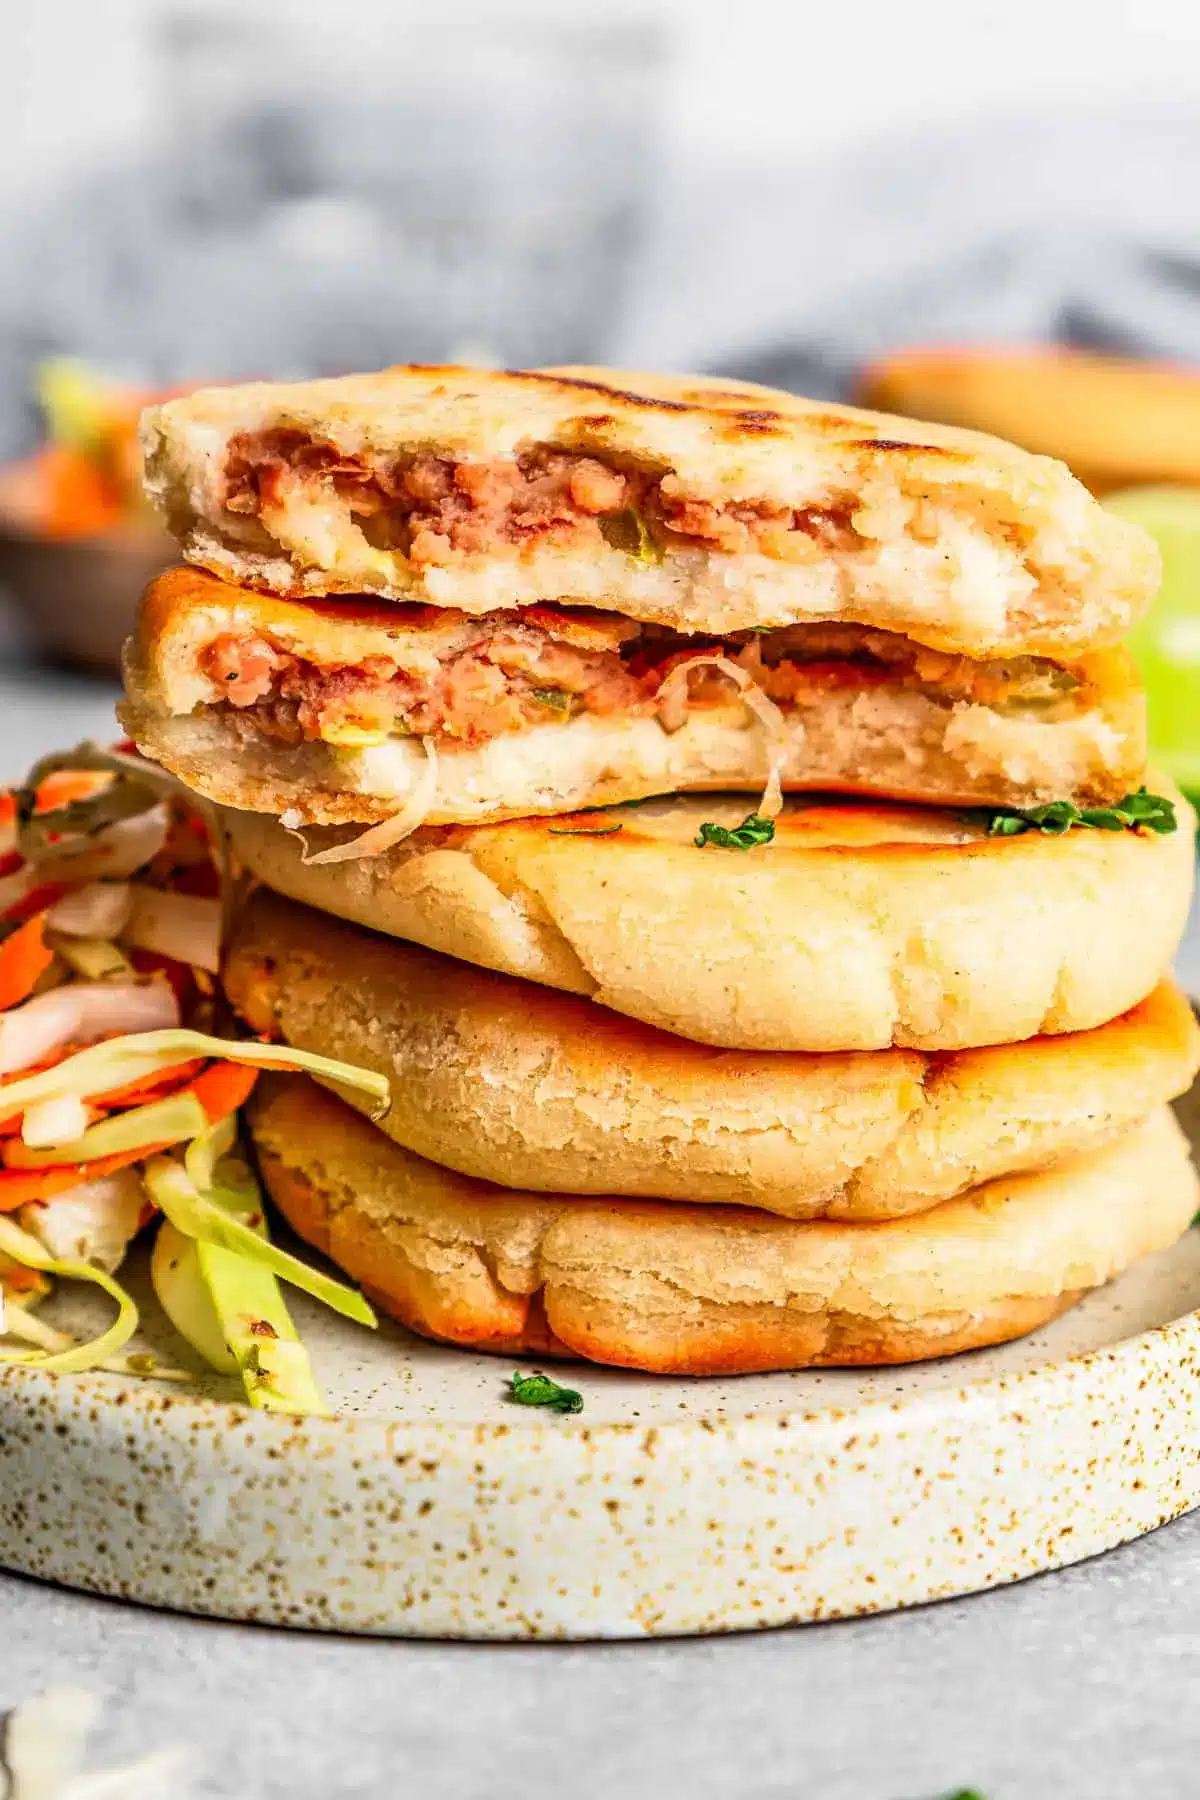
Embark on a culinary adventure with this authentic pupusas recipe, a true taste of El Salvador right in your own kitchen. These delightful masa cakes are crispy on the outside, wonderfully tender on the inside, and packed with savory fillings. They’re perfect for a satisfying snack, a light lunch, or even a fun dinner option that will impress your guests.
As a lover of vibrant street food, I’ve always been drawn to the unique flavors and textures of Latin American cuisine. Pupusas, with their comforting masa dough and delectable fillings, quickly became a favorite after I first discovered them. This recipe is my perfected version, designed for home cooks to achieve that authentic, irresistible taste and texture.
Why You Will Love This Recipe
- Authentic Flavor: Crafted with traditional masa harina for a truly Salvadoran experience.
- Simple Yet Satisfying: Uses readily available ingredients for a delightful meal without fuss.
- Customizable Fillings: Offers endless possibilities to tailor the pupusas to your personal taste preferences.
- Engaging Preparation: The shaping process is fun and rewarding, making cooking a joy.
- Perfect Pairing: Accompanied by a zesty curtido, a classic Salvadoran slaw that perfectly complements the richness of the pupusas.
Ingredients You Need
The beauty of this pupusas recipe lies in its use of simple, wholesome ingredients that come together to create something truly special. We’ll focus on quality masa harina for that distinct corn flavor, and a medley of delicious fillings. Remember, the exact quantities and specific measurements are detailed in the recipe card below for your convenience.
Pupusas Recipe
Pupusas are crispy stuffed masa cakes from El Salvador, filled with refried beans, pickled jalapeños, and melted cheese. Serve them with a zesty cabbage slaw called curtido!
- For the curtido:
- 1 cup shredded cabbage
- 1 small carrot, thinly sliced or grated
- 2 teaspoons dried oregano
- ½ cup apple cider vinegar
- ½ cup hot water
- ½ teaspoon salt
- ½ teaspoon cane sugar
- For the pupusas:
- 1½ cups + 2 tablespoons masa harina
- 1⅓ cup water
- 1 teaspoon salt
- ½ cup shredded mozzarella cheese
- ¼ cup refried beans
- ¼ cup pickled jalapenos, finely chopped
- 1Make the curtido: Combine the cabbage, carrots, and oregano in a bowl. In a separate bowl, combine vinegar, hot water, salt, and sugar and stir until dissolved. Pour over cabbage and stir. Cover and refrigerate for at least 4 hours.
- 2Make the pupusas: Combine masa harina, water, and salt in a bowl. Stir with a spatula, then knead until a soft dough forms. Divide into 8 balls.
- 3Wet your hands and flatten each ball to ¼-inch thick.
- 4Place ½ tablespoon refried beans, mozzarella cheese, and chopped jalapeños in the center of each dough circle.
- 5Fold the dough edges up and pinch to enclose the filling, then roll into a ball. Gently flatten to ½-inch thick.
- 6Heat 2 tablespoons of oil in a skillet over medium-high heat.
- 7Fry pupusas for 4-5 minutes per side, until golden and crispy.
- 8Serve warm with the prepared curtido.
Keywords: Pupusas, Salvadoran, Masa Harina, Refried Beans, Cheese, Jalapenos, Curtido, Cabbage Slaw, Street Food, Vegetarian
You’ll find all the precise measurements for each ingredient in the printable recipe card located further down the page.
Variations
While the classic refried bean and cheese filling is incredibly popular, the world of pupusas is ripe for creative exploration. Don’t hesitate to venture beyond the traditional to discover new favorite combinations.
For a delightful vegan option, swap the mozzarella cheese for a dairy-free shredded cheese alternative, or simply fill the pupusas with seasoned mashed black beans and sautéed vegetables like bell peppers and onions. A sprinkle of nutritional yeast can add a cheesy, umami depth.
If you’re following a low-carb lifestyle, you can adapt this recipe by using a cauliflower-based masa alternative or exploring other low-carb dough options. Fillings can then focus on lean proteins like shredded chicken or pork, alongside a variety of finely chopped, non-starchy vegetables.
Experiment with different cheeses beyond mozzarella, such as a sharp cheddar, a smoky gouda, or even a creamy Oaxacan cheese for an authentic Mexican twist. You could also incorporate seasoned shredded meats like pulled pork or barbacoa for a heartier pupusa.
How to Prepare pupusas recipe
Step 1: Prepare the Zesty Curtido
We begin by crafting the essential accompaniment to our pupusas: the curtido. This vibrant Salvadoran cabbage slaw is a refreshing counterpoint to the rich, fried masa cakes. Its tangy and slightly sweet profile cuts through the cheesiness beautifully, making each bite perfectly balanced.
Start by finely shredding a head of green cabbage; a mandoline slicer works wonders for achieving uniform thinness, but a sharp knife is perfectly adequate. Grate one small carrot and add it to the cabbage along with a teaspoon of dried oregano. The oregano adds a subtle herbal note that is characteristic of traditional curtido.
In a separate bowl, whisk together 1/2 cup of apple cider vinegar with 1/2 cup of hot water. This warm liquid helps to slightly soften the vegetables and meld the flavors. Stir in 1/2 teaspoon of salt and 1/2 teaspoon of cane sugar until both are completely dissolved. The sugar balances the tartness of the vinegar.
Pour this zesty dressing over the cabbage and carrot mixture. Toss everything thoroughly to ensure all the vegetables are coated. The salt will begin to draw out moisture from the cabbage, creating a delicious dressing as it marinates. Cover the bowl tightly and refrigerate for at least 4 hours, or preferably overnight. This chilling period is crucial for allowing the flavors to meld and the vegetables to soften to the perfect texture, making the curtido truly sing.
Step 2: Craft the Masa Dough
With the curtido chilling, it’s time to turn our attention to the heart of the pupusa: the masa dough. This is a surprisingly simple process that yields a versatile dough ready to embrace its delicious fillings. The key is to achieve a soft, pliable consistency that is easy to work with.
In a large mixing bowl, combine 1 and 1/2 cups plus 2 tablespoons of masa harina with 1 and 1/3 cups of water. Masa harina, a finely ground corn flour, is essential for authentic pupusas, providing that distinct corn flavor and characteristic texture. If you can’t find masa harina, a good quality cornmeal can be used as a substitute, though the flavor profile will be slightly different.
Add 1 teaspoon of salt to the mixture. Stir everything together with a sturdy spatula until a shaggy dough begins to form. Once it’s mostly combined, use your hands to knead the dough directly in the bowl. Continue kneading for about 5-7 minutes until the dough is smooth, soft, and no longer sticky. It should feel similar to Play-Doh, pliable and easy to shape without clinging excessively to your fingers.
If the dough seems too dry and crumbly, gradually add a tablespoon of water at a time until the desired consistency is reached. Conversely, if it feels too wet and sticky, you can incorporate a touch more masa harina, a teaspoon at a time. Proper hydration is key to preventing the dough from cracking or becoming difficult to handle during the stuffing and shaping stages. The goal is a smooth, cohesive mass that holds its shape well.
Step 3: Divide and Shape the Dough Balls
Once your masa dough has achieved the perfect soft consistency, the next step is to divide it into uniform portions. This ensures that each pupusa will cook evenly and have a consistent size, making for a beautiful presentation. A large cookie scoop can be an invaluable tool here for achieving perfect portioning.
Using a kitchen scale, divide the dough into 8 equal portions, aiming for approximately 2.5 to 3 ounces each. Alternatively, you can eyeball it, ensuring each piece is roughly the same size. Roll each portion of dough between your palms to form smooth, neat balls. These dough balls are the foundation for your delicious pupusas, so take a moment to ensure they are well-formed and free of cracks.
If you’re finding the dough a bit sticky, which can sometimes happen with masa, don’t worry. Keep a small bowl of water handy. Wetting your hands with a little water will help prevent the dough from sticking to your palms as you shape the balls. You can also opt to lightly oil your hands, which serves a similar purpose and can even add a subtle crispness to the exterior.
Place the perfectly formed dough balls onto a clean plate or a piece of parchment paper. Having them ready to go makes the filling process much smoother and more efficient. This organized approach minimizes handling time and keeps the dough at an optimal temperature for shaping. The visual uniformity of these balls sets the stage for equally beautiful finished pupusas.
Step 4: Stuff and Seal the Pupusas
This is where the magic truly happens – transforming simple dough balls into delicious stuffed pockets of flavor. The process requires a gentle touch and a bit of dexterity, but it’s incredibly rewarding as you see the pupusas take shape.
Take one dough ball and, using your fingertips, flatten it into a thick disc, about 1/4 inch thick. Work from the center outwards, creating a small well. It’s crucial to keep a bowl of water nearby to dip your fingers in periodically; this prevents the masa from sticking to your hands, ensuring a smooth flattening process. The key is to create a pouch-like cavity without making the dough too thin around the edges.
Spoon about 1/2 tablespoon of refried beans into the center of the flattened dough disc. Don’t overfill, as this can make sealing difficult. Top the beans with a generous sprinkle of shredded mozzarella cheese, and then add about 1 tablespoon of finely chopped pickled jalapeños. Adjust the amount of jalapeños to your desired level of heat and tanginess.
Now, carefully gather the edges of the dough up and around the filling. Pinch these edges together firmly to seal the filling inside, then gently roll the stuffed dough back into a ball. Once it’s a ball again, carefully flatten it between your palms into a disc about 1/2 inch thick. You want to ensure the filling is completely enclosed. Repeat this stuffing and sealing process for all remaining dough balls, setting the shaped pupusas onto parchment paper to prevent sticking.
Step 5: Fry to Golden Perfection
The final stage of preparing your pupusas involves frying them until they achieve that signature crispy, golden-brown exterior. This cooking method locks in the flavors and creates a delightful textural contrast to the soft interior filling.
Heat about 2 tablespoons of cooking oil in a large skillet over medium-high heat. A neutral oil like vegetable oil or canola oil works well here. You want the oil to be hot enough to sizzle immediately when a pupusa is added, but not so hot that it burns the masa before it cooks through. The correct temperature is crucial for achieving a perfect sear.
Carefully place 2-3 pupusas into the hot skillet, making sure not to overcrowd the pan. Overcrowding will lower the oil temperature and result in greasy, less crispy pupusas. Cook each side for approximately 4-5 minutes, or until they are beautifully golden brown and have a satisfying crispness. You’ll see the edges start to firm up and develop those appealing little blisters.
Using a spatula, gently flip the pupusas and continue cooking the other side for another 4-5 minutes. The exact cooking time may vary depending on your stove and skillet. Once both sides are perfectly cooked, remove the pupusas from the skillet and place them on a wire rack set over a baking sheet. This allows any excess oil to drain off, keeping them wonderfully crisp. This method is also ideal for keeping cooked pupusas warm while you fry the remaining batches.
Step 6: Serve and Enjoy
The moment of truth has arrived! Your homemade pupusas are ready to be savored. The aroma of freshly fried masa combined with the tangy curtido is simply irresistible. Serve them immediately while they are hot and their crispness is at its peak.
Arrange the golden-brown pupusas on a platter. Spoon a generous portion of the chilled, zesty curtido alongside them. The vibrant colors of the curtido will beautifully contrast with the warm tones of the pupusas, creating an inviting presentation.
Encourage your diners to enjoy them by tearing them open to reveal the molten cheese and savory bean filling within. The combination of the crispy exterior, the warm, soft masa, the gooey cheese, and the tangy slaw is a culinary symphony. This dish is perfect as a standalone snack or as part of a larger Latin American feast.
Pro Tips for pupusas recipe
Achieving pupusa perfection is all about a few key techniques that enhance both the process and the final result. By incorporating these tips, you’ll elevate your homemade pupusas from good to absolutely spectacular.
The Dough Consistency is Key: Pay close attention to the hydration of your masa harina dough. It should be soft and pliable, but not overly sticky. If it’s too dry, it will crack; if too wet, it will be difficult to handle. A little oil or water on your hands can be a lifesaver during the shaping process, preventing sticking and ensuring smooth discs.
Don’t Overfill: While it’s tempting to pack in as much filling as possible, overfilling can make it very difficult to seal the pupusas properly. This can lead to filling leaking out during frying, resulting in a mess and less appealing pupusas. Aim for a balanced ratio of dough to filling for best results.
Consistent Thickness Matters: When flattening the stuffed pupusas, aim for an even thickness of about 1/2 inch. If they are too thin, they might dry out or break; too thick, and the masa might not cook through properly. Uniformity ensures even cooking and a delightful texture throughout.
Proper Frying Temperature: Use medium-high heat for frying. If the oil is too low, the pupusas will absorb too much grease and become soggy. If it’s too high, they will burn on the outside before the inside is heated through. Test the oil with a small piece of dough; it should sizzle actively.
Keep Them Warm and Crispy: To maintain the crispness of fried pupusas while you finish cooking the batch, place a wire rack over a baking sheet and keep it in a low oven (around 200°F or 95°C). Transfer the freshly fried pupusas to this rack. This allows air to circulate, preventing them from becoming soggy from residual steam.
Serving Suggestions for pupusas recipe
Decoration
While pupusas are visually appealing in their golden-brown state, a few simple garnishes can enhance their presentation. A dollop of creamy avocado slices or a sprinkle of fresh cilantro can add a pop of color and a fresh, herbaceous note. Some enthusiasts also enjoy a light dusting of crumbled cotija cheese for an extra layer of salty flavor and visual texture, though this is less traditional.
Side Dishes
The classic and most beloved side dish for pupusas is, without a doubt, curtido. This tangy, slightly fermented cabbage slaw provides a much-needed acidity and crunch that perfectly balances the rich, cheesy pupusas. You can also serve a side of fresh salsa, such as a mild tomato-based pico de gallo or a spicier salsa verde, to offer another layer of flavor. For a heartier meal, consider pairing them with a side of black beans or white rice, common staples in Salvadoran cuisine.
Creative Serving Ideas
Think beyond the traditional accompaniments to truly elevate your pupusa experience. Consider serving them as part of a tapas-style meal, alongside other small bites like taquitos, empanadas, or mini arepas. They also make a fantastic appetizer for a larger Latin American-inspired dinner party; prepare a variety of fillings to let guests customize their pupusas.
For a fun brunch option, serve mini pupusas topped with a poached egg and a drizzle of crema or sour cream. You could also experiment with sweet and savory combinations, perhaps a pupusa filled with spiced pumpkin and black beans, served with a dollop of tangy yogurt. The versatility of pupusas means they can adapt to many different dining occasions and flavor profiles.
Preparation & Storage
Storing Leftovers
Leftover pupusas are best enjoyed fresh, but they can be stored for a few days if necessary. Once they have cooled completely, place them in an airtight container or wrap them tightly in plastic wrap. Refrigerate them for up to 2-3 days. It’s important to ensure they are fully cooled before storing to prevent condensation from making them soggy. While they will lose some of their initial crispness, they are still quite delicious.
Freezing
Pupusas freeze exceptionally well, making them a fantastic option for make-ahead meals. Arrange the shaped, but un-fried, pupusas on a baking sheet lined with parchment paper, ensuring they are not touching. Freeze them until they are solid, which usually takes about 1-2 hours. Once frozen, transfer the solid pupusas to a heavy-duty freezer bag or an airtight container. They can be stored in the freezer for up to 4 months. This method allows you to have homemade pupusas ready at a moment’s notice.
Reheating
The best way to reheat pupusas is to restore their crispy exterior. Avoid using the microwave, as it tends to make them soft and somewhat gummy. Instead, reheat them in a dry or lightly oiled skillet over medium heat for about 4-6 minutes per side, until warmed through and crisped up. A toaster oven or a regular oven preheated to around 350°F (175°C) also works wonderfully; place them on a baking sheet and reheat for 10-15 minutes, flipping halfway through. If reheating from frozen, you’ll need to add a few extra minutes to the cooking time.
Frequently Asked Questions
-
What is masa harina and can I substitute it?
Masa harina is a type of corn flour made from dried maize that has been cooked in limewater (nixtamalized), then ground. This process is fundamental to its unique flavor, texture, and how it hydrates. It’s the traditional flour used for tortillas, tamales, and pupusas. While you can substitute cornmeal or corn flour in a pinch, the resulting flavor and texture will be different. Masa harina is readily available in most well-stocked grocery stores or specialty Latin markets, and it truly makes a difference in achieving authentic pupusas.
-
My masa dough is too sticky. What can I do?
A slightly sticky dough is common with masa harina, but it shouldn’t be unmanageable. If your dough is proving too sticky to shape, the best solution is to slightly dampen your hands with water before handling the masa. This provides a slick surface that prevents the dough from clinging to your palms. You can also add a tablespoon of cooking oil to the water you use for wetting your hands, or lightly grease your hands with oil directly. Conversely, if the dough is too dry and crumbly, gradually add a tiny bit more water, a teaspoon at a time, until it reaches a soft, pliable consistency without being excessively wet.
-
Can I make pupusas with fillings other than beans and cheese?
Absolutely! The beauty of pupusas lies in their versatility. While the classic combination of refried beans and cheese is delicious, you can explore a world of other fillings. Popular options include seasoned shredded chicken (like tinga or mole chicken), shredded pork (carnitas or pernil), or even vegetables like mashed sweet potato or seasoned spinach. Some people enjoy a simple cheese-filled pupusa, while others add finely chopped loroco, a Salvadoran edible flower. The key is to ensure the filling is not too wet, and to chop any solid ingredients finely enough to allow the dough to seal properly around them.