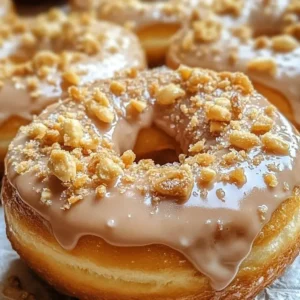
Ultimate Peanut Butter Cheesecake Donuts

Imagine biting into a warm, freshly baked donut that merges the creamy richness of cheesecake with the nutty charm of peanut butter. Welcome to the delightful world of Peanut Butter Cheesecake Donuts, a treat designed to bring pure joy to your taste buds. These homemade delights offer a sweet and indulgent experience that’s hard to resist, perfect for any occasion that calls for something truly special. Who wouldn’t want to treat themselves and their loved ones to such a unique dessert experience?
This recipe for Peanut Butter Cheesecake Donuts is special because it’s straightforward yet utterly satisfying, making gourmet baking accessible to everyone. Unlike complicated desserts that demand hours of intricate kitchen work, these donuts come together fairly easily, making them perfect for both baking novices and seasoned cooking enthusiasts. The harmonious combination of flavors creates a symphony that dances on your taste buds, leaving a lasting impression and making you crave just one more bite.
Why You Will Love This Recipe
- Flavor Explosion: The rich, earthy notes of peanut butter blend seamlessly with the tangy, creamy texture of cheesecake, creating a truly divine flavor harmony. This unique combination offers a gourmet taste that stands out from ordinary donuts, making every bite an exciting experience.
- Simplicity: This recipe is surprisingly easy to follow, making it a perfect choice for bakers of all skill levels, from beginners to more experienced home cooks. Clear, concise steps ensure a smooth baking process, allowing you to achieve impressive results without unnecessary stress.
- Versatile Treat: You can effortlessly customize these donuts with your favorite toppings, glazes, or even different fillings to truly make them your own signature creation. This adaptability means they can be tailored to suit various palates or themed for specific events and celebrations.
- Family-Friendly: These delightful donuts are absolutely sure to be a hit with both kids and adults alike, making them an excellent choice for family gatherings or weekend treats. Their universally appealing flavors and fun format guarantee smiles all around, fostering wonderful shared moments.
- Perfect for Any Occasion: From a special weekend breakfast or brunch to an elegant dessert for a dinner party, these donuts fit seamlessly into any situation. They elevate casual moments and add a touch of sophistication to more formal events, proving their incredible versatility.
- Make Ahead Potential: The dough for these irresistible donuts can be prepared in advance, allowing you to save valuable time on busy mornings or when planning for special events. This thoughtful flexibility ensures fresh, warm donuts are always within reach, even on a tight schedule.
Ingredients You Need
Crafting exceptional Peanut Butter Cheesecake Donuts begins with selecting high-quality ingredients. Choosing fresh, good-quality components ensures the best flavor and texture in your final product, making a noticeable difference in every bite. Opt for reputable brands for your flour, dairy, and especially your peanut butter to truly elevate the taste experience.
Peanut Butter Cheesecake Donuts
Indulge in warm, freshly baked donuts that merge the creamy richness of cheesecake with the nutty charm of peanut butter. These homemade delights offer a sweet and indulgent experience, perfect for any occasion. The recipe is straightforward yet utterly satisfying, suitable for bakers of all skill levels, and allows for versatile customization.
- For the Donut Base:
- 2 1/4 cups all-purpose flour (Provides structure.)
- 1/4 cup granulated sugar (Sweetens the dough.)
- 2 1/4 tsp instant yeast (Helps the donuts rise.)
- 1/2 tsp salt (Balances the sweetness.)
- 3/4 cup warm milk (110°F) (Activates yeast.)
- 2 tbsp unsalted butter, softened (Adds flavor.)
- 1 large egg (Binds the ingredients.)
- 1 tsp vanilla extract (Enhances flavor.)
- For the Filling:
- 8 oz cream cheese, softened (Creates a creamy texture.)
- 1/2 cup creamy peanut butter (Adds flavor.)
- 1 cup powdered sugar (Sweetens the filling.)
- 1 tsp vanilla extract (For extra flavor.)
- 1-2 tbsp heavy cream or milk (optional) (Adjusts consistency.)
- For the Glaze:
- 1 cup powdered sugar (Forms the glaze.)
- 2-3 tbsp milk or water (To thin out the glaze.)
- 1/2 tsp vanilla extract (Adds flavor.)
- Optional Toppings:
- 1/4 cup chopped peanuts (For added crunch.)
- to taste melted peanut butter (For drizzling.)
- 1Step 1 – Prepare IngredientsStart by gathering all your ingredients. Measure out each component to ensure everything is ready for mixing. This makes the baking process smoother and more enjoyable.
- 2Step 2 – Activate YeastIf using active dry yeast, dissolve it in the warm milk with a pinch of sugar. Let it bloom for about 5 minutes or until foamy. If using instant yeast, you can skip this step and mix it directly with dry ingredients.
- 3Step 3 – Combine Dry IngredientsIn a mixing bowl, whisk together the all-purpose flour, granulated sugar, and salt. This creates a flavorful base for your donuts.
- 4Step 4 – Mix Wet IngredientsIn a separate bowl, beat together the egg, softened butter, and vanilla extract until well combined and smooth. This can be done with a hand mixer or whisk.
- 5Step 5 – Create the DoughAdd the yeast mixture (if blooming) and the wet ingredients to the dry mixture. Mix until it forms a dough, then knead for about 8 minutes by hand or 5 minutes with a mixer until smooth and elastic.
- 6Step 6 – Let Dough RiseCover the dough with a clean kitchen towel and let it rise in a warm place until it doubles in size. This usually takes about 1 to 1.5 hours.
- 7Step 7 – Shape DonutsOnce the dough has risen, roll it out on a lightly floured surface to about 1/3 inch thickness. Use a donut cutter or two round cutters to cut out donuts and their holes.
- 8Step 8 – Rest the DonutsPlace the cut donuts on a baking sheet lined with parchment paper. Let them rest for another 20 minutes to rise slightly.
- 9Step 9 – Preheat OvenWhile the donuts are resting, preheat the oven to 350°F. This ensures that your donuts bake evenly and thoroughly.
- 10Step 10 – BakeBake the donuts in the preheated oven for 10-12 minutes or until they are golden brown and cooked through. Test with a toothpick for doneness.
- 11Step 11 – Prepare FillingWhile the donuts are baking, beat together the softened cream cheese and peanut butter in a bowl until smooth. Gradually incorporate powdered sugar and vanilla extract. If needed, adjust the consistency with milk or cream.
- 12Step 12 – Fill the DonutsOnce the donuts are completely cooled, use a piping bag fitted with a small round tip to fill each donut with the peanut butter cheesecake mixture. You can fill them from the side or bottom.
- 13Step 13 – Make GlazeCombine powdered sugar, milk or water, and vanilla extract in another bowl. Whisk until smooth to create your glaze.
- 14Step 14 – Glaze the DonutsDip the tops of the filled donuts into the glaze, allowing excess to drip off. You can also drizzle additional melted peanut butter on top for added flair.
- 15Step 15 – ServeSprinkle with chopped peanuts before the glaze sets if desired. Allow the donuts to sit for a few minutes to let the filling stabilize. Serve them fresh for the best taste and texture.
Keywords: Baked Donuts, Cheesecake Donuts, Dessert Recipe, Easy Donuts, Peanut Butter Donuts
- 2 1/4 cups all-purpose flour: The foundational ingredient, providing essential structure and a tender crumb to your homemade donut base.
- 1/4 cup granulated sugar: Sweetens the dough subtly, perfectly balancing the richness of other components without overpowering the flavors.
- 2 1/4 tsp instant yeast: The crucial leavening agent that helps the donuts rise beautifully, ensuring a light, airy, and fluffy texture.
- 1/2 tsp salt: A small but mighty addition that balances the sweetness and enhances all the other flavors present in the donut dough.
- 3/4 cup warm milk (110°F): Activates the yeast effectively and adds necessary moisture to the dough, contributing to its soft and pliable consistency.
- 2 tbsp unsalted butter, softened: Incorporates a rich, buttery flavor and contributes to the tender mouthfeel of the donut dough.
- 1 large egg: Acts as a binding agent, helping to hold the ingredients together while adding richness and improving the overall texture of the dough.
- 1 tsp vanilla extract: Enhances the overall flavor profile of the donut, adding a warm and comforting aromatic note.
- 8 oz cream cheese, softened: The essential base for the creamy, tangy cheesecake filling, providing its signature smooth texture.
- 1/2 cup creamy peanut butter: Infuses the filling with that irresistible nutty flavor, creating the star component of these unique donuts.
- 1 cup powdered sugar: Sweetens the luscious cheesecake filling, contributing to its smooth consistency and delightful taste.
- 1 tsp vanilla extract: For an extra layer of warm flavor in the filling, complementing both the cream cheese and peanut butter.
- 1-2 tbsp heavy cream or milk (optional): Used to adjust the filling consistency, ensuring it’s perfectly pipeable and wonderfully smooth.
- 1 cup powdered sugar: Forms the smooth and glossy glaze, providing a sweet finish to the baked donuts.
- 2-3 tbsp milk or water: To thin out the glaze to your desired consistency, ensuring it coats the donuts evenly and beautifully.
- 1/2 tsp vanilla extract: Adds flavor to the simple glaze, tying all the sweet elements together harmoniously.
- 1/4 cup chopped peanuts: An optional topping for added crunch, textural contrast, and an intensified peanut flavor.
- to taste melted peanut butter: An optional drizzle for an extra tasty touch and a beautiful visual flourish on top of your glazed donuts.
Always remember that precise quantities for each ingredient are typically detailed within the accompanying recipe card. This ensures you have all the exact measurements at your fingertips for a perfect bake. Selecting quality components from reputable sources like Wikipedia’s entry on Peanut Butter ensures the best possible outcome for your delightful treats.
Variations
Embrace dietary needs with a Vegan Version: To transform these delectable donuts into a plant-based delight, simply substitute the egg with a flaxseed “egg” (1 tablespoon ground flaxseed mixed with 3 tablespoons water, allowed to sit for 5 minutes). For the dairy components, use high-quality plant-based cream cheese and butter alternatives. Ensure your milk is a non-dairy option like almond or oat milk, and check that your yeast is naturally vegan-friendly.
Create a Gluten-Free Indulgence: For those with gluten sensitivities, a 1:1 gluten-free all-purpose flour blend can be used as a direct substitute for conventional flour. It is crucial to select a blend that contains xanthan gum, or add a small amount separately, to provide the necessary elasticity to the dough. Always double-check that your yeast is certified gluten-free, ensuring the entire recipe adheres to dietary requirements for a safe and delicious treat.
Explore flavor combinations with Chocolate Peanut Butter: Elevate the classic peanut butter profile by incorporating cocoa powder into the donut dough itself, creating a rich chocolate base. Additionally, you could drizzle melted chocolate over the finished, glazed donuts for an extra layer of decadence. This variation creates a delightful contrast and a more intense flavor experience, perfect for chocolate lovers.
Consider a Dairy-Free Option: If you are avoiding dairy, easily swap out traditional dairy butter for a high-quality plant-based butter substitute. For the creamy filling, use a dairy-free cream cheese alternative, which are widely available in most grocery stores. Coconut cream can also be used as an alternative for heavy cream, providing a wonderfully rich and smooth texture to your filling.
Low-Sugar Alternatives: For a less sweet version, you can reduce the amount of granulated sugar in the dough and powdered sugar in both the filling and glaze. Consider using natural sweeteners like erythritol or stevia-based blends for a sugar-free alternative. Always remember that alternative sweeteners can sometimes affect the texture, so small adjustments might be needed to achieve your desired consistency.
How to Prepare Peanut Butter Cheesecake Donuts
Step 1: Preparing Your Dough for Perfection
Gathering Ingredients: Begin by meticulously gathering all your necessary ingredients for the donut dough, ensuring they are measured accurately and at the correct temperatures. Having everything prepped at arm’s reach streamlines the entire baking process, preventing last-minute rushes. Room temperature ingredients, especially the egg and butter, integrate much more smoothly into the dough mixture, creating a more uniform and consistent texture.
Activating the Yeast: If your recipe calls for active dry yeast, it is crucial to properly activate it. Gently dissolve the yeast in the specified amount of warm milk, ensuring the temperature is precisely 110°F (43°C), as too hot or too cold can hinder activation. Add a tiny pinch of sugar to the mixture; this provides a food source for the yeast, encouraging it to bloom into a foamy layer, which indicates its vitality and readiness for baking. This step is non-negotiable for achieving fluffy donuts.
Combining Dry Elements: In a large mixing bowl, meticulously whisk together your all-purpose flour, granulated sugar, and salt. This thorough mixing ensures that these dry ingredients are evenly distributed throughout the dough. An even distribution is paramount for a consistent texture and balanced flavor in the final baked donut, preventing pockets of unmixed ingredients. Consider sifting your flour for an even lighter texture.
Integrating Wet Components: In a separate bowl, carefully beat together your softened unsalted butter, the large egg, and a teaspoon of vanilla extract until they are well combined and appear smooth. This can be achieved with a hand mixer or a simple whisk, ensuring the butter is fully emulsified. The vanilla extract provides a beautiful aromatic foundation for the donuts, adding warmth to the overall flavor profile.
Forming the Dough: Now, it’s time to bring everything together. Gradually add the activated yeast mixture (if applicable) and the combined wet ingredients into your bowl of dry ingredients. Mix these components until they just begin to come together and form a cohesive, shaggy dough. Avoid overmixing at this stage, as the real work begins with kneading.
The Art of Kneading: Turn the dough out onto a lightly floured surface and begin the kneading process. Knead the dough for approximately 8 minutes by hand, or about 5 minutes if you’re using a stand mixer fitted with a dough hook. Continue kneading until the dough transforms into a smooth, elastic, and supple ball that springs back when gently poked. Proper kneading develops the gluten, which is essential for the characteristic chewy texture of a perfect donut.
Step 2: The Art of Rising and Shaping
First Rise: Once your dough is beautifully kneaded, lightly grease a clean large bowl with a neutral oil, and place the dough inside. Turn the dough once to coat it thoroughly with oil, then cover the bowl tightly with a clean kitchen towel or plastic wrap. Place it in a warm, draft-free spot in your kitchen to rise until it has visibly doubled in size, which typically takes about 1 to 1.5 hours depending on your ambient temperature. A warm oven (turned off, with just the pilot light on) can be an excellent rising environment.
Punching Down and Rolling: After the dough has successfully completed its first rise, gently punch it down to release the accumulated gases. This step helps to redistribute the yeast and creates a finer crumb in your final product. Turn the dough out onto a lightly floured surface and, using a rolling pin, carefully roll it out to an even thickness of approximately 1/3 inch. Uniform thickness is key for evenly cooked donuts.
Shaping Your Donuts: Now comes the fun part: shaping! Utilize a donut cutter for perfectly symmetrical donuts, or if you don’t have one, use two round cutters—one larger for the donut itself and a smaller one for the center hole. Dip your cutters in flour between cuts to prevent sticking. Carefully transfer the cut donuts to a baking sheet lined with parchment paper, leaving sufficient space between each one to allow for their second rise. Don’t discard the donut holes; they bake up into delightful, bite-sized treats!
The Second Proof: Once the donuts are cut and arranged on the baking sheet, gently cover them again with a clean kitchen towel. Allow them to rest for another 20 minutes in a warm place; this crucial second rise is known as proofing. This brief resting period allows the donuts to puff up slightly, contributing to their ultimate light and airy texture once baked. Do not rush this step, as it significantly impacts the final product.
Step 3: Baking to Golden Perfection
Preheating the Oven: While your shaped donuts are undergoing their final proofing, preheat your oven to the precise temperature of 350°F (175°C). Ensuring your oven is fully preheated before the donuts go in is absolutely critical for even baking and a beautiful golden-brown finish. An oven that isn’t up to temperature can lead to dense, unevenly cooked donuts, so give it ample time to stabilize.
Baking the Donuts: Carefully transfer the baking sheet with your proofed donuts into the preheated oven. Bake them for approximately 10-12 minutes, or until they achieve a gorgeous golden-brown color and are cooked through. To check for doneness, you can gently insert a toothpick into the center of a donut; if it comes out clean, they are ready. Avoid opening the oven door too frequently, as this can cause temperature fluctuations and affect their rise. Once baked, remove them from the oven and transfer them to a wire rack to cool completely before filling.
Step 4: Crafting the Irresistible Peanut Butter Cheesecake Filling
Softening the Cream Cheese: While your donuts are baking and cooling, turn your attention to the luscious peanut butter cheesecake filling. Ensure your cream cheese is softened to room temperature, which is paramount for achieving a smooth, lump-free filling. Cold cream cheese will result in a clumpy texture that is difficult to work with. If you forget to take it out in advance, you can gently warm it in the microwave for a few seconds.
Mixing Cream Cheese and Peanut Butter: In a medium-sized mixing bowl, combine the softened cream cheese with the creamy peanut butter. Using an electric hand mixer or a stand mixer with a paddle attachment, beat these two ingredients together until they are completely smooth and well-incorporated. This initial mixing creates the creamy base, ensuring no lumps remain before adding other components. The combination of these two elements forms the rich heart of your donut filling.
Sweetening the Filling: Gradually incorporate the powdered sugar into the cream cheese and peanut butter mixture, beating well after each addition until it is fully blended. Powdered sugar is preferred over granulated sugar for its fine texture, which contributes to the silky smoothness of the filling. Add a teaspoon of vanilla extract at this stage to enhance the overall flavor, giving the filling a warm, aromatic depth.
Adjusting Consistency: If your filling appears too thick or stiff to pipe easily, you can adjust its consistency by adding 1-2 tablespoons of heavy cream or milk, one tablespoon at a time. Beat the mixture briefly after each addition until you reach your desired smooth, pipeable consistency. The goal is a filling that holds its shape but is soft enough to flow freely through a piping bag, ensuring a perfect filling for every donut.
Chill for Firmness (Optional): For an even firmer filling that is easier to handle, especially if your kitchen is warm, you can cover the bowl and refrigerate the peanut butter cheesecake filling for about 15-30 minutes. This chilling period allows the cream cheese to firm up slightly, making the piping process much cleaner and preventing the filling from becoming too soft once inside the donuts. Just give it a quick beat again before piping to restore its creamy texture.
Step 5: Filling and Glazing Your Donuts
Cooling is Key: Before attempting to fill your freshly baked donuts, it is absolutely imperative that they are completely cooled to room temperature. Filling warm donuts will cause the peanut butter cheesecake mixture to melt and seep out, creating a messy and less appealing result. Place them on a wire rack and allow ample time for them to cool down thoroughly, patience at this stage is rewarded with a perfect donut.
Preparing for Filling: Once cool, prepare your piping bag for the filling. Fit a piping bag with a small, round tip, or simply snip a small corner off a sturdy zip-top bag if you don’t have a piping tip. Carefully spoon the prepared peanut butter cheesecake filling into the piping bag, pushing it down towards the tip to remove any air pockets. This ensures a steady and even flow of filling.
The Filling Technique: To fill each donut, gently insert the tip of the piping bag into the side or bottom of the donut, creating a small incision. Steadily squeeze the piping bag, allowing the delicious peanut butter cheesecake filling to expand inside the donut cavity. You’ll feel the donut become heavier and slightly plump up as it fills. Be careful not to overfill, as this can cause the donut to burst. Aim for a generous but not excessive amount of filling.
Crafting the Glaze: While the filled donuts are resting, prepare your simple yet essential glaze. In a separate bowl, combine the powdered sugar, 2-3 tablespoons of milk or water, and 1/2 teaspoon of vanilla extract. Whisk these ingredients together until the mixture is completely smooth and free of any lumps. Adjust the consistency by adding more liquid a tiny bit at a time for a thinner glaze, or more powdered sugar for a thicker one. The ideal glaze consistency should be pourable but still coat the back of a spoon.
Glazing Your Masterpieces: Once the glaze is ready, it’s time to give your filled donuts their shiny, sweet finish. Gently dip the tops of each filled donut into the glaze, allowing any excess to drip off back into the bowl. For a beautifully smooth coating, try to avoid twisting the donut in the glaze. Place the glazed donuts back onto the wire rack, preferably with a sheet of parchment paper underneath to catch any drips, allowing the glaze to set slightly. This step adds both sweetness and an appealing sheen.
Optional Drizzle and Toppings: For an extra layer of flavor and visual appeal, consider drizzling additional melted peanut butter over the freshly glazed donuts before the glaze fully sets. You can also sprinkle a generous amount of chopped peanuts on top for added crunch and an intensified nutty flavor. These optional garnishes elevate the presentation and provide delightful textural contrast, making your donuts even more irresistible. Get creative with your toppings!
Step 6: The Grand Finale: Serving Your Masterpiece
Allowing to Stabilize: Before diving into your freshly filled and glazed donuts, allow them a few minutes to sit. This brief resting period allows the filling to stabilize further and the glaze to set properly, preventing messiness. This short wait enhances both the eating experience and the presentation of your beautiful creations. This ensures the filling holds its shape when you take that first glorious bite.
Optimal Serving: Serve these Peanut Butter Cheesecake Donuts fresh for the absolute best taste and texture. They are particularly delightful when slightly warm, as the flavors are more pronounced and the donut itself is wonderfully soft. Pair them with a hot cup of coffee, a cold glass of milk, or even a scoop of vanilla ice cream for an extra indulgent dessert. Enjoying them soon after preparation ensures you experience them at their peak.
Presentation Matters: Arrange your donuts artfully on a serving platter to impress your guests and family. A sprinkle of cocoa powder, a dusting of extra powdered sugar, or a few fresh berries can further enhance their visual appeal. Presentation can elevate the entire experience, turning a simple treat into a memorable culinary moment. Consider adding a small sprig of mint for a pop of color, making them look even more professional.
Sharing the Joy: These donuts are perfect for sharing at any gathering, from casual brunches to festive holiday celebrations. Their unique flavor profile and charming appearance make them a guaranteed conversation starter and a beloved treat. Don’t hesitate to take a picture and share your creations online; your friends will undoubtedly be envious and inspired by your baking prowess. They are perfect for bringing smiles and creating delightful memories.
Pro Tips for Peanut Butter Cheesecake Donuts
Avoid Over-Kneading: While kneading is essential for gluten development, over-kneading the dough can lead to tough, dense donuts with an undesirable rubbery texture. Knead just until the dough is smooth and elastic, stopping once it springs back gently when poked. Pay close attention to the dough’s feel; it should be pliable and soft, not stiff, which indicates you’ve developed sufficient gluten without overworking it.
Respect the Rise Time: Allowing the dough to rise properly is absolutely crucial for achieving light, airy, and fluffy donuts. Skipping or rushing the rise times (both the first and second proof) will result in heavy, compact donuts. Find a warm, draft-free spot in your kitchen for optimal rising, such as a slightly warmed (but turned off) oven or near a sunny window. Patience during these stages is key to a superior donut texture.
Cool Completely Before Filling: It is paramount that your baked donut shells are completely cooled to room temperature before you attempt to fill them. Filling warm donuts will cause the creamy peanut butter cheesecake filling to melt, thin out, and potentially seep out of the donut, creating a messy situation. A fully cooled donut will hold the filling perfectly, ensuring a clean and enjoyable eating experience. This step truly cannot be rushed.
Ensure Proper Yeast Proofing: If you’re using active dry yeast, make sure it blooms properly in warm milk with a pinch of sugar, forming a foamy layer within 5-10 minutes. This foam indicates that your yeast is alive and active, ready to leaven your dough. If no foam appears, your yeast might be expired or the milk temperature was incorrect, and it’s best to start with a fresh batch of yeast to guarantee a good rise. This initial check prevents wasted effort later in the process.
Don’t Overdo the Glaze: When glazing your donuts, aim for a light, even coating rather than a thick, heavy one. Too much glaze can make the donuts excessively sweet and can also become overly sticky. A thin, glossy layer is perfect for enhancing the flavor and providing an attractive finish without oversaturating the donut. Dip the tops gently and allow any excess to drip off before placing them on a cooling rack.
Quality Peanut Butter Matters: The type of peanut butter you choose significantly impacts the flavor of your cheesecake filling. Opt for a creamy, good-quality peanut butter that you genuinely enjoy eating on its own. Avoid natural peanut butters that separate excessively, as their oil can affect the filling’s texture. A smooth, conventional creamy peanut butter works best for consistency and flavor integration. This is truly the star ingredient.
Serving Suggestions for Peanut Butter Cheesecake Donuts
Decoration
Artful Drizzles: Elevate the visual appeal of your Peanut Butter Cheesecake Donuts with artistic drizzles. A contrasting chocolate ganache can be beautifully swirled over the peanut butter glaze, creating an eye-catching pattern. Alternatively, a simple drizzle of melted white chocolate adds a touch of elegance and an extra layer of sweetness, making each donut look professionally crafted and utterly irresistible.
Textural Toppings: Introduce delightful texture and enhanced flavor by sprinkling various toppings over your freshly glazed donuts. Finely chopped roasted peanuts not only boost the nutty profile but also provide a satisfying crunch. Consider adding mini chocolate chips for pockets of intense chocolate flavor, or a dusting of cocoa powder for a sophisticated, slightly bitter contrast that balances the sweetness beautifully. These toppings make each bite more engaging.
Festive Touches: For special occasions, personalize your decorations with festive sprinkles or edible glitter. Red and green sprinkles can be perfect for holiday celebrations, while pastel colors might suit a spring brunch or baby shower. These simple additions transform your donuts into celebratory treats, adding a playful and joyful element to your serving platter. They are fantastic for making an impression.
Side Dishes
Fresh Fruit Pairing: Balance the richness of the donuts with the freshness of seasonal fruits. A vibrant medley of sliced strawberries, ripe bananas, and blueberries offers a refreshing contrast in flavor and texture. The natural sweetness and slight tartness of the fruit cleanse the palate, making the indulgent donuts even more enjoyable and creating a well-rounded breakfast or dessert experience.
Beverage Companions: Pair these delightful donuts with classic beverages that complement their sweet and nutty profile. A robust cup of freshly brewed coffee cuts through the sweetness, providing a perfect morning or afternoon pick-me-up. For a more comforting combination, serve them with a cold glass of milk, a pairing beloved by both kids and adults. Alternatively, a creamy hot chocolate offers a decadent match, especially on a chilly day.
Light Savory Contrast: For a brunch spread, consider offering a light savory element to contrast the sweetness of the donuts. A small side of crispy bacon or a simple fruit and yogurt parfait can provide a satisfying counterpoint. This thoughtful pairing ensures your guests have a range of flavors and textures, making the overall meal more dynamic and enjoyable, without overwhelming the main star of the show.
Creative Serving Ideas
Donut Sandwich: For an extra indulgent treat, carefully slice a chilled Peanut Butter Cheesecake Donut horizontally and spread a thin layer of chocolate hazelnut spread or strawberry jam on one half before reassembling. This creates a gourmet donut sandwich, adding another dimension of flavor and texture. It’s an unexpected twist that will surely delight adventurous eaters, making it a unique dessert experience.
Donut Sundae: Transform your donuts into an unforgettable dessert sundae. Gently warm a donut, then place it in a bowl. Top generously with a scoop of vanilla or chocolate ice cream, a dollop of whipped cream, and a drizzle of caramel or hot fudge sauce. Finish with a sprinkle of crushed peanuts or a cherry on top for a truly decadent creation. This is perfect for a special occasion or a fun family night dessert.
Mini Donut Skewers: For an impressive party presentation, consider making mini versions of these donuts or using donut holes. Thread them onto skewers alternately with fresh fruit pieces like strawberries or grapes. This creates an appealing and easy-to-eat dessert option for gatherings, offering a lovely visual display and convenient portion control. They are perfect for a party platter.
Preparation & Storage
Storing Leftovers
Airtight Container is Key: To maintain the freshness, softness, and rich flavor of your Peanut Butter Cheesecake Donuts, it is absolutely crucial to store any leftovers in an airtight container. This barrier prevents them from drying out and shields the delicate flavors from absorbing odors from other foods in your kitchen. Proper sealing ensures every bite remains as delicious as the first, preserving their delightful texture for longer.
Room Temperature vs. Refrigeration: If you plan to consume the donuts within 1 to 2 days, they can be safely stored in an airtight container at cool room temperature, away from direct sunlight. However, due to the cream cheese in the filling, for optimal freshness and to extend their shelf life up to a week, refrigeration is highly recommended. Always prioritize refrigeration if your home environment is particularly warm or humid to prevent spoilage.
Avoiding Moisture: When refrigerating, consider placing a sheet of parchment paper between layers of donuts to prevent them from sticking together. Additionally, if you notice any condensation forming inside the container, place a small paper towel on top of the donuts before sealing; this will help absorb excess moisture and keep them from becoming soggy, preserving their delightful texture. This simple trick makes a big difference in freshness.
Freezing
Freezing Unglazed Donuts: For longer-term storage, the best approach is to freeze the unglazed donut shells. Once baked and completely cooled, arrange the plain donuts in a single layer on a baking sheet and flash freeze them until solid, which typically takes about an hour. This step prevents them from sticking together when transferred to a storage bag. Flash freezing helps maintain their individual shape and prevents them from forming a large frozen clump.
Long-Term Freezing: After flash freezing, transfer the solid donuts into a freezer-safe airtight container or a heavy-duty freezer bag, ensuring as much air as possible is removed to prevent freezer burn. Label the container with the date. These unglazed donuts can be stored in the freezer for up to 3 months, providing a convenient option for enjoying fresh-tasting treats whenever a craving strikes. This preparation makes them perfect for a future dessert.
Freezing the Filling Separately: While the donuts freeze well, the peanut butter cheesecake filling can also be frozen separately in an airtight container for up to a month. Thaw the filling in the refrigerator overnight and give it a good whisk or beat with a mixer before using, as the texture might change slightly after freezing and thawing. This method allows for maximum flexibility when preparing your delicious donuts.
Reheating
Thawing Frozen Donuts: To prepare your frozen, unglazed donuts for consumption, transfer them from the freezer to the refrigerator and allow them to thaw overnight. This gradual thawing process helps maintain their texture and prevents them from becoming rubbery. Once thawed, let them come to room temperature on the counter for about 15-30 minutes before proceeding with baking, which helps even heating.
Warming Thawed Donuts: If you desire a warm donut experience, place the thawed donuts on a baking sheet and warm them in a preheated oven at 350°F (175°C) for approximately 5-8 minutes. Be careful not to overheat them, as this can dry them out. The goal is a gentle warming that restores their freshly baked softness and brings out their wonderful aromas. This step elevates the flavor and texture significantly.
Glazing and Serving: Once warmed, or simply brought to room temperature after thawing, proceed with preparing your fresh glaze and filling the donuts with the peanut butter cheesecake mixture as per the recipe instructions. This ensures that the glaze is fresh and glossy, and the filling is creamy and smooth, giving you a delicious treat that tastes as if it was just made. Garnish with desired toppings and serve immediately for the best experience.
Frequently Asked Questions
- Can I prepare Peanut Butter Cheesecake Donuts ahead of time?
Absolutely, these delightful donuts are fantastic for make-ahead planning, offering great flexibility for busy schedules or special events. You have a few excellent options for preparing them in advance. The donut dough can be made the day before and stored, tightly covered, in the refrigerator overnight. This allows the dough to undergo a slow, cold fermentation, often resulting in a richer flavor profile. Alternatively, you can bake the donut shells completely, let them cool, and then freeze them unglazed for up to three months. This method ensures you always have a base ready to go. When you’re ready to serve, simply thaw, fill with the freshly made peanut butter cheesecake mixture, glaze, and enjoy. This adaptability makes them a stress-free option for entertaining.
- Is it possible to freeze the finished Peanut Butter Cheesecake Donuts?
While you can freeze the unglazed donut shells effectively, freezing the finished, filled, and glazed donuts is generally not recommended if you prioritize optimal texture and presentation. The delicate cream cheese filling can sometimes alter its texture upon thawing, potentially becoming a bit grainy or watery. Additionally, the glaze might become sticky or lose its smooth sheen, and any crispy toppings could become soggy. For the best experience, freeze the unglazed donuts, and prepare the filling and glaze fresh on the day you plan to serve them. This ensures every component retains its intended deliciousness and delightful consistency, making for a truly superior homemade treat.
- What are the best substitutions if I have dietary restrictions or preferences?
This recipe is quite adaptable, allowing for various substitutions to accommodate different dietary needs without compromising too much on flavor. For a gluten-free version, a 1:1 gluten-free all-purpose flour blend works wonderfully, often requiring a little extra kneading to ensure proper structure. If you’re dairy-free, readily available plant-based butter, cream cheese alternatives, and non-dairy milk (like almond or oat milk) can be used. For a vegan modification, in addition to dairy substitutes, a flaxseed “egg” (made from ground flaxseed and water) can replace the chicken egg. When it comes to sugar, natural alternatives like erythritol or coconut sugar can be used, though they might slightly alter the final texture and sweetness level. Always ensure your yeast is certified to meet your specific dietary requirements, like being gluten-free.