Irresistibly Chewy Banana Mochi Bread Recipe You'll Love
As the aroma of ripe bananas and toasted coconut fills the kitchen, you’re about to embark on a culinary adventure that promises a delightful textural surprise. This Banana Mochi Bread recipe is a celebration of fusion, where the comforting familiarity of banana bread meets the unique, irresistible chewiness of mochi.
Get ready to discover a treat that’s not only a joy to make but an absolute delight to savor, perfect for any time of day. Whether you’re a seasoned baker or just starting, this recipe is designed to bring a smile to your face and a wonderful chew to your palate.
Why You Will Love This Recipe
- Unique Texture: Experience the satisfying, slightly bouncy chew that mochi is famous for, perfectly integrated into a moist banana bread base.
- Effortless Elegance: Despite its special texture, this recipe is remarkably simple, requiring no fancy techniques and minimal active preparation time.
- Dietary Friendly: Naturally gluten-free, dairy-free, and vegan, it’s an inclusive treat that caters to a variety of dietary needs without compromising on flavor or texture.
- Flavorful Fusion: The natural sweetness of ripe bananas pairs exquisitely with the subtle nuttiness of toasted coconut and walnuts, creating a harmonious taste sensation.
- Versatile Enjoyment: This bread is a champion for all occasions, serving beautifully as a breakfast item, a satisfying snack, or an elegant dessert.
Ingredients You Need
The magic of this Banana Mochi Bread lies in its simple yet effective combination of ingredients, each playing a crucial role in achieving that perfect chewy texture and delicious flavor profile. We emphasize using very ripe bananas, as their natural sugars caramelize beautifully during baking, providing both sweetness and an incredibly moist crumb. The star of the show, glutinous rice flour, is what gives this bread its signature mochi chew, so it’s important not to substitute it with regular rice flour. Quality ingredients ensure the best outcome, making your baking experience both rewarding and delicious.
Irresistibly Chewy Banana Mochi Bread

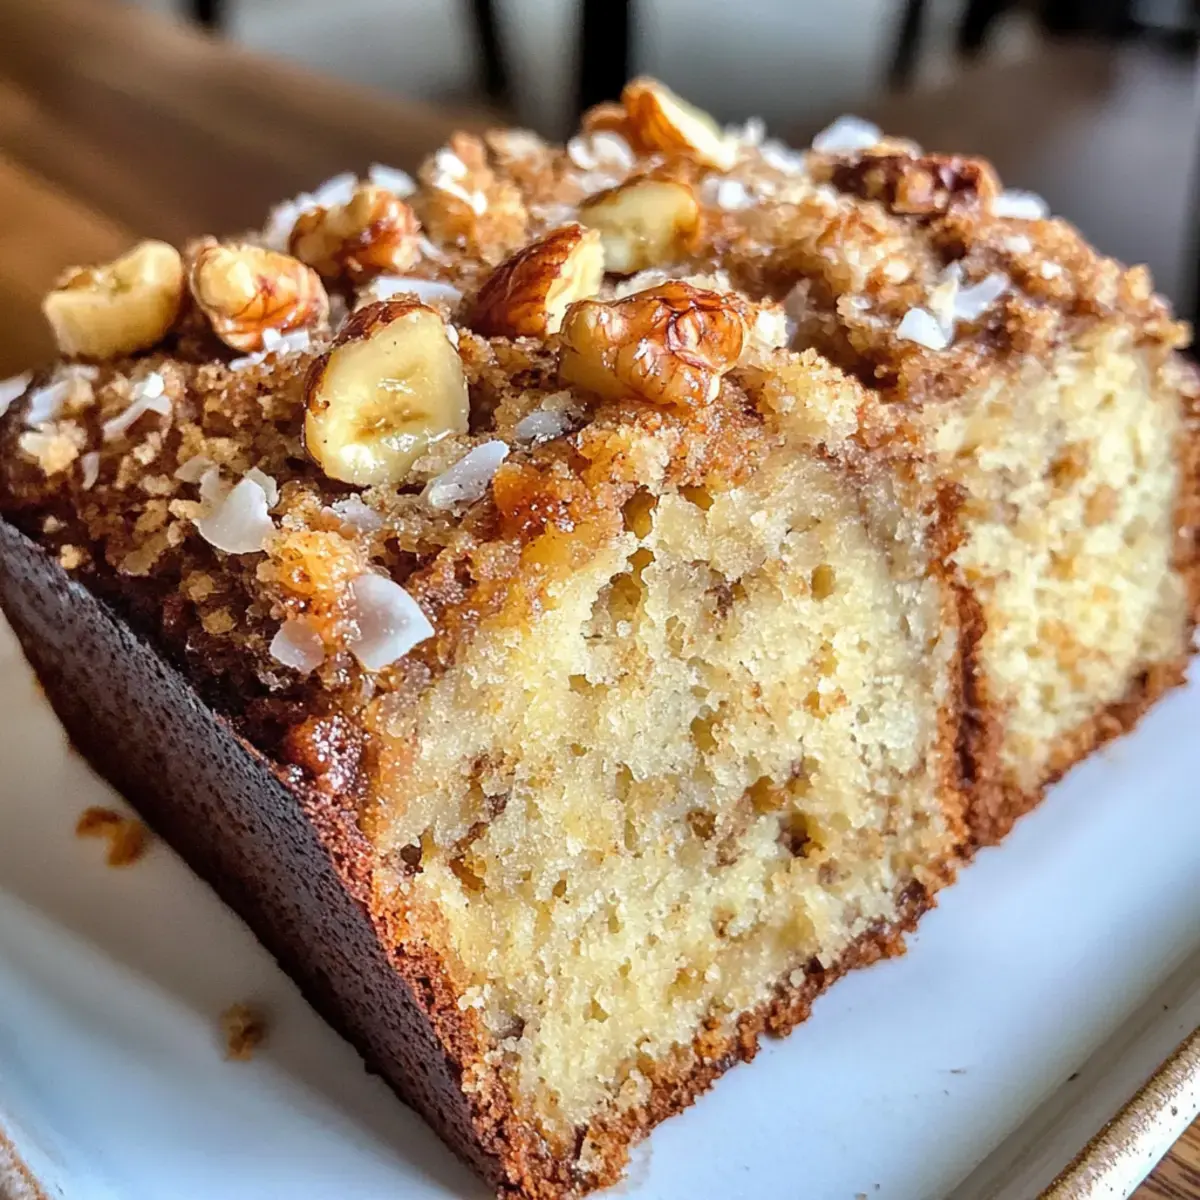
This delightful recipe beautifully marries the sweet, mellow flavors of ripe bananas with the unexpected chewiness of mochi, all topped off with toasty coconut and crunchy walnuts. Not only is it gluten-free, dairy-free, and vegan, but it also makes for a quick, satisfying snack or a perfect partner to your morning coffee.
- 3 medium Ripe Bananas (Very ripe for best flavor)
- 1 cup Glutinous Rice Flour (Essential for mochi texture)
- 1/2 cup Sugar (Adjust based on sweetness preference)
- 1 tsp Baking Powder (Ensure it’s fresh)
- 1/4 tsp Salt (Enhances overall flavor)
- 1 cup Coconut Milk (Can substitute with dairy-free milk)
- 1/4 cup Avocado Oil (Can swap for melted coconut oil)
- 1 tsp Vanilla Extract (Enhances overall taste)
- 1/2 cup Chopped Walnuts (Toast for better flavor)
- 1/2 cup Toasted Coconut Flakes (Toast carefully to prevent burning)
- 1Preheat your oven to 350°F (175°C) and prepare a 9x9 inch baking dish.
- 2In a large mixing bowl, combine glutinous rice flour, sugar, baking powder, and salt.
- 3Mash very ripe bananas until smooth, then add coconut milk, avocado oil, and vanilla extract. Mix thoroughly until creamy.
- 4Pour the banana mixture into the bowl of dry ingredients. Use a spatula to fold until just combined. The batter will be thick and sticky.
- 5Gently fold in the chopped walnuts.
- 6Spread the batter evenly in your prepared baking dish.
- 7Bake for 40-45 minutes, or until a toothpick inserted comes out clean.
- 8While the bread bakes, toast coconut flakes in a skillet over medium heat, stirring frequently for 4-5 minutes until golden brown.
- 9Allow the Banana Mochi Bread to cool completely in the dish before sprinkling with toasted coconut and slicing to serve.
Keywords: banana mochi bread, gluten-free, dairy-free, vegan, chewy, snack, dessert, easy baking
All the specific quantities for these wonderful ingredients can be found within the detailed recipe card provided.
Variations
To truly make this Banana Mochi Bread your own, consider exploring a few delightful variations that can add new dimensions of flavor and texture. A popular choice is the Chocolate Chip Infusion, where a generous handful of vegan chocolate chips are folded into the batter just before baking. The warm, gooey pockets of melted chocolate alongside the chewy mochi bread are simply divine and a guaranteed crowd-pleaser for any chocolate lover.
For those seeking a brighter, fruitier note, adding fresh or frozen berries can be a fantastic option. Blueberries or raspberries, when gently folded into the batter, will burst with a tart sweetness that beautifully complements the mellow banana flavor. Imagine those vibrant pops of color and flavor scattered throughout your chewy loaf – it’s a refreshing twist that elevates the bread to another level of deliciousness.
And for a bit of zest and warmth, incorporating spices like cinnamon or cardamom can transform the bread into a cozy, aromatic treat. A teaspoon of cinnamon, whisked into the dry ingredients, will add that familiar, comforting spice that pairs so well with banana and coconut. This simple addition can make your Banana Mochi Bread perfect for a chilly morning or a comforting afternoon snack, offering a warm embrace with every bite.
How to Prepare Banana Mochi Bread Recipe
Step 1: Preparing Your Baking Environment
The journey to creating this delightful Banana Mochi Bread begins with setting the stage for success, and that starts with preheating your oven. Aim for a consistent temperature of 350°F (175°C). This ensures that once the batter is in, it bakes evenly and develops that sought-after golden crust and perfectly cooked interior.
Simultaneously, prepare your baking vessel. A standard 9×9 inch baking dish is ideal for achieving the right thickness and even cooking. Greasing it thoroughly with a neutral oil or lining it with parchment paper is a critical step. This not only prevents the bread from sticking, making cleanup a breeze, but also helps in neatly removing the finished loaf, preserving its beautiful shape.
Ensuring your oven is at the correct temperature before the batter is ready minimizes any waiting time. This immediate transfer allows the baking process to commence without delay, promoting uniform heat distribution from the moment it enters the oven. It’s a small detail that contributes significantly to the final texture and appearance of your Banana Mochi Bread.
Step 2: Harmonizing the Dry Foundations
In a spacious mixing bowl, the dry ingredients form the structural backbone of your mochi bread. Carefully measure and combine the glutinous rice flour, which is the key to the signature chewiness, with the sugar for sweetness. Add the baking powder, an essential leavening agent, and a pinch of salt to balance and enhance all the flavors.
A whisk is your best friend in this stage, as it ensures thorough incorporation. Gently whisking these components together until they are uniformly distributed is paramount. This step ensures that every bite of your Banana Mochi Bread will have the desired texture and taste, preventing pockets of unmixed ingredients or uneven rise.
The thorough blending of dry ingredients also helps in preventing the formation of large lumps when the wet ingredients are added later. This initial step is crucial for a smooth batter consistency and a well-structured, chewy loaf that is characteristic of exceptional mochi bread. It lays the groundwork for the delightful fusion of textures and flavors to come.
Step 3: Crafting the Luscious Banana Base
In a separate, medium-sized bowl, the essence of the bread’s flavor begins to take shape with the ripe bananas. Take your very ripe bananas, ensuring they have plenty of brown spots for maximum sweetness and moisture, and mash them until they are smooth and creamy. This mashed banana mixture will provide the core flavor and moisture for the bread.
To this mashed banana base, add the rich coconut milk, which contributes to the creaminess and dairy-free nature of the recipe. Then, incorporate the avocado oil, a source of healthy fats that ensures the bread remains wonderfully moist and tender. Finally, a touch of vanilla extract is added to enhance the overall aroma and flavor profile.
Whisk these wet ingredients together thoroughly until they are well combined and form a smooth, emulsified mixture. The consistency should be liquid and homogenous, ready to be introduced to the dry ingredients. This step is where the comforting, sweet notes of banana truly begin to meld with the subtle richness of the other components, promising a delicious outcome.
Step 4: Uniting Wet and Dry Elements
Now comes the moment of integration, where the creamy banana mixture meets the foundational dry ingredients. Pour the entire contents of the wet ingredient bowl into the larger bowl containing the whisked dry ingredients. This is where the transformation into a unique batter begins, preparing to deliver that signature chew.
Using a spatula, gently fold the wet ingredients into the dry. The goal here is to combine them until just incorporated, without overmixing. The batter will naturally be quite thick and sticky, which is exactly what you want; this viscosity is essential for achieving the delightful chewy texture characteristic of mochi bread.
It is perfectly acceptable and even desirable to have a few small lumps remaining in the batter. Overworking the mixture can lead to a denser, less chewy product, so resist the urge to stir vigorously. The sticky, cohesive nature of the batter is a positive sign that you are on the right track to creating a wonderfully chewy Banana Mochi Bread.
Step 5: Incorporating the Crunchy Delight
With the batter now a cohesive, sticky mass, it’s time to add the textural contrast that elevates this bread: the chopped walnuts. Measure out your chopped walnuts and gently fold them into the thick batter using your spatula. This step requires a delicate touch to ensure the nuts are evenly distributed throughout the mixture.
The aim is to coat the walnuts lightly with the batter rather than to mix them in vigorously. This technique helps them to remain distinct elements within the bread, providing satisfying crunch in every bite. Overmixing at this stage can develop the glutinous rice flour too much, potentially affecting the desired chewiness.
Imagine the delightful sensation of biting into the soft, chewy bread and encountering a crisp, flavorful walnut. This interplay of textures is a hallmark of a well-made Banana Mochi Bread, making each mouthful an exciting experience. Ensuring an even distribution means everyone gets a delightful crunch in their slice.
Step 6: The Baking Transformation
Once your batter is perfectly mixed with the walnuts, it’s time to transfer it into the prepared baking dish. Use your spatula to spread the thick, sticky batter evenly across the bottom of the 9×9 inch dish. Ensure the top surface is relatively smooth for even baking, though perfection isn’t necessary given its rustic charm.
Carefully place the filled baking dish into your preheated oven at 350°F (175°C). The baking time typically ranges from 40 to 45 minutes. During this period, the heat will work its magic, transforming the dense batter into a beautifully baked loaf with a slightly golden exterior and that characteristic chewy interior.
To test for doneness, insert a toothpick into the center of the bread. If it comes out clean, your Banana Mochi Bread is ready. If it has any wet batter clinging to it, allow it to bake for a few more minutes and test again. The aroma filling your kitchen will be your first delicious clue that it’s nearly ready.
Step 7: Crafting the Golden Coconut Topping
While your Banana Mochi Bread is baking to perfection, take this opportunity to prepare the flavorful topping. In a dry skillet, place your toasted coconut flakes. Toasting them yourself allows you to achieve the perfect shade of golden brown and brings out their rich, nutty aroma, which complements the bread wonderfully.
Place the skillet over medium heat. Stir the coconut flakes frequently using a spatula or wooden spoon. This constant motion is crucial to ensure they toast evenly and prevent them from burning, which can happen very quickly. Keep a close eye on them as they transform from pale white to a beautiful golden hue.
This process usually takes about 4 to 5 minutes, depending on your stove and the thickness of the flakes. The resulting toasted coconut flakes will add a delightful crunch and an intense coconut flavor that perfectly crowns your Banana Mochi Bread. This step adds another layer of texture and taste, making the finished product even more irresistible.
Step 8: The Crucial Cooling and Presentation
Once your Banana Mochi Bread emerges from the oven, a crucial step follows: allowing it to cool completely in the baking dish. Resist the urge to cut into it immediately, as this is vital for achieving the best chewy texture. The residual heat continues to set the interior, and allowing it to cool properly prevents a gummy or overly soft crumb.
This cooling period, which can take an hour or more, is also when the flavors meld and settle. Patience here is key to unlocking the full potential of the bread’s unique texture. Once it has cooled down significantly and is no longer warm to the touch, you can gently remove it from the pan if you used parchment paper, or slice it directly from the dish.
Finally, and perhaps most deliciously, sprinkle the pre-toasted coconut flakes evenly over the cooled bread. This adds the finishing touch of texture and flavor. Then, slice your Banana Mochi Bread into squares or desired portions, and prepare to enjoy this wonderfully chewy, flavor-packed treat. Your efforts are rewarded with a truly special bake.
Pro Tips for Banana Mochi Bread Recipe
Ripe Bananas are Non-Negotiable: For the most intense banana flavor and natural sweetness, use bananas that are heavily speckled or even mostly brown. These are the bananas that have broken down their starches into sugars, providing maximum impact without needing extra sweeteners. Don’t discard those overripe bananas; they are perfect for this recipe.
Gentle Folding is Key: When combining the wet and dry ingredients, and especially when adding the walnuts, fold gently with a spatula. Overmixing can develop the glutinous rice flour excessively, leading to a tougher rather than chewy texture. A few lumps are perfectly acceptable and even beneficial for achieving that desirable mochi feel.
Watch the Coconut Like a Hawk: Toasted coconut flakes can go from golden to burnt in a matter of seconds. Keep a constant eye on them in the skillet over medium heat, stirring continuously to ensure even browning. The goal is a beautiful, toasted aroma and color, not char.
Embrace the Cool Down: Allowing the bread to cool completely before slicing is paramount for the mochi texture. It helps the bread set and firm up, revealing its signature chewy quality. Cutting it warm will result in a softer, perhaps mushier, consistency that doesn’t fully showcase its unique properties.
Airtight Storage is Essential: To maintain the moisture and chewy texture of your Banana Mochi Bread, store any leftovers in an airtight container. This prevents it from drying out and keeps it tasting fresh for up to three days at room temperature. If you live in a very warm climate, the refrigerator might be a better option for longer storage.
Serving Suggestions for Banana Mochi Bread Recipe
Decoration
Elevate the visual appeal of your Banana Mochi Bread by artfully arranging the toasted coconut flakes over the top. You can create patterns or simply a generous, even layer to showcase the lovely golden crunch. A light dusting of powdered sugar, applied through a sieve for an ethereal look, can also add a touch of elegance, particularly if serving as a dessert.
For an extra pop of color and freshness, consider adding a few fresh berries, like raspberries or thinly sliced strawberries, as a garnish. A delicate drizzle of melted vegan white chocolate or dark chocolate could also transform this into a more decadent dessert offering, adding a beautiful contrasting swirl across the chewy surface.
If you’ve opted for a variation with added nuts, a few whole or halved toasted nuts scattered strategically can serve as both decoration and a visual cue to the delicious crunch within. The key is to keep the decoration complementary to the bread’s flavor profile, enhancing its natural beauty without overpowering it.
Side Dishes
This chewy Banana Mochi Bread pairs wonderfully with a variety of beverages that can either complement or contrast its sweetness. A robust cup of coffee, whether black or with a splash of dairy-free milk, provides a perfect wake-up call and balances the bread’s sweetness. For a lighter option, a fragrant herbal tea, such as peppermint or chamomile, offers a soothing counterpoint and refreshes the palate.
If you’re serving this as a dessert, consider a small scoop of your favorite vegan vanilla ice cream. The contrast between the warm chewiness of the bread and the cold creaminess of the ice cream is an irresistible combination. A dollop of dairy-free whipped cream or coconut yogurt also adds a lovely, creamy dimension.
For those who enjoy a sweet and savory interplay, a small side of salted roasted nuts can provide a delightful crunch and a hint of saltiness that cuts through the bread’s sweetness. Alternatively, a simple side of fresh, sliced fruit like mango or kiwi can add a bright, tropical note, enhancing the overall experience.
Creative Serving Ideas
Transform your Banana Mochi Bread into delightful individual treats by cutting it into small, bite-sized squares. These make for perfect party favors or an elegant addition to a dessert buffet, allowing guests to sample the unique texture without committing to a large slice. For an extra touch, you can present these on decorative mini cupcake liners.
Consider creating a “Banana Mochi Bread Parfait” by layering crumbled pieces of the bread with vegan yogurt, fresh berries, and a sprinkle of granola or toasted coconut in a glass. This offers a refreshing and visually appealing way to enjoy the flavors and textures in a different format. It’s a fantastic option for a light breakfast or a sophisticated dessert.
Another creative idea is to serve it warm with a drizzle of honey or maple syrup. This enhances the natural sweetness of the bananas and adds a glossy finish that is both appealing and delicious. For a more indulgent experience, you could even lightly toast a slice and serve it with a spread of nut butter or a creamy vegan cheese, creating a delightful sweet and savory combination that is truly unique.
Preparation & Storage
Storing Leftovers
To keep your delicious Banana Mochi Bread fresh and wonderfully chewy after its initial bake, proper storage is key. The best method for everyday enjoyment is to store it in an airtight container at room temperature. Ensure the container is completely sealed to prevent air from drying out the bread, which can diminish its signature mochi texture.
Stored this way, the bread should remain wonderfully moist and delicious for up to three days. This makes it perfect for having a ready-made snack or breakfast item throughout the week. Always allow the bread to cool completely before sealing it in the container to avoid trapping any condensation, which can lead to sogginess.
If you live in a particularly warm or humid climate, or if you simply want to extend its freshness even further, refrigerating the bread is an option. While it might slightly alter the texture, making it a bit firmer, it can last for up to a week when stored correctly in an airtight container.
Freezing
For longer-term preservation, Banana Mochi Bread freezes beautifully, allowing you to enjoy its chewy goodness for weeks to come. The trick is to prepare it for freezing in a way that prevents freezer burn and makes reheating a simple process. Start by slicing the cooled bread into individual portions or squares, as this makes it easy to grab just what you need.
Lay these individual slices in a single layer on a baking sheet lined with parchment paper. Place the baking sheet in the freezer until the slices are completely frozen solid, which typically takes a couple of hours. This flash-freezing step prevents the slices from sticking together in one large clump once they are transferred to their final storage container.
Once frozen solid, transfer the individual slices into a heavy-duty freezer-safe zip-top bag or an airtight freezer container. Ensure you remove as much air as possible from the bag before sealing it to maintain optimal quality. Properly frozen, your Banana Mochi Bread can be stored for up to a month, retaining much of its original texture and flavor.
Reheating
When you’re ready to enjoy your frozen Banana Mochi Bread, thawing and reheating it is a straightforward process that restores its delightful texture. The most recommended method is to simply take the frozen slices from the freezer and place them in the refrigerator overnight. This gradual thawing helps to maintain the integrity of the bread’s structure and prevents any drastic changes in moisture content.
Once thawed, you can enjoy the bread as is, or give it a gentle reheat to bring back some of that freshly baked warmth and chewiness. A quick 20-second zap in the microwave is usually sufficient for a single slice, just enough to warm it through without making it tough. Be cautious not to over-microwave, as this can lead to a rubbery texture.
Alternatively, for a slightly crispier exterior, you can reheat the thawed slices in a toaster oven or a conventional oven preheated to a low temperature (around 300°F or 150°C) for a few minutes. Keep a close eye on it to prevent burning. This gentle warming will revive the chewy texture and comforting flavors, making it taste almost as good as when it was freshly baked.
Frequently Asked Questions
-
What kind of bananas should I use for Banana Mochi Bread?
Absolutely! For the best flavor and sweetness, use very ripe bananas that are heavily speckled or brown. The riper the bananas, the sweeter and more flavorful your Banana Mochi Bread will be. These bananas have a higher sugar content and softer texture, which contributes significantly to the bread’s moisture and delightful taste profile, making them indispensable for this recipe’s success.
-
How should I store my leftover Banana Mochi Bread?
Store your Banana Mochi Bread in an airtight container at room temperature for up to 3 days. If you want to extend its shelf life, you can refrigerate it for up to a week. Just make sure to wrap it tightly to keep it from drying out, as exposure to air is the primary enemy of its chewy texture. For longer storage, freezing individual slices is the best approach.
-
Can I freeze Banana Mochi Bread?
Yes, you can! To freeze, slice the bread into squares and lay them in a single layer on a baking sheet. Once frozen solid, transfer the pieces into a zip-top bag, where they’ll last for up to a month. When you’re ready to enjoy, simply thaw in the fridge overnight and reheat for about 20 seconds in the microwave to revive its delightful chewiness and flavor, making it a convenient treat anytime.