Easy Maki Roll Recipe – Make Your Own Sushi
Embarking on the journey of crafting your own sushi at home can feel like a culinary expedition into uncharted territory, but this delightful Maki Roll recipe promises to transform that apprehension into pure gastronomic joy. Prepare to be captivated by the simplicity and sheer deliciousness of creating these vibrant rolls, perfectly seasoned with the essence of fresh ingredients and the satisfying chew of expertly prepared sushi rice, all encased in a crisp sheet of nori.
Imagine the satisfaction of presenting a platter of beautifully rolled maki, each one a testament to your newfound sushi-making prowess. This recipe is more than just a collection of instructions; it’s an invitation to a fun, interactive, and incredibly rewarding cooking experience that will undoubtedly impress your family and friends, turning ordinary meals into extraordinary culinary events.
Why You Will Love This Recipe
- Effortless Assembly: Despite its elegant presentation, this maki roll recipe is surprisingly straightforward, making it accessible even for beginner sushi enthusiasts.
- Flavorful Fusion: The delightful combination of savory imitation crab, crisp cucumber, creamy avocado, and sweet carrot creates a harmonious balance of tastes and textures in every bite.
- Customizable Delight: This recipe serves as a fantastic canvas for your creativity, allowing you to easily swap fillings and explore a world of personalized maki roll creations.
- Impressive Presentation: Homemade maki rolls are visually stunning and are guaranteed to elevate any meal, making them perfect for special occasions or a fun family dinner night.
- Healthy & Satisfying: Offering a good source of vegetables and lean protein, these rolls are a wholesome and incredibly satisfying option for lunch or dinner.
Ingredients You Need
The foundation of any exceptional maki roll lies in the quality of its ingredients, and this recipe champions freshness and vibrant flavors. Using the best available components will ensure that each roll is a miniature masterpiece of taste and texture, transforming a simple meal into a culinary adventure. We’ll be focusing on sushi rice, nori, and a classic medley of fresh vegetables and imitation crab for this delightful creation.
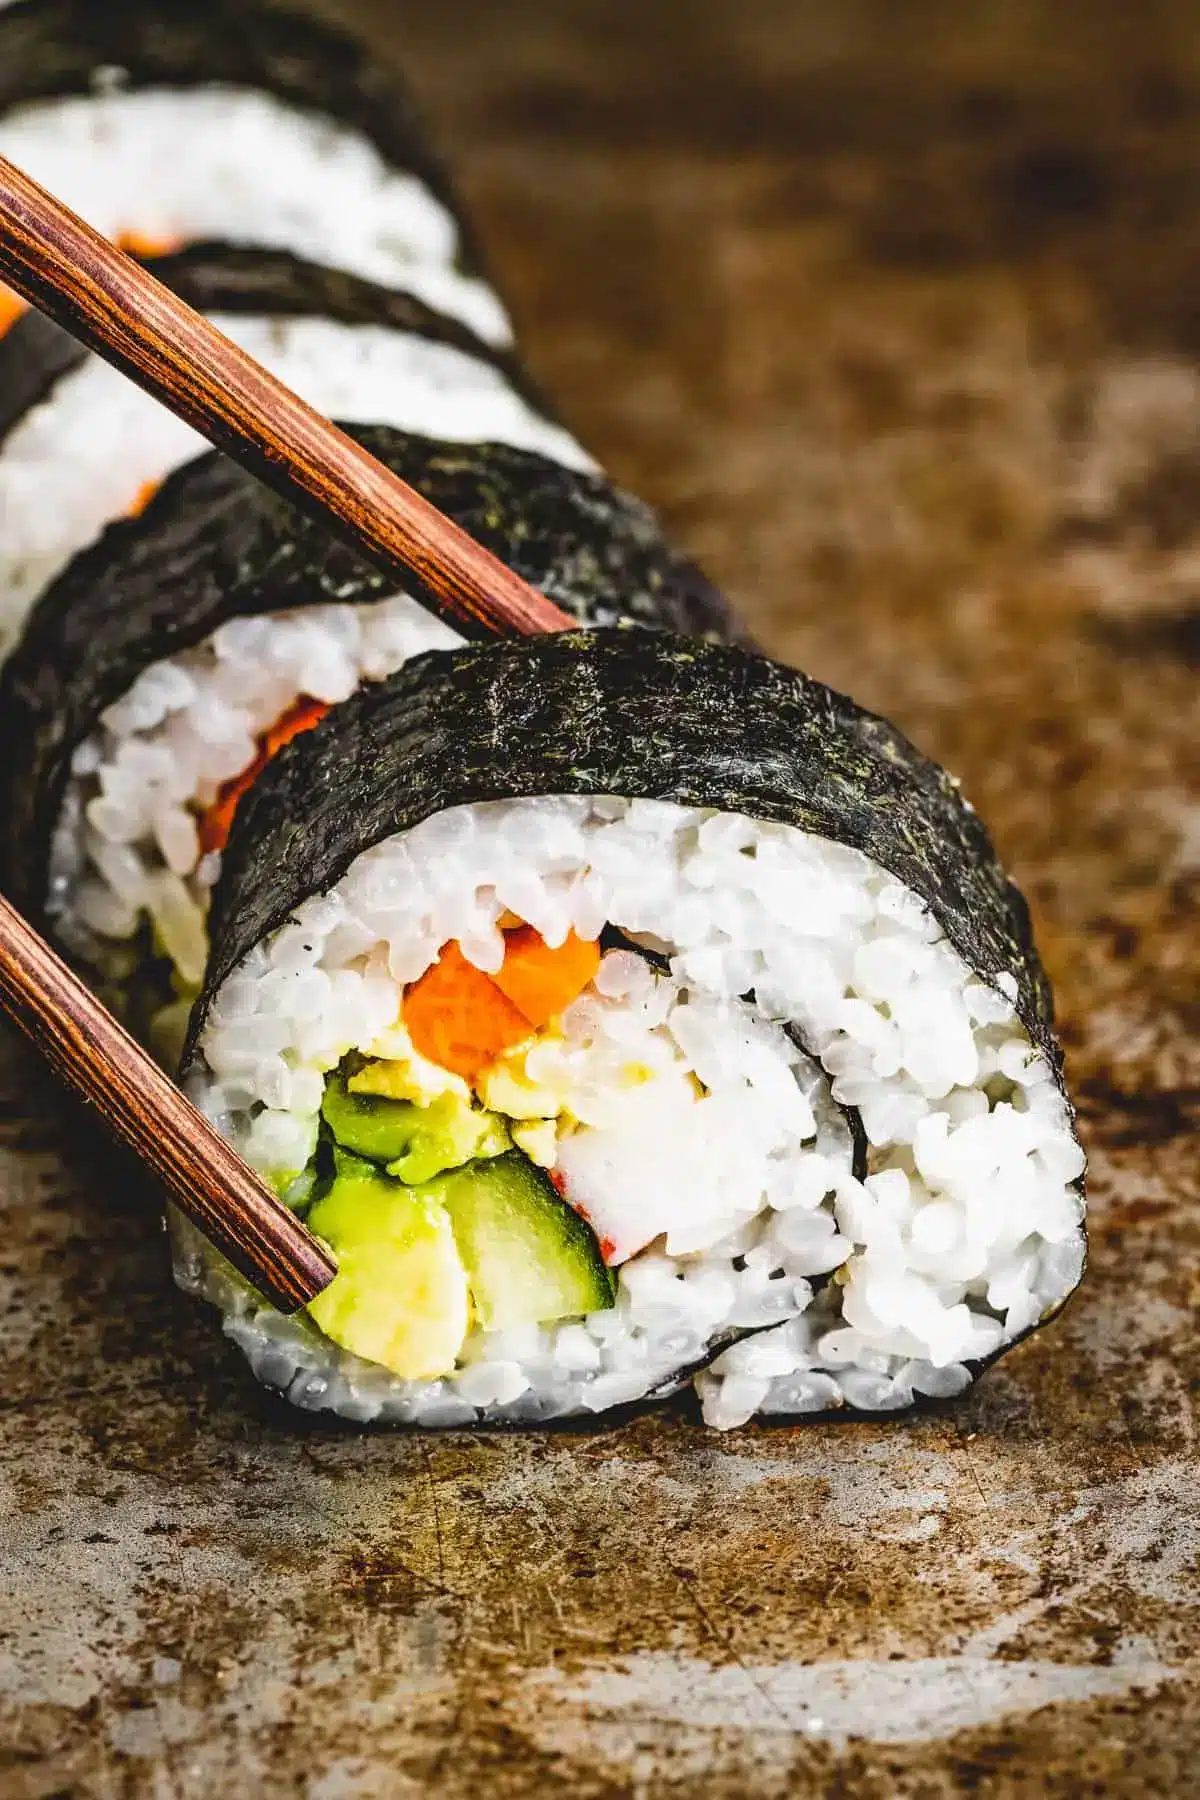
Easy Maki Rolls

Master the art of homemade sushi with this easy Maki Roll recipe! Featuring nori and perfectly cooked sushi rice wrapped around a colorful combo of imitation crab, cucumber, avocado, and carrots, these rolls promise a fun and flavorful dining experience!
- For the sushi rice
- 1½ cups sushi rice
- 1½ cups water
- 1½ tablespoons granulated sugar
- To assemble
- 4 sheets sushi Nori
- 1 English cucumber, peeled and sliced into thin strips
- 1 medium carrot, peeled and sliced into thin strips
- 1 avocado, sliced
- 4 sticks imitation crab, cut in half, longwise
- 1Prep the rice. In a fine mesh strainer, rinse the rice until the water runs clear.
- 2Cook the rice. Combine the rice and the water in the bowl of an Instant Pot. Seal the Instant Pot and cook on high pressure for 10 minutes. Allow the pressure to release naturally for 12 minutes before opening the instant pot and fluffing the rice with a fork.
- 3Make the rice wine vinegar mixture. In a small saucepan, combine the rice wine vinegar and the sugar and cook over medium heat until the sugar dissolves.
- 4Combine and cool. Fold the rice vinegar mixture into the prepared sushi rice. Allow the rice to cool to just above room temperature before using.
- 5Prep. Place a sheet of nori over a bamboo sushi mat. Wet your fingers with warm water. This will help keep the rice from sticking to your hands.
- 6Add the rice. Press about ¾ cup of the prepared sushi rice over the nori. Use your hand to press it into an even layer, covering the nori.
- 7Layer the veggies and crab. Stack 1 row of English cucumbers, 1 row of carrots, 1 row of imitation crab, and 1 row of avocado slices on top of each other in a line at one end of the mat.
- 8Roll. Fold the nori and rice over the filling, then squeeze the bamboo mat to create a tight cylinder. Continue folding the roll over itself, squeezing it into a cylinder after each fold, until you reach the end of the roll.
- 9Repeat with the remaining ingredients.
- 10Cut and serve. Wet a sharp knife with warm water and slice the rolls into ½ inch slices, wetting the knife between slices if it starts to get sticky. Serve the sushi rolls with your favorite sushi dipping sauce(s).
Keywords: Maki Rolls, Sushi, Japanese, Imitation Crab, Cucumber, Avocado, Carrot, Nori
Please refer to the recipe card above for the precise quantities of each ingredient required to achieve maki roll perfection.
Variations
One of the most appealing aspects of maki rolls is their incredible versatility, allowing for endless customization to suit every palate and dietary need. This adaptable recipe serves as a wonderful starting point for exploring a multitude of delicious variations, ensuring that there’s a perfect maki roll for everyone.
For those seeking a plant-based option, the possibilities are abundant and incredibly satisfying. Swap the imitation crab for marinated and pan-fried tofu, tempeh, or even a generous helping of shiitake mushrooms sautéed with a touch of soy sauce and sesame oil. Think vibrant additions like roasted sweet potato strips, edamame, or pickled ginger for an extra layer of complexity and zest. The key is to create fillings that offer a good balance of texture and flavor, ensuring a fulfilling vegan experience.
Embracing a low-carb lifestyle doesn’t mean you have to miss out on the maki roll magic. Consider using thinly sliced strips of jicama or daikon radish as a crispy, refreshing substitute for rice. Another innovative approach is to create “rice-less” rolls where the fillings are tightly wrapped in nori, perhaps with a thin layer of mashed avocado acting as a binder. You can also explore using thinly sliced cucumber or bell peppers as the outer layer, offering a light and crisp alternative to the traditional rice and nori combination.
For the adventurous palate, consider incorporating a touch of sweetness or an unexpected crunch. Thinly sliced ripe mango can add a delightful tropical note and a wonderfully soft texture that contrasts beautifully with the other ingredients. For added crunch, consider sprinkling a small amount of toasted sesame seeds, finely chopped macadamia nuts, or even a handful of crispy fried shallots over the fillings before rolling. These small additions can significantly elevate the sensory experience of your maki rolls.
How to Prepare maki roll recipe
Step 1: Perfecting the Sushi Rice
The soul of any maki roll resides in its rice, and achieving that signature sticky, slightly sweet perfection is crucial. Begin by selecting the correct type of rice; short-grain sushi rice is your best friend here, boasting a higher starch content that ensures it clumps together beautifully. It’s imperative to rinse the rice thoroughly under cold running water until the water runs clear, a vital step that removes excess starch and prevents a gummy, unmanageable texture.
Once rinsed, combine the rice with the specified amount of water in your cooking vessel. Whether you’re using an Instant Pot for ultimate convenience or following the instructions on your preferred rice cooker, the goal is to achieve perfectly cooked, fluffy grains. While the rice is cooking, prepare the seasoned vinegar mixture by gently heating rice wine vinegar and sugar in a small saucepan until the sugar is fully dissolved. This simple yet essential step infuses the rice with its characteristic tang and subtle sweetness.
After the rice has finished cooking, gently fold the warm vinegar mixture into the cooked rice using a slicing motion with a rice paddle or spatula. This process ensures the vinegar is evenly distributed without mashing the delicate grains. Allow the seasoned rice to cool to just above room temperature before proceeding; it should be warm enough to mold but not so hot that it wilts the nori or makes the ingredients difficult to handle.
Step 2: Preparing the Fillings
With your perfectly seasoned sushi rice cooling, it’s time to prepare the vibrant medley of fillings that will bring your maki rolls to life. This stage is where you can truly personalize your creation, but for this classic recipe, we’ll focus on the stars: crisp cucumber, sweet carrot, creamy avocado, and savory imitation crab.
Start by peeling your English cucumber and then slicing it into thin, uniform strips, similar to matchsticks. The goal here is to have manageable pieces that won’t overpower the roll. Next, peel and julienne your medium carrot into similarly sized strips. For the avocado, select a ripe but firm specimen, halve it, remove the pit, and then slice it into neat, even strips. Ensure your avocado slices aren’t too thick, as this can make rolling more challenging.
Finally, prepare your imitation crab sticks. If they are long, simply cut them in half lengthwise to create more manageable pieces for rolling. The aim is to have all your fillings prepped and ready to go before you start assembling the rolls, as the process moves quite quickly once you begin. Having everything cut into uniform, bite-sized strips ensures that each maki roll is aesthetically pleasing and easy to eat.
Step 3: Assembling the Maki Rolls
Now comes the moment of truth: assembling your beautiful maki rolls. Lay a sheet of nori, shiny side down, on top of your bamboo sushi mat, ensuring the longest side is facing you. It’s a good idea to have a small bowl of warm water nearby; dipping your fingers in this water periodically is a crucial trick to prevent the sticky sushi rice from adhering to your hands.
Gently take about three-quarters of a cup of the prepared sushi rice and spread it evenly over the nori sheet. Use the palms of your hands to press the rice down, creating a thin, consistent layer that covers the nori almost entirely, leaving about a half-inch border at the top edge furthest from you. This border will help seal the roll once it’s complete. Avoid pressing the rice too firmly, as you want to maintain some of its airiness.
Carefully arrange your prepared fillings in a horizontal line across the rice, about an inch from the edge closest to you. Layer the cucumber strips, followed by the carrot strips, then the imitation crab sticks, and finally, the avocado slices. Try to keep the fillings relatively compact and even in height to facilitate a neat roll. Don’t overfill the roll, as this can make it difficult to close properly.
Step 4: Rolling the Maki
With your fillings perfectly placed, it’s time to master the art of rolling. Begin by lifting the edge of the bamboo mat closest to you, folding it over the fillings so that the nori and rice encase them completely. Gently press down on the roll through the mat to create a firm, compact cylinder. This initial fold is critical for securing the ingredients.
Once the first fold is complete, continue to roll the mat forward, gradually tucking and shaping the roll into a tight cylinder. After each subsequent fold, give the mat a gentle squeeze to ensure the roll remains tight and holds its shape. This repeated squeezing helps to compress the rice and fillings, creating a cohesive and structurally sound maki roll that won’t fall apart when cut.
Continue this rolling and squeezing process until you reach the end of the nori sheet. The small border of nori you left exposed at the beginning will help seal the roll. Once rolled, gently shape the cylinder with the mat to ensure it’s even and firm. Repeat this entire assembly and rolling process with the remaining nori, rice, and fillings until all your ingredients are used.
Step 5: Slicing and Serving
The final flourish in creating perfect maki rolls is the slicing, a step that requires a touch of precision and the right tools. Grab a sharp chef’s knife and have a damp towel or a small bowl of warm water readily accessible. Dipping the blade of your knife in warm water before each cut, and wiping it clean with the damp towel between slices, is the secret to achieving clean, distinct cuts without smushing the rolls.
Begin by trimming off the very ends of the roll, as these are often less uniformly shaped and can be discarded or eaten by the chef. Then, slice the main body of the roll into approximately half-inch thick pieces. Apply gentle, even pressure as you slice, allowing the sharp, wet knife to do the work. The consistent moisture on the blade prevents the sticky rice from clinging to the knife, ensuring each slice is neat and presentable.
Arrange your beautifully sliced maki rolls on a serving platter, showcasing their vibrant interior. Serve immediately with your favorite accompaniments such as soy sauce, wasabi, and pickled ginger, or explore some of our recommended serving suggestions. This immediate serving ensures the best texture and flavor, allowing your guests to fully appreciate the fresh ingredients and your culinary efforts. It’s the perfect conclusion to a rewarding cooking experience, bringing a taste of Japan right to your table.
Pro Tips for maki roll recipe
Rice is Key: Always use short-grain sushi rice and rinse it thoroughly before cooking to remove excess starch, ensuring a sticky yet manageable texture that holds your rolls together beautifully. Properly seasoned sushi rice, with its subtle tang from rice vinegar and a hint of sweetness from sugar, is the cornerstone of a delicious maki roll.
Wet Hands, Happy Sushi: Keep a bowl of warm water nearby throughout the assembly process. Dipping your fingers in this water before handling the sushi rice is a non-negotiable tip that prevents the rice from sticking to your hands, making the spreading and rolling process infinitely smoother and less frustrating.
Don’t Overfill: While it’s tempting to load your maki rolls with generous amounts of filling, resist the urge. Overfilling can make the rolls difficult to close tightly, leading to them falling apart during the rolling or slicing stages. Aim for a balanced ratio of rice to filling for optimal results.
The Power of the Squeeze: When rolling, firm yet gentle pressure is essential. Squeeze the bamboo mat around the roll after each turn to compact the rice and fillings, ensuring a tight cylinder that will slice cleanly. This step is crucial for the structural integrity of your maki rolls.
Sharp, Wet Knife for Clean Cuts: A dull knife will lead to crushed rolls. Always use a very sharp knife, and importantly, dip the blade in warm water and wipe it with a damp cloth between each cut. This simple technique guarantees clean, professional-looking slices every time.
Practice Makes Perfect: If your first few rolls aren’t perfectly shaped, don’t be discouraged! Sushi rolling is a technique that improves with practice. Each attempt will bring you closer to mastering the art, so enjoy the process and learn from each roll.
Serving Suggestions for maki roll recipe
Decoration
Elevate your maki rolls with a touch of artistic flair. A sprinkle of toasted sesame seeds, both white and black, adds a visual contrast and a subtle nutty flavor. For an added pop of color and a hint of umami, consider garnishing with finely chopped chives or a few delicate strands of thinly sliced nori.
Consider artfully arranging slivers of pickled ginger around the platter; their bright pink hue provides a lovely visual counterpoint to the sushi. A small dollop of vibrant green wasabi paste on the side, placed with care, not only adds to the aesthetic but also hints at the zesty kick that awaits.
For a truly impressive presentation, you could use a small amount of edible flowers or microgreens to adorn the platter. Even a simple drizzle of eel sauce or spicy mayo in a decorative pattern over the rolls can add a sophisticated touch, making your homemade sushi look restaurant-quality.
Side Dishes
To complement the delicate flavors of your maki rolls, consider serving them with a light and refreshing Asian cucumber salad. Its crisp texture and tangy dressing offer a perfect palate cleanser between bites of sushi.
A classic bowl of miso soup is another excellent accompaniment, providing a warm, savory broth that harmonizes beautifully with the sushi. For a heartier option, a simple ramen salad or a side of steamed edamame seasoned with sea salt offers a satisfying contrast in textures and flavors.
Consider offering small bowls of pickled ginger and a mound of wasabi paste alongside the soy sauce. These traditional accompaniments not only enhance the dining experience but also allow your guests to customize the intensity of their flavors according to their preferences.
Creative Serving Ideas
Transform your maki roll presentation into an engaging dining experience. Consider creating a “sushi tasting platter” where you offer a variety of maki rolls with different fillings alongside nigiri and sashimi, allowing guests to sample a wide array of flavors and textures.
For a fun, interactive meal, set up a “build-your-own-maki” station at your next gathering. Provide all the prepped ingredients, bamboo mats, and let your guests unleash their inner sushi chef, creating their personalized rolls. This is especially popular for birthday parties or casual get-togethers.
Another creative approach is to serve maki rolls as part of a larger bento box. Alongside your maki, include small portions of other Japanese delights such as teriyaki chicken skewers, a simple green salad with ginger dressing, and perhaps a small portion of steamed rice or agedashi tofu. This creates a beautifully balanced and visually appealing meal.
Preparation & Storage
Storing Leftovers
If you find yourself with leftover maki rolls, proper storage is key to maintaining their quality and freshness. It’s best to store them as soon as they have cooled down. Wrap each individual roll tightly in plastic wrap to prevent them from drying out and to keep them from absorbing any odors from the refrigerator.
After wrapping, place the individually wrapped rolls in an airtight container. This double layer of protection will help maintain their moisture and texture for as long as possible. Maki rolls are best consumed within 1 to 2 days of preparation for optimal taste and safety.
Avoid storing maki rolls at room temperature for extended periods, as this can lead to bacterial growth. The combination of rice and raw or cooked ingredients requires careful refrigeration to ensure food safety. While leftovers are best enjoyed fresh, these steps will help preserve them for a short time.
Freezing
Unfortunately, maki rolls are generally not well-suited for freezing. The delicate texture of the sushi rice tends to become mushy and watery upon thawing, and the fresh ingredients like avocado and cucumber can lose their crispness and develop an unpleasant texture. The nori also tends to become leathery and unappealing.
While it’s technically possible to freeze them, the resulting quality is usually compromised significantly. If you absolutely must freeze them, wrap them very tightly in multiple layers of plastic wrap and then an additional layer of aluminum foil to minimize freezer burn. However, it is highly recommended to prepare maki rolls fresh and consume them within a day or two.
For best results, it is always advisable to make only as many maki rolls as you intend to eat in the immediate timeframe. This ensures you enjoy the optimal taste, texture, and safety of your homemade sushi. If you have extra rice, it can be stored and repurposed for other dishes, but the assembled rolls are best enjoyed fresh.
Reheating
Maki rolls are designed to be enjoyed at room temperature or slightly chilled, and they are not typically reheated. The process of reheating would fundamentally alter the texture of the rice, making it gummy or dry, and would negatively impact the freshness of the fillings.
If you have stored your maki rolls properly in the refrigerator, you can simply take them out about 15-20 minutes before you plan to eat them. This allows them to come to a more pleasant eating temperature, similar to how they might be served in a restaurant. The key is to avoid any form of cooking or intense heating.
Microwaving or baking maki rolls is strongly discouraged, as these methods will invariably result in a loss of texture and flavor. The ideal way to enjoy leftover maki rolls is to ensure they were stored correctly and then allow them to gently return to room temperature before serving. This preserves the integrity of the ingredients and provides the most enjoyable eating experience.
Frequently Asked Questions
-
What is the difference between Maki and Nigiri sushi?
Maki, in Japanese cuisine, refers to sushi that has been rolled using a bamboo mat. It typically involves sushi rice and fillings, such as fish, vegetables, or egg, all wrapped together in a sheet of nori (seaweed). The defining characteristic of maki is its rolled form, which is then sliced into bite-sized pieces. Nigiri, on the other hand, is a type of sushi that consists of a hand-pressed oblong mound of sushi rice, typically topped with a slice of raw fish, seafood, or sometimes egg. While both use seasoned sushi rice, maki is characterized by its cylindrical, rolled shape with nori (or sometimes rice on the outside), whereas nigiri is characterized by its oval rice base topped with a single ingredient.
-
Can I use regular white rice instead of sushi rice for maki rolls?
While you technically can use regular long-grain white rice, the results will be significantly different and generally less successful for making maki rolls. Sushi rice, typically a short-grain variety, has a higher starch content which makes it sticky when cooked. This stickiness is essential for holding the maki rolls together, allowing the rice to adhere to the nori and the fillings to stay in place. Regular long-grain rice, while also a rice, lacks this inherent stickiness and tends to be much fluffier and drier when cooked, making it very difficult to mold, spread evenly, and roll into cohesive sushi. You would likely end up with rolls that fall apart easily, and the texture wouldn’t have that satisfying chewiness.
-
How can I make my maki rolls visually appealing and professional-looking?
Achieving professional-looking maki rolls involves attention to detail at several stages. Firstly, ensure all your fillings are cut into uniform, thin strips; consistency in size makes for a neater roll. When spreading the rice, aim for an even layer that covers the nori without being too thick. During the rolling process, apply firm, even pressure with the bamboo mat to create a tightly packed cylinder, avoiding any gaps. The most critical step for a professional finish is the slicing: use a very sharp knife that has been wetted with warm water and wiped with a damp cloth between each cut. This prevents the sticky rice from smearing and ensures clean, distinct slices that showcase the beautiful cross-section of your roll. Finally, neat arrangement on the serving platter, perhaps with garnishes like toasted sesame seeds or a drizzle of sauce, can significantly enhance the visual appeal.