Lemon Pepper Chicken Recipe – One Skillet and 30 Minutes!
Embarking on a culinary journey to create a dish that is both sophisticated and incredibly simple is often the goal for home cooks, and this Lemon Pepper Chicken recipe truly delivers.
It’s a testament to how a few quality ingredients, expertly combined, can transform humble chicken breasts into a meal that sings with vibrant flavors and satisfying textures, perfect for any weeknight or even a casual gathering.
Why You Will Love This Recipe
- Speedy Preparation: This delightful chicken dish comes together in approximately 30 minutes, making it an ideal option for those busy evenings when time is of the essence.
- Pantry Staples: You’ll find that most, if not all, of the necessary ingredients are likely already in your kitchen, minimizing last-minute grocery runs.
- Exceptional Flavor: The combination of zesty lemon, pungent pepper, and rich butter creates a truly memorable taste profile that is both bright and deeply savory.
- One-Skillet Wonder: Minimizing cleanup is always a win, and this recipe is designed to be cooked entirely in a single skillet, from searing the chicken to creating the luscious sauce.
- Versatile Pairing: This dish is incredibly adaptable, pairing beautifully with a wide array of sides, from creamy mashed potatoes to fresh, crisp salads and steamed vegetables.
Ingredients You Need
The success of this Lemon Pepper Chicken hinges on the quality of the ingredients you choose; opting for fresh, vibrant components will elevate the final dish considerably.
Lemon Pepper Chicken

Juicy Lemon Pepper Chicken cooked in one skillet and finished with a buttery garlic and lemon sauce. A quick 30-minute chicken dinner.
- 1 to 1.5 pounds boneless, skinless chicken breasts
- 1 tablespoon lemon pepper seasoning
- 2 tablespoons vegetable oil
- 2 tablespoons butter, divided
- 2 cloves garlic, minced
- 2 teaspoons lemon juice
- Freshly chopped parsley, for garnish
- Lemon slices, for garnish
- 1In a shallow plate, combine coconut flour, lemon pepper seasoning, lemon zest, and salt.
- 2Place the chicken breasts on a cutting board and, using a chef's knife, cut the chicken breasts in half, longwise. You should have a total of 8 chicken pieces that are about a 1/4-inch-thick. Toss the chicken breasts in the flour mixture until coated on both sides.
- 3Heat the cooking oil in a large skillet over medium-high heat. Add the chicken breasts to the hot oil in a single layer, and cook for 3 to 4 minutes per side, or until cooked through. Depending on the skillet's size, you may need to cook the chicken in batches. Cooking time will also depend on the size of the chicken breasts. Remove the cooked chicken from the skillet and set it aside on a plate.
- 4Add 1 tablespoon of butter to the skillet, along with the minced garlic, and cook for 30 seconds. Slowly pour in the chicken broth and stir, scraping up the browned bits from the bottom of the skillet. Then stir in the lemon juice and cook for 3 to 4 minutes, or until the sauce has slightly reduced. Add the remaining butter and let it melt through.
- 5Return the chicken breasts to the skillet and cook for 1 minute, or until heated through.
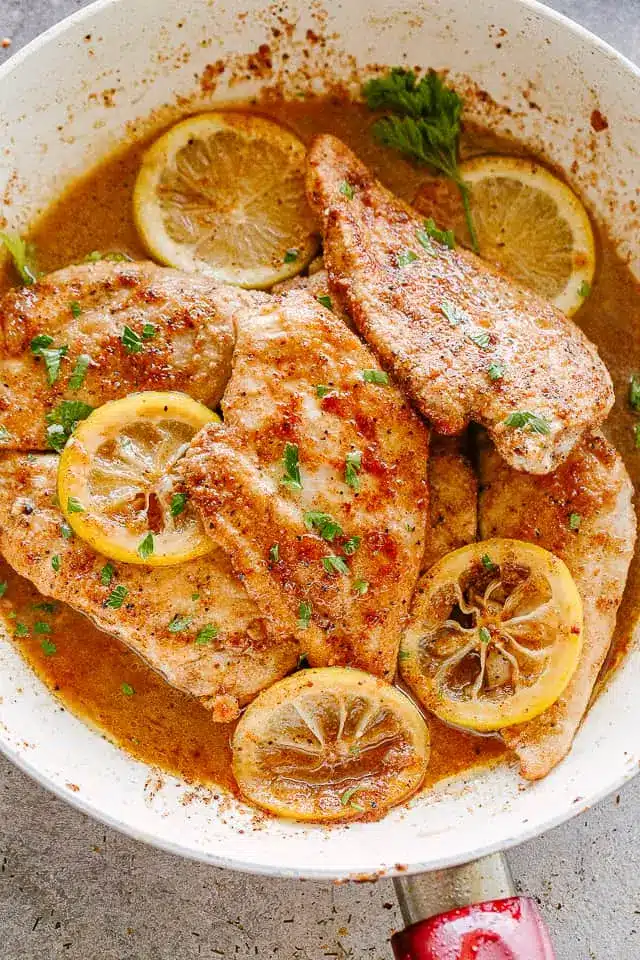
- 6Remove from heat. Serve the lemon pepper chicken garnished with parsley and lemon slices.
Keywords: Lemon Pepper Chicken, Skillet Chicken, Quick Dinner, Easy Chicken Recipe, Garlic Butter Sauce, 30-Minute Meal
For a detailed breakdown of exact quantities and specific measurements, please refer to the recipe card provided within the shortcode.
Variations
This versatile Lemon Pepper Chicken recipe serves as an excellent base for creative culinary exploration, allowing you to tailor it to different dietary preferences and flavor profiles.
For a delicious vegan alternative, consider using firm or extra-firm tofu or large portobello mushrooms as your protein base.
Marinate them similarly and pan-sear until golden brown and tender, ensuring a satisfying plant-based rendition of this classic dish.
If you’re following a low-carb lifestyle, the flour coating can be entirely omitted, or you can opt for a blend of almond flour and a touch of psyllium husk for a keto-friendly alternative.
Focus on ensuring your sauce ingredients are carb-conscious, perhaps using a sugar-free chicken broth and maximizing the fresh lemon juice and butter for flavor.
This adjustment ensures you can still enjoy the bright, peppery notes without compromising your dietary goals.
For those who adore a bit of spice, consider incorporating a pinch of red pepper flakes into the flour mixture or adding a dash of your favorite hot sauce to the lemon butter sauce.
This subtle addition can introduce an extra layer of warmth and complexity that complements the lemon and pepper beautifully.
You could also experiment with different types of citrus, like a touch of lime zest or even a hint of orange zest, for a nuanced citrus twist.
How to Prepare Lemon Pepper Chicken
Step 1: Prepare the Flour Coating
Begin by gathering your dry ingredients for the coating. In a shallow dish, such as a pie plate or a wide bowl, combine the coconut flour or all-purpose flour with the lemon pepper seasoning, lemon zest, and salt.
Whisk these ingredients together thoroughly to ensure an even distribution of the lemon pepper and salt throughout the flour. This step is crucial for creating a beautifully seasoned crust on the chicken.
The lemon zest adds an extra burst of fresh citrus aroma and flavor that intensifies during the cooking process.
The Importance of Zest: Lemon zest, which is the finely grated outer peel of the lemon, contains a high concentration of essential oils that are packed with aromatic compounds. These oils are responsible for the bright, fragrant, and intensely citrusy notes that are so characteristic of lemon-flavored dishes. Unlike lemon juice, which is liquid and can make coatings soggy, zest provides a dry, concentrated burst of lemon essence. It doesn’t introduce excess moisture, making it ideal for creating a crispier coating on pan-fried foods. When it’s heated, these oils release their potent aroma, infusing the entire dish with a lively and invigorating scent that signals deliciousness before the first bite is even taken. This is why adding lemon zest to the flour mixture is such a game-changer for lemon pepper chicken, ensuring that the lemon flavor isn’t just an afterthought but an integral part of the chicken’s delicious exterior.
Ensure that the flour mixture is well-mixed before you begin coating the chicken. An even coating prevents some pieces from being overly seasoned while others are bland. The consistency of the flour coating plays a significant role in how the chicken browns; too much or too little can impact the final texture.
Step 2: Prepare the Chicken
Take your boneless, skinless chicken breasts and place them on a clean cutting board. Using a sharp chef’s knife, carefully slice each chicken breast in half lengthwise.
The goal is to create thinner, more uniform pieces of chicken that will cook quickly and evenly. You should aim for approximately 8 pieces of chicken, each about 1/4-inch thick.
This technique ensures that the chicken doesn’t dry out and becomes tough, which is a common issue with thicker chicken breast cuts.
Uniform Thickness is Key: Achieving uniform thickness in your chicken pieces is one of the most impactful techniques for ensuring perfectly cooked chicken. Chicken breasts are naturally thicker in the center and taper towards the edges, which leads to uneven cooking. By slicing them horizontally (butterflying) and then trimming any thicker sections, you create pieces that are roughly the same thickness from edge to edge. This allows all the pieces to cook at the same rate. When you place them in the hot skillet, they will all reach their ideal internal temperature around the same time. This prevents the thinner edges from becoming dry and chalky while the thicker center is still undercooked, or worse, the entire piece becoming overcooked and tough in an attempt to reach doneness. It also contributes to a more aesthetically pleasing presentation, with uniformly browned and appealing chicken pieces ready to be served.
Once the chicken is sliced, gently pat each piece dry with paper towels. This step is vital because moisture on the surface of the chicken will prevent the flour coating from adhering properly and will steam the chicken instead of searing it.
Step 3: Coat the Chicken
Now, take the prepared chicken pieces and place them into the shallow dish containing the seasoned flour mixture. Gently toss each piece of chicken, ensuring it is fully coated on all sides with the flour blend.
Use your hands or tongs to press the flour onto the chicken, making sure there are no bare spots. This coating will not only add flavor but also help create a lovely golden crust as the chicken cooks.
Discard any excess flour left in the dish after coating all the chicken pieces. Proper coating is essential for texture and flavor absorption.
The Art of Coating: Coating proteins before pan-searing is a culinary technique that serves multiple purposes, significantly enhancing both texture and flavor. The primary function of the coating, in this case, a mixture of coconut flour and seasonings, is to create a barrier that promotes browning and crispiness. As the flour hits the hot oil in the skillet, it undergoes the Maillard reaction, a complex chemical process that creates hundreds of new flavor compounds and results in that desirable golden-brown hue. Beyond browning, the coating acts as a vehicle for flavor. The lemon pepper seasoning, salt, and lemon zest are directly absorbed by the flour, and as the chicken cooks, these flavors meld and penetrate the protein. Furthermore, the coating helps to retain moisture within the chicken. It forms a protective layer that seals in the juices, preventing the chicken from drying out too quickly during the high-heat cooking process. This results in chicken that is simultaneously juicy on the inside and delightfully crisp on the outside, a perfect textural contrast that makes the dish so appealing.
Avoid overcrowding the dish when coating. If you are using a small dish, it might be best to coat the chicken in batches to ensure each piece gets adequate coverage without becoming clumped together. This ensures an even layer of seasoning.
Step 4: Cook the Chicken
Place a large skillet over medium-high heat and add the vegetable oil. Allow the oil to heat up until it shimmers, which indicates it’s hot enough for searing.
Carefully place the coated chicken breasts into the hot oil in a single layer. Be sure not to overcrowd the skillet, as this can cause the chicken to steam rather than sear, resulting in a less desirable texture. You may need to cook the chicken in batches depending on the size of your skillet.
Cook each side for approximately 3 to 4 minutes, or until the chicken is golden brown and cooked through. The exact cooking time will vary depending on the thickness of your chicken pieces.
The Searing Process: Searing is a high-heat cooking technique that creates a flavorful, crispy exterior on food while helping to lock in juices. When you place the coated chicken into a hot skillet with oil, the coating immediately begins to brown and crisp up due to the intense heat and the Maillard reaction. This reaction not only develops a rich, savory flavor but also forms a protective crust. This crust acts as a barrier, preventing excessive moisture loss from the interior of the chicken during cooking. The oil in the pan transfers heat efficiently to the chicken, ensuring rapid cooking on the surface. It’s crucial to maintain a consistent medium-high heat to achieve optimal searing without burning the coating. Flipping the chicken at the right time is also important; waiting for a good crust to form before turning ensures that you don’t tear the coating and that both sides are equally browned and delicious. The result is tender, juicy chicken with a delightful crunch, a stark contrast to boiled or steamed chicken.
Once the chicken is cooked, remove it from the skillet and set it aside on a clean plate. It’s important to let it rest briefly to allow the juices to redistribute. This resting period is key to ensuring moist and tender chicken.
Step 5: Make the Lemon Butter Sauce
Reduce the heat slightly if necessary, and add 1 tablespoon of butter to the same skillet you used for the chicken. Once the butter has melted, add the minced garlic and sauté for about 30 seconds until fragrant. Be careful not to burn the garlic, as this can impart a bitter flavor.
Slowly pour in the chicken broth, and while it’s still hot, use a wooden spoon or spatula to scrape up any browned bits (fond) that have stuck to the bottom of the skillet. This fond is packed with flavor and will enrich your sauce.
Stir in the lemon juice and bring the sauce to a simmer. Allow it to cook for about 3 to 4 minutes, or until the sauce has reduced slightly and begun to thicken.
The Magic of Deglazing: Deglazing is a culinary technique that involves adding liquid to a hot pan after cooking to dissolve the browned bits of food (fond) stuck to the bottom. This fond is incredibly flavorful, as it’s the result of the Maillard reaction and caramelization that occurred during searing. When you add liquid, such as chicken broth in this recipe, to the hot pan, it creates steam, which helps to loosen these flavorful particles. By scraping them up with a spoon and incorporating them into the sauce, you’re essentially infusing the sauce with all the delicious essence of what was cooked before. This technique dramatically enhances the depth and complexity of the final sauce, transforming it from a simple liquid into a rich, savory concoction that complements the main protein beautifully. It’s a simple step that makes a monumental difference in the overall flavor profile of the dish.
For an extra touch of richness, you can swirl in the remaining tablespoon of butter after the sauce has thickened. This emulsifies into the sauce, making it glossy and even more decadent.
Step 6: Combine and Serve
Return the cooked lemon pepper chicken pieces to the skillet with the sauce. Gently toss the chicken to ensure it is well-coated in the glossy lemon butter sauce.
Allow the chicken to simmer in the sauce for about 1 minute, just long enough to heat through and absorb some of the delightful flavors. Be careful not to overcook at this stage, as the chicken is already fully cooked.
Remove the skillet from the heat and serve the Lemon Pepper Chicken immediately, garnished with freshly chopped parsley and bright lemon slices for an extra pop of color and freshness.
Garnish for Presentation and Flavor: Garnishing might seem like a minor detail, but it plays a crucial role in both the visual appeal and the overall tasting experience of a dish. Freshly chopped parsley, with its vibrant green color and mild, slightly peppery flavor, adds a welcome contrast to the golden chicken and rich sauce. It provides visual interest, making the dish look more appetizing and professionally prepared. The bright yellow lemon slices, placed strategically around the chicken or on the side of the plate, not only enhance the visual theme but also serve as a reminder of the dish’s key flavor component. Guests can squeeze extra fresh lemon juice over their chicken if they desire, adding another layer of brightness and acidity at the table. These elements are not just decorative; they contribute subtle aromatic and flavor notes that enhance the diner’s perception of the meal.
The aroma of the parsley and lemon will further entice your diners, making the meal an all-around sensory delight. This final touch elevates the dish from a simple meal to a memorable culinary presentation.
Pro Tips for Lemon Pepper Chicken
To elevate your Lemon Pepper Chicken from delicious to truly spectacular, consider these expert tips that focus on enhancing flavor, texture, and overall cooking precision. Mastering these nuances will ensure consistent, restaurant-quality results every time you prepare this dish.
Don’t Skip the Drying Step: Before coating the chicken, thoroughly pat it dry with paper towels. Excess moisture prevents the flour from adhering properly and will steam the chicken instead of searing it, leading to a less desirable, soggy texture. A dry surface is the first step towards a crispy, golden crust.
Achieve the Perfect Sear: Ensure your skillet is properly preheated with enough oil before adding the chicken. A medium-high heat is crucial for developing that beautiful golden-brown crust. Avoid overcrowding the pan; cook in batches if necessary. Overcrowding lowers the pan temperature, leading to steaming rather than searing, and compromises the crispiness of the coating.
Master the Sauce: When making the sauce, don’t rush the deglazing process. Scrape up all those flavorful browned bits from the bottom of the pan, as they are the foundation of a rich sauce. Simmering the sauce allows the flavors to meld and the liquid to reduce, concentrating its taste and achieving the right consistency. Swirling in the final tablespoon of butter at the end creates a glossy, emulsified sauce that coats the chicken beautifully.
Taste and Adjust Seasoning: Before serving, always taste the sauce and the chicken. Lemon pepper seasoning can vary in saltiness and pepper intensity. Adjust with additional salt, pepper, or lemon juice as needed to achieve your desired flavor balance. This final taste test is critical for perfect seasoning.
Consider Chicken Thighs for Extra Juiciness: While chicken breasts are classic, boneless, skinless chicken thighs offer a more forgiving option that is inherently more forgiving and tends to stay juicier. If using thighs, adjust cooking times accordingly, ensuring they reach an internal temperature of 165°F (74°C) for safe consumption. Their higher fat content also contributes to a richer flavor profile.
Serving Suggestions for Lemon Pepper Chicken
Decoration
Elevate the visual appeal of your Lemon Pepper Chicken with thoughtful garnishes that add both color and freshness. A generous sprinkle of freshly chopped flat-leaf parsley provides a vibrant green contrast against the golden chicken and rich sauce, adding a delicate herbaceous note.
Thin slices of fresh lemon, artfully arranged on the plate or around the chicken, not only enhance the citrus theme but also offer an optional extra burst of brightness for those who enjoy a tangier flavor.
Consider adding a small sprig of rosemary or thyme for an aromatic touch, or even a pinch of finely diced red bell pepper for an additional pop of color and a hint of sweetness.
Side Dishes
This versatile Lemon Pepper Chicken pairs wonderfully with a wide array of side dishes, making it suitable for any occasion. For a comforting and classic pairing, serve it over creamy mashed potatoes, which will soak up the delicious lemon butter sauce beautifully.
Steamed or roasted asparagus, tender-crisp green beans, or a simple side of broccoli also make excellent accompaniments, offering a healthy dose of vegetables and a pleasant textural contrast.
Alternatively, serve it alongside fluffy white rice, flavorful quinoa, or even zucchini noodles for a lighter, lower-carb option. A side of easy lobster bisque could also offer a luxurious start to your meal.
Creative Serving Ideas
Beyond traditional plating, get creative with how you present and enjoy your Lemon Pepper Chicken. For a delightful lunch option, dice the cooked chicken and toss it with pasta, chopped celery, and a light lemon-mayo dressing to create a vibrant chicken salad perfect for sandwiches or serving over fresh greens.
You could also serve the chicken over a bed of wilted spinach or kale, allowing the warm sauce to gently cook the greens and infuse them with flavor. For a more elegant presentation, consider layering the chicken and sauce over a bed of creamy risotto or a simple lemon-herb pasta, transforming it into a sophisticated main course.
This dish is also a fantastic addition to dinner spreads, offering a reliable and crowd-pleasing option that can be prepared with minimal fuss.
Preparation & Storage
Storing Leftovers
Properly storing any leftover Lemon Pepper Chicken is key to maintaining its quality and ensuring food safety. Once the chicken has cooled down to room temperature, transfer it to an airtight container. This prevents the chicken from drying out and also stops it from absorbing any odors from other foods in the refrigerator.
It’s best to store the chicken with any remaining sauce, as this helps to keep it moist. Refrigerate the leftovers promptly, ideally within two hours of cooking. The chicken should remain delicious and safe to consume for up to 2 to 3 days when stored correctly in the refrigerator.
Make sure the container is well-sealed to prevent any air exposure, which can accelerate spoilage.
Freezing
While this Lemon Pepper Chicken is best enjoyed fresh, it can be frozen for longer-term storage if needed. For optimal results, it’s advisable to freeze the chicken without the sauce if possible, or ensure it is thoroughly cooled before packaging.
Portion the chicken into freezer-safe containers or heavy-duty freezer bags, removing as much air as possible to prevent freezer burn. If you plan to freeze the sauce separately, allow it to cool completely before transferring it to freezer-safe containers. Properly frozen, the chicken should maintain good quality for up to 2 to 3 months.
Remember to label your containers with the date of freezing so you can keep track of its freshness.
Reheating
Reheating Lemon Pepper Chicken requires a gentle approach to preserve its tenderness and moisture. The best method for reheating is often in a skillet over medium-low heat, adding a splash of water or chicken broth to help create steam and prevent the chicken from drying out.
Alternatively, you can reheat the chicken in the oven at a low temperature, around 300°F (150°C), covered with foil to trap moisture. If you have frozen the chicken, thaw it in the refrigerator overnight before reheating. Avoid reheating in the microwave for extended periods, as this can sometimes lead to uneven heating and a tougher texture, though a brief microwave reheat is acceptable if time is limited.
Ensure the chicken is heated through to an internal temperature of 165°F (74°C) before serving.
Frequently Asked Questions
-
Can I use chicken thighs instead of chicken breasts?
Absolutely, boneless, skinless chicken thighs are an excellent alternative to chicken breasts in this recipe, and they often yield an even juicier result due to their higher fat content. When using chicken thighs, you’ll want to ensure they are cooked thoroughly, aiming for an internal temperature of 165°F (74°C). They might require a few minutes longer on each side compared to chicken breasts, so it’s always best to use a meat thermometer to confirm doneness. The flavor profile will be slightly richer, and the texture more tender, making it a delightful variation.
-
What is lemon pepper seasoning made of?
Lemon pepper seasoning is typically a dry blend of ingredients designed to deliver a potent combination of citrusy brightness and peppery heat. The primary components are usually dehydrated lemon peel, which provides the intense lemon aroma and flavor without adding moisture, and ground black pepper, which offers its characteristic pungency. Many commercial blends also include salt to enhance the overall taste and often contain other complementary aromatics like garlic powder and onion powder to add savory depth. Some artisanal blends might even include other spices like coriander or paprika for subtle flavor nuances. You can find it readily available in most grocery stores, or you can easily make your own by combining dried lemon zest, black pepper, and salt.
-
How can I make the lemon butter sauce richer or thicker?
To achieve a richer or thicker lemon butter sauce, you have several effective techniques at your disposal. One simple method is to continue simmering the sauce for a longer duration, allowing more of the liquid to evaporate, which concentrates the flavors and naturally thickens the sauce. Another popular and effective technique is to introduce a cornstarch slurry; mix one teaspoon of cornstarch with two teaspoons of cold water until smooth, then whisk this mixture into the simmering sauce and cook for another minute or two until it thickens. For an even richer mouthfeel, you can emulsify more butter into the sauce at the end by whisking in cold, cubed butter, piece by piece, off the heat until it is fully incorporated, creating a glossy and luxurious finish. Lastly, incorporating a tablespoon of heavy cream or a small amount of cream cheese towards the end of the sauce-making process can also add both richness and thickness.