Irresistible Japanese Chicken and Egg Rice Bowl You'll Crave

There’s something undeniably comforting about warm rice topped with tender chicken and a silky blanket of eggs. My foray into making a Japanese Chicken and Egg Rice Bowl began on a rainy afternoon when I craved the kind of meal that wraps you in warmth like a cozy hug. The aroma of savory soy sauce mixing with sweet mirin filled my kitchen, and I could hardly wait to dig in.
While fast food may tempt with its convenience, nothing holds a candle to the satisfaction of creating this dish from scratch. It’s deceptively easy to prepare—perfect for those evenings when you want to impress guests or simply indulge in a delectable homemade feast. Each bite brings a delightful contrast of flavors, with perfectly cooked chicken soaking in a rich, glossy sauce and the eggs adding a creamy touch that elevates the entire dish.
Join me as we whip up this vibrant, crowd-pleasing favorite that’s not just about filling your belly, but also feeding your soul. Get ready to transform simple ingredients into a plate of pure bliss!
Why You Will Love This Recipe
- Comforting Simplicity: This dish is straightforward to make, ensuring a hassle-free cooking experience even for beginners, allowing you to create a satisfying meal with minimal effort.
- Flavor Explosion: The harmony of savory chicken, rich soy sauce, and sweet mirin creates an unforgettable taste that will have your taste buds dancing with every single bite.
- Versatile Meal: Great for lunch, dinner, or meal prep, this bowl is adaptable to your cravings and ingredient availability, making it a go-to option for various occasions.
- Quick Cooking: Ready in under 30 minutes, this recipe is your fast-track to a delicious homemade meal without all the fuss, perfect for busy weeknights.
- Crowd-Pleaser: Perfect for family dinners or impressing guests, it’s a dish that brings everyone together around the table, offering a universally loved flavor profile.
Indulge in this savory delight and experience a homemade favorite that’s easier than you think! For more quick and satisfying ideas, check out my guide on easy homemade meals.
Ingredients You Need
Crafting this Japanese Chicken and Egg Rice Bowl is a celebration of simple, high-quality ingredients coming together to create something truly special. We aim for fresh produce and good quality proteins to ensure the best possible flavor and texture in every single serving. The beauty of this dish lies in its ability to transform these basic components into a harmonious and deeply satisfying meal that feels both authentic and comforting.
Savory Japanese Chicken and Egg Rice Bowl
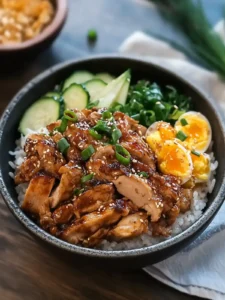
This Japanese Chicken and Egg Rice Bowl offers comforting flavors of tender chicken and creamy eggs over rice, a perfect meal for any occasion. It's deceptively easy to prepare and great for those evenings when you want to impress guests or simply indulge in a delectable homemade feast.
- 600 g Boneless chicken thighs
- 1.5 tbsp Soy sauce
- 1 tbsp Vegetarian oyster sauce
- 0.5 tsp Black pepper
- 2 tbsp Cornstarch
- 1 small Onion
- 1 tbsp Neutral oil
- 4 Eggs
- 0.75 cup Dashi chicken or vegetable stock
- 2 tbsp Soy sauce
- 1 tbsp Mirin or sugar
- Green onion for garnish
- 1In a bowl, mix together the chicken thighs with soy sauce, vegetarian oyster sauce, and black pepper. Coat lightly with cornstarch.
- 2Heat neutral oil in a pan over medium-high heat. Add marinated chicken and cook for 2–3 minutes on each side until golden brown and about 80% cooked through. Remove and set aside.
- 3In the same pan, add sliced onion and sauté for 3–4 minutes until fragrant and slightly softened.
- 4Pour in dashi stock, soy sauce, and mirin. Stir well, then return the chicken to the pan. Let simmer for about 4 minutes.
- 5Reduce heat to low and slowly pour beaten eggs around the chicken. Cover and cook for 1–2 minutes, or until eggs are just set and have a silky texture.
- 6Spoon mixture over warm rice. Garnish with finely chopped green onions.
Keywords: Japanese, Chicken, Egg, Rice Bowl, Savory, Comfort Food, Quick Meal
The specific quantities for each ingredient are meticulously detailed within the accompanying recipe card, ensuring you have all the precise measurements needed for success. This careful attention to detail allows for consistent and delicious results every time you prepare this delightful meal.
Variations
This Japanese Chicken and Egg Rice Bowl is wonderfully adaptable, allowing you to tailor it to your personal preferences and dietary needs. Feel free to experiment with different additions to make it your own unique culinary creation.
For a lighter, lower-carbohydrate option, consider substituting the traditional white rice with fluffy cauliflower rice. This change significantly reduces the carbohydrate count while still providing a satisfying base for the savory chicken and egg topping, making it an excellent choice for those managing their carb intake.
If you’re exploring a plant-based lifestyle, this dish can be easily transformed into a delicious vegan meal. Replace the chicken thighs with firm tofu or tempeh, ensuring they are well-marinated to absorb the rich flavors. You can also use vegetable stock instead of dashi to maintain the dish’s authentic essence without compromising your dietary choices.
Adding a medley of colorful vegetables can boost the nutritional value and visual appeal of your bowl. Sauté sliced bell peppers, carrots, or snow peas along with the onions to introduce more vitamins and a delightful crunch. This simple addition not only enhances the health factor but also makes the dish a feast for the eyes.
For those who enjoy a bit of heat, a dash of sriracha or a drizzle of chili oil during the simmering process will introduce a pleasant spicy kick. This variation is perfect for adding an extra layer of excitement to the classic flavor profile, transforming it into a bolder, more intense culinary experience.
To introduce a touch of the exotic, try swapping the dashi stock for creamy coconut milk. This substitution imparts a subtle sweetness and a wonderfully rich, velvety texture that complements the savory elements beautifully, offering a tropical twist on the traditional Japanese flavors.
Deepen the umami notes by incorporating sliced shiitake mushrooms into the cooking process. Their earthy, robust flavor profile pairs exceptionally well with the chicken and the savory sauce, adding another dimension of deliciousness to the bowl.
Instead of the traditional green onions, consider garnishing with fresh cilantro or basil. These herbs offer a bright, refreshing herbaceousness that can lift the overall flavor profile of the dish, adding a unique and aromatic finish that’s both invigorating and delightful.
For a textural contrast and an extra layer of flavor, sprinkle toasted sesame seeds over the finished bowl. Their subtle nutty taste and satisfying crunch provide a delightful finishing touch that elevates the entire culinary experience.
How to Prepare Japanese Chicken and Egg Rice Bowl
Step 1: Marinate the Chicken for Ultimate Flavor Infusion
Begin your culinary journey by preparing the chicken marinade, a crucial step that ensures every bite is packed with savory goodness. In a medium-sized mixing bowl, combine the succulent boneless chicken thighs with the foundational elements of soy sauce, vegetarian oyster sauce, and a whisper of black pepper. These ingredients work synergistically to tenderize the chicken and impart a deep, umami-rich flavor that will permeate the entire dish. Ensure each piece of chicken is thoroughly coated with this aromatic blend, allowing the flavors to meld and penetrate the meat.
Once the chicken is beautifully coated, it’s time to introduce the cornstarch. Sprinkle the cornstarch evenly over the marinated chicken pieces, gently tossing to ensure each thigh is lightly dusted. This seemingly simple addition is a game-changer; the cornstarch acts as a binder, creating a slightly crispy exterior when the chicken is cooked. This texture contrast is essential to the overall appeal of the dish, providing a delightful crispness against the tender interior of the chicken.
Allow the chicken to marinate for at least 15 to 30 minutes at room temperature, or for an even more intense flavor, cover the bowl and refrigerate it for up to 24 hours. This resting period is vital for allowing the flavors to fully develop and penetrate the chicken, ensuring that each morsel is as delicious as possible. The longer it marinates, the deeper and more complex the flavors will become, setting a fantastic foundation for the rest of the cooking process.
Step 2: Sear the Chicken to Golden Perfection
Now, it’s time to bring the marinated chicken to life through the art of searing. Heat a tablespoon of neutral oil, such as avocado or canola oil, in a large skillet or wok over medium-high heat. The key here is to achieve a properly hot pan without letting the oil smoke excessively; a gentle shimmer is ideal. Once the oil is heated, carefully add the marinated chicken pieces in a single layer, making sure not to overcrowd the pan.
Overcrowding will steam the chicken rather than sear it, preventing the formation of that desirable golden-brown crust. If necessary, cook the chicken in batches to ensure each piece gets direct contact with the hot pan. Sear the chicken for approximately 2 to 3 minutes on each side. You are looking for a beautiful, even golden-brown color to develop on the surface of the chicken, indicating that it is beginning to cook through and develop its rich flavors.
The goal at this stage is not to cook the chicken completely through, but rather to achieve about 80% doneness. This partial cooking allows the chicken to remain incredibly tender and juicy once it’s simmered with the sauce later in the process. Once the chicken has achieved this perfect sear, remove it from the pan and set it aside on a clean plate. Reserve any rendered chicken juices in the pan, as these will form the flavorful base for the sauce.
Step 3: Sauté the Aromatics for Enhanced Depth
With the chicken seared and set aside, it’s time to build another layer of flavor by sautéing the aromatics. In the same skillet where you cooked the chicken, add your thinly sliced onion. The residual oil and the flavorful bits left behind from the chicken will infuse the onions with deliciousness as they cook. If the pan seems a bit dry, you can add another teaspoon of neutral oil to ensure the onions sauté rather than stick or burn.
Sauté the onions over medium heat, stirring occasionally, for about 3 to 4 minutes. You want the onions to soften beautifully and become translucent, releasing their natural sweetness. As they cook, they will absorb the savory remnants from the chicken, creating a wonderful flavor foundation. This step is crucial for adding a subtle sweetness and aromatic complexity that balances the richness of the other ingredients in the dish.
The gentle sautéing process ensures the onions are tender and fragrant without becoming overly browned or bitter. This mild caramelization is key to integrating their sweet notes seamlessly into the final sauce. The goal is to create an aromatic base that complements, rather than overpowers, the star ingredients of chicken and egg. This careful layering of flavors is what transforms a simple meal into a culinary delight.
Step 4: Simmer and Infuse for Ultimate Juiciness
Now, it’s time to bring all the components together and let the magic happen. Pour the dashi stock, soy sauce, and mirin into the skillet with the sautéed onions. Stir everything together well, scraping up any flavorful browned bits from the bottom of the pan – these are packed with delicious flavor. This liquid mixture will form the luscious sauce that will coat the chicken and rice.
Once the sauce is heated and well combined, return the partially cooked, seared chicken pieces back into the skillet. Nestle them into the sauce, ensuring they are partially submerged. Bring the mixture to a gentle simmer over medium-low heat. Allow everything to simmer together for approximately 4 minutes. During this time, the chicken will continue to cook through, absorbing the rich flavors of the sauce while remaining incredibly tender and juicy.
The simmering process is essential for allowing the flavors to meld and the chicken to become perfectly cooked. The sauce will also thicken slightly, coating the chicken in a glossy, delectable glaze. This step ensures that the chicken is not only cooked through but also infused with the complex savory and slightly sweet notes of the sauce, preparing it to be a star component of the final rice bowl.
Step 5: The Silky Egg Embrace
This is arguably the most visually appealing and texturally exciting step: the addition of the eggs. Once the chicken has simmered and is cooked through, reduce the heat of the skillet to low. This lower temperature is critical to achieving the perfect silky texture for the eggs, preventing them from becoming rubbery or overcooked. You want a gentle heat that cooks the eggs slowly and delicately.
Carefully and slowly pour the lightly beaten eggs around the chicken pieces in the skillet. Try to distribute them evenly, allowing the liquid eggs to flow into the nooks and crannies around the chicken. Once the eggs are poured, immediately cover the skillet with a lid. This trapping of steam is what gently cooks the eggs to a beautiful, silky, and just-set consistency.
Let the eggs cook, covered, for about 1 to 2 minutes. Resist the urge to stir or lift the lid too early; patience here will be rewarded with delicate, custardy eggs that are perfectly integrated with the chicken and sauce. The goal is for the eggs to be mostly set but still retain a slight moistness, creating that signature creamy finish that makes this dish so comforting and satisfying.
Step 6: Assemble and Serve Your Masterpiece
The final step is the artful assembly of your Japanese Chicken and Egg Rice Bowl. Prepare your serving bowls by filling them generously with warm, fluffy steamed rice. The rice acts as the perfect canvas, absorbing all the delicious flavors of the chicken, egg, and sauce. Ensure the rice is still warm, as this enhances the overall comforting experience of the dish.
Using a large spoon or ladle, carefully transfer the chicken and egg mixture from the skillet onto the bed of rice. Aim to get a good balance of chicken, egg, and that wonderful glossy sauce. Allow the sauce to cascade down over the rice, coating every grain with its savory goodness. This visual presentation is part of the enjoyment, creating an inviting and appetizing bowl.
For a finishing touch that adds both freshness and visual appeal, garnish generously with finely chopped green onions. Their vibrant green color provides a beautiful contrast to the rich colors of the chicken and egg, and their subtle crispness adds another delightful textural element. Serve immediately and savor the incredible flavors and textures you’ve created!
Pro Tips for Japanese Chicken and Egg Rice Bowl
Marinate for Maximum Flavor: Don’t skimp on the marinating time for the chicken. At least 15-30 minutes will significantly enhance the depth of flavor and ensure the chicken is exceptionally tender. For an even deeper infusion, consider marinating overnight in the refrigerator.
The Art of the Sear: When cooking the chicken, ensure your pan is sufficiently hot before adding the pieces. Avoid overcrowding the pan to allow for proper searing, which creates a beautiful golden-brown crust and locks in juices, preventing the chicken from steaming.
Dashi: The Umami Secret: If you’re new to dashi, it’s a fundamental Japanese soup stock that provides a unique umami flavor. Its subtle yet profound taste elevates this dish significantly, so using good quality dashi is highly recommended for an authentic experience.
Gentle Heat for Eggs: The key to achieving that signature silky, tender egg texture is to cook them on very low heat. Once the chicken is cooked, reduce the burner to its lowest setting before adding the eggs and covering the pan. This gentle cooking method prevents them from becoming rubbery.
Garnish with Gusto: Fresh green onions are not just for decoration; they add a bright, slightly pungent flavor and a pleasing crunch that cuts through the richness of the dish. Always add them just before serving to preserve their freshness and vibrancy.
Balance the Sweetness: The mirin or sugar is crucial for balancing the saltiness of the soy sauce and the savory depth of the other ingredients. Taste the sauce as it simmers and adjust the sweetness if necessary to achieve your preferred flavor profile.
Rice is Key: Use good quality short-grain Japanese rice for the best results. Its slightly sticky texture is ideal for holding the toppings and sauce. Ensure it’s cooked perfectly and served warm to complement the other components of the bowl.
Serving Suggestions for Japanese Chicken and Egg Rice Bowl
Decoration
Elevate the visual appeal of your Japanese Chicken and Egg Rice Bowl with thoughtful garnishes. Finely chopped fresh green onions are a classic choice, providing a vibrant pop of green and a mild, fresh bite. For an extra touch of color and flavor, consider a sprinkle of toasted sesame seeds, which also add a delightful nutty aroma and subtle crunch. A small drizzle of unagi sauce or a touch of shredded nori (seaweed) can add further visual interest and a complementary savory element.
Side Dishes
Complement the rich flavors of your rice bowl with a selection of delightful side dishes. A bowl of steaming hot miso soup offers a comforting and savory counterpoint, its umami notes harmonizing beautifully with the main dish. Lightly blanched or steamed broccoli, with its vibrant green hue and satisfying crunch, provides a fresh, healthy contrast. Japanese pickles, such as pickled daikon or cucumbers, offer a tangy and refreshing element that cleanses the palate between bites.
Creative Serving Ideas
Think beyond the basic bowl for unique serving presentations. For a more refined dining experience, serve the chicken and egg mixture in individual bento boxes alongside perfectly cooked rice and a small assortment of colorful pickled vegetables. You could also create a deconstructed version, serving the rice on one side of a platter and the saucy chicken and egg mixture in a small bowl next to it, allowing diners to assemble their own perfect bite. For a fun, family-style approach, present the main components in separate dishes and let everyone build their own customized rice bowl, fostering interaction and personalization at the dinner table.
Preparation & Storage
Storing Leftovers
Leftover Japanese Chicken and Egg Rice Bowl can be stored in an airtight container in the refrigerator for up to 3 days. It’s best to store the rice separately from the chicken and egg mixture if possible, as rice can become dry when stored for extended periods. Ensure the container is sealed tightly to prevent any exposure to air, which can accelerate spoilage and affect the texture of the food.
Freezing
While this dish is best enjoyed fresh, it can be frozen for longer storage, though some textural changes may occur, particularly with the eggs. Allow the cooked chicken and egg mixture to cool completely before transferring it to a freezer-safe container or heavy-duty freezer bag. Ensure the container is sealed tightly to prevent freezer burn. Properly stored, it can be kept in the freezer for up to 3 months.
Reheating
To reheat leftovers, the best method is on the stovetop over low heat. This allows for gentle warming and helps to preserve the texture of the eggs. Add a splash of dashi stock, water, or even a little soy sauce to the pan to keep the mixture moist and prevent it from drying out. Avoid reheating in the microwave if possible, as it can often lead to the eggs becoming rubbery and the rice becoming hard.
If you’ve stored leftover rice separately, reheat it in the microwave or on the stovetop until warmed through before serving. Combine the reheated rice with the gently warmed chicken and egg mixture for a delicious meal that tastes almost as good as the first time.
Frequently Asked Questions
-
How do I select ripe ingredients for this dish?
For the best flavor and texture in your Japanese Chicken and Egg Rice Bowl, choose high-quality, fresh ingredients. Select chicken thighs that are plump, moist, and have a vibrant pinkish hue, indicating freshness and good quality. For the onions, look for ones that are firm to the touch, with dry, papery skins and no soft spots or sprouting. When selecting eggs, opt for fresh ones; they will typically have a brighter yolk and firmer whites, and checking for any cracks in the shell is always a good practice. Using organic or free-range eggs can also contribute to a richer flavor and color.
-
What’s the best way to store leftovers?
To ensure your leftover Japanese Chicken and Egg Rice Bowl remains delicious, store it in an airtight container in the refrigerator. It’s advisable to consume leftovers within 3 days for optimal taste and safety. When reheating, a gentle approach is key; use a skillet over low heat, adding a tiny splash of stock or water to rehydrate the ingredients and prevent them from drying out, especially the eggs, which can become rubbery if reheated too aggressively. This careful reheating process helps to maintain the dish’s intended creamy texture.
-
Can I freeze the Japanese Chicken and Egg Rice Bowl?
Yes, you can freeze the cooked Japanese Chicken and Egg Rice Bowl, though it’s important to manage expectations regarding the texture of the eggs. For the best results, allow the entire dish to cool completely before portioning it into freezer-safe containers or heavy-duty freezer bags. Ensure they are sealed tightly to prevent freezer burn. Frozen portions can be stored for up to 3 months. When you’re ready to enjoy them, thaw the portions overnight in the refrigerator and then reheat them gently on the stovetop, adding a bit of liquid to help restore moisture and maintain palatability.