Easy Homemade Strawberry Rhubarb Jam Without Pectin

As the days lengthen and the sun graces us with its warmth, the kitchen often beckons with the promise of vibrant, seasonal flavors. The delicate balance between the sweetness of ripe strawberries and the delightful tang of fresh rhubarb is a quintessential taste of early summer, a combination that is both comforting and invigorating.
Crafting homemade preserves is a rewarding endeavor, allowing you to capture the essence of fleeting seasons and enjoy them long after their peak. This particular recipe for strawberry rhubarb jam stands out for its simplicity, requiring minimal ingredients and no commercial pectin, proving that delicious, homemade jam is within everyone’s reach. It’s a delightful way to savor the season’s bounty and create something truly special.
Why You Will Love This Recipe
- Effortless Simplicity: This jam comes together with just a few core ingredients and straightforward steps, making it accessible for cooks of all skill levels. You’ll be amazed at how quickly you can transform fresh produce into a pantry staple.
- Perfect Sweet-Tart Balance: The natural pairing of strawberries and rhubarb creates a complex flavor profile that is neither too sweet nor too sour, offering a delightful tangy sweetness that enhances many dishes. It’s a harmonious blend that truly sings.
- Remarkably Versatile: Beyond just toast, this jam is a culinary chameleon, perfect for elevating yogurt, ice cream, baked goods, or even as a savory counterpoint on a cheese board. Its adaptability makes it an indispensable condiment.
- Naturally Wholesome: Free from artificial preservatives and commonly found allergens, this jam is both gluten-free and vegan, making it a fantastic choice for those with dietary considerations or simply seeking a more natural option. It’s a treat you can feel good about.
- Seasonal Flavor Preservation: Enjoy the taste of summer long into the cooler months by canning this delicious jam, ensuring you have a bright, fruity burst available at any time. It’s a wonderful way to extend the joy of fresh produce.
Ingredients You Need
The beauty of this homemade strawberry rhubarb jam lies in its reliance on high-quality, fresh ingredients. Selecting ripe, flavorful strawberries and vibrant, firm rhubarb stalks is paramount to achieving the best possible taste and texture. The addition of sugar not only sweetens but also aids in the preservation process, while fresh lemon juice brightens the flavors and helps the natural pectin in the fruit do its magic. You’ll find that the quality of your produce directly impacts the final product, so choosing wisely makes all the difference in creating a truly exceptional jam.
Easy Homemade Strawberry Rhubarb Jam Without Pectin
This easy homemade strawberry rhubarb jam recipe uses only three core ingredients and no commercial pectin. It's a delightful balance of sweet and tart flavors, perfect for preserving the essence of summer. Gluten-free and vegan, it's versatile enough for toast, yogurt, or even charcuterie boards.
- 2 cups fresh strawberries, washed and hulled
- 1 cup vibrant red rhubarb, chopped
- 1 to 1.5 cups granulated sugar, adjust based on desired sweetness
- 1 tablespoon fresh lemon juice
- 4 sterilized jars, thoroughly sterilized
- 1Wash and hull the strawberries, then chop them into quarter-sized pieces. Trim and slice the rhubarb. Combine both in a large, heavy-bottomed pot.
- 2Sprinkle the granulated sugar over the fruit and squeeze in the fresh lemon juice. Stir to combine and let sit for about 10 minutes to macerate.
- 3Place the pot over medium heat and bring the mixture to a gentle simmer, stirring frequently. Cook for approximately 30–40 minutes, until the jam thickens to coat the back of a spoon.
- 4Test for doneness using the chilled plate method: place a plate in the freezer, spoon a bit of jam onto it, and freeze for a minute. If it holds its shape when you run your finger through it, it's ready.
- 5Carefully pour the hot jam into sterilized jars, filling to within about ¼ inch of the top. Seal each jar with clean lids immediately. For long-term storage, process the jars in a boiling water bath for 5–10 minutes.
Keywords: strawberry rhubarb jam, homemade jam, no pectin jam, easy jam recipe, fruit jam, summer jam, gluten-free, vegan
The precise quantities for each ingredient are readily available within the detailed recipe card above, ensuring you have all the necessary information for perfect execution.
Variations
Once you’ve mastered the classic strawberry rhubarb jam, the possibilities for delightful variations are endless, allowing you to tailor this delightful spread to your exact preferences and available ingredients. Consider infusing it with other seasonal fruits for a complex flavor profile that offers a unique twist on the traditional. Think about adding a handful of fresh blueberries for an extra layer of sweetness and a beautiful jewel-toned appearance, or perhaps swapping some of the strawberries for raspberries for a more intense berry essence.
For those seeking a different textural experience, incorporating finely chopped dried cranberries or apricots could introduce a pleasant chewiness and a deeper, more concentrated sweetness. Alternatively, a touch of finely grated apple or pear can add a subtle background note and contribute additional natural pectin, potentially reducing the need for extra sugar and promoting a smoother set. These small additions can transform a familiar jam into an exciting new creation.
The addition of warm spices can also dramatically alter the character of your jam, imbuing it with a cozy, comforting aroma. A pinch of ground cinnamon, a whisper of nutmeg, or even a tiny amount of ground ginger stirred in during the cooking process can lend a delightful autumnal feel, perfect for cooler weather enjoyment. For a more exotic touch, consider a small amount of cardamom or a sliver of vanilla bean. These aromatic enhancements can elevate your jam from a simple preserve to a gourmet delight, perfect for pairing with rich desserts or hearty breakfasts.
How to Prepare homemade strawberry rhubarb jam
Step 1: Prepare the Fruits for Jam Making
Begin your journey into creating this delightful homemade strawberry rhubarb jam by meticulously preparing your fruits. You will need approximately two cups of fresh strawberries, ensuring they are thoroughly washed under cool running water to remove any dirt or debris. Once washed, gently hull the strawberries by removing the green leafy tops, and then slice them into uniform quarter-sized pieces. Uniformity in size is key, as it allows the fruits to break down evenly during the cooking process, contributing to a consistent jam texture.
Concurrently, you will prepare about one cup of vibrant red rhubarb stalks. Select stalks that are firm and free of blemishes; the redder the stalks, the deeper the color your jam will achieve. Trim off the very ends of the rhubarb stalks, as these can sometimes be tougher or more fibrous. Slice the prepared rhubarb into small, bite-sized chunks, ideally similar in size to your strawberry pieces. Both the strawberries and rhubarb should then be transferred into a large, heavy-bottomed pot. A heavy-bottomed pot is crucial as it distributes heat more evenly, preventing scorching and allowing for better control over the cooking temperature.
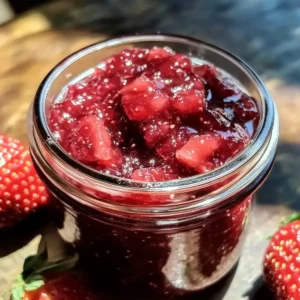
The visual appeal of your jam starts here, with the careful preparation of these two star ingredients. Ensure a good visual mix of the red rhubarb and the bright red strawberries within the pot, as this blend of colors is the first hint of the delicious jam to come. This initial step is foundational for a successful and visually appealing homemade strawberry rhubarb jam that will be a delight to both the eyes and the palate.
Step 2: Macerate the Fruit with Sugar and Lemon
Once your beautifully prepped strawberries and rhubarb reside together in the heavy-bottomed pot, it’s time to introduce the elements that will transform them into jam. Begin by evenly sprinkling between one to one and a half cups of granulated sugar over the mixture of fruits. The exact amount of sugar you use can be adjusted based on your personal preference for sweetness and the natural sweetness of your fruits; a tangier jam will require less sugar, while a sweeter profile will benefit from more. This sugar not only provides sweetness but also plays a vital role in drawing out the natural juices from the fruit.
Following the sugar, you will add the freshly squeezed juice of one lemon. It is essential to use fresh lemon juice rather than bottled, as it provides a brighter, more vibrant citrus note that cuts through the sweetness and enhances the fruit flavors. Lemon juice also contributes vital acidity, which helps to activate the natural pectin present in both the strawberries and the rhubarb, a crucial step for achieving the desired jam consistency without the need for commercial pectin. After adding the sugar and lemon juice, gently stir the entire mixture with a wooden spoon or a heatproof spatula. Ensure all the fruit pieces are lightly coated with the sugar and lemon juice.
Allow this delightful combination to sit undisturbed for approximately ten minutes. This resting period is known as maceration, and it’s a critical step in the jam-making process. During maceration, the sugar begins to draw moisture out of the fruit cells, creating a luscious, syrupy liquid. This natural juice release is what will form the base of your jam, ensuring a more fluid start to the cooking process and contributing significantly to the final texture and flavor of your homemade strawberry rhubarb jam.
Step 3: Cook the Jam Mixture to Thicken
With your fruit macerated and juices beginning to pool in the bottom of the pot, it’s time to apply heat and begin the transformation into jam. Place the pot containing the fruit, sugar, and lemon juice mixture over medium heat on your stovetop. Allow the mixture to gradually come to a gentle simmer, which is characterized by small bubbles breaking the surface of the liquid intermittently. As the temperature rises and the sugar begins to dissolve completely, you will notice the liquid becoming more abundant and increasingly vibrant in color, a testament to the fruits releasing their natural pigments.
Throughout this cooking phase, it is imperative to stir the mixture frequently. Stirring prevents the sugar from sticking to the bottom of the pot and potentially burning, which would impart an undesirable bitter flavor to your jam. A wooden spoon or a heatproof spatula works best for this, allowing you to scrape the bottom and sides of the pot to ensure even cooking and prevent any caramelization that isn’t desired. Continue this gentle simmering process for approximately 30 to 40 minutes, stirring consistently.
During this time, the liquid will gradually reduce, and the fruit will soften and begin to break down, thickening the mixture. You are aiming for a consistency that is thick enough to coat the back of a spoon. As the jam thickens, the stirring may need to become more vigorous to prevent splattering and ensure uniformity. The kitchen will fill with a wonderfully sweet and tangy aroma, indicating that your delicious homemade strawberry rhubarb jam is well on its way to perfection.
Step 4: Test for the Perfect Jam Consistency
Ensuring your homemade strawberry rhubarb jam has reached the optimal thick consistency is a crucial step that requires a simple yet effective test. The most reliable method for home cooks is the chilled plate test, which accurately indicates if your jam has set properly and will hold its shape once cooled. To perform this test, take a small, clean plate and place it in your freezer for a few minutes before you plan to test the jam; you want it to be quite cold.
When you believe your jam is nearing readiness, carefully remove the chilled plate from the freezer. Using a clean spoon, scoop a small amount of the hot jam from the pot and place it onto the cold plate. Return the plate with the jam to the freezer for about one minute. This brief chilling period will help the jam to cool and firm up, mimicking how it will behave once it’s in the jar and cooled completely. After the minute is up, gently run your finger through the dollop of jam on the plate.
If the jam holds its shape, meaning the line you’ve made with your finger remains distinct and doesn’t immediately flow back together, then your jam is ready. Congratulations, you have achieved the perfect consistency! However, if the jam appears runny and the line you made quickly disappears as the jam flows back, it indicates that it needs to cook a little longer. In this case, simply return the jam to the heat, continue simmering and stirring, and repeat the chilled plate test every few minutes until it reaches the desired thickness. Patience here ensures a jam that won’t be too liquid.
Step 5: Jar, Seal, and Store Your Homemade Jam
Once you are absolutely certain your homemade strawberry rhubarb jam has achieved the perfect, thick consistency using the chilled plate test, it’s time to preserve your hard work. Prepare your sterilized jars by carefully placing them on a clean kitchen towel or a heatproof surface. Sterilizing the jars is a vital step to ensure the longevity and safety of your jam, preventing spoilage and the growth of unwanted microorganisms. If you are planning for long-term storage, ensure your lids are also clean and ready to be applied.
With extreme caution, as the jam will be very hot, carefully ladle the finished jam into the sterilized jars. Fill each jar to within approximately ¼ inch of the top; this headspace is important for proper sealing. Wipe the rims of the jars clean with a damp cloth to ensure a good seal can be achieved. Immediately place the clean lids onto the jars and screw on the bands until they are fingertip tight. Avoid overtightening, as this can prevent air from escaping during the sealing process.
For extended shelf life and secure canning, it is recommended to process the filled jars in a boiling water bath. Submerge the sealed jars in a large pot of boiling water, ensuring they are covered by at least an inch of water, and process them for 5 to 10 minutes, depending on your altitude and specific canning guidelines. Once the processing time is complete, carefully remove the jars from the water bath and allow them to cool undisturbed on the counter for 12 to 24 hours. You should hear a satisfying “pop” as the lids seal. Store sealed jars in a cool, dark place for months of delicious enjoyment of your homemade strawberry rhubarb jam.
Pro Tips for homemade strawberry rhubarb jam
Fruit Selection is Paramount: Always opt for the freshest, ripest strawberries and the most vibrant, firm red rhubarb stalks available. The flavor of your jam is a direct reflection of the quality of your produce; avoiding overripe fruits will help maintain a balanced taste profile. Using produce at its peak ensures a superior end product for your homemade strawberry rhubarb jam.
Embrace Maceration: Do not skip the crucial step of letting the fruits macerate with sugar for at least ten minutes. This process is key to drawing out the natural juices from the fruits, which is essential for achieving a thicker consistency and a more developed flavor without relying on commercial pectin. It sets the stage for a perfect jam.
Gentle Heat is Best: Cook your jam mixture over medium heat rather than high heat. This gentle approach prevents the sugar from burning and ensures the fruits break down evenly, resulting in a smooth, consistent texture. Frequent stirring, especially as the sugar concentration increases, is vital to avoid caramelization and achieve that perfect jam finish.
Master the Plate Test: The chilled plate test is your most important tool for checking the jam’s doneness. It provides a realistic indication of the final consistency. If the jam doesn’t hold its shape on the cold plate, continue simmering and testing every few minutes until it thickens to your liking. This step guarantees you won’t end up with runny jam.
Sterilization is Non-Negotiable: Always sterilize your jars and lids thoroughly before filling them with hot jam. Proper sterilization is critical to preventing spoilage and ensuring that your homemade strawberry rhubarb jam remains fresh and safe to eat for an extended period. This step is a cornerstone of successful jam making.
Serving Suggestions for homemade strawberry rhubarb jam
Decoration
Elevate the presentation of your homemade strawberry rhubarb jam by using charming decorations that complement its rustic appeal. Consider tying a simple twine bow around the neck of the jar, perhaps with a small sprig of dried lavender or a delicate dried flower. Alternatively, a personalized label featuring a hand-drawn illustration or a calligraphic font adds a touch of bespoke elegance. A small fabric swatch tied to the lid with ribbon can also introduce a pop of color and texture, making each jar a miniature work of art.
Side Dishes
The versatility of homemade strawberry rhubarb jam extends to a delightful array of side dishes that showcase its vibrant flavor. It is an unparalleled companion to freshly baked scones or warm, flaky biscuits, where its sweet-tart notes cut through the richness. For breakfast enthusiasts, a generous dollop alongside fluffy pancakes or golden waffles transforms a simple meal into a special occasion. It also pairs beautifully with creamy plain yogurt or a rich vanilla ice cream, offering a delightful contrast in texture and taste.
Creative Serving Ideas
Beyond the traditional, think outside the jar for truly creative ways to enjoy your jam. Spread it thinly over slices of a grilled cheese sandwich for an unexpected sweet and savory combination. Use it as a glaze for roasted meats, such as pork tenderloin or chicken breast, allowing the fruity notes to caramelize and enhance the savory flavors. Swirl a spoonful into a simple vinaigrette for a salad dressing with a vibrant fruity twist, or incorporate it into a homemade cocktail for a refreshing, seasonal beverage. It even makes a delightful filling for simple thumbprint cookies, adding a burst of fruitiness to each bite.
Preparation & Storage
Storing Leftovers
Once your homemade strawberry rhubarb jam has been opened, it should be stored in an airtight container in the refrigerator. This keeps it fresh and prevents it from absorbing any unwanted odors from other foods. Properly stored in the fridge, your jam should maintain its delightful flavor and texture for approximately three to four weeks. Always ensure the lid is securely fastened after each use to maximize its shelf life and preserve its quality.
Freezing
For longer-term storage beyond its refrigerated shelf life, freezing is an excellent option for your homemade strawberry rhubarb jam. Transfer the jam into freezer-safe airtight containers, leaving a little headspace at the top to accommodate expansion during the freezing process. Properly sealed and frozen, the jam can retain its delicious flavor for up to a year, allowing you to enjoy the taste of summer long into the colder months. Labeling the containers with the date of freezing is a helpful practice.
Reheating
When you are ready to use your frozen homemade strawberry rhubarb jam, it’s best to thaw it gradually. The most recommended method is to transfer the frozen jam from the freezer to the refrigerator the night before you plan to use it, allowing it to thaw slowly and evenly. Alternatively, for quicker thawing, you can place the sealed container in a bowl of warm (not boiling) water until the jam has softened. After thawing, give the jam a good stir to restore its smooth, consistent texture before serving.
Frequently Asked Questions
- What is the best type of strawberry and rhubarb to use for this jam, and does the color of the rhubarb matter?
For optimal flavor and texture in your homemade strawberry rhubarb jam, fresh, ripe strawberries are highly recommended. If fresh strawberries are unavailable, well-thawed and thoroughly drained frozen strawberries can be used, but ensure they are not watery. For the rhubarb, vibrant red stalks are preferred. While green rhubarb can be used, red stalks contribute more intensely to the jam’s beautiful ruby color and often have a slightly sweeter profile. The color doesn’t significantly impact the setting properties, but the visual appeal is certainly enhanced by red rhubarb. - How can I ensure my jam sets properly if I’m not using commercial pectin, and what are signs it’s ready?
The setting power of this jam relies on the natural pectin present in the fruit and the acidity from the lemon juice, combined with adequate sugar and cooking time. The most reliable way to test if your jam has set is the chilled plate method: place a small amount of hot jam on a pre-chilled plate from the freezer, wait a minute, and then run your finger through it. If the jam wrinkles or holds its shape, it’s ready. If it’s still runny, continue simmering and testing every few minutes. - Can I substitute the granulated sugar with other sweeteners, and how might this affect the jam?
Yes, you can substitute granulated sugar with alternatives like coconut sugar, honey, or maple syrup, but be aware that this can alter the jam’s texture, flavor, and setting properties. Honey and maple syrup are liquids and may require longer cooking times to reach the desired thickness, and they impart their own distinct flavors. Coconut sugar can also affect the color and may result in a slightly less smooth texture. If using liquid sweeteners, reduce the amount of liquid in the recipe slightly to compensate, or expect a potentially softer set.