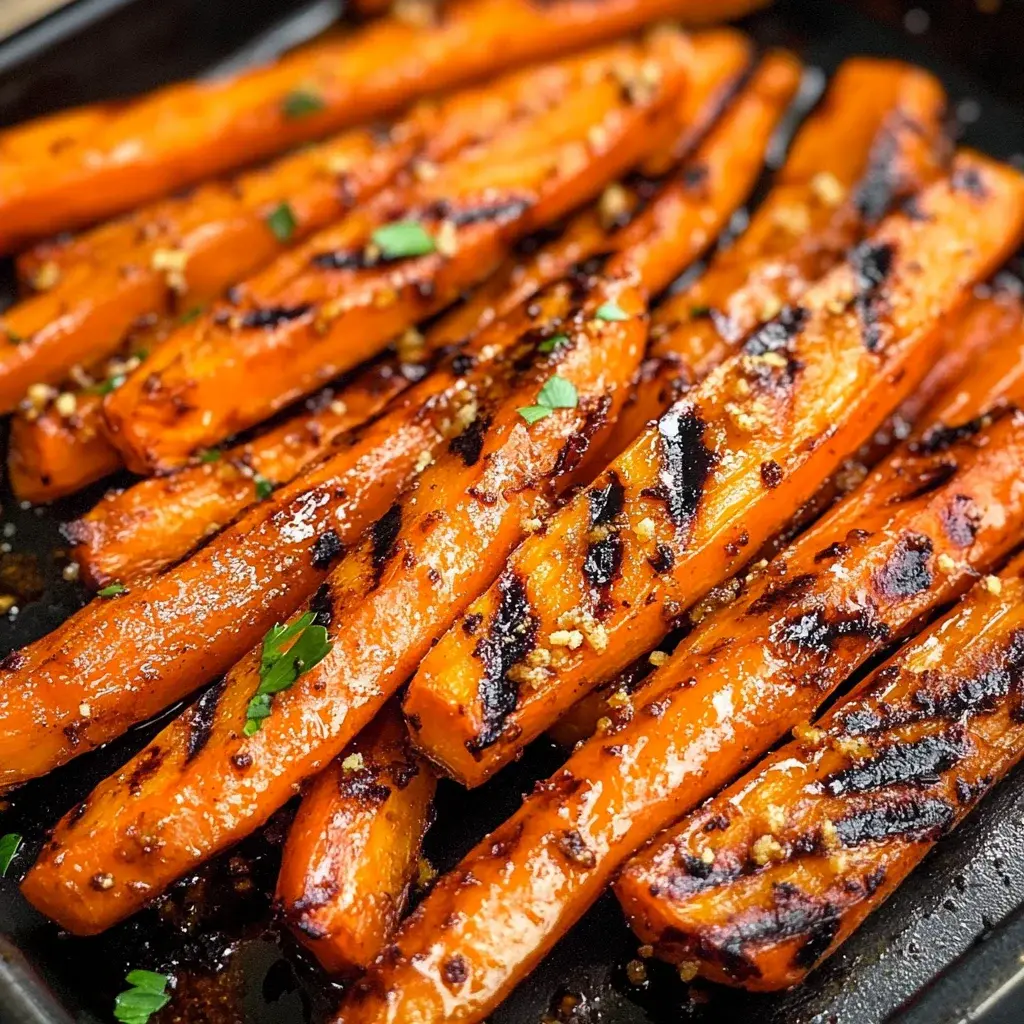
Grilled and Glazed Carrots Recipe
Elevate your everyday meals with a side dish that’s bursting with flavor and incredibly easy to make. Grilled and Glazed Carrots offer a delightful balance of sweetness and savory notes, with a beautiful caramelized finish that will have everyone asking for seconds.
This recipe transforms the humble carrot into a star attraction, perfect for weeknight dinners or special gatherings. Prepare to impress your guests with minimal effort and maximum deliciousness.
Why You Will Love This Recipe
- Exceptional Flavor: The combination of honey, brown sugar, and a hint of char from the grill creates an irresistible sweet and savory profile.
- Quick Preparation: You can have these beautiful glazed carrots ready to serve in under 30 minutes, making it an ideal last-minute addition to any meal.
- Versatile Pairing: These carrots are a fantastic accompaniment to a wide range of main courses, from grilled meats to poultry and even vegetarian dishes.
- Visually Appealing: The glossy glaze and slight char make these carrots a colorful and attractive addition to any plate, enhancing the overall dining experience.
- Simple Ingredients: All the components are readily available in most kitchens, ensuring you can whip up this dish whenever the craving strikes.
Ingredients You Need
The success of any dish hinges on the quality of its ingredients, and for these Grilled and Glazed Carrots, selecting fresh, vibrant carrots is paramount. Using young, tender carrots will yield the sweetest results, while slightly older ones might benefit from a brief pre-blanching for guaranteed tenderness. Ensuring all other components are fresh will amplify the delightful flavors of the final glaze.
Grilled and Glazed Carrots Recipe
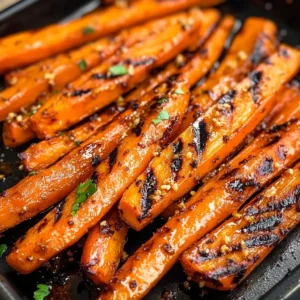
Grilled and Glazed Carrots are a vibrant, flavorful side dish that adds a touch of sweetness and elegance to any meal. Perfect for summer barbecues or cozy family dinners, these carrots are coated in a delightful honey and brown sugar glaze that caramelizes beautifully on the grill. The result is tender, charred carrots that burst with flavor and nutrition. This recipe is not only easy to prepare but also versatile enough to complement a range of main dishes, making it a staple for any occasion.
- 1 pound carrots (sliced lengthwise if thick)
- 1 tablespoon extra virgin olive oil
- 2 tablespoons plant-based margarine or coconut oil
- 1/4 cup brown sugar
- 1/4 cup honey
- 1/8 teaspoon salt (pinch)
- 1 tablespoon orange juice (optional)
- 1/4 teaspoon cinnamon (optional)
- 1Preheat your grill to about 450°F.
- 2Toss the carrots in olive oil to coat evenly.
- 3Place them on the grill over direct heat, rotating every few minutes until they achieve a slight char (12-15 minutes total).
- 4Just before removing from the grill, brush the glaze over the carrots; cook for an additional minute.
- 5Serve immediately after glazing again.
Keywords: carrots, grilled, glazed, side dish, barbecue, vegetarian, sweet, savory, honey, brown sugar
- carrots: approximately 1 pound, prepared as needed for grilling.
- extra virgin olive oil: 1 tablespoon, for coating the carrots before grilling.
- butter: 2 tablespoons, to form the base of the delicious glaze.
- brown sugar: 1/4 cup, providing sweetness and aiding caramelization.
- honey: 1/4 cup, for a rich, syrupy sweetness that complements the brown sugar.
- salt: 1/8 teaspoon, a pinch to enhance all the other flavors.
- orange juice: 1 tablespoon, optional, to add a subtle citrus brightness.
- cinnamon: 1/4 teaspoon, optional, for a warm, aromatic spice note.
Detailed quantities for these ingredients are readily available in the associated recipe card.
Variations
For those seeking a plant-based alternative, transforming these Grilled and Glazed Carrots into a vegan delight is wonderfully straightforward. The key is to substitute the butter with a high-quality plant-based margarine or a rich coconut oil. This swap ensures that the glaze retains its smooth, emulsified texture and delightful richness without compromising on flavor. The sweetness from the brown sugar and honey, along with the char from the grill, remains the star, making it indistinguishable for many.
Adopting a low-carb lifestyle doesn’t mean you have to miss out on these delectable carrots. To adapt them for a low-carb diet, the primary adjustment involves swapping the brown sugar and honey for low-carb sweeteners. A blend of erythritol and stevia, or a liquid monk fruit sweetener, can effectively replicate the sweetness without the sugar content. Ensure the sweetener you choose dissolves well to achieve a smooth glaze consistency. The butter remains a staple for richness.
Another exciting avenue for customization involves infusing the glaze with aromatic herbs or spices. Consider adding finely chopped fresh rosemary or thyme to the butter and sugar mixture before it melts. This addition brings an earthy, herbaceous dimension that beautifully contrasts with the sweet glaze. Alternatively, a pinch of smoked paprika can introduce a subtle smoky depth, further enhancing the grilled character of the carrots.
How to Prepare Grilled and Glazed Carrots Recipe
Step 1: Grill Preparation and Carrot Coating
The initial step in crafting these exquisite Grilled and Glazed Carrots involves meticulously preparing your grill. Aim for a temperature around 450 degrees Fahrenheit, a sweet spot that allows for adequate caramelization without charring too quickly. This temperature range is crucial for achieving that perfect balance of tender interior and beautifully seared exterior.
Simultaneously, you’ll want to prepare your carrots. Ensure they are washed thoroughly and trimmed. For larger, thicker carrots, slicing them lengthwise down the middle is highly recommended. This crucial step ensures that all pieces cook evenly on the grill, preventing some from becoming mushy while others remain undercooked. It also allows for better adhesion of the olive oil coating.
Once prepared, toss the carrots generously with extra virgin olive oil. The olive oil acts as a vital barrier, preventing the carrots from sticking to the grill grates and providing a base for the initial searing. Ensure each carrot piece is lightly but evenly coated. This simple step is fundamental for achieving those desirable grill marks and a pleasant texture.
Step 2: Grilling the Carrots to Perfection
Now, it’s time to introduce the coated carrots to the hot grill. Arrange them directly over the heat source, taking care not to overcrowd the grill. Overcrowding can lead to steaming rather than grilling, diminishing the smoky flavor and char marks you desire. Maintain an eye on the heat, ready to adjust as needed.
As the carrots begin to cook, it’s essential to rotate them frequently. Aim for every few minutes. This consistent rotation is key to achieving an even char on all sides and preventing any single spot from burning. The goal here is to develop a lovely, slightly caramelized exterior while the carrot begins to soften.
The total grilling time will typically range from 12 to 15 minutes, but this can vary based on your grill’s heat and the thickness of your carrots. You are looking for the carrots to be fork-tender. If you notice the carrots charring too rapidly before they become tender, don’t hesitate to move them to a cooler, indirect heat zone on your grill to finish cooking. This maneuver ensures tenderness without sacrificing the desired exterior texture.
Step 3: Crafting and Applying the Luscious Glaze
While the carrots are nearing the end of their grilling time, it’s the perfect moment to prepare the star of the show: the glaze. In a small saucepan, gently melt the butter over medium-low heat. Be patient; you don’t want to scorch the butter, just melt it until it’s smooth and liquid.
Once the butter is melted, stir in the brown sugar and honey. Continue to stir gently over low heat until the brown sugar is completely dissolved and the mixture is smooth and syrupy. If you are using the optional orange juice or cinnamon, whisk them in now. The aroma alone will be incredibly enticing, hinting at the deliciousness to come.
The application of the glaze is a two-stage process designed for maximum flavor infusion and visual appeal. Just before you are about to remove the carrots from the grill, take a basting brush and liberally coat the carrots with the prepared glaze. Allow them to cook for one additional minute on the grill, letting the glaze bubble and caramelize slightly onto the carrot surface. This brief period on the heat is crucial for melding the flavors.
Step 4: The Final Glazing and Immediate Serving
After the initial glazing and brief caramelization on the grill, carefully remove the carrots from the heat. It’s at this precise moment that you will apply a second layer of the luscious glaze. This final brushing ensures every nook and cranny is coated, and it imparts a beautiful, glossy sheen to the finished dish.
The magic of the glaze is most potent when it’s freshly applied and still warm. Therefore, it is highly recommended to serve these Grilled and Glazed Carrots immediately after the final glazing. The contrast between the warm, tender carrots and the sweet, sticky glaze is truly irresistible and at its peak right out of the kitchen.
This immediate serving ensures that the glaze has not had time to solidify or become overly sticky, providing the most delightful eating experience. The slight residual heat will keep them perfectly warm and inviting for your guests.
Step 5: Enhancing the Flavor with Optional Additions
While the basic recipe for Grilled and Glazed Carrots is fantastic on its own, there are wonderful opportunities to enhance the flavor profile further with optional ingredients. These additions can introduce new layers of complexity and cater to different taste preferences, making the dish even more versatile.
Consider incorporating a splash of fresh orange juice into your glaze mixture. The natural acidity and bright citrus notes of orange juice can cut through the sweetness of the honey and brown sugar, adding a refreshing counterpoint. This subtle lift can make the overall flavor profile feel more balanced and sophisticated, preventing the sweetness from becoming overwhelming.
Another excellent optional addition is a touch of cinnamon. A mere quarter teaspoon can impart a warm, comforting aroma and a subtle spicy undertone that beautifully complements the inherent sweetness of the carrots. This is particularly effective if you are serving the carrots as part of a holiday meal, as cinnamon is often associated with festive flavors. It adds a cozy depth without being overtly spicy.
Step 6: Ensuring Even Cooking and Texture
Throughout the grilling process, vigilance regarding the carrots’ texture is paramount. The aim is for them to be perfectly tender, easily pierced with a fork, but still possessing a slight firmness—a delightful al dente quality. Overcooked carrots can quickly turn mushy, losing their appealing texture and becoming less enjoyable.
To guard against this, actively monitor the carrots as they grill. The 12-15 minute timeframe is a guideline; actual cooking time can fluctuate based on the heat of your grill and the initial thickness of the carrots. Periodically testing a carrot with a fork is the most reliable method to gauge doneness. If a carrot yields easily but still has a subtle bite, it’s ready.
If you find your carrots are browning too quickly on the outside but are still too firm on the inside, the solution is to strategically relocate them on your grill. Move them to an area of indirect heat, away from the direct flame. This allows them to continue cooking through gently without further charring the exterior. This technique is a lifesaver for ensuring consistent results, especially when dealing with varying carrot sizes.
Pro Tips for Grilled and Glazed Carrots Recipe
Select the Right Carrots: For the most naturally sweet and tender results, opt for fresh, firm carrots. Look for vibrant color and smooth skin, indicating peak freshness. Avoid carrots that are limp or have soft spots, as these may not yield the best texture or flavor.
Even Cutting is Key: Consistency in size is vital for uniform cooking. If you’re using thicker carrots, slicing them in half lengthwise before grilling ensures they cook through at the same rate as thinner ones, preventing a mix of overcooked and undercooked pieces.
Master the Grill Heat: Start with a hot grill to achieve those appealing char marks, but be prepared to adjust the heat. If the carrots begin to char too quickly before becoming tender, move them to a cooler zone of the grill to finish cooking gently. This prevents burning while ensuring a tender interior.
Glaze at the Crucial Moment: Apply the glaze in the final minutes of grilling. This allows the sugars to caramelize beautifully without burning. A second, light glazing right after removing them from the grill adds a final glossy finish and boosts flavor.
Don’t Fear Flavor Boosts: Feel free to experiment with spices beyond cinnamon, such as a pinch of nutmeg or even a tiny amount of chili powder for a hint of heat. Fresh herbs like thyme or rosemary can also be finely chopped and added to the glaze for an aromatic twist.
Serving Suggestions for Grilled and Glazed Carrots Recipe
Decoration
To make these already delightful carrots even more visually stunning, consider a few simple garnishes. A sprinkle of finely chopped fresh parsley or chives adds a vibrant pop of green and a fresh, herbaceous note. For a slightly more sophisticated look, toasted slivered almonds or chopped pecans can provide a delightful crunch and a nutty contrast to the sweetness of the carrots.
Side Dishes
Grilled and Glazed Carrots serve as an exceptional accompaniment to a wide array of main courses. They pair wonderfully with succulent grilled chicken breasts or thighs, their sweetness complementing the savory char of the poultry. For a heartier meal, consider serving them alongside roasted pork loin or a perfectly cooked steak. They also make a fantastic partner for baked fish dishes, adding a touch of color and sweetness to lighter proteins.
For a complete vegetarian or vegan meal, these glazed carrots can be served alongside dishes like lentil shepherd’s pie or hearty mushroom burgers. They also offer a delightful contrast to creamy polenta or a flavorful grain pilaf. The versatility means they can seamlessly integrate into many different culinary themes and dietary preferences, acting as a bridge between different components of a meal.
The sweetness of the glaze also makes them a fantastic counterpoint to slightly more bitter or savory side dishes. Imagine them alongside a crisp, lightly dressed salad or a side of sautéed kale. This interplay of flavors and textures elevates the entire dining experience, ensuring a well-rounded and satisfying plate for everyone.
Creative Serving Ideas
Think beyond the traditional side dish placement and get creative! These glazed carrots can be artfully arranged on a platter alongside other grilled vegetables like zucchini, bell peppers, and asparagus for a colorful and healthy summer medley. They can even be incorporated into a beautiful charcuterie board, offering a sweet and slightly savory element among cheeses and cured meats.
Another idea is to serve them as a vibrant topping for grain bowls or salads. Their sweet, sticky glaze adds an exciting dimension to a simple quinoa or farro base, especially when paired with other roasted vegetables and a zesty dressing. They also add a wonderful burst of flavor and color when mixed into a pasta salad or used as a component in a more complex layered dish.
For a touch of elegance at brunch or a special breakfast, consider serving them alongside a frittata or a savory pancake. The unexpected sweetness can be a delightful surprise and a beautiful contrast to more savory breakfast items. Their adaptability makes them a culinary chameleon, ready to shine in various culinary contexts.
Preparation & Storage
Storing Leftovers
Should you find yourself with any leftover Grilled and Glazed Carrots, proper storage is key to maintaining their quality. Allow the carrots to cool completely to room temperature before attempting to store them. Transfer the cooled carrots into an airtight container. This prevents them from drying out and absorbs any lingering moisture, which could promote spoilage. Properly stored, they can retain their delicious flavor and texture for up to 3 to 5 days in the refrigerator.
Freezing
While fresh is always best, these glazed carrots can be frozen for longer-term storage if necessary. Ensure the carrots are thoroughly cooled before proceeding with the freezing process. Place the cooled grilled carrots into a freezer-safe bag or an airtight freezer container. Expelling as much air as possible from the bag before sealing will help prevent freezer burn. Properly frozen, they can maintain good quality for up to 3 months.
Reheating
When you’re ready to enjoy your frozen or refrigerated leftovers, reheating them is a straightforward process. For oven reheating, preheat your oven to 350°F (175°C). Spread the carrots evenly on a baking sheet and heat them for approximately 10 to 15 minutes, or until they are warmed through. This method often helps to revive some of the original texture and warmth.
Microwave reheating offers a quicker alternative. Place the carrots in a microwave-safe dish. Heat on medium power for 1 to 2 minutes, stirring them halfway through the heating time to ensure even warming. Be cautious not to overheat, as this can lead to a softer texture than desired.
A stovetop method is also effective. In a skillet over medium heat, add a small amount of olive oil or butter. Add the carrots and stir occasionally until they are heated through, which should take about 5 minutes. This method can help to bring back a slight crispness to the exterior, mimicking the original grilled texture more closely.
Frequently Asked Questions
-
How do I achieve perfect grill marks on my Grilled and Glazed Carrots Recipe?
To achieve those coveted, attractive grill marks, ensure your grill grates are clean and well-oiled before placing the carrots down. Crucially, you must resist the urge to move or rotate the carrots too frequently in the initial stages of grilling. Allow them sufficient time to sear against the hot grates; this is what creates the defined lines. Once you see the marks developing, then proceed with turning them to achieve marks on all sides, but let each side sit for a minute or two undisturbed to imprint properly. A sufficiently hot grill is paramount for this effect. -
Can I use different vegetables with this Grilled and Glazed Carrots Recipe?
Absolutely! The beauty of this honey-brown sugar glaze is its versatility. It complements a wide range of vegetables beautifully. Consider trying it with asparagus spears, thick slices of zucchini or yellow squash, bell pepper chunks, or even Brussels sprouts halved lengthwise. For root vegetables that require a longer cooking time, such as parsnips or sweet potatoes, it’s advisable to pre-blanch them slightly before grilling to ensure they cook through evenly with the glaze. The caramelization principle applies wonderfully across many produce items. -
What should I serve with my Grilled and Glazed Carrots Recipe?
These glazed carrots are incredibly adaptable and make a delightful accompaniment to a vast array of main courses. They pair exceptionally well with grilled meats like chicken, pork chops, or steaks, where their sweetness offers a pleasant contrast to savory flavors. For a more elegant meal, they are a superb addition to roasted turkey or ham, especially during holiday seasons. They also complement vegetarian and vegan mains, such as lentil loaf, stuffed bell peppers, or tofu steaks, adding a touch of sweetness and vibrant color. Consider serving them alongside other fresh or roasted vegetables for a complete and balanced meal.