Crispy Chicken Cheese Balls: 7 Irresistible Flavor Bombs
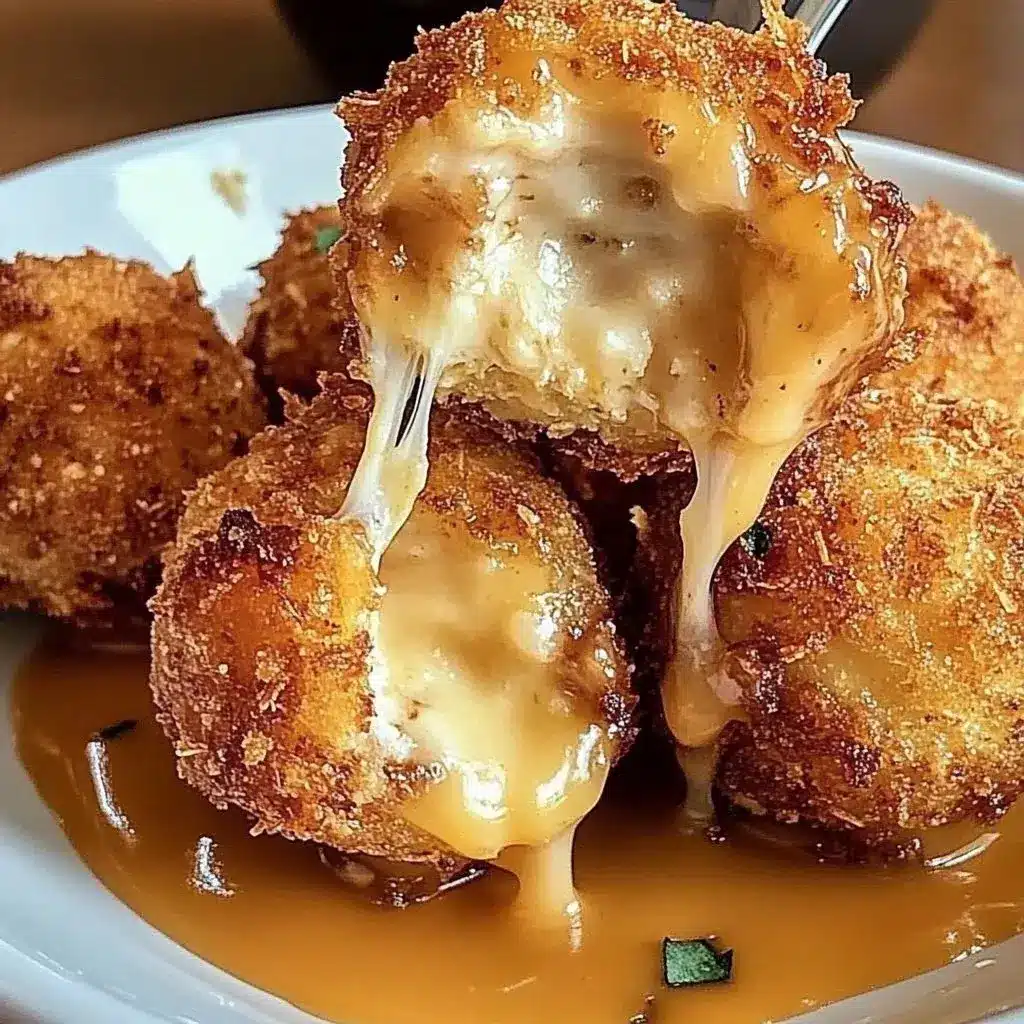
Crispy Chicken Cheese Balls are a delightful treat that combines the satisfying crunch of a perfectly fried exterior with the gooey, savory richness of a chicken and cheese filling. They represent the ultimate bite-sized appetizer, promising an explosion of flavor that will leave your guests begging for more. Imagine the aroma filling your kitchen as these golden orbs cook to perfection, their irresistible scent a prelude to the culinary joy they offer.
What truly sets these cheese balls apart is their remarkable simplicity coupled with their profound deliciousness. The preparation process is straightforward, making them an accessible recipe for cooks of all skill levels, from beginners to seasoned gourmands. They embody the perfect fusion of textures and tastes, offering a delightful contrast that appeals to almost everyone. These are more than just snacks; they are little flavor bombs designed to create moments of shared culinary pleasure.
Why You Will Love This Recipe
- Irresistible Texture: Experience the ultimate contrast between a super crispy, golden-brown exterior and a tender, cheesy chicken interior in every single bite.
- Quick and Easy Preparation: Despite their gourmet appeal, these cheese balls come together surprisingly fast, making them perfect for last-minute entertaining or weeknight cravings.
- Crowd-Pleasing Appeal: Universally loved by both adults and children, these are guaranteed to be a hit at parties, family gatherings, game nights, or any occasion calling for a delicious snack.
- Versatile Serving Options: Serve them as a standalone appetizer, a side dish, or even a fun addition to a casual lunch, making them incredibly adaptable to your culinary needs.
- Flavor Customization: Easily tweak the ingredients to suit your taste preferences, from the type of cheese to the added spices, ensuring a unique flavor profile every time you make them.
Ingredients You Need
The success of these Crispy Chicken Cheese Balls hinges on using fresh, high-quality ingredients. Opting for good quality ground chicken ensures a tender and flavorful base, while a blend of cheeses offers that irresistible melt and creamy texture. Freshly minced garlic and finely chopped onion provide aromatic depth that complements the savory chicken beautifully. The breadcrumbs are crucial for achieving that signature crispiness, so choose a good variety that toasts well.
Crispy Chicken Cheese Balls: 7 Irresistible Flavor Bombs

Delightful bite-sized appetizers made from ground chicken and gooey cheese, perfect for any occasion. These balls feature a crispy exterior and a savory, cheesy interior, making them a crowd-pleasing snack or appetizer.
- 500g ground chicken
- 100g shredded cheese (e.g., cheddar, mozzarella)
- 1 cup breadcrumbs (gluten-free breadcrumbs can be used as a substitute)
- 1 egg
- 1 onion, finely chopped
- 2 cloves garlic, minced
- Salt to taste
- Pepper to taste
- Oil for frying
- 1Gather all ingredients. Chop the onion and mince the garlic.
- 2In a large mixing bowl, combine ground chicken, chopped onion, minced garlic, shredded cheese, salt, and pepper. Mix thoroughly with hands for even flavor distribution.
- 3Shape small portions of the mixture into golf ball-sized balls.
- 4Beat the egg in a separate bowl to create an egg wash.
- 5Dip each chicken ball into the egg wash, then roll in breadcrumbs until fully coated.
- 6Heat oil in a deep pan over medium heat. Test oil temperature by dropping a small piece of the mixture; it should sizzle.
- 7Carefully place chicken balls into the hot oil, frying in batches for about 4-5 minutes until golden brown. Do not overcrowd the pan.
- 8Remove fried balls and place on a paper towel-lined plate to drain excess oil.
- 9Allow the cheese balls to cool slightly before serving.
- 10Serve hot with your favorite dipping sauces.
Keywords: Appetizers, Cheese Balls, Crispy Chicken Cheese Balls, Finger Food, Party Snacks, Chicken Recipes, Easy Appetizers
- ground chicken: 500 grams of lean ground chicken forms the savory foundation of these delightful balls.
- shredded cheese: 100 grams of your favorite melting cheese, such as cheddar, mozzarella, or a blend, provides that essential gooeyness.
- breadcrumbs: 1 cup of breadcrumbs, plain or seasoned, is key to achieving a perfectly crispy coating.
- egg: 1 large egg acts as a binder, helping the breadcrumbs adhere beautifully to the chicken mixture.
- onion: 1 small onion, finely chopped, adds a subtle sweetness and aromatic complexity.
- garlic: 2 cloves of garlic, minced, offer a punchy, savory flavor that enhances the overall taste profile.
- salt: To taste, to enhance all the delicious flavors within the mixture.
- pepper: Freshly ground black pepper, to taste, adds a gentle warmth and spice.
- oil for frying: A generous amount of neutral oil, like vegetable or canola, for achieving that perfect golden crisp.
The precise quantities for each ingredient, along with specific instructions for preparation, are detailed within the recipe card above. This ensures you have all the exact measurements needed for consistent, delicious results every time.
Variations
For those seeking a plant-based alternative, the Crispy Chicken Cheese Balls can be beautifully adapted. Substitute the ground chicken with a high-quality plant-based ground ‘chicken’ product that holds its shape well when cooked. Opt for a dairy-free shredded cheese that melts effectively, such as a cashew or almond-based variety. The breadcrumbs can remain the same if they are vegan, or you can use gluten-free breadcrumbs as a binder, ensuring your vegan cheese balls are just as satisfyingly crisp and flavorful as the original.
A low-carb version of these delightful cheese balls can be achieved by making a few key substitutions. Instead of traditional breadcrumbs, consider using finely crushed pork rinds or a blend of almond flour and coconut flour for the coating. This creates a wonderfully crunchy exterior without the carbohydrate load. You can also amplify the cheesy factor by incorporating a variety of low-carb cheeses like sharp cheddar, Gruyère, or even a touch of Parmesan for an extra savory kick. This variation maintains the irresistible texture and cheesy goodness.
To introduce a delightful spicy kick, consider the “Buffalo Chicken Cheese Balls” variation. Simply mix a couple of tablespoons of your favorite buffalo wing sauce directly into the ground chicken mixture along with the other ingredients. You can also add a pinch of cayenne pepper or red pepper flakes for extra heat. For an even more intense flavor profile, use a spicy cheese like pepper jack. This variation transforms the classic into a fiery delight, perfect for those who enjoy a little heat.
How to Prepare Crispy Chicken Cheese Balls
Step 1: Preparing the Foundation of Flavor
Begin by meticulously gathering all the necessary ingredients. This initial step is crucial for an organized and efficient cooking process, allowing you to move seamlessly through the subsequent stages without interruption. Finely chop the onion to ensure it integrates evenly into the chicken mixture, and mince the garlic cloves to release their potent aroma and flavor. The goal here is to have all your flavor components prepped and ready for combination.
Ensure your ground chicken is at room temperature before proceeding, which aids in better mixing and uniform texture. Having all your spices measured out also contributes to a smoother workflow. A well-prepared mise en place not only streamlines the cooking but also significantly reduces the likelihood of errors, ensuring a more enjoyable experience in the kitchen and a better final product.
Step 2: Crafting the Savory Core
In a spacious mixing bowl, combine the ground chicken, the finely chopped onion, and the minced garlic. Add the shredded cheese, salt, and freshly ground black pepper to this base. It is absolutely essential to use your hands for this mixing process; this allows you to ensure that every component is thoroughly integrated, creating a cohesive and uniformly flavored mixture. This tactile approach guarantees that the cheese and seasonings are distributed evenly throughout the chicken.
Mix gently but thoroughly until all ingredients are just combined. Overmixing can lead to tough chicken, so aim for a mixture that holds together without being overworked. The aim is to create a blend where the chicken, aromatics, and cheese are harmoniously united, forming the perfect base for your cheese balls. This step is where the core flavor of your appetizer is truly established.
Step 3: Shaping the Irresistible Bites
Once the mixture is well combined, it’s time to shape the individual cheese balls. Take small portions of the chicken mixture, about the size of a walnut or a small golf ball, depending on your preference for appetizer size. Roll each portion gently between your palms until you achieve a relatively smooth, spherical shape. Consistency in size is key to ensuring that all the cheese balls cook evenly.
Don’t worry if the balls aren’t perfectly uniform; a slightly rustic look can be charming. The goal is to create compact spheres that will hold their form during the frying process. Place the shaped balls onto a plate or baking sheet lined with parchment paper to prevent any sticking. Ensure they have a little space between them to avoid them fusing together before they are cooked.
Step 4: Preparing the Golden Crust’s Foundation
In a separate, shallow bowl, crack the egg and beat it lightly with a fork until the yolk and white are just combined. This egg wash serves a vital purpose: it acts as the adhesive that will help the breadcrumbs cling to the chicken balls, creating that essential crispy exterior. A well-prepared egg wash ensures a more even and robust coating of breadcrumbs.
Ensure the egg is lightly beaten, not vigorously whisked into a froth. The goal is a smooth, liquid coating that will evenly coat the surface of each chicken ball. This simple step is a critical contributor to the overall texture and visual appeal of your finished Crispy Chicken Cheese Balls. It primes the surface for the crunchy breadcrumb layer.
Step 5: Coating for Maximum Crispiness
Now, it’s time to coat the shaped chicken balls with breadcrumbs. Take each chicken ball and carefully dip it into the beaten egg wash, ensuring it is fully submerged and coated. Allow any excess egg to drip off for a moment before transferring it to the bowl of breadcrumbs. Roll the egg-coated ball in the breadcrumbs, pressing gently to ensure a thick, even layer adheres all around. You want every surface to be covered for that satisfying crunch.
For an extra-crispy coating, you can double-dip the balls: after the first breadcrumb coating, dip them back into the egg wash and then into the breadcrumbs again. This creates a thicker crust that becomes exceptionally crunchy when fried. Place the fully breadcrumb-coated balls back onto your parchment-lined plate or baking sheet, ensuring they don’t touch each other.
Step 6: Heating the Frying Oil to Perfection
Pour a generous amount of neutral oil into a deep, heavy-bottomed pot or a deep fryer. The oil should be deep enough to submerge the chicken balls for even cooking. Heat the oil over medium heat. It’s crucial to achieve the correct oil temperature; too cool and the balls will absorb excess grease, becoming soggy, while too hot and they will burn on the outside before cooking through.
To test if the oil is ready, carefully drop a tiny piece of the chicken mixture into the pot. If it sizzles immediately and floats to the surface, the oil is at the optimal temperature, typically around 350°F (175°C). If it doesn’t sizzle, allow the oil to heat up a bit longer. Maintaining this temperature throughout the frying process is key to achieving perfectly cooked, golden-brown cheese balls.
Step 7: Frying to Golden Perfection
Carefully place the breadcrumb-coated chicken balls into the hot oil, working in batches to avoid overcrowding the pot. Overcrowding will lower the oil temperature significantly, resulting in greasy, unevenly cooked cheese balls. Fry each batch for approximately 4-5 minutes, turning them occasionally with a slotted spoon or spider strainer to ensure they brown evenly on all sides. You are looking for a deep golden-brown color and a wonderfully crisp texture.
The internal temperature of the chicken should reach 165°F (74°C). Keep a close eye on them to prevent burning. As each batch is perfectly cooked and golden, use your slotted spoon to remove them from the hot oil. The aroma at this stage is truly intoxicating, signaling that these delicious bites are nearing completion.
Step 8: Draining for Optimal Crispiness
Once the chicken cheese balls have achieved their beautiful golden-brown color and are cooked through, remove them from the hot oil. Place them immediately onto a plate lined with paper towels or a wire rack set over a baking sheet. This step is critical for absorbing any excess oil, which ensures that the cheese balls remain delightfully crispy rather than becoming greasy. Proper draining prevents the bottom from becoming soggy.
Allowing them to drain for a few minutes is essential. This not only removes excess oil but also helps to set the exterior crust slightly, maintaining its crunch. This simple yet important step contributes significantly to the overall superior texture of these homemade treats. It ensures every bite delivers that satisfying crunch you’re aiming for.
Step 9: The Moment of Patience
Resist the urge to dive in immediately! While they smell and look incredibly tempting, it’s important to let the Crispy Chicken Cheese Balls cool for just a few minutes before serving. This brief cooling period allows the molten cheese inside to settle slightly and prevents anyone from burning their mouths on the hot, gooey center. It also helps the exterior texture to fully crisp up.
This small window of patience ensures that the cheese is perfectly gooey and warm, not scalding hot. It’s a brief pause that significantly enhances the eating experience, allowing the flavors and textures to be fully appreciated. The slightly cooled exterior makes them easier to handle and enjoy.
Step 10: Serving and Savouring
Serve your Crispy Chicken Cheese Balls hot and fresh, and prepare for them to disappear remarkably quickly. They are delightful served on their own, allowing the pure flavor of the chicken and cheese to shine. However, they also pair exceptionally well with a variety of dipping sauces that can elevate the experience even further. Consider classic choices like creamy ranch dressing, zesty marinara sauce, or a tangy honey mustard.
These delightful bites are perfect for any gathering, acting as a fantastic appetizer or a fun snack. Their bite-sized nature makes them easy to share and enjoy, fostering a convivial atmosphere. Whether presented as part of a larger spread or as the star of the show, they are guaranteed to be a memorable and delicious addition to your culinary repertoire.
Pro Tips for Crispy Chicken Cheese Balls
Don’t Overmix the Chicken: Gently combine the ingredients for the chicken ball mixture. Overworking the chicken can result in a dense and tough texture, diminishing the delightful tenderness you’re aiming for. Mix just until everything is incorporated and the mixture holds together. The goal is a tender interior, not a firm, dense one.
Ensure Proper Oil Temperature: Using a kitchen thermometer to monitor your oil’s temperature is highly recommended. Frying at around 350°F (175°C) is ideal. If the oil is too cool, the balls will absorb too much grease, becoming soggy. If it’s too hot, they’ll burn before the inside is cooked through, leaving them underdone and disappointing.
Fry in Small Batches: This is a cardinal rule for achieving crispiness. Overcrowding the fryer will drastically lower the oil temperature, leading to greasy results. Fry only a few cheese balls at a time, allowing the oil to maintain its optimal temperature for even cooking and a superior crisp. This ensures each ball gets perfectly golden and cooked through.
Double-Dip for Extra Crunch: For an exceptionally crispy coating that holds up even longer, consider a double breading. After the initial dip in egg and breadcrumbs, repeat the process: dip again in egg, then coat thoroughly in breadcrumbs for a second time. This creates a thicker, more robust crust that truly shines when fried.
Consider the Cheese Blend: While cheddar or mozzarella are excellent choices, don’t be afraid to experiment with different cheeses. A mix of sharp cheddar for flavor and mozzarella for meltiness, or even a bit of Monterey Jack or Gruyère, can add delightful complexity and a richer flavor profile to your cheese balls. The choice of cheese greatly impacts the final taste and texture.
Serving Suggestions for Crispy Chicken Cheese Balls
Decoration
Elevate the visual appeal of your Crispy Chicken Cheese Balls with thoughtful decoration. Arrange them artfully on a platter, perhaps interspersed with fresh parsley sprigs or chives for a touch of green. A dusting of smoked paprika or a sprinkle of finely chopped chives over the top before serving can add an extra layer of visual interest and a hint of added flavor. Consider serving them in mini muffin liners for a more refined presentation.
Side Dishes
These delightful cheese balls are incredibly versatile and pair well with a range of side dishes. A crisp, fresh garden salad with a light vinaigrette provides a refreshing contrast to the richness of the cheese balls. Roasted vegetables, such as broccoli florets or asparagus spears, offer a healthy and complementary addition. For a heartier meal, consider serving them alongside a creamy potato salad or a comforting bowl of soup, like a classic lobster bisque.
Creative Serving Ideas
Beyond the traditional platter, think outside the box for serving. Create mini “skewers” by threading a cheese ball onto a toothpick and adding a cherry tomato or a cube of bell pepper. For a fun game-day presentation, arrange them around a bowl of dipping sauce to resemble a football or a star. You could even serve them as a fun appetizer before a main course like baked lemon chicken. Their adaptability makes them a go-to for any occasion.
Preparation & Storage
Storing Leftovers
To store any leftover Crispy Chicken Cheese Balls, allow them to cool completely to room temperature. Once cooled, place them in an airtight container. It’s best to layer them with parchment paper or wax paper between each layer to prevent them from sticking together. Properly stored in the refrigerator, they can maintain their quality for up to 3 days.
Freezing
For longer storage, these cheese balls freeze exceptionally well. It is recommended to freeze them before frying. Arrange the shaped, uncooked balls in a single layer on a baking sheet lined with parchment paper and freeze until solid. Once frozen, transfer them to a freezer-safe bag or airtight container, separating layers with parchment paper. They can be stored in the freezer for up to 2 months.
Reheating
The best method for reheating is in the oven to restore their crispiness. Preheat your oven to 350°F (175°C). Place the refrigerated or thawed cheese balls on a baking sheet and heat for about 10-15 minutes, or until warmed through and crispy. If reheating from frozen, you may need to add a few extra minutes to the baking time and ensure they are heated through completely. Avoid reheating in the microwave, as this tends to make them soggy.
Frequently Asked Questions
-
Can I prepare the chicken mixture for the cheese balls ahead of time, and if so, how should it be stored?
Absolutely, preparing the chicken mixture in advance is a great time-saving strategy. You can mix all the ingredients together, including shaping the balls, and then store them in the refrigerator. Place the shaped balls in a single layer on a parchment-lined baking sheet and cover them tightly with plastic wrap. They can be kept refrigerated for up to 24 hours before you are ready to coat and fry them. Ensure they are well-covered to prevent them from drying out.
-
What are the best methods for ensuring the cheese balls are perfectly crispy and not soggy, especially when frying or reheating?
Achieving perfect crispiness involves several key steps. Firstly, ensure your oil is at the correct temperature (around 350°F/175°C) before frying and maintain it throughout the process; frying in small batches prevents the oil temperature from dropping too much. Secondly, drain them thoroughly on paper towels immediately after frying to absorb excess oil. For reheating, using an oven or an air fryer at a moderate temperature (around 350°F/175°C) is far superior to a microwave, which tends to steam food and make it soggy. Reheating for 10-15 minutes should restore that desirable crunch.
-
Are there specific types of cheese that work best for the melted interior, and can I incorporate different flavors or spices into the chicken mixture for added complexity?
For the best melted interior, cheeses that melt smoothly and have a good flavor profile are ideal. A blend of sharp cheddar for robust flavor and mozzarella for its excellent stretch and meltiness is a fantastic combination. Monterey Jack, Gruyère, or even a touch of smoked Gouda can add wonderful depth. Yes, you can absolutely incorporate different flavors and spices into the chicken mixture to enhance complexity. Consider adding a teaspoon of paprika, a pinch of garlic powder, onion powder, or Italian seasoning. For a spicy kick, diced jalapeños or a dash of cayenne pepper can be incorporated. Experimenting with herbs like finely chopped chives or parsley can also add a fresh dimension to the savory filling.