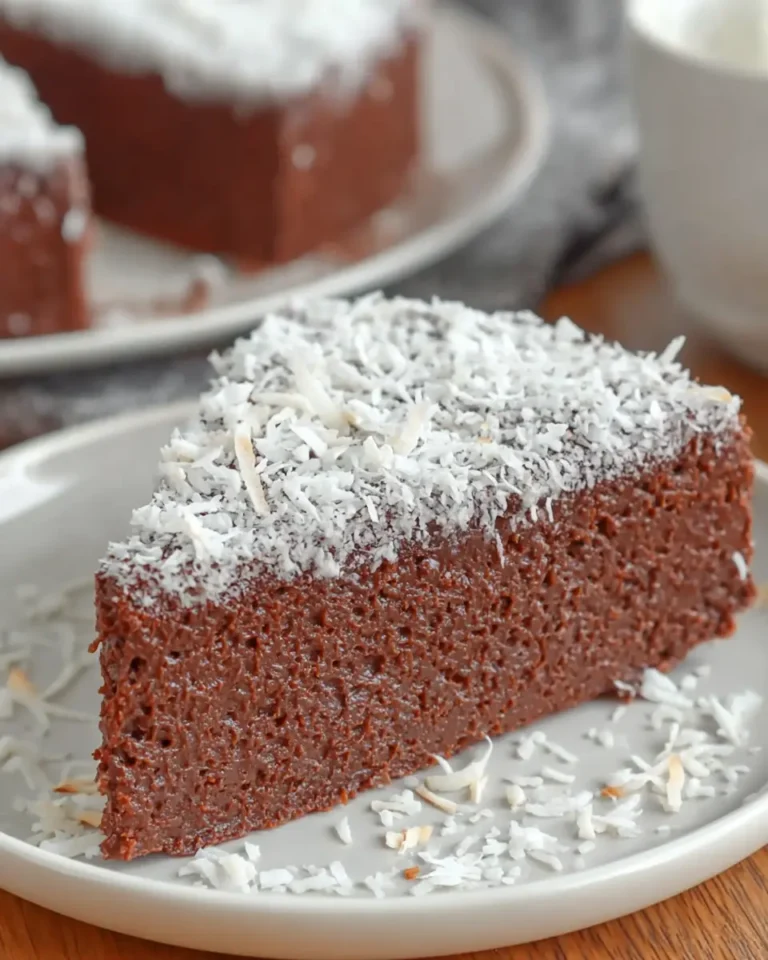
Creamy Chilled Coconut Cake
Coconut cake is a creamy, make-ahead dessert that boasts a soft, moist crumb, a rich coconut flavor, and a cool, whipped finish. It’s wonderfully simple to assemble, making it an ideal choice for gatherings, and it’s even more delightful after a long, chilled rest in the refrigerator.
This is precisely the kind of cake that shines when you desire something that is both low-stress to prepare and visually impressive on any dessert table. The clever use of a standard cake mix provides a straightforward base, while the incorporation of coconut milk and cream of coconut significantly deepens its inherent tropical flavor profile.
Why You Will Love This Recipe
- Effortless Preparation: With a few key ingredients and simple steps, you can create a stunning dessert without spending hours in the kitchen.
- Irresistible Texture: The unique soaking method ensures a supremely moist and tender crumb that practically melts in your mouth, especially after chilling.
- Make-Ahead Convenience: This cake is designed to be prepared in advance, freeing you up on the day of your event and allowing flavors to meld beautifully.
- Crowd-Pleasing Flavor: The harmonious blend of coconut milk, cream of coconut, and sweet shredded coconut creates a universally loved flavor profile that appeals to a wide range of palates.
- Customizable Topping: While a classic whipped topping and shredded coconut combination is divine, this cake also serves as a fantastic canvas for your own creative finishing touches.
Ingredients You Need
The success of this delightful coconut cake hinges on selecting quality ingredients that contribute to its signature moistness and rich flavor. Using premium coconut milk and a good brand of cream of coconut will elevate the overall taste experience significantly. Ensuring your whipped topping is fresh and your shredded coconut is the sweetened variety will also contribute to the perfect textural and flavor balance.
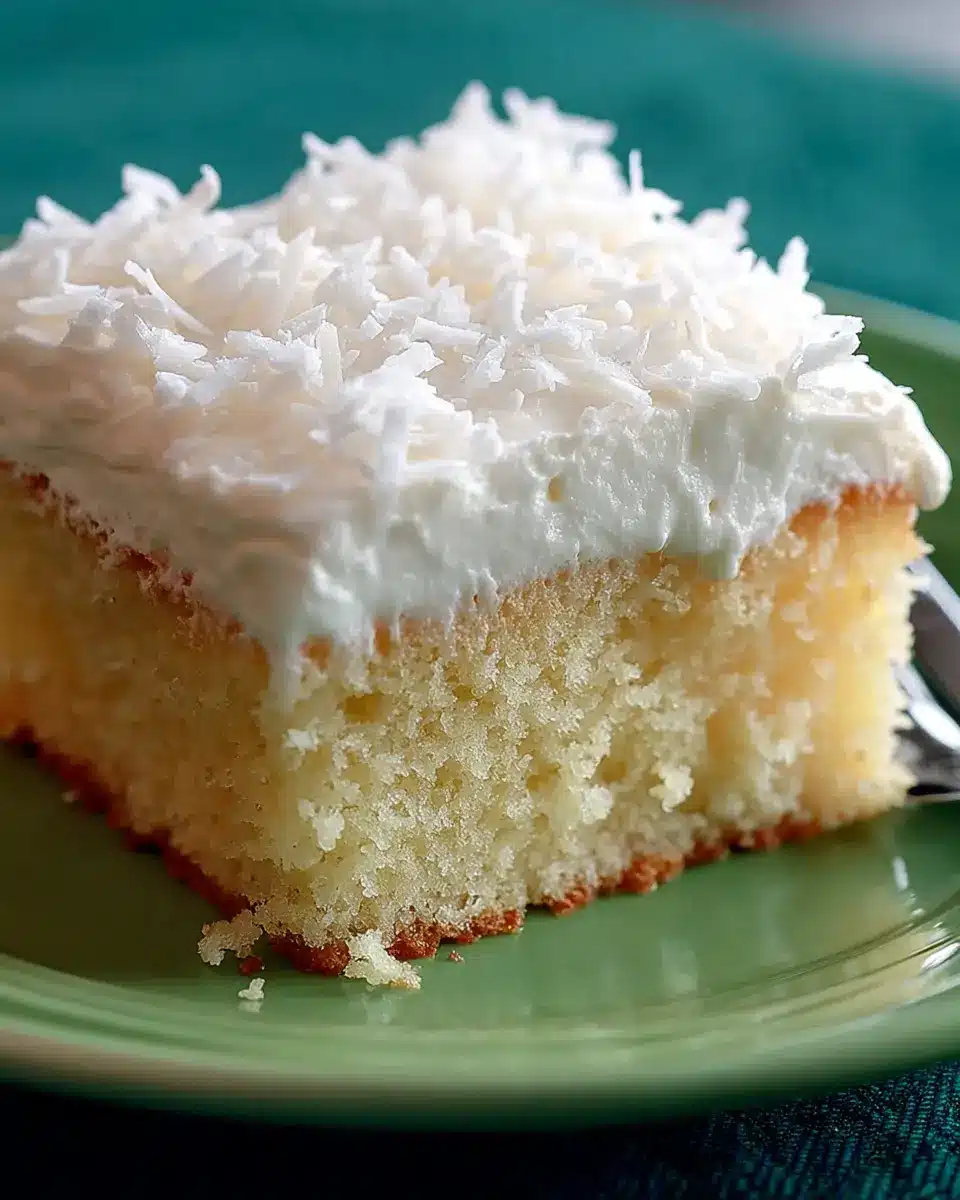
Creamy Coconut Cake

This coconut cake is prepared with a white cake mix enriched with coconut milk, then saturated with warm cream of coconut for a tender, moist crumb. It is finished with a smooth layer of whipped topping and a generous scattering of sweetened shredded coconut. It's a creamy, make-ahead dessert with a soft moist crumb, rich coconut flavor, and a cool whipped finish. It is simple to assemble, great for gatherings, and even better after a long chill in the fridge.
- 1 cup sweetened shredded coconut (for the finishing layer)
- 1 box white cake mix
- 8 ounces whipped topping
- 1 1/4 cups coconut milk (to replace the water listed on the cake mix package)
- 1 15-ounce can cream of coconut, for soaking
- 1Prepare the white cake mix according to the package instructions, using 1 1/4 cups of coconut milk in place of the water specified. Mix thoroughly, preferably with a stand mixer, until the batter is smooth and well aerated.
- 2Transfer the batter to a 9 x 13-inch baking dish and bake as directed on the package. Begin checking for doneness about 5 minutes before the suggested baking time, as a slightly less baked surface will better absorb the soaking liquid without becoming dry.
- 3Remove the cake from the oven and, while it is still warm, pierce the top all over with a skewer, toothpick, chopstick, or fork.
- 4Place the cream of coconut in the microwave and heat on HIGH for 1 1/2 minutes. Pour the warmed cream of coconut evenly over the cake, allowing it to flow into the holes and soak into the crumb.
- 5Refrigerate the cake for several hours, or ideally overnight, so the coconut flavor can fully develop and the cake can set properly.
- 6Once chilled, spread the whipped topping evenly across the surface of the cake.
- 7Scatter the shredded coconut evenly over the whipped topping. Keep the cake refrigerated until serving.
Keywords: Coconut Cake, Dessert, Make-ahead, Creamy, Moist, Easy
- white cake mix: a dependable and light foundation for the cake’s texture.
- coconut milk: adds a deeper coconut essence and promotes a softer crumb than water.
- cream of coconut: the essential component for creating the signature moist, tender, and rich soaked crumb.
- whipped topping: provides a light, cool contrast to the sweet, moist cake beneath.
- sweetened shredded coconut: offers a delightful texture and a final burst of classic coconut flavor on top.
Detailed quantities for each ingredient are readily available within the provided recipe card for your convenience.
Variations
While this recipe is a triumph as is, its versatile nature allows for wonderful culinary explorations. Consider a vibrant tropical twist by incorporating finely diced pineapple into the cake batter before baking. This addition will introduce little pockets of juicy sweetness that complement the coconut beautifully, offering a delightful textural surprise in every bite and enhancing the overall island vibe of the dessert. Remember to drain the pineapple very well to avoid adding too much excess moisture to the batter.
For those seeking a more decadent experience, a drizzle of luscious caramel sauce over the whipped topping before adding the shredded coconut can create an indulgent flavor combination. The rich, buttery notes of caramel pair exceptionally well with the creamy coconut, transforming this already beloved cake into something truly spectacular. A sprinkle of toasted coconut flakes on top would add an extra layer of nutty depth and crunch to this already amazing variation.
A delightful dairy-free or vegan adaptation can also be achieved with a few thoughtful substitutions. Opt for a vegan white cake mix, and use full-fat canned coconut milk for both the cake batter and the soaking liquid, perhaps with a touch of maple syrup or agave for sweetness in the soak. For the topping, a good quality vegan whipped cream or coconut cream that has been chilled and whipped to stiff peaks will work wonderfully, maintaining that essential creamy finish.
How to Prepare coconut cake
Step 1: Preparing the Cake Batter
Begin by preheating your oven and preparing your baking pan according to the cake mix package instructions. It’s crucial to use a 9×13 inch baking dish for this recipe to ensure even baking and sufficient surface area for the soaking liquid. As you gather your ingredients, notice the substitution for water; we’re using rich coconut milk to infuse the cake from its very foundation.
In a large mixing bowl, combine the dry cake mix with the specified amount of coconut milk, ensuring it replaces the water called for on the box. Mix the ingredients thoroughly, ideally using an electric mixer on a medium speed. You’re aiming for a batter that is smooth, well-aerated, and free of any lumps. This thorough mixing ensures a tender crumb and an even bake, setting the stage for the delightful textures to come.
Once the batter is perfectly smooth and airy, carefully pour it into the prepared 9×13 inch baking dish. Gently spread the batter evenly with a spatula to ensure the top is level. A level batter will bake more uniformly, preventing any potential dry or undercooked spots, which is especially important for this recipe where the entire cake will absorb a delicious soak.
Step 2: Baking the Cake to Perfection
Place the baking dish into the preheated oven and bake for the duration suggested on the cake mix package. However, a critical part of this recipe involves baking the cake until it’s just set, not overly dry. This is because the warm cake needs to be porous enough to absorb the rich soaking liquid effectively.
Start checking for doneness a few minutes before the recommended baking time indicated on the cake mix box. Insert a toothpick or a thin skewer into the center of the cake; it should come out clean or with just a few moist crumbs attached. If the cake seems slightly underbaked in the very center, it’s actually ideal for this recipe as it will continue to cook slightly as the soak is added and will absorb the liquid more readily.
Avoid the temptation to overbake, as a dry cake will not absorb the cream of coconut as efficiently, potentially leaving you with a less moist dessert. The goal is a cake that is cooked through but still possesses a tender, yielding quality. This slight under-baking is a secret to achieving that signature melt-in-your-mouth texture that makes this coconut cake so irresistible and memorable.
Step 3: Creating the Pores for the Soak
As soon as the cake is removed from the oven, while it is still wonderfully warm and yielding, it’s time to create the pathways for the luscious soak. This step is absolutely paramount to achieving the incredibly moist crumb that defines this dessert. The warmth of the cake allows the holes to remain open and receptive to the liquid, ensuring it penetrates deeply.
Using a skewer, a chopstick, a thick toothpick, or even the tines of a fork, begin poking holes all over the entire surface of the warm cake. Don’t be shy; create a generous network of holes spaced about an inch apart. Ensure the holes go down reasonably deep into the cake, but not so deep that you risk breaking through the bottom of the pan.
The more holes you create, the more surface area the cream of coconut will have to penetrate. Imagine you are creating a small, edible sponge cake ready to absorb all the delicious coconut goodness. This meticulous poking ensures that the rich, sweet liquid is distributed evenly throughout the cake’s interior, rather than just pooling on the surface, which is key to its ultimate texture and flavor.
Step 4: Soaking the Cake Generously
While the cake is still warm and pocked with numerous holes, it’s time to prepare and apply the magical soaking liquid. Gently warm the can of cream of coconut, perhaps by placing the unopened can in warm water for a few minutes, or by briefly microwaving it on a low power setting until it is pourable. You want it to be warm and fluid, but not hot, to avoid cooking the cake further.
Slowly and deliberately, spoon or pour the warmed cream of coconut evenly over the entire surface of the cake. Take your time with this step, allowing the liquid to seep into the holes you’ve meticulously created. You should see the cream of coconut gradually sinking into the cake, filling those tiny crevices and making the crumb wonderfully moist.
Continue to pour the cream of coconut until the entire cake appears saturated, ensuring that every corner and edge receives its share of this sweet, rich elixir. The goal is for the liquid to be absorbed into the cake rather than running off the sides. This process is where the cake truly transforms into an exceptionally moist and flavorful dessert, setting the stage for its delightful transformation.
Step 5: The Crucial Chilling Period
Once the cake has been generously soaked, cover the baking dish tightly with plastic wrap or a lid. Now comes the most important part of developing its signature texture and flavor: the chilling period. It is highly recommended to refrigerate the cake for at least several hours, and ideally, overnight.
This extended chilling time is not merely about cooling the cake; it’s an essential step where the magic truly happens. During this period, the cream of coconut has ample time to fully permeate the cake crumb, allowing the flavors to meld and deepen significantly. The cake’s texture will transform from warm and yielding to perfectly tender, moist, and set.
Allowing the cake to chill overnight is particularly beneficial. This extended rest allows the moisture to distribute evenly and the coconut flavor to become even more pronounced. The cake firms up beautifully, making it much easier to slice neatly and serve without it falling apart. Patience during this stage is rewarded with an unparalleled dessert experience.
Step 6: The Final Flourish – Topping and Finishing
After the cake has had ample time to chill and develop its perfect texture, remove it from the refrigerator. Uncover the baking dish, and you’ll notice how the soaked liquid has been beautifully absorbed, leaving a wonderfully moist and slightly firm cake.
Gently spread a generous layer of whipped topping evenly over the entire surface of the chilled cake. Use an offset spatula or the back of a spoon to create a smooth, even coating. This cool, fluffy layer provides a delightful textural contrast to the rich, moist cake underneath and adds a beautiful visual appeal.
Finally, generously sprinkle the sweetened shredded coconut over the whipped topping, covering it completely. This final touch not only adds a delightful texture and enhances the coconut flavor but also gives the cake its classic, snowy appearance. Return the finished cake to the refrigerator until it’s time to serve, ensuring it stays perfectly chilled and holds its shape.
Pro Tips for coconut cake
Poke While Warm: For optimal absorption, poke holes into the cake immediately after it comes out of the oven. The warmth of the cake allows the cream of coconut to penetrate more deeply and evenly into the crumb, ensuring maximum moisture throughout. Don’t wait for it to cool down significantly before starting this crucial step.
Embrace the Chill: Resist the urge to serve the cake too soon after soaking. The chilling period, especially an overnight rest, is vital for the texture to fully develop and the flavors to meld beautifully. This extended time allows the liquid to saturate the cake properly, resulting in a cleaner slice and a superior mouthfeel.
Monitor Baking Closely: Always start checking your cake for doneness a few minutes earlier than the package suggests. A slightly underbaked cake is perfect for this recipe as its surface will be more receptive to the soaking liquid. An overbaked, dry cake will not absorb the cream of coconut as effectively, potentially compromising the final texture and moisture level.
Gentle Warming of Soak: When warming the cream of coconut, ensure it is only just warm enough to pour easily. Overheating can alter the texture or even begin to cook the cake, which is counterproductive. A gentle warming ensures it flows smoothly and is absorbed without negatively impacting the cake’s structure.
Even Distribution is Key: When applying the cream of coconut and the whipped topping, take care to distribute them as evenly as possible across the entire surface of the cake. This ensures that every slice receives a balanced amount of moisture, sweetness, and creamy topping, leading to a consistently delightful eating experience.
Serving Suggestions for coconut cake
Decoration
The classic decoration for this delightful coconut cake involves a generous blanket of sweetened shredded coconut spread evenly over the whipped topping. For an added touch of elegance, you could toast some of the shredded coconut lightly in a dry skillet or a low oven until golden brown. Sprinkle this toasted coconut over the white layer for a beautiful contrast in color and a deeper, nuttier flavor profile that complements the cake wonderfully.
Consider adding a few fresh, vibrant elements to your decoration. Delicate edible flowers, such as pansies or violas, can add a pop of color and a sophisticated touch. Alternatively, a scattering of finely chopped toasted almonds or macadamia nuts around the edges of the cake can provide an additional layer of crunch and nutty flavor that pairs exceptionally well with coconut.
For a more whimsical presentation, you could pipe decorative swirls or rosettes using the whipped topping around the edges of the cake before adding the shredded coconut. A light dusting of powdered sugar or a drizzle of white chocolate ganache can also enhance its visual appeal. Think about creating a tropical theme with small maraschipine fruits or edible glitter for a truly festive touch.
Side Dishes
The inherent sweetness and richness of this coconut cake pair beautifully with bright, fresh fruit. Sliced fresh strawberries, raspberries, or a medley of mixed berries offer a delightful tang that cuts through the creaminess of the cake, providing a refreshing counterpoint with every bite. Their vibrant colors also add a visually appealing element to your dessert presentation.
A simple bowl of fresh pineapple chunks or mango slices can further enhance the tropical theme of this dessert. The natural sweetness and slight acidity of these fruits complement the coconut flavor exceptionally well, creating a harmonious and summery flavor profile. This pairing is especially refreshing on a warm day, making the cake feel lighter and more invigorating.
For a contrast in temperature and texture, consider serving small glasses of passion fruit mousse or a light lime sorbet alongside the cake. The tartness of the lime or passion fruit will cleanse the palate beautifully, while the smooth texture of the mousse offers a different kind of creaminess. This thoughtful pairing elevates the entire dessert experience and appeals to a variety of flavor preferences.
Creative Serving Ideas
Transform individual slices of this coconut cake into elegant parfaits by layering them with more whipped topping and fresh fruit in clear glasses. This presentation is not only visually stunning but also makes for a convenient and refined dessert option for parties or formal gatherings. A sprinkle of toasted coconut flakes between layers adds an extra dimension of texture and flavor.
Consider creating mini coconut cake trifles by cubing the cake and layering it in small jars or ramekins with the whipped topping and a fruit compote, such as mango or berry. This allows for a delightful mix of textures and flavors in each spoonful, making it a fun and interactive dessert experience for your guests. Garnish with a mint sprig for a touch of freshness.
For a unique dessert bar experience, serve slices of the coconut cake alongside a variety of complementary toppings, such as a raspberry coulis, a salted caramel sauce, and extra toasted coconut flakes. Guests can then customize their own slice, turning the simple act of eating cake into a personalized culinary adventure. This interactive approach is always a hit at any celebration and encourages guest engagement.
Preparation & Storage
Storing Leftovers
To keep your delicious coconut cake fresh and moist, store any leftovers tightly covered in the refrigerator. Due to the whipped topping and the inherently moist, soaked crumb, refrigeration is essential for maintaining its texture and preventing spoilage. A well-covered cake will stay delightful for up to 4 days, making it perfect for enjoying over several days.
Ensure the plastic wrap is pressed gently onto the surface of the whipped topping if possible, or use an airtight container that fits snugly over the baking dish. This minimizes exposure to air, which can dry out the topping and the cake. Storing it promptly after serving will help preserve its optimal freshness and flavor.
For the cleanest serving, it is best to slice the cake directly from the refrigerator. This helps the whipped topping stay neat and prevents the cake from becoming too soft or sticky, ensuring each slice looks as appealing as the first. Allowing it to sit at room temperature for too long before serving can affect its structural integrity.
Freezing
While this coconut cake is best enjoyed fresh, freezing is an option if you need to store it for a longer period, though some slight changes in the texture of the whipped topping may occur upon thawing. For the best results, it’s advisable to freeze individual portions rather than the entire cake.
Wrap each slice securely in a layer of plastic wrap, followed by a layer of aluminum foil or a freezer-safe bag. This double wrapping provides an extra barrier against freezer burn and helps maintain the cake’s quality. Properly wrapped portions can be stored in the freezer for up to 1 month.
When you’re ready to enjoy a frozen slice, the best method for thawing is to place it in the refrigerator. This slow thawing process allows the cake to gradually come back to temperature, helping the moisture redistribute more evenly and minimizing any drastic changes in texture. Avoid thawing at room temperature, as this can lead to a less desirable consistency.
Reheating
Due to its refrigerated nature and the presence of whipped topping, this coconut cake is not typically reheated. It is designed to be served chilled, and any attempt to warm it up would compromise the texture of the topping and potentially make the cake overly soft or mushy. The cool, creamy contrast is a key element of its appeal.
If you find that your cake has become a bit too firm from being in the refrigerator for a day or two, you can let it sit at room temperature for about 15-20 minutes before serving. This brief period allows the cake to soften slightly, bringing it to a more ideal eating consistency without negatively impacting the integrity of the whipped topping.
The moistness from the soaking liquid should keep the cake tender even after refrigeration. Focus on serving it chilled for the best possible texture and flavor experience. If you’re looking for a warm dessert, this particular recipe is best enjoyed as is, in its intended cool and creamy state.
Frequently Asked Questions
-
Can I make this coconut cake the day before serving?
Yes, absolutely! In fact, making this coconut cake the day before is highly recommended and is considered one of the best ways to serve it. An overnight chilling period allows the cream of coconut soak ample time to fully permeate the cake’s crumb, resulting in a more intensely infused coconut flavor and a significantly improved, ultra-moist texture that is both tender and firm enough for slicing. This extended resting time is crucial for the cake to reach its optimal state, making it ideal for preparing in advance for parties or gatherings.
-
How do I know when the cake is perfectly baked and ready to be soaked?
To determine if your coconut cake is ready for the soaking process, you should check for doneness a few minutes *before* the time suggested on the cake mix packaging. Insert a toothpick or a thin skewer into the center of the cake; it should come out clean or with only a few moist crumbs attached. The cake should appear set and cooked through, but a slightly softer surface is actually ideal for this recipe, as it will absorb the soaking liquid more readily without becoming dry. Avoid overbaking, as a dry crust will hinder proper absorption of the cream of coconut.
-
Does this cake need to be kept refrigerated at all times?
Yes, this coconut cake absolutely needs to remain refrigerated at all times once it has been prepared and topped. This is primarily because it is finished with a layer of whipped topping, which requires cold temperatures to maintain its structure and prevent spoilage. Additionally, keeping the cake chilled helps to firm up the moist, soaked crumb, ensuring that it slices cleanly and maintains a pleasant, cohesive texture. Serving it cold is integral to its intended delightful experience, preventing it from becoming too soft or sticky.