Irresistible Chicken & Egg Fried Rice for Easy Family Dinners
As I stepped into the kitchen, the rich aroma of sizzling chicken and garlic transported me back to my favorite takeout spot, a place that always promised a comforting and delicious meal.
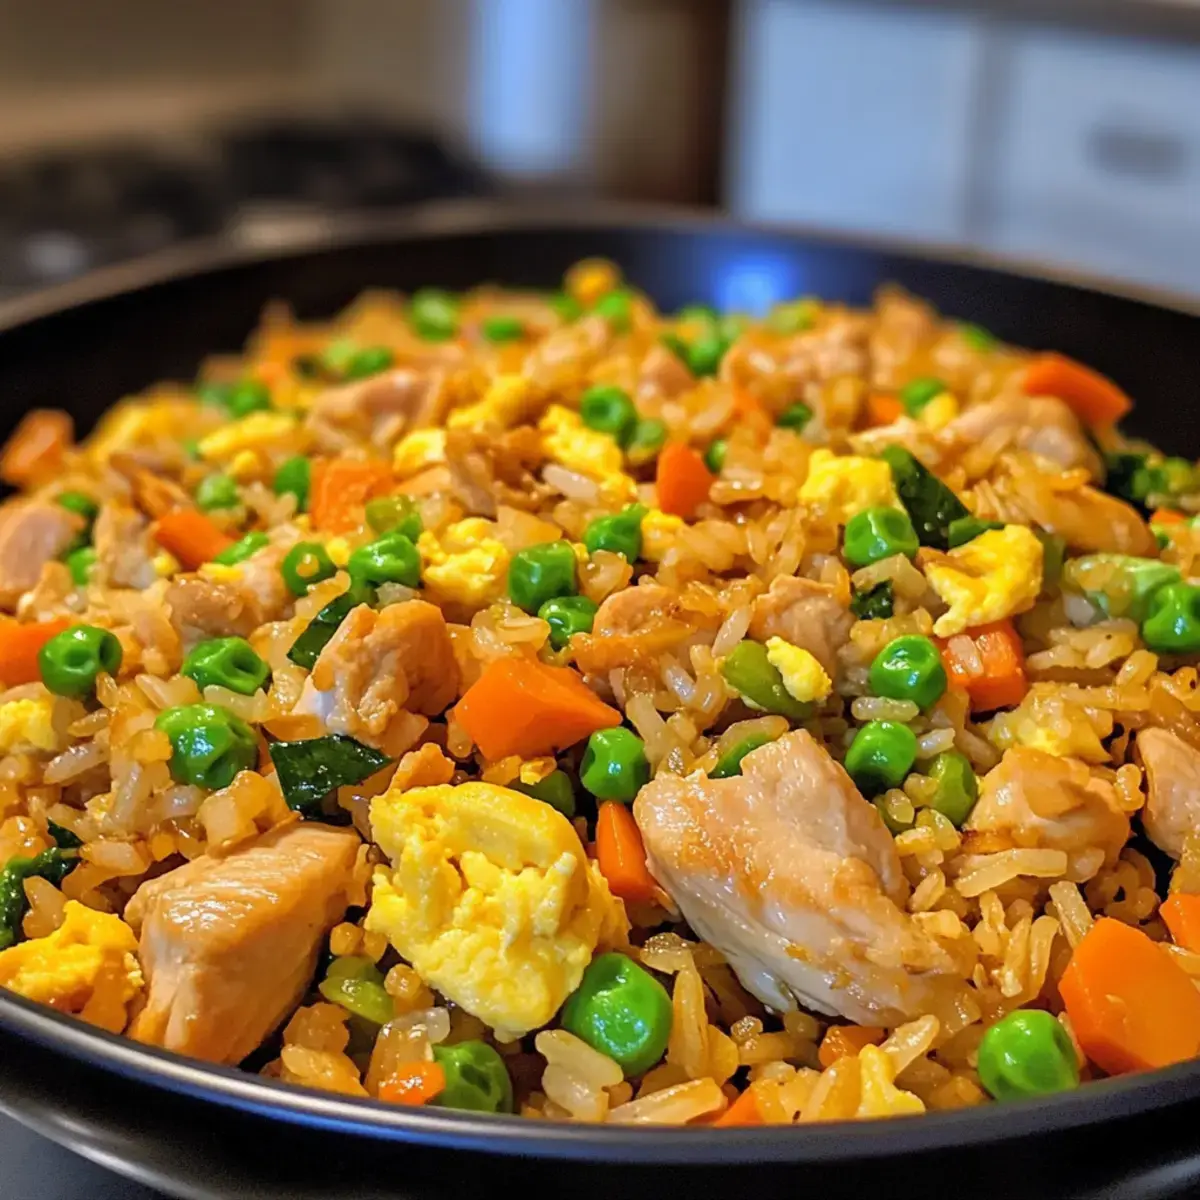
Today, I’m bringing that beloved flavor home with my Chicken & Egg Fried Rice, a dish that perfectly balances succulent chicken, fluffy scrambled eggs, and colorful veggies, creating a symphony of textures and tastes that will delight your palate.
Why You Will Love This Recipe
- Quick Preparation: This delightful Chicken & Egg Fried Rice can be on your table in just 30 minutes, making it an absolute lifesaver for those busy weeknights when time is of the essence.
- Versatile and Customizable: One of the greatest joys of this recipe is its inherent flexibility; you can easily customize it with your favorite vegetables, proteins, or even adjust the sauce to perfectly suit your family’s unique taste preferences.
- Meal Prep Friendly: Prepare a generous big batch on a lazy Sunday afternoon and enjoy flavorful, nutritious meals throughout the entire week; it stores exceptionally well in the fridge for up to three days, making lunches and quick dinners a breeze.
- High in Protein: Packed with tender chicken and wholesome eggs, this dish is not only incredibly satisfying but also a fantastic source of protein, aiding in post-workout recovery or simply keeping hunger at bay with sustained energy.
- Authentic Flavor: Experience the comforting, irresistible taste of authentic takeout right in the comfort of your own home, all while knowing you’re avoiding the extra calories and preservatives often found in restaurant versions.
Ingredients You Need
The foundation of any great dish lies in the quality of its ingredients, and this Chicken & Egg Fried Rice is no exception; using fresh, vibrant components will truly elevate the final flavor profile. From succulent chicken thighs to crisp spring onions and perfectly cooked rice, each element plays a crucial role in creating a harmonious and satisfying meal. Remember that the specific quantities for each ingredient are detailed in the accompanying recipe card, ensuring you have everything you need for success.
Flavorful Chicken & Egg Fried Rice

A quick and nutritious Chicken & Egg Fried Rice that balances rich chicken and eggs with colorful veggies. This recipe comes together in just 30 minutes, making it perfect for busy weeknights.
- 1 pound Boneless Skinless Chicken Thighs (Substitute with chicken breast or tofu for a leaner option.)
- 2 Eggs (Use scrambled tofu for a vegan alternative.)
- 4 cups Cooked Rice (Day-old rice works best for texture.)
- 2 tablespoons Vegetable Oil (Any neutral oil can be substituted.)
- 3 cloves Garlic (Freshly minced garlic is preferred.)
- 2 Spring Onions (Shallots can replace spring onions.)
- 1 cup Frozen Peas (Fresh peas or corn can be used for variety.)
- 1 cup Beansprouts (Can be omitted or replaced with sliced bell peppers.)
- 2 tablespoons Oyster Sauce (Use mushroom or soy sauce for a vegetarian version.)
- 1 tablespoon Dark Soy Sauce (Substitute with light soy sauce if unavailable.)
- 1 tablespoon Light Soy Sauce (Adjust according to taste.)
- 1 tablespoon Sriracha (Chili flakes can be substituted.)
- 1 teaspoon Sugar (Honey or maple syrup can be used as alternatives.)
- 1/2 teaspoon MSG (Can be omitted for a cleaner taste.)
- 1Prepare the Sauce: In a small bowl, whisk together the oyster sauce, dark soy sauce, light soy sauce, Sriracha, sugar, and MSG, if using. Set this flavorful sauce aside.
- 2Chop Ingredients: Chop the boneless skinless chicken thighs into bite-sized pieces. Finely mince the garlic cloves. Slice the spring onions, setting aside the white and green parts separately.
- 3Beat the Eggs: In a medium bowl, crack and whisk the eggs until well combined. Set aside.
- 4Sauté the Chicken: Heat a large wok over high heat and add 1-2 tablespoons of vegetable oil. Once shimmering, add the diced chicken and stir-fry for about 4-6 minutes until golden brown and cooked through. Remove the chicken and set aside.
- 5Cook Garlic and Onions: In the same hot wok, add another splash of oil if necessary, then add the minced garlic and the white parts of the spring onions. Sauté for 1-2 minutes until fragrant. Push the mixture to the side of the wok.
- 6Scramble the Eggs: Pour the beaten eggs directly into the space created in the wok. Allow them to set for a moment before gently scrambling. Cook until fluffy and just set, then combine with the garlic and spring onions.
- 7Incorporate the Rice: Add the day-old cooked rice to the wok, breaking up any clumps. Toss everything together for about 3-4 minutes until the rice is heated through and slightly golden.
- 8Add Chicken and Sauce: Return the cooked chicken to the wok along with the prepared sauce. Toss to blend all ingredients well and stir-fry for another 2-3 minutes until heated through and coated.
- 9Finish with Vegetables: Stir in the frozen peas and beansprouts, cooking for an additional 1-2 minutes until tender-crisp.
- 10Serve Your Fried Rice: Transfer the Chicken & Egg Fried Rice into serving containers. Garnish with the reserved green parts of the spring onions.
Keywords: fried rice, chicken, egg, quick dinner, easy recipe, stir-fry, Asian cuisine, weeknight meal
- boneless skinless chicken thighs: provides protein and richness to the dish; substitute with chicken breast or tofu for a leaner option.
- eggs: adds creaminess and protein; use scrambled tofu for a vegan alternative.
- cooked rice: the base of the dish; day-old rice works best for texture, but freshly cooked rice can be used if cooled properly to prevent mushiness.
- vegetable oil: essential for frying ingredients and achieving crispness; any neutral oil can be substituted.
- garlic: adds depth of flavor; freshly minced garlic is preferred, but garlic powder can be a quick substitute.
- spring onions: offers freshness and crunch; the green part is used for garnish, while the white part is sautéed. Shallots can be used in place of spring onions.
- frozen peas: introduces a pop of color and sweetness; fresh peas or other vegetables like corn can be used.
- beansprouts: adds texture and crunch; can be omitted or replaced with sliced bell peppers.
- oyster sauce: provides umami and depth; for a vegetarian version, use mushroom or soy sauce.
- dark soy sauce: for color and flavor depth; substitute with additional light soy sauce if unavailable.
- light soy sauce: lowers sodium and enhances flavor; may adjust according to taste.
- sriracha: adds heat and spice; chili flakes or any hot sauce can be substituted.
- sugar: balances flavors; honey or maple syrup can be utilized as alternatives.
- msg: enhances umami flavor but can be omitted for a cleaner taste.
These ingredients come together to create a flavorful and satisfying meal that is both easy to prepare and incredibly delicious.
Variations
To truly make this Chicken & Egg Fried Rice your own, consider exploring some of these delightful variations that cater to different dietary needs and flavor preferences.
For a vibrant and nutrient-dense option, consider the Extra Veggies variation; simply toss in a medley of finely chopped bell peppers, crisp broccoli florets, or even shredded carrots during the sautéing process. These additions not only boost the nutritional content but also introduce a delightful array of colors and textures, transforming your fried rice into a visually stunning and even more satisfying dish.
If you’re aiming for a lighter, lower-carbohydrate meal, the Cauliflower Rice variation is an excellent choice; replace traditional rice with finely riced cauliflower for a similar texture and ability to absorb flavors, all while significantly reducing the carb count. This swap is a fantastic way to incorporate more vegetables into your diet without compromising on the beloved taste and convenience of fried rice.
For those seeking a different protein profile, the Protein Swap is a fantastic idea; substitute the chicken with succulent shrimp, firm tofu for a vegetarian twist, or even hearty chickpeas for a plant-based powerhouse. Each protein offers a unique texture and flavor that complements the other ingredients beautifully, allowing for endless culinary creativity and catering to a wider range of dietary needs or simply a desire for variety.
To introduce an aromatic lift, consider the Herb Infusion; just before serving, generously scatter fresh herbs like fragrant cilantro or peppery Thai basil over the finished dish. Their bright, herbaceous notes cut through the richness of the fried rice and add a refreshing complexity that awakens the palate.
Lastly, for those who enjoy a bit of crunch and nutty depth, the Nutty Texture variation is perfect; toss in a handful of toasted cashews or peanuts during the final stir-fry. These additions provide a delightful textural contrast and a subtle, earthy flavor that enhances the overall sensory experience of the fried rice.
How to Prepare Chicken and Egg Fried Rice
Step 1: Prepare the Sauce
In a small bowl, whisk together the oyster sauce, dark soy sauce, light soy sauce, Sriracha, sugar, and MSG, if using. This savory mix will form the flavor backbone of your Chicken & Egg Fried Rice, infusing every bite with a delightful balance of sweet, salty, and spicy notes. Set this flavorful sauce aside as you prepare the other ingredients, ensuring everything is ready for an effortless and streamlined cooking process that minimizes time spent juggling multiple tasks.
The careful combination of these sauce components is key to achieving that authentic umami-rich taste often associated with your favorite takeout dishes. Oyster sauce provides a fundamental savory depth, while the dark soy sauce contributes a rich color and a deeper, more complex flavor profile. Light soy sauce adds the necessary saltiness and brightness, and Sriracha offers a customizable kick of heat that can be adjusted to your personal preference.
A touch of sugar acts as a crucial flavor balancer, mellowing out the saltiness and spice, and enhancing the overall harmony of the sauce. For those seeking an extra boost of savoriness, MSG can be included, though it’s entirely optional and can be omitted without sacrificing the dish’s deliciousness. Having this sauce pre-mixed ensures that once your ingredients are stir-frying, you can add it at precisely the right moment to coat everything perfectly.
Step 2: Chop Ingredients
While your sauce is resting and its flavors are melding, it’s time to prepare the other essential components of your Chicken & Egg Fried Rice. Begin by chopping the boneless, skinless chicken thighs into uniform, bite-sized pieces, ensuring they will cook evenly and quickly during the stir-frying process. This consistency in size is vital for achieving perfectly cooked chicken throughout the dish, avoiding any undercooked or overcooked pieces.
Next, finely mince the garlic cloves; the smaller the pieces, the more surface area is exposed, allowing their aromatic goodness to be released more intensely into the oil as it heats. Mincing the garlic finely ensures its flavor permeates the entire dish without leaving large, overpowering chunks. Then, slice the spring onions, carefully separating the white parts from the green parts, as they will be used at different stages of the cooking process for distinct flavor contributions and visual appeal.
The white parts of the spring onions, with their slightly more pungent flavor, are ideal for sautéing early on to build a flavorful base in the wok, similar to how onions or shallots are used in many savory dishes. The vibrant green parts, on the other hand, offer a fresher, milder onion flavor and a beautiful pop of color when used as a garnish at the very end, adding a delightful visual and aromatic finishing touch.
Step 3: Beat the Eggs
In a medium bowl, crack and whisk the eggs until they are thoroughly combined and possess a uniform, pale yellow hue, indicating that the yolks and whites are fully incorporated. This step is crucial for creating the fluffy, tender scrambled eggs that will become an integral part of your Chicken & Egg Fried Rice, adding a delicate texture and richness to every mouthful. A well-beaten egg mixture ensures a more consistent and pleasant texture when it’s cooked in the wok.
Avoid over-whisking, which can incorporate too much air and make the eggs tough; simply aim for a smooth, homogenous liquid that is ready to be poured into the hot wok. The goal is to achieve a light and airy texture once cooked, allowing the scrambled eggs to meld seamlessly with the rice and chicken without becoming rubbery or dry. This attention to the egg preparation significantly contributes to the overall appeal and mouthfeel of the finished dish.
Set the bowl of beaten eggs aside within easy reach of your cooking station. This proximity is essential because the eggs cook very quickly, and you’ll want to pour them into the pan promptly once the initial aromatics have been sautéed, ensuring they cook perfectly without becoming overdone. This preparation ensures that all the elements are ready to be added to the wok in quick succession, maintaining the high heat and fast pace crucial for authentic stir-frying.
Step 4: Sauté the Chicken
Heat a large wok or a heavy-bottomed skillet over high heat until it is smoking hot; this intense heat is paramount for achieving a proper sear on the chicken and preventing it from steaming. Add 1-2 tablespoons of vegetable oil to the shimmering hot wok, ensuring it coats the surface evenly. The oil should be hot enough that it ripples slightly when tilted, indicating it’s ready to cook the chicken quickly and efficiently.
Once the oil is shimmering and hot, carefully add the diced chicken pieces in a single layer, avoiding overcrowding the wok, which can lower the temperature and lead to steaming instead of searing. Stir-fry the chicken vigorously for about 4-6 minutes, tossing and turning the pieces continuously to ensure they cook evenly on all sides. You are aiming for pieces that are golden brown and beautifully caramelized, indicating they are cooked through to perfection and have developed a rich flavor.
Remove the cooked chicken from the wok and set it aside on a clean plate, keeping it warm while you proceed with the other steps. It’s important to remove it at this stage to prevent it from overcooking while the rest of the ingredients are prepared; the chicken will be added back later to reheat and absorb the sauce. This strategic removal ensures that the chicken remains tender and juicy in the final dish.
Step 5: Cook Garlic and Onions
In the same hot wok where you cooked the chicken, add another splash of vegetable oil if the surface appears dry, ensuring there’s enough fat to sauté the aromatics without sticking. Toss in the finely minced garlic and the reserved white parts of the spring onions, stirring them constantly for 1-2 minutes until they become fragrant and slightly softened. The aroma of garlic and onions blooming in hot oil is one of the most inviting smells in cooking, signaling the development of a rich flavor base.
Be careful not to burn the garlic, as burnt garlic can impart a bitter taste to your dish; sautéing should be quick, just long enough to release their essential oils and develop their characteristic sweet, pungent flavors. Once they are fragrant and softened, push the garlic and onion mixture to the side of the wok, creating a clear space in the center. This creates a dedicated area for the next ingredient to be cooked without disturbing the flavor base already established.
This technique of pushing ingredients to the side of the wok is a classic stir-frying maneuver that allows for efficient cooking of multiple components in the same pan. It ensures that each ingredient is exposed to direct heat at the appropriate time, contributing its unique flavor and texture to the overall dish. The waiting garlic and onions will gently continue to cook in the residual heat while you attend to the eggs.
Step 6: Scramble the Eggs
Pour the beaten eggs directly into the cleared space you created in the center of the hot wok, right onto the hot surface where the garlic and onions were pushed aside. Allow the eggs to set undisturbed for about 15-30 seconds, which helps them form a base layer that will be easier to scramble and prevent them from sticking to the wok. This initial moment of setting is key to achieving tender, fluffy scrambled eggs rather than a messy, dispersed scramble.
Once the edges of the eggs begin to appear cooked, gently use a spatula to push and fold the cooked portions towards the center, allowing the uncooked liquid egg to flow onto the hot surface. Continue this gentle scrambling motion until the eggs are fluffy and just set, meaning they are cooked through but still retain a slight moisture and tenderness. Overcooked eggs can become dry and rubbery, so it’s important to pull them off the heat at the right moment.
Once the eggs are perfectly scrambled, gently combine them with the sautéed garlic and spring onions that were pushed to the side. Stir everything together briefly to distribute the flavors and create a lovely, cohesive flavor base for your fried rice. This combination of aromatics and tender eggs forms a delicious foundation that will be further enhanced as the rice and chicken are introduced.
Step 7: Incorporate the Rice
Add the day-old cooked rice to the wok, immediately breaking up any clumps with your spatula. The key to great fried rice texture is to ensure the rice grains are separated; clumps will lead to a gummy, less enjoyable consistency. Using day-old rice is highly recommended because its moisture has evaporated overnight, making the grains firmer and less likely to stick together, thus allowing them to fry beautifully and absorb the sauce.
Spread the rice out in an even layer across the bottom of the wok, allowing it to come into direct contact with the hot surface. Toss everything together vigorously for about 3-4 minutes, ensuring the rice grains are evenly coated with the residual oil, garlic, onions, and scrambled eggs. This process is essentially frying the rice, which helps to dry it out further, develop a slightly toasted flavor, and achieve a desirable texture where each grain is distinct.
Listen for the gentle sizzle as the rice fries; you want it to turn a bit golden and perhaps even slightly crispy in places, indicating it’s developing that perfect fried rice texture. This stage is crucial for building the foundational texture and absorbing the initial layers of flavor that have been developed by the aromatics and eggs.
Step 8: Add Chicken and Sauce
Return the cooked chicken pieces to the wok, distributing them evenly amongst the rice and aromatics. Now, pour the prepared savory sauce mixture over everything in the wok. The sauce contains the primary flavor profile for your dish, bringing together the sweet, salty, and spicy elements that define classic fried rice.
Toss everything together with your spatula, ensuring all the ingredients—the rice, chicken, and vegetables—are thoroughly coated with the sauce. Continue to stir-fry for another 2-3 minutes, allowing the sauce to thicken slightly and coat each grain of rice and piece of chicken beautifully. This is the point where the flavors truly meld together, and the rice begins to absorb the delicious sauce, becoming infused with its savory goodness.
The high heat of the wok will help the sauce caramelize slightly onto the rice and chicken, adding another layer of depth and deliciousness. Ensure that all the chicken is heated through, and the rice is evenly coated and has reached your desired level of sauciness. This step is critical for binding all the components together into a cohesive and flavorful whole.
Step 9: Finish with Vegetables
Finally, stir in the frozen peas and the fresh beansprouts into the wok. These ingredients require minimal cooking time and are best added towards the end to retain their vibrant color and delightful crunch. Cooking them too long would result in them becoming mushy and losing their appealing texture and freshness.
Continue to stir-fry for an additional 1-2 minutes, just until the peas are heated through and tender-crisp, and the beansprouts have slightly softened but still retain a pleasant bite. If you’re incorporating any other fresh vegetables like diced bell peppers or corn, this is also the stage to add them, ensuring they are cut small enough to cook quickly. This step adds pops of color, freshness, and a satisfying textural contrast to the dish.
This final addition of vegetables provides essential nutrients and balances the richer flavors of the chicken and sauce, making the dish more complete and visually appealing. The goal is to have vegetables that are cooked but still retain a slight firmness, contributing to the overall enjoyable texture of the fried rice.
Step 10: Serve Your Fried Rice
Once everything is cooked to your satisfaction, and the flavors have beautifully melded together, it’s time to serve your masterpiece. Carefully transfer the delicious Chicken & Egg Fried Rice into individual serving bowls or onto plates. Ensure you get a good distribution of chicken, egg, and vegetables in each portion for a balanced meal.
Garnish generously with the reserved green parts of the spring onions, which add a final flourish of fresh, mild onion flavor and a vibrant splash of green color. This visual appeal enhances the dining experience, making the dish look as appetizing as it smells and tastes. The fresh onion greens provide a subtle aromatic lift that complements the cooked components.
Allow the fried rice to cool slightly before refrigerating any leftovers, as this helps prevent condensation that can make the dish soggy. Alternatively, serve it immediately while hot for a comforting and deeply satisfying meal that is sure to impress your family and friends. Enjoy the fruits of your labor, a delicious homemade meal reminiscent of your favorite takeout, prepared with love and fresh ingredients.
Pro Tips for Chicken and Egg Fried Rice
- Day-Old Rice: Using day-old rice is absolutely key to achieving the right texture in your fried rice; its reduced moisture content prevents the grains from clumping together and allows them to fry up perfectly, enhancing the overall dish quality.
- Ingredient Prep: Have all your ingredients chopped, measured, and ready to go before you even turn on the stove; this organizational step is crucial for ensuring a seamless and stress-free cooking experience, especially in the fast-paced world of stir-frying.
- Avoid Overcrowding: To achieve that desirable crispy rice texture and ensure even cooking, avoid overcrowding your pan; if necessary, cook the fried rice in batches, as this prevents the ingredients from steaming rather than frying, which is essential for flavor and texture.
- Customize Vegetables: Feel free to add in any vegetables you have on hand, such as colorful bell peppers, vibrant carrots, or crisp snap peas, for added color, nutrients, and flavor; just make sure they’re cut into small, uniform pieces for faster cooking and even distribution.
- Maintain High Heat: Consistently maintain a high heat while stir-frying to lock in flavors and achieve that coveted slightly crispy rice texture; this high heat is what allows for quick cooking and caramelization, imparting a depth of flavor that is difficult to replicate at lower temperatures.
- Taste as You Go: Don’t be afraid to adjust the seasoning gradually by tasting your fried rice as you cook; you may want to add more sauce, a pinch more sugar, or extra Sriracha to achieve the perfect balance of flavors that suits your personal preference.
Serving Suggestions for Chicken and Egg Fried Rice
Decoration
Elevate the visual appeal of your Chicken & Egg Fried Rice with simple yet effective garnishes. The most common and effective decoration is the reserved green parts of the spring onions, thinly sliced for a fresh, vibrant green contrast against the golden rice. A sprinkle of toasted sesame seeds adds a delicate nutty aroma and a visual texture that suggests careful preparation. For a touch of elegance, a few fresh cilantro leaves or a small drizzle of chili oil can further enhance both the look and the flavor profile.
Side Dishes
Complement the savory notes of your Chicken & Egg Fried Rice with thoughtfully chosen side dishes that offer a balance of flavors and textures. A refreshing Cucumber Salad, dressed with rice vinegar and a hint of sesame oil, provides a palate-cleansing acidity that cuts through the richness. Steamed or stir-fried Garlic Green Beans offer a delightful crunch and earthy flavor. For a lighter option, a simple side of steamed broccoli drizzled with a light soy sauce is always a healthy and delicious choice.
Creative Serving Ideas
Transform your homemade fried rice into a restaurant-worthy experience with these creative serving ideas. Serve the fried rice in individual bamboo steamer baskets for an authentic Asian touch, or present it in hollowed-out pineapple halves for a tropical flair, especially if serving during warmer months. You can also create individual fried rice bowls, layering the rice with a fried egg on top, a sprinkle of crispy fried shallots, and a side of pickled ginger. For a family-style presentation, pile the fried rice high in a large, shallow serving bowl, garnished generously with fresh herbs and a scattering of colorful chili threads.
Preparation & Storage
Storing Leftovers
To store any leftover Chicken & Egg Fried Rice, it is crucial to allow it to cool down to room temperature completely before transferring it into an airtight container. This rapid cooling prevents the growth of bacteria and avoids trapping steam, which can make the rice soggy. Once in an airtight container, the fried rice can be safely stored in the refrigerator for up to three days. Ensuring the container is well-sealed will help maintain its freshness and prevent it from absorbing odors from other foods in the fridge.
Freezing
For longer-term storage, Chicken & Egg Fried Rice can be frozen, making it an excellent candidate for meal prepping further into the future. Portion the cooled fried rice into freezer-safe containers or heavy-duty resealable freezer bags, leaving a small amount of headspace for expansion as it freezes. Properly sealed, the fried rice can be stored in the freezer for up to two months without significant loss of quality. It’s advisable to label the containers with the date of freezing to keep track of freshness.
Reheating
Reheating your Chicken & Egg Fried Rice effectively will bring back its delicious texture and flavor. The best method is to reheat it in a skillet over medium heat, adding a tablespoon or two of water or broth to help loosen the grains and prevent sticking; stir frequently until heated through. Alternatively, you can reheat it in the microwave, covered loosely with a damp paper towel, stirring halfway through the cooking time to ensure even heating. Ensure the rice is piping hot before serving to guarantee safety and optimal taste.
Frequently Asked Questions
- How do I select the best chicken for my fried rice?
Absolutely! For the juiciest and most flavorful results, I recommend using boneless, skinless chicken thighs, as they offer richness and tend to stay tender even when stir-fried. If you prefer a leaner option, chicken breast or even cubed firm tofu make excellent substitutes and absorb flavors beautifully. Just make sure your chosen protein is fresh, exhibiting a pinkish hue and no dark spots or off-putting odors, which are indicators of quality and freshness.
- What can I do if my fried rice turns out mushy?
If your fried rice turns out mushy, it could be due to using freshly cooked rice or not allowing it to cool properly before stir-frying, as this traps too much moisture. For the best possible texture, always opt for day-old rice that has been refrigerated; this helps dry out the grains and reduces stickiness, ensuring each grain fries up separately. If you absolutely must use fresh rice, spread it out on a baking sheet and let it cool for about 30 minutes to an hour to achieve a similar effect.
- Can I modify this recipe for dietary restrictions?
Very much so! This Chicken & Egg Fried Rice recipe is quite flexible and can be adapted to suit a variety of dietary needs. For a delicious vegan alternative, use scrambled tofu instead of eggs and swap the oyster sauce for a plant-based version like mushroom sauce or a vegan stir-fry sauce. Additionally, you can easily omit the MSG and adjust the sauce ratios to fit preferences such as gluten-free by using tamari instead of traditional soy sauce, ensuring everyone can enjoy this versatile dish.