Ultimate Marry Me No Bake Raspberry Chocolate Mousse

Imagine a dessert that captures the essence of pure indulgence while remaining perfectly mindful of your wellness and dietary preferences. That is precisely what the Marry Me No Bake Raspberry Chocolate Mousse achieves with its sophisticated profile and luxurious texture. This harmonious blend of dark, rich chocolate and the sharp, bright tartness of fresh raspberries creates a flavor explosion that consistently sends taste buds into ecstasy.
This exquisite mousse is not just a triumph of flavor; it is also remarkably simple to construct without the need for an oven. By opting for a no-bake preparation, you allow yourself to relish in professional-grade elegance without the usual stress of complex kitchen instructions. Whether you are looking to impress special dinner guests or simply want to treat yourself to a wholesome indulgence, this recipe stands as a perfect, worry-free solution for every occasion.
Why You Will Love This Recipe
- Decadent Flavor Profile: The intense, deep notes of raw cocoa powder pair flawlessly with the vibrant, tart acidity of fresh or frozen raspberries for a perfectly balanced bite.
- Effortless Preparation: This recipe eliminates the need for complicated baking techniques, making it an accessible choice for home cooks of all skill levels.
- Wholesome Ingredients: By utilizing plant-based components like almond flour and natural dates, this dessert offers a nutrient-dense alternative to traditional sugar-heavy treats.
- Stunning Visual Presentation: The contrast between the dark, velvety chocolate mousse and the bright red raspberry topping creates an eye-catching result that looks like it came from a high-end bakery.
- Dietary Inclusivity: This recipe is naturally vegan and gluten-free, ensuring that almost every guest at your table can enjoy a generous serving without hesitation.
Ingredients You Need
To achieve the perfect silky texture and deep flavor profile, it is crucial to source high-quality ingredients like fresh Medjool dates and rich coconut cream. Using premium cocoa powder will significantly enhance the final taste, providing that luxurious chocolate depth we all crave. Please note that all specific measurements for these components are provided in the recipe card below.
Marry Me No Bake Raspberry Chocolate Mousse
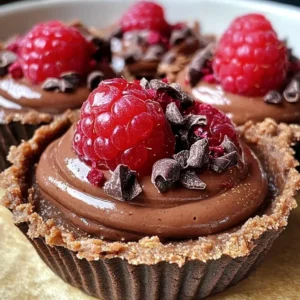
A decadent, no-bake dessert featuring a rich chocolate mousse layer, a crunchy nut-based crust, and a fresh raspberry topping. This vegan-friendly treat is perfect for romantic occasions or elegant dinners.
- 240 g almond flour
- 45 g flax meal
- 80 g runny almond butter
- 175 g medjool dates, pitted
- 30 g cocoa powder
- 80 ml unsweetened dairy-free milk
- 5 ml vanilla extract
- 400 ml heavy coconut cream
- 25 g cocoa powder (for mousse)
- 100 g medjool dates, pitted (for mousse)
- 285 g frozen raspberries
- 240 ml water
- 12 g chia seeds
- 2 g ground cinnamon
- 1Combine almond flour, flax meal, almond butter, dates, cocoa powder, milk, and vanilla in a food processor until a dough forms.
- 2Press the dough into parchment-lined muffin cups, creating a well in the center, and freeze for 15-20 minutes.
- 3Blend coconut cream, cocoa powder, and dates until creamy for the mousse.
- 4Spoon the mousse into the chilled crusts and freeze for 120 minutes until firm.
- 5Simmer raspberries, water, chia seeds, and cinnamon in a saucepan for 10 minutes until thickened; cool completely.
- 6Top the set mousse cups with the raspberry jam and freeze briefly before serving.
Keywords: chocolate mousse, Easy Dessert, No Bake, Raspberry Dessert, Vegan Dessert
- almond flour: serves as the perfect gluten-free, nutty base for our crust.
- flax meal: acts as a natural binder to keep the crust ingredients held firmly together.
- almond butter: provides healthy fats and a smooth, creamy consistency to the dough.
- medjool dates: act as the primary, natural sweetener for both the base and the mousse filling.
- cocoa powder: delivers a robust, authentic chocolate flavor to both layers of the dessert.
- dairy-free milk: helps adjust the consistency of the crust to ensure it is pliable and easy to press.
- vanilla extract: adds a subtle aromatic warmth that bridges the gap between the fruit and the chocolate.
- heavy coconut cream: creates the signature thick and velvety texture of the mousse without needing dairy.
- frozen raspberries: offer the essential tartness required to balance the heavy cocoa notes.
- water: provides the base for simmering the raspberries into a thick, delicious jam topping.
- chia seeds: function as a natural thickening agent for the fruit layer, adding subtle texture and nutrients.
- ground cinnamon: introduces a whisper of spice that enhances the overall complexity of the dish.
Variations
The Nut-Free Twist: If you are dealing with common nut allergies, you can easily substitute the almond flour for oat flour and the almond butter for sunflower seed butter. This simple change maintains the structural integrity of the crust while ensuring the dessert is safe for everyone to enjoy.
The Low-Carb Adjustment: For those following a ketogenic lifestyle, you can replace the Medjool dates with a high-quality sugar-free sweetener like erythritol or monk fruit. Be sure to add a small amount of extra liquid if the mixture seems too dry, as dates provide moisture that sugar substitutes do not.
The Tropical Escape: Feel free to infuse the mousse layer with a tablespoon of shredded, unsweetened coconut or a drop of food-grade lime oil for a bright, tropical flavor profile. This pairs exceptionally well with the raspberries and creates a refreshing contrast that makes the dessert perfect for warm-weather gatherings.
How to Prepare no bake raspberry chocolate mousse
Step 1: Gather and Prepare Your Ingredients
Before you begin the assembly process, it is essential to organize all your ingredients on the counter. Having everything measured out in advance will ensure that your workflow remains smooth and efficient throughout the preparation. This practice is a hallmark of professional culinary techniques and prevents unnecessary kitchen stress.
Take the time to pit your Medjool dates carefully, ensuring no rogue pits end up in your food processor. If your dates feel particularly dry, you might want to soak them in warm water for about ten minutes beforehand to soften them up. This extra step ensures a perfectly uniform consistency for your crust and mousse layers.
Double-check that your coconut cream is properly chilled, as this is vital for the mousse’s final stability. If the coconut cream is too warm, it may struggle to aerate or hold its shape properly once the filling is complete. Proper preparation at this stage guarantees a superior, restaurant-quality result that will leave your guests impressed.
Step 2: Create the Rich Chocolate Base
To begin the crust, add the almond flour, flax meal, and cocoa powder into your food processor bowl. Pulse these dry ingredients several times until they are well-combined and free of any large clumps. A consistent dry mix ensures that the final crust has an even texture in every single bite.
Add the pitted Medjool dates and the runny almond butter into the processor while the motor is running on a low setting. Slowly drizzle in the dairy-free milk and vanilla extract to help the mixture bind together effectively. You are aiming for a dough that feels slightly tacky to the touch but holds its shape when squeezed between your fingers.
Be careful not to over-process the mixture, as you want to maintain a slight, pleasant crunch from the almond flour. Once the dough looks uniform, stop the machine immediately to preserve the structural integrity of the base. This step creates the foundation for your dessert masterpiece.
Step 3: Shape and Chill the Crusts
Prepare your muffin tin by lining each individual cup with small squares of parchment paper. This will allow you to remove the finished mousse cups easily without any breakage or mess. Press a generous amount of your dough into the bottom and up the sides of each cup to create a secure, deep shell.
Use the back of a spoon to ensure the dough is pressed firmly and evenly into every corner of the liner. A uniform thickness is key to making sure every bite provides a perfect ratio of crust to mousse. Once all cups are lined and filled, place the tin into the freezer for at least twenty minutes.
This quick freeze helps the fats in the crust solidify, which creates a sturdy base that won’t crumble later. During this time, you can clean your food processor bowl to prepare for the next step. A clean station keeps you organized and ready for the final assembly.
Step 4: Craft the Silky Mousse Filling
In a high-powered blender, combine your thick coconut cream, the remaining cocoa powder, and the pitted dates. Blend on a high setting for several minutes, stopping periodically to scrape down the sides of the container. You want the mixture to be completely smooth and velvety, with absolutely no remnants of date skins remaining.
The texture should be reminiscent of a classic, rich ganache but with a lighter, airier mouthfeel. If the mixture is too thick, add a tiny splash of additional coconut cream to reach your desired consistency. Taste the mousse at this stage, and if you prefer a deeper chocolate flavor, feel free to add an extra teaspoon of cocoa.
Once the mixture is perfectly uniform and luscious, remove your muffin tin from the freezer. Spoon or pipe the chocolate mousse into the center of each prepared crust, filling them nearly to the top. Smooth the tops with a spatula to create a neat, professional appearance before returning the tin to the freezer for at least two hours.
Step 5: Create the Raspberry Topping and Finalize
While the mousse is setting, prepare the final layer by placing the frozen raspberries, water, chia seeds, and cinnamon in a small saucepan. Cook this mixture over medium heat, allowing the raspberries to break down naturally as they thaw and release their juices. Stir the mixture frequently to ensure the chia seeds are evenly distributed.
The chia seeds will absorb the moisture from the berries, thickening the mixture into a delicious, spreadable jam. This natural thickening process creates a beautiful ruby-red topping that contrasts perfectly with the dark chocolate mousse. Once it has reached a thick, jam-like consistency, remove it from the heat and let it cool completely to room temperature.
Once the mousse cups have set and the jam is cool, spoon a generous layer of the raspberry mixture over each individual dessert. Give them a final brief chill in the freezer for about ten minutes to set the topping before serving. This final assembly creates a stunning, multi-layered lunch treat or evening snack that looks beautiful on any plate.
Pro Tips for no bake raspberry chocolate mousse
The Importance of Patience: Never rush the chilling process, as the coconut cream needs time to fully solidify to ensure the mousse holds its shape. If you attempt to serve the dessert before it has sufficiently frozen, you risk having the filling lose its structural integrity on the plate.
Mastering the Crust: If you want a more intense chocolate experience, brush the inside of your chilled crusts with a little bit of melted dark chocolate before adding the mousse. This creates a moisture barrier that keeps the crust crisp for even longer, providing a professional touch.
Quality Matters: Always use full-fat canned coconut cream for the best results, as the lower-fat versions lack the necessary richness to create a creamy mousse. If you cannot find coconut cream, you can chill a can of full-fat coconut milk overnight and scoop out the solid white part that separates to the top.
Temperature Control: Serve this dessert directly from the refrigerator for a soft, creamy experience, or straight from the freezer if you prefer a texture more like an ice cream cake. Adjusting the serving temperature allows you to customize the mouthfeel based on your personal preference or the season.
Serving Suggestions for no bake raspberry chocolate mousse
Decoration
Elevate your presentation by garnishing each mousse cup with a fresh, whole raspberry and a small sprig of mint. The vibrant green of the mint leaves perfectly complements the deep red of the berries and the dark tones of the chocolate. You could also lightly dust the tops with a pinch of cocoa powder or shredded coconut for added visual interest.
Side Dishes
While this dessert is quite rich on its own, it pairs wonderfully with a side of lightly whipped coconut cream or a small spoonful of almond yogurt. If you are hosting a larger gathering, consider serving these alongside some funfetti cookies to provide a variety of textures and flavor profiles on the dessert platter. The contrast between the soft mousse and crunchy cookies is always a crowd-pleaser.
Creative Serving Ideas
For an elegant touch, serve the mousse in individual small glass ramekins instead of paper liners, which allows the beautiful layers to be visible from the side. This is a great way to showcase the work you put into the distinct layers. You can even place the finished cups on a beautiful wooden serving board surrounded by fresh berries for a rustic, inviting display.
Preparation & Storage
Storing Leftovers
Store any remaining mousse cups in an airtight container in the refrigerator for up to three days. Keep them away from strong-smelling foods like onions or garlic, as the coconut cream can absorb odors quite easily. If you notice the raspberry topping starting to weep moisture, simply blot it lightly with a paper towel before serving.
Freezing
This dessert is an excellent candidate for long-term storage in the freezer, where it can be kept for up to two months. Simply wrap the airtight container well to prevent freezer burn, which can degrade the delicate flavor of the cocoa. When you are ready to eat, move a portion to the refrigerator a few hours beforehand to allow it to thaw slowly.
Reheating
These mousse cups should never be reheated, as they are designed to be enjoyed chilled or frozen. If they have become too hard after a long period in the freezer, let them sit on the counter for about ten to fifteen minutes before serving. This allows the texture to soften perfectly without losing the integrity of the mousse.
Frequently Asked Questions
- Can I use fresh raspberries instead of frozen? Yes, you can certainly use fresh raspberries, but you may need to add a splash of water to the pan to help them break down properly. Since frozen berries are picked at peak ripeness and contain a higher water content, they often produce a smoother, more jam-like consistency for the topping.
- Is this dessert suitable for children or family gatherings? Absolutely, this is a very family-friendly treat that tastes like a decadent indulgence while hiding wholesome, nutrient-rich ingredients. It is a fantastic way to introduce kids to the flavors of dark chocolate and fresh fruit without the excessive processed sugars found in many store-bought alternatives.
- Why is it important to use a food processor for the base? A food processor is necessary to properly break down the fibrous dates and evenly distribute the nut flour and cocoa, ensuring a uniform dough. If you try to mix it by hand, the crust will likely result in large, uneven chunks of dates that don’t bind well, making it difficult to press into the muffin tins effectively.
If you enjoy this recipe and want to explore more, make sure to check out our breakfast ideas and other dinner options to keep your kitchen inspired. For more helpful tips and community discussions, you can also visit our Pinterest page for visual guides and inspiration. Your culinary journey is just beginning, and we are thrilled to be part of your kitchen adventures!