Irresistible Italian Sausage Manicotti: A Comforting Delight
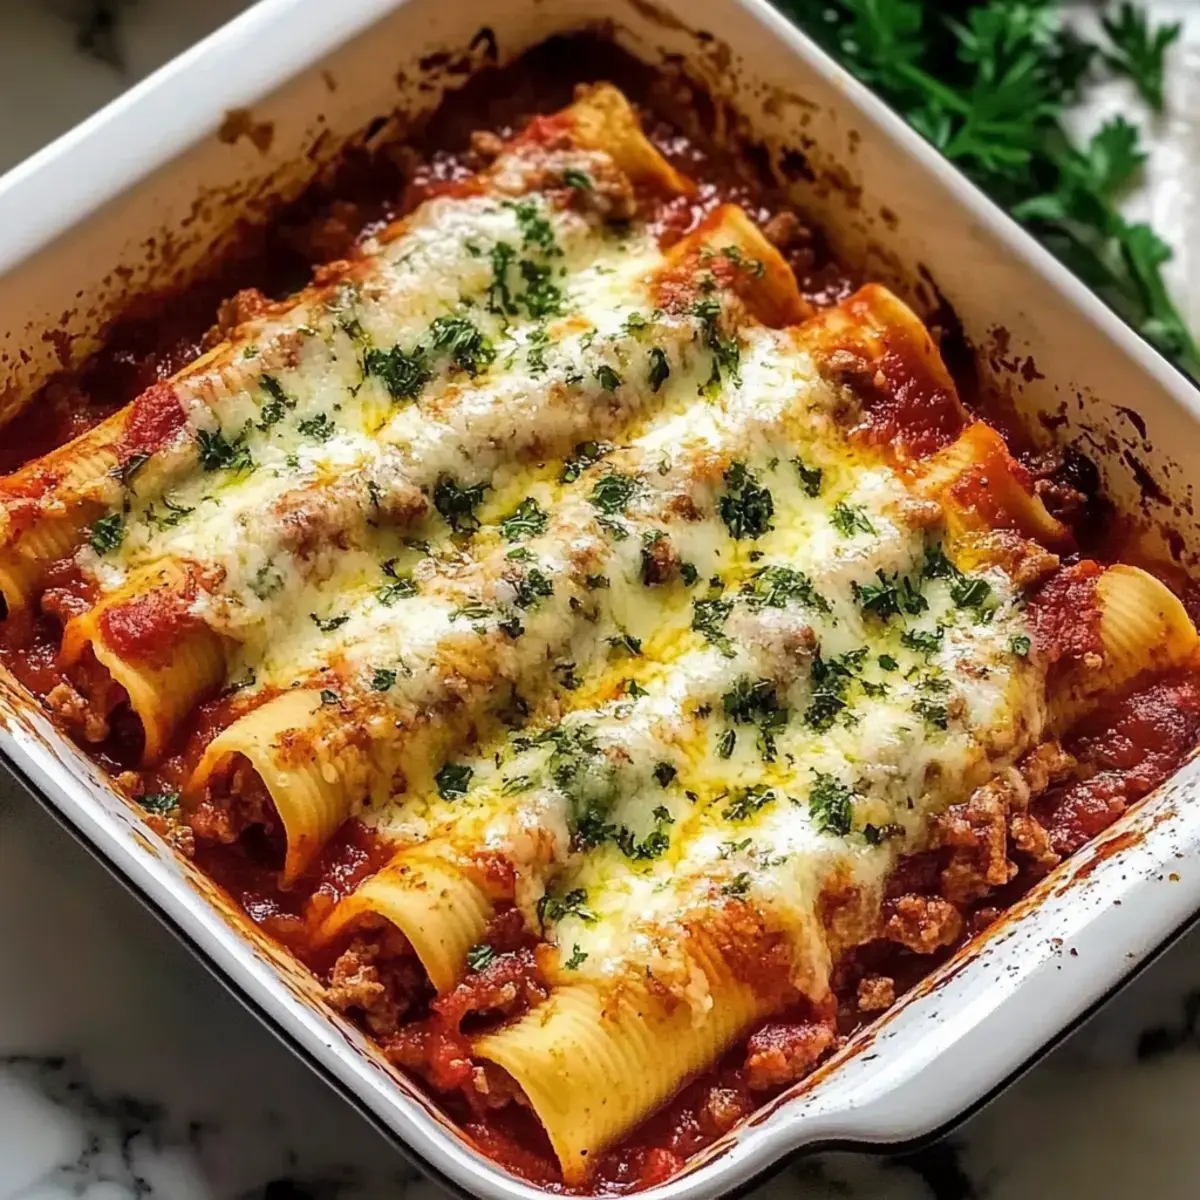
As the aroma of sizzling Italian sausage layered with garlic and onions filled my kitchen, I felt transported to a cozy trattoria tucked away in the heart of Florence. That’s the magic of making Italian Sausage Manicotti—each bite is a comforting hug, lovingly crafted with ricotta, seasoned sausage, and oozing mozzarella nestled in tender pasta shells.
This simple yet impressive dish is not only quick to prepare but also freezer-friendly, making it an ideal choice for family dinners or an easy meal prep option. With just a few ingredients and a sprinkle of love, you’ll impress everyone at the table, so are you ready to dive into this delightful Italian feast?
Why You Will Love This Recipe
- Irresistible Comfort: This recipe brings together the warm, hearty flavors of Italian sausage, silky ricotta, and gooey mozzarella, creating a dish that’s perfect for family gatherings or a cozy night in. The combination of textures and rich tastes makes it a guaranteed crowd-pleaser that speaks to the soul.
- Time-Saving Convenience: With easy prep and freezer-friendly options, you can whip this up ahead of time and enjoy a homemade meal on those busy nights without sacrificing flavor or quality. This recipe is designed to fit seamlessly into your weekly meal planning.
- Endless Customization: Whether you prefer spicy or sweet sausage, or even want to sneak in some extra vegetables, this manicotti adapts beautifully to your tastes and dietary needs. It’s a versatile base for countless delicious variations.
- Impressive Presentation: Serving up this baked dish, bubbling with cheese and smothered in marinara, will have everyone asking for seconds—even your pickiest eaters! It looks as good as it tastes, making any meal feel special.
- Perfect Pairing Potential: Don’t forget to serve it alongside a fresh Italian salad or some warm garlic bread; they complement each other perfectly and complete the dining experience. It’s a dish that pairs beautifully with many classic sides.
Ingredients You Need
The heart of any remarkable dish lies in the quality of its ingredients. For this Italian Sausage Manicotti, we are focusing on fresh, flavorful components that come together harmoniously. Using good quality sausage and freshly grated cheeses will make a noticeable difference in the final taste. Every element is chosen to contribute to a rich and satisfying culinary experience.
Italian Sausage Manicotti
Sizzling Italian sausage, creamy ricotta, and oozing mozzarella tucked into tender pasta shells, all baked to perfection in a rich marinara sauce. This comforting dish is a classic Italian favorite, perfect for family dinners or meal prep.
- 1 tablespoon Olive Oil (Extra virgin recommended)
- 1 pound Italian Sausage
- 1 medium Onion (Diced)
- 2 cloves Garlic (Minced)
- 15 ounces Ricotta Cheese
- 1 large Egg
- 1 cup Mozzarella Cheese (Shredded)
- 1/2 cup Parmesan Cheese (Freshly grated)
- 1 tablespoon Italian Seasoning
- 1/4 teaspoon Red Pepper Flakes (Optional)
- Salt and Pepper (To taste)
- 12 pieces Manicotti Shells (Barilla recommended)
- 2 cups Marinara Sauce (Homemade or store-bought)
- 1/4 cup Fresh Parsley (Chopped, for garnish)
- 1Preheat your oven to 350°F (175°C) and coat a 9x13 inch baking dish with cooking spray.
- 2In a large skillet over medium heat, heat olive oil and sauté crumbled Italian sausage for 3-4 minutes until browned. Add diced onion and cook until translucent, about 4-5 minutes, then stir in minced garlic for 30 seconds.
- 3Transfer the sausage mixture to a mixing bowl. Add ricotta, beaten egg, mozzarella, Parmesan, Italian seasoning, red pepper flakes, salt, and pepper. Mix until creamy.
- 4Boil a large pot of salted water and cook manicotti shells 1-2 minutes less than package directions. Drain and cool on a towel.
- 5Spread about 1 cup of marinara sauce on the bottom of the baking dish. Fill each manicotti shell with the cheese and sausage mixture, arrange in the dish, then top with remaining sauce.
- 6Cover with aluminum foil and bake for 20 minutes. Remove the foil and sprinkle on remaining mozzarella, then bake uncovered for another 10-15 minutes until bubbly and golden.
- 7Let the manicotti rest for 3-5 minutes, garnish with fresh parsley, and serve hot.
Keywords: Italian Sausage Manicotti, Italian Pasta, Baked Pasta, Sausage and Ricotta, Comfort Food
The specific quantities for each ingredient are detailed within the recipe card, ensuring you have everything you need for a perfect preparation.
Variations
The beauty of Italian Sausage Manicotti lies in its adaptability, allowing you to tailor it to diverse palates and dietary needs with ease. Consider infusing your dish with an extra layer of flavor by introducing unique ingredients or switching up the core components.
For a delightful vegan twist, you can omit the Italian sausage and instead opt for a robust filling made from sautéed mushrooms, finely chopped spinach, and a blend of seasoned plant-based ricotta or cashew cheese. This variation proves that a meatless manicotti can be just as satisfying and incredibly flavorful, offering a hearty meal without any animal products.
If you’re looking to reduce carbohydrates, explore using zucchini ribbons or thinly sliced eggplant as your “pasta” shell. These vegetable alternatives offer a lighter, low-carb base that still holds the delicious filling beautifully. You can also experiment with different types of cheeses, perhaps incorporating a smoked mozzarella for an added depth of flavor that complements the lighter vegetable shell.
Another exciting variation involves playing with the sauce. Instead of a traditional marinara, try a creamy béchamel sauce or a spicy arrabbiata for a different flavor profile. A béchamel offers a luxurious, velvety texture, while an arrabbiata brings a welcome heat that awakens the taste buds. These sauce swaps can transform the entire character of the dish, making it feel entirely new.
How to Prepare Italian Sausage Manicotti
Step 1: Preheat the Oven and Prepare the Baking Dish
Begin by preheating your oven to a precise 350°F (175°C). This ensures that when your assembled manicotti enters the oven, it starts cooking immediately at the optimal temperature. While the oven is reaching its target heat, take a standard 9×13 inch baking dish and apply a generous coating of cooking spray. Alternatively, you can lightly grease it with butter or olive oil, ensuring every nook and cranny is covered.
A well-greased dish is your first line of defense against sticking, which is crucial for easy serving and a beautiful presentation. This step prevents the delicate pasta shells and the bubbling cheese from adhering to the bottom and sides, ensuring that each portion can be lifted out cleanly. This diligence in preparation sets the stage for a stress-free cooking and serving experience later on.
Step 2: Sauté the Sausage and Aromatics
In a large, heavy-bottomed skillet, pour in a tablespoon of olive oil and heat it over medium heat until it shimmers slightly. Add one pound of crumbled Italian sausage to the hot skillet. Cook the sausage, breaking it up with a spoon, for about 3-4 minutes until it is thoroughly browned and cooked through. Drain off any excess grease to prevent the dish from becoming too oily.
Next, add one medium diced onion to the same skillet, sautéing it with the rendered sausage drippings for approximately 4-5 minutes. You are looking for the onion to become translucent and tender, releasing its natural sweetness. Finally, stir in two cloves of minced garlic and cook for an additional 30 seconds until fragrant, being careful not to burn the garlic, which can turn bitter.
Step 3: Prepare the Creamy Cheese Filling
Once your sausage mixture has been cooked and slightly cooled in the skillet, carefully transfer it to a large mixing bowl. This cooling step is important to prevent the egg from scrambling when added. Add 15 ounces of ricotta cheese to the bowl, creating a creamy base for your filling. For binding and richness, stir in one large beaten egg until it is well incorporated into the ricotta and sausage mixture.
Next, add one cup of shredded mozzarella cheese and half a cup of freshly grated Parmesan cheese to the bowl, contributing to the gooey, cheesy deliciousness. For seasoning and depth of flavor, incorporate one tablespoon of Italian seasoning, a quarter teaspoon of red pepper flakes (if you desire a touch of heat), and salt and pepper to taste. Stir all these ingredients together thoroughly until everything is evenly combined and has a creamy, uniform consistency.
Step 4: Cook the Manicotti Shells
Bring a large pot of generously salted water to a rolling boil over high heat. Carefully add 12 manicotti shells to the boiling water. It is critical to cook the shells for 1 to 2 minutes less than the time indicated on the package directions. This al dente cooking stage is essential because the shells will continue to cook in the oven and you want them to hold their shape without becoming mushy or tearing when filled.
Once the shells have reached the desired slightly undercooked state, carefully drain them in a colander. Gently lay the drained shells on a clean kitchen towel or parchment paper in a single layer. Allowing them to cool completely on the towel is vital; this prevents them from becoming too soft and makes the filling process much smoother and less prone to breakage.
Step 5: Assemble the Manicotti Masterpiece
Begin the assembly by spreading approximately one cup of marinara sauce evenly across the bottom of your prepared baking dish. This layer of sauce acts as a flavorful bed for the manicotti shells, preventing them from sticking and adding moisture during baking. Now, carefully take your cooled manicotti shells and begin filling each one with the prepared cheese and sausage mixture using a spoon or, for a cleaner fill, a piping bag or a zip-top bag with the corner snipped off.
Fill each shell generously but avoid overstuffing, which can cause them to split. Once filled, arrange the manicotti shells snugly in the baking dish, seam-side down if possible, ensuring they are packed closely together. This tight arrangement helps them maintain their shape during baking and creates a beautiful presentation when served. Once all shells are filled and arranged, pour the remaining marinara sauce evenly over the top of the filled shells, ensuring they are well coated and nestled in the sauce.
Step 6: Bake to Golden Perfection
Cover the entire baking dish tightly with aluminum foil. This step is crucial for the initial baking phase, as it traps steam and ensures that the manicotti shells cook through evenly and the flavors meld together without the top becoming too browned too quickly. Place the foil-covered dish into your preheated oven and bake for approximately 20 minutes.
After the initial 20 minutes, carefully remove the aluminum foil. You will see the sauce is bubbling and the pasta is beginning to soften. Now, sprinkle the remaining shredded mozzarella cheese evenly over the top of the marinara-covered manicotti. Return the dish to the oven, uncovered this time, and bake for an additional 10 to 15 minutes. This uncovered baking time allows the cheese to melt into a beautiful, golden-brown, bubbly topping that is the hallmark of a perfect baked Italian dish.
Step 7: Rest and Serve with Flair
Once the manicotti has reached that perfect bubbly, golden stage, carefully remove the baking dish from the oven. It is imperative to let the Italian Sausage Manicotti rest for at least 3 to 5 minutes before serving. This short resting period allows the cheese and sauce to set slightly, which makes serving much easier and prevents the filling from spilling out of the shells.
As it rests, you can prepare your garnish. Chop a small bunch of fresh parsley for a vibrant pop of color and freshness. Just before serving, sprinkle the chopped parsley over the top of the manicotti. This adds a professional touch and enhances the visual appeal of the dish. Cut the manicotti into individual portions using a spatula or knife, and serve hot, inviting everyone to savor this comforting, cheesy, and deeply satisfying Italian classic.
Pro Tips for Italian Sausage Manicotti
Mastering Italian Sausage Manicotti involves a few key techniques that ensure perfect results every time. Pay close attention to the cooking of the pasta shells; overcooking them even slightly can lead to breakage during the filling process, creating a messy experience and potentially a less appealing presentation. Always aim to cook them just until al dente, which means they still have a slight bite.
Allowing the filled manicotti to rest after baking is an often-overlooked but vital step. This resting period allows the molten cheese and sauce to firm up just enough, making it much easier to serve neat portions without the filling escaping. It also allows the flavors to settle and meld further, creating a more cohesive and delicious final dish.
Consider using a piping bag or even a sturdy zip-top bag with a corner snipped off for filling the manicotti shells. This method offers much more control and allows for a neater, more efficient filling process than using a spoon, especially for delicate shells. It helps ensure each shell is evenly filled, leading to a more uniform dish.
Don’t skimp on the marinara sauce, especially when assembling the dish. Ensure there’s a generous layer on the bottom of the baking dish and that the tops of the filled shells are well-covered. The sauce provides essential moisture during baking, preventing the manicotti from drying out and contributing significantly to the overall flavor and texture.
Embrace creativity with your filling and sauce choices to adapt the recipe to your preferences. Adding finely chopped sautéed vegetables like spinach or mushrooms to the ricotta mixture can boost the nutritional value and add another layer of flavor without altering the core character of the dish too much. For a unique twist, a touch of pesto stirred into the ricotta can add a vibrant, herbaceous note.
Serving Suggestions for Italian Sausage Manicotti
Decoration
The visual appeal of your Italian Sausage Manicotti can be significantly enhanced with simple garnishes. A generous sprinkle of freshly chopped flat-leaf parsley over the top just before serving provides a beautiful contrast of green against the rich red sauce and golden cheese. The vibrant color instantly makes the dish look more appetizing and professionally prepared. For an extra touch of elegance, a few fresh basil leaves can be strategically placed, adding both visual interest and a complementary aroma.
Side Dishes
To complement the hearty nature of Italian Sausage Manicotti, consider serving it with sides that offer a refreshing balance. A crisp Caesar salad, with its romaine lettuce, croutons, and tangy Caesar dressing, cuts through the richness of the cheese and sausage beautifully. Alternatively, a simple mixed green salad with a light vinaigrette provides a fresh counterpoint that cleanses the palate. Warm, crusty bread, especially garlic bread, is essential for soaking up any extra delicious marinara sauce left on the plate.
Creative Serving Ideas
Elevate your Italian Sausage Manicotti experience with these creative serving ideas. For a family-style meal, present the entire bubbling baking dish at the center of the table, allowing everyone to serve themselves. For a more formal occasion, plate individual portions, ensuring each serving has a few well-filled manicotti shells nestled in sauce. You could also serve it alongside a small bowl of extra marinara sauce for those who like to add more. For a truly authentic Italian experience, pair it with a glass of medium-bodied red wine, such as a Chianti or Montepulciano.
Preparation & Storage
Storing Leftovers
Storing leftover Italian Sausage Manicotti is straightforward and ensures you can enjoy this comforting dish for days to come. Once the baked manicotti has cooled to room temperature, transfer any remaining portions into an airtight container. It’s important that the container is well-sealed to prevent the pasta and sauce from drying out in the refrigerator. Properly stored, leftovers will remain delicious and safe to eat for up to 4 days.
Freezing
This versatile dish freezes exceptionally well, making it a fantastic option for meal prepping or having a ready-to-bake meal on hand. For the best results, it’s ideal to freeze the manicotti *before* baking. Assemble the manicotti in a freezer-safe baking dish, cover it tightly first with a layer of plastic wrap, and then a layer of aluminum foil to prevent freezer burn. Properly frozen, it can maintain its quality for up to 3 months.
Reheating
Reheating your Italian Sausage Manicotti, whether from the refrigerator or freezer, is simple and effective. If reheating from the refrigerator, cover the dish with foil and warm it in a preheated oven at 350°F (175°C) for about 15-20 minutes, or until heated through. You may want to add a splash more marinara sauce before reheating to ensure it stays moist. For frozen manicotti, bake it directly from frozen, covered with foil, at the same temperature (350°F/175°C) for about 40-50 minutes.
After the initial covered baking time for frozen manicotti, remove the foil and continue baking for another 10-15 minutes, or until the cheese is bubbly and golden brown on top. This two-stage baking process ensures that the dish is heated evenly throughout and achieves that desirable cheesy crust. Microwaving leftovers is also an option, but be sure to add a bit of sauce and heat in short intervals to avoid drying it out.
Frequently Asked Questions
- How do I choose the right Italian sausage for this recipe?
For the best flavor, opt for high-quality ground Italian sausage, whether sweet or spicy based on your preference. Look for sausages without excessive filler ingredients or artificial flavors, as these can detract from the authentic Italian taste. You can also substitute with ground chicken or turkey sausage for a lighter option, but ensure it is well-seasoned to maintain that desired savory profile. If you’re seeking a truly authentic experience, consider using sausage from a local butcher for unparalleled freshness and flavor.
- How should I store leftover Italian Sausage Manicotti?
Leftover Italian Sausage Manicotti can be stored in an airtight container in the refrigerator for up to 4 days. To reheat, gently warm it in the oven at 350°F (175°C) for about 15-20 minutes, covering it with foil to keep it moist and prevent the top from over-browning. Alternatively, microwaving it works well; just add a splash of marinara sauce to retain moisture and prevent the pasta from becoming dry. Ensure the container is properly sealed to maintain freshness and prevent any unwanted odors from permeating other foods in your refrigerator.
- Can I freeze Italian Sausage Manicotti? What’s the best way?
Absolutely! To freeze, it is best to assemble your manicotti but do not bake it. This prevents the pasta from becoming too soft. Wrap the dish tightly in plastic wrap, ensuring all edges are sealed, and then cover it thoroughly with aluminum foil. This double protection helps prevent freezer burn and maintains the quality for up to 3 months. When you’re ready to enjoy, bake it directly from frozen, covered with foil at 350°F (175°C) for about 40-50 minutes, then remove the foil and bake for another 10-15 minutes until bubbly and golden. This method ensures a delicious meal even weeks later.