Brown Butter Chocolate Chip Skillet Cookie – Gooey and Irresistible

You know that moment when your kitchen starts to smell like a cozy bakery and all your worries begin to fade away? That is exactly how I felt the first time I whipped up this Brown Butter Chocolate Chip Skillet Cookie. It is a sensory experience that is perfect for sharing with family or friends on a quiet weekend evening.
With its golden, crisp edges and a soft, gooey center packed with melty chocolate, this treat is more than just a simple dessert. Elevating the classic chocolate chip cookie, the brown butter adds a rich, nutty depth that simply cannot be beat. You might just find yourself twirling your spatula with excitement as you prepare this warm, comforting masterpiece.
Why You Will Love This Recipe
- Irresistible Flavor: The process of browning the butter adds a deep, complex, and nutty essence that takes this cookie from ordinary to truly extraordinary.
- Quick Preparation: You can have this mouthwatering, warm skillet cookie ready for the oven with just a few simple mixing steps.
- Sharing is Caring: This skillet cookie is the perfect centerpiece for any gathering, offering a warm and communal dessert that everyone will enjoy.
- Flexible Customization: You are in complete control; feel free to swap your favorite chocolate types or toss in crunchy nuts for a unique twist.
- Gooey Perfection: Every single bite showcases a contrast between the crispy outer edges and a soft, molten center that embodies pure indulgence.
Ingredients You Need
Creating the perfect skillet cookie starts with selecting high-quality ingredients that harmonize beautifully. Each component plays a vital role in achieving that specific texture and depth of flavor we crave. Please refer to the quantities below for your shopping and preparation list.
Brown Butter Chocolate Chip Skillet Cookie
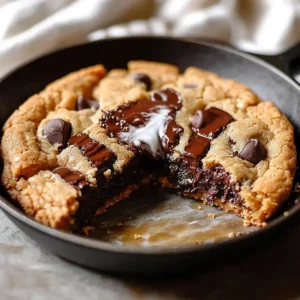
A rich, nutty, and gooey chocolate chip cookie baked in a skillet, featuring crispy golden edges and a soft center, elevated by the deep flavor of browned butter.
- 1 cup Unsalted Butter
- 3/4 cup Light Brown Sugar
- 1/2 cup Granulated Sugar
- 1 large Egg
- 1 teaspoon Vanilla Extract
- 1 1/2 cups All-Purpose Flour
- 1 teaspoon Cornstarch
- 1/2 teaspoon Baking Soda
- 1 pinch Salt
- 1 cup Chocolate Chips or Chopped Chocolate
- 1/2 cup Nuts (Pecans/Walnuts)
- 1Brown the butter in a saucepan over medium heat until it turns amber, then cool for 10-20 minutes.
- 2Whisk the cooled brown butter with brown and granulated sugars until smooth.
- 3Mix in the egg and vanilla extract until well blended.
- 4Fold in the flour, cornstarch, baking soda, and salt.
- 5Add the chocolate chips and optional nuts.
- 6Press the dough into a greased 8-inch cast iron skillet.
- 7Bake at 325°F (163°C) for 24-28 minutes.
- 8Cool for 15 minutes and top with a pinch of flaky salt.
Keywords: skillet cookie, brown butter, chocolate chip, dessert, baking
- unsalted butter: use high-quality butter to create the rich, nutty brown butter base.
- light brown sugar: this provides the essential moisture needed for a chewy, tender cookie texture.
- granulated sugar: helps balance the deep molasses notes of the brown sugar for the perfect level of sweetness.
- egg: functions as the primary binder for the batter; ensure it is at room temperature for the best emulsion.
- vanilla extract: adds a warm, aromatic note that highlights the buttery profile of the cookie.
- all-purpose flour: serves as the structural backbone of the recipe to keep everything held together.
- cornstarch: a secret weapon for maintaining a soft, tender crumb in every bite.
- baking soda: provides the necessary lift to ensure the cookie rises slightly while remaining dense and chewy.
- salt: helps to elevate all the sweet flavors and provides a necessary contrast to the richness.
- chocolate chips: high-quality chips create those iconic gooey pockets of melted goodness throughout the dish.
- nuts: optional walnuts or pecans can be added for a satisfying crunch and rustic flavor profile.
Variations
The Vegan Twist: You can easily adapt this recipe by using a plant-based butter substitute and a flax egg as a binding agent. Ensure your chocolate chips are certified dairy-free to keep the entire skillet vegan-friendly.
Low Carb Adaptation: For a lighter take, swap the traditional sugars for your favorite granulated erythritol or monk fruit sweetener. Use almond flour as a base to reduce the carbohydrate count while maintaining that signature nutty profile.
Sophisticated Flavor Pairings: Try adding a pinch of espresso powder to the dry ingredients to intensify the chocolate notes. Alternatively, a sprinkle of orange zest provides a bright, citrusy counterpoint to the deep, brown butter base.
How to Prepare Brown Butter Chocolate Chip Skillet Cookie
Step 1: Brown the Butter
Start by placing one cup of high-quality unsalted butter into a medium saucepan set over medium heat. Stir the butter constantly as it melts to ensure it heats evenly without burning. You will notice it bubbling, which is the water content evaporating from the butter solids.
After approximately five to seven minutes, the butter will begin to foam and turn a beautiful golden-brown color. You will start to smell an incredible, toasted, nutty aroma filling your kitchen. Remove the pan from the heat immediately once it reaches a deep amber shade, and let it cool for 10 to 20 minutes.
Step 2: Mix Sugars and Butter
Pour your cooled brown butter into a large mixing bowl to begin the base of your dough. Add your measured light brown sugar and granulated sugar directly into the butter. Whisk these ingredients vigorously for about one full minute until the mixture appears smooth, glossy, and well-combined.
The brown butter needs to be cool enough so that it does not scramble the egg in the next step. This process creates a silky, uniform foundation that ensures the final cookie has a consistent texture throughout. When the sugar and butter look like a cohesive paste, you are ready to proceed.
Step 3: Incorporate Wet Ingredients
Crack your large, room-temperature egg into the sugar-butter mixture. Add one teaspoon of pure vanilla extract to provide that classic aromatic warmth. Whisk the mixture until the egg is fully integrated and the batter takes on a smooth, luscious appearance.
Take care to ensure there are no visible streaks of egg remaining in the bowl. If the batter seems too warm, wait a few more minutes before adding the egg to avoid unwanted coagulation. A smooth, well-mixed wet base is essential for a high-quality finished product.
Step 4: Combine Dry Ingredients
In a separate bowl, whisk together your all-purpose flour, cornstarch, baking soda, and a pinch of salt. Ensure these dry elements are evenly distributed to guarantee a uniform rise throughout the lunch or dinner dessert. Gradually fold this dry mixture into your wet batter using a sturdy rubber spatula.
Stir gently and only until you no longer see streaks of dry flour. Overmixing at this stage can develop too much gluten, which will lead to a tough cookie rather than a tender one. Keep the motion light and purposeful to maintain the integrity of the dough.
Step 5: Fold in Chocolate
Now is the time to add the best part, which is the chocolate. Gently fold in your chosen chocolate chips or chopped chunks of high-quality dark chocolate until they are distributed evenly. If you are adding nuts for extra crunch, fold them in now alongside the chocolate.
Ensure every portion of the dough has a generous amount of chocolate to create those molten pockets. If you want a more gourmet look, reserve a small handful of chips to press onto the top of the dough later. This visual detail makes the final skillet cookie look professional and incredibly tempting.
Step 6: Press into Skillet
Preheat your oven to 325°F (163°C) to ensure a steady, even bake. Lightly grease your 8-inch cast iron skillet with a small amount of butter or non-stick spray. Transfer the prepared dough into the skillet, using your spatula or fingers to press it into an even layer.
Aim for a consistent thickness across the entire surface of the skillet to prevent uneven baking. If the edges are slightly higher than the center, the outer ring will become beautifully crispy while the middle remains soft. Once the dough is level, you are ready to bake this masterpiece to perfection.
Pro Tips for Brown Butter Chocolate Chip Skillet Cookie
The Temperature Check: Always allow your brown butter to cool slightly before adding the egg, as this prevents the risk of scrambling and ensures a perfectly smooth batter consistency.
Don’t Overmix: When folding your dry ingredients into the wet mixture, use a gentle hand and stop as soon as the flour disappears. Overworking the dough is a common mistake that can make the final result dense and tough instead of chewy.
Watch the Edges: Ovens vary significantly in their heating patterns, so begin checking for doneness at the 24-minute mark. You are looking for edges that are golden and set, while the center should still look soft and slightly underdone.
Resting Time: It is tempting to dig in immediately, but letting the cookie rest for 15 minutes allows the center to set properly. This ensures you get that iconic spoonable texture without the cookie falling apart when you try to serve it.
Finishing Touch: A small pinch of flaky sea salt sprinkled over the top just before serving provides a contrast that highlights the deep, buttery notes. It gives the dessert a gourmet, bakery-style finish that guests will love.
Serving Suggestions for Brown Butter Chocolate Chip Skillet Cookie
Decoration
To make the presentation truly special, add a dusting of powdered sugar over the warm surface. You can also place a few extra chocolate chips on top during the last two minutes of baking for a beautiful, glossy finish. A final sprinkle of coarse sea salt adds a professional touch that balances the sweetness.
Side Dishes
The most classic companion is a large, generous scoop of high-quality vanilla bean ice cream served right in the center. For a lighter contrast, a handful of fresh, tart raspberries or strawberries provides a bright acidity that cuts through the rich, buttery flavor of the cookie. If you want to lean into the indulgence, a dollop of fresh whipped cream also pairs wonderfully.
Creative Serving Ideas
Serve the skillet directly to the table as the centerpiece for a cozy dessert party. Provide individual spoons for guests to dig into the warm center together. You can also drizzle warm salted caramel or a rich chocolate ganache over the top for an extra level of decadent flavor.
Preparation & Storage
Storing Leftovers
If you have any leftovers, cover the cooled skillet tightly with foil or plastic wrap to keep the air out. You can keep it at room temperature for up to two days to maintain its soft, gooey texture. For longer storage, keep it in an airtight container in the refrigerator for up to five days.
Freezing
You can freeze individual slices of the cookie by wrapping them tightly in plastic wrap and then placing them in a freezer-safe bag. The cookie will stay delicious in the freezer for up to two months. When you are ready to eat, simply thaw the slice in the refrigerator overnight before reheating.
Reheating
To enjoy that fresh-out-of-the-oven experience, reheat individual portions in the microwave for 15 to 20 seconds. If you prefer using an oven, place the skillet or a slice in a preheated 350°F oven for about eight to ten minutes. This process brings back that perfect balance of crispy edges and a soft, molten center.
Frequently Asked Questions
- How do I ensure the best flavor from the butter? To achieve the best flavor, make sure to use unsalted butter so you have full control over the final salt content. Browning the butter until it reaches a deep, nutty aroma is essential; this technique creates the signature base that pairs perfectly with brown sugar, much like you might experience in a German pancake recipe.
- Can I prepare this ahead of time for guests? Yes, you can prepare the dough up to 24 hours in advance and keep it covered in the refrigerator. Just remember to let the dough reach room temperature for about 15 minutes before pressing it into your skillet to bake. This makes hosting much easier while ensuring you still serve a warm, freshly baked treat.
- What should I do if the center seems too soft after baking? The center is intended to remain slightly soft and gooey, so don’t be alarmed if it looks less firm than the edges. If it feels too raw, return it to the oven for two to three minutes, but always aim for that soft texture. Proper resting time is the secret to ensuring the center sets perfectly while remaining indulgent for serving.
Check out more inspiration at Pinterest to see how we pair this with other delicious treats. Happy baking!