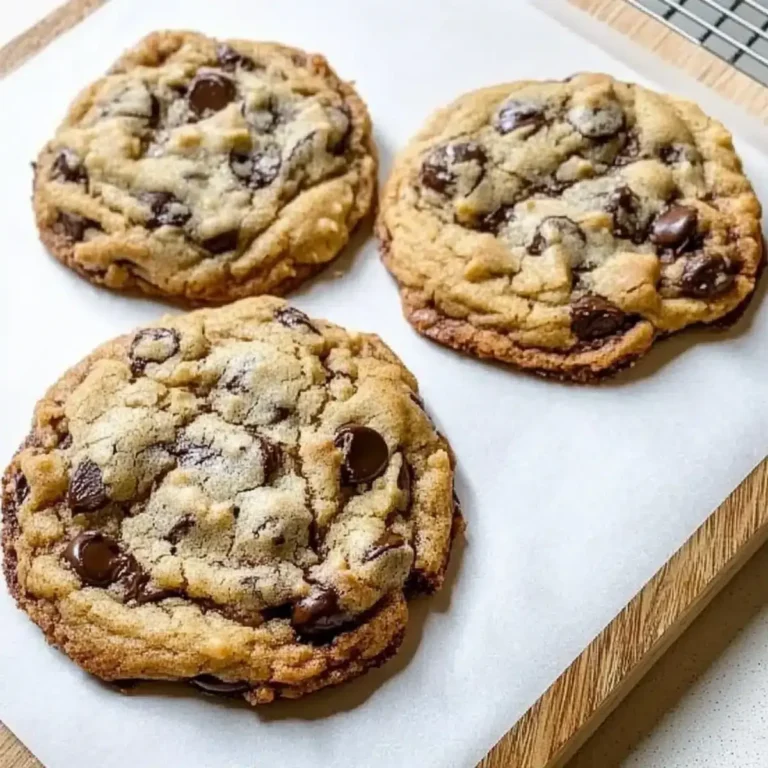
Ultimate Biscoff Butter Cookies for Delicious Moments

The unmistakable scent of warm cookies filling the house is a comforting reminder of home, and these Biscoff Butter Cookies take that sensation to a whole new level. The moment you crack open a jar of Biscoff cookie butter, you’re greeted by a sweet aroma that ignites the imagination and tantalizes the taste buds.
I was initially skeptical—could a cookie be both chewy and delicately crisp while packing such rich, spiced flavor? But one bite and the answer was clear: these cookies were a revelation. Perfect for any occasion, these cookies take no time to whip up, making them an ideal treat for both casual gatherings and special celebrations. With simple ingredients and a few easy steps, you’ll have a batch ready to impress friends and family—or just to indulge in a little “me-time.” Imagine sinking your teeth into a cookie with a burst of caramelized sugar and spice, each morsel speaking of warmth and nostalgia.
Why You Will Love This Recipe
- Unforgettable Flavor: The rich Biscoff cookie butter adds a unique sweetness that transforms ordinary cookies into something extraordinary, boasting a delightful caramel and spiced profile.
- Simple Preparation: With just a few easy steps and readily available ingredients, you can whip up a batch of these delicious cookies without any fuss, making them perfect for busy home cooks or spontaneous baking sessions.
- Perfect Texture: These cookies achieve the ideal balance of soft, chewy centers and lightly crisp edges, creating a satisfying mouthfeel that keeps you coming back for more delightful bites.
- Crowd-Pleaser: Whether served at a festive gathering, a casual get-together, or simply enjoyed with a cup of tea, these cookies are universally loved and sure to impress friends and family alike with their comforting taste.
- Versatile Treat: They can be easily customized with optional add-ins like chocolate chips or enjoyed as-is, allowing you to tailor the beloved Biscoff flavor to your personal preference.
Ingredients You Need
To create these truly exceptional Biscoff Butter Cookies, the quality of your ingredients plays a significant role in achieving the perfect balance of flavor and texture. Opting for fresh, high-quality staples will ensure that the distinctive taste of the Biscoff cookie butter shines through brilliantly. Remember that the nuances of well-chosen components can elevate simple cookies into a memorable culinary experience.
Melt-in-Your-Mouth Biscoff Butter Cookies to Savor
These Biscoff Butter Cookies deliver an unforgettable taste experience with a perfect balance of chewy and crisp textures. The rich Biscoff cookie butter adds a unique sweetness that transforms ordinary cookies into something extraordinary. Simple preparation with just a few easy steps, you can whip up a batch of these delicious cookies without any fuss—perfect for busy home cooks.
- 2 cups all-purpose flour
- 1 teaspoon cinnamon
- 1 teaspoon baking powder
- 1 teaspoon baking soda
- 1/2 teaspoon salt
- 1 cup unsalted butter, softened
- 1 cup light brown sugar, packed
- 1/2 cup granulated white sugar
- 3 large egg yolks, room temperature
- 1 teaspoon vanilla bean paste or extract
- 1 cup Biscoff cookie butter
- 1 cup chocolate chips (optional)
- 1Preheat your oven to 350°F (175°C). Get your baking sheets ready by lining them with parchment paper.
- 2Whisk together the dry ingredients: flour, cinnamon, baking powder, baking soda, and salt in a small bowl.
- 3Cream together the softened butter, brown sugar, and granulated sugar in a large mixing bowl using an electric hand mixer for about 3 minutes.
- 4Add in the egg yolks and vanilla to the creamed mixture and mix until well combined.
- 5Incorporate the cookie butter into the batter, mixing on medium-low speed until well blended.
- 6Combine the dry ingredients with the wet mixture gradually until no flour streaks remain.
- 7Scoop the dough into balls using a 2-tablespoon cookie scoop and place them 2 inches apart on the lined baking sheet.
- 8Bake the cookies for 10-11 minutes until golden at the edges and soft in the center. Let them cool for 5 minutes on the cookie sheet.
- 9Transfer the cookies to a wire rack to cool for another 10-15 minutes.
- 10Store leftovers in an airtight container for up to three days, or freeze them for up to two weeks.
Keywords: Biscoff, Butter Cookies, Chewy Cookies, Spiced Cookies, Easy Cookies, Holiday Baking, Dessert, Afternoon Tea
- all-purpose flour: This forms the foundational structure of our cookies, ensuring a delightful chewiness and a satisfying base for the other flavors to build upon.
- cinnamon: A warm, fragrant spice that complements the caramelized notes of the Biscoff, adding a subtle yet crucial layer of complexity to the cookie’s profile.
- baking powder: This leavening agent helps the cookies rise slightly, contributing to their tender texture and preventing them from becoming too dense.
- baking soda: Working in conjunction with acidic ingredients, baking soda aids in browning and promotes a desirable crispness around the edges of the cookie.
- salt: Essential for enhancing sweetness and balancing flavors, a pinch of salt elevates the overall taste profile and prevents the cookies from being overly sweet.
- unsalted butter: Softened to perfection, it provides richness, moisture, and a tender crumb, acting as the creamy canvas for the cookie dough.
- light brown sugar: Packed tightly, it imparts a deep, subtle molasses flavor and contributes to the cookie’s characteristic chewiness and golden hue.
- granulated white sugar: This adds crispness to the edges and enhances the overall sweetness, balancing the richer flavors of the brown sugar and cookie butter.
- egg yolks: At room temperature, they add crucial moisture, richness, and a tender bite, contributing to the cookie’s luxurious, melt-in-your-mouth quality.
- vanilla bean paste or extract: Infuses a sweet, aromatic essence that rounds out the flavors, enhancing the spiced and caramelized notes of the Biscoff without overpowering them.
- Biscoff cookie butter: The undisputed star of the show, its unique blend of caramelized biscuits provides an unforgettable sweet and spiced flavor that defines these cookies.
- chocolate chips: For an optional, but highly recommended, addition that introduces pockets of melted chocolate, adding another layer of indulgence to the spiced cookie base.
The precise quantities for each ingredient are readily available in the recipe card at the end of this article.
Variations
For those seeking to explore beyond the classic Biscoff Butter Cookie, a world of delightful variations awaits. These adjustments cater to different dietary needs and flavor preferences, ensuring that everyone can enjoy a taste of this beloved cookie.
Consider a vegan adaptation by substituting the butter with a high-quality vegan butter or coconut oil and using flax eggs (one tablespoon of flaxseed meal mixed with 2.5 tablespoons of water, left to sit for five minutes) to bind the dough. These swaps maintain the cookie’s integrity while making it suitable for a plant-based diet, offering a slightly different, yet equally delicious, flavor profile.
For a low-carb option, you can experiment with almond flour or coconut flour in place of all-purpose flour, along with a sugar substitute like erythritol or stevia to maintain sweetness. Be mindful that these flour substitutions can alter the texture, potentially resulting in a more crumbly cookie, so adjustments to liquid ingredients might be necessary.
Adding a pinch of cayenne pepper or a teaspoon of ground ginger to the dry ingredients can introduce a delightful spicy kick. This variation offers a surprising warmth that beautifully contrasts with the sweet, caramelized notes of the cookie butter, creating an exciting flavor dynamic for those who appreciate a touch of heat.
Another popular variation involves incorporating nuts, such as finely chopped pecans or walnuts, into the dough. The nutty crunch adds a wonderful textural contrast to the chewy cookie, and their earthy flavor pairs harmoniously with the spices. For a more decadent experience, consider folding in half a cup of chocolate chips, as mentioned as an optional ingredient, creating irresistible pockets of melted chocolate goodness.
How to Prepare biscoff butter cookies
Step 1: Mixing the Dry Ingredients
The journey to perfectly chewy Biscoff Butter Cookies begins with the careful combination of your dry ingredients. This foundational step ensures that the leavening agents and spices are evenly distributed throughout the flour, which is paramount for consistent texture and flavor in every bite. Preheating your oven and preparing your baking sheets simultaneously is a wise move; setting your oven to 350°F (175°C) and lining your baking sheets with parchment paper will ensure they are ready when the dough is.
In a medium-sized bowl, gently whisk together the all-purpose flour, ground cinnamon, baking powder, baking soda, and salt. The goal here is to aerate the mixture slightly and ensure there are no clumps, especially from the baking soda and baking powder. This thorough blending is crucial for the cookies to rise evenly during baking, preventing any pockets of concentrated spice or leavening that could affect the final outcome.
Take your time with this step. A well-mixed dry ingredient base sets the stage for a superior cookie texture. It’s also a good moment to ensure your whisk is clean and dry to avoid introducing any moisture prematurely into your flour mixture. This meticulous attention to detail in the initial stages directly translates into the quality of the finished product, promising a delightful bite every time you indulge.
Step 2: Creaming Butter and Sugars
This is where the magic of transforming simple ingredients into a luscious dough truly begins. In a large mixing bowl, combine the softened unsalted butter with the light brown sugar and granulated white sugar. Using an electric hand mixer or a stand mixer fitted with the paddle attachment, cream these ingredients together on medium-high speed until the mixture becomes light, fluffy, and pale in color. This process should take approximately three minutes, and it’s essential for incorporating air into the dough, which contributes significantly to the cookies’ texture and spread.
The visual cue you’re looking for is a significant change in consistency and color; the mixture should appear significantly lighter and almost whipped. Proper creaming is a critical step for achieving that desirable balance of chewy centers and slightly crisp edges. If your butter isn’t softened enough, it won’t cream properly, and if it’s too soft or melted, the cookies might spread too much.
Ensure you scrape down the sides and bottom of the bowl periodically with a spatula. This guarantees that all the butter and sugars are incorporated evenly, preventing any pockets of unmixed ingredients. This well-aerated base is fundamental for the cookies’ structure and the overall delightful texture that makes these Biscoff Butter Cookies so irresistible and a true joy to bake.
Step 3: Incorporating Wet Ingredients
Once your butter and sugar mixture is perfectly creamed, it’s time to introduce the richness of the egg yolks and the aromatic essence of vanilla. Add the room-temperature egg yolks and the vanilla bean paste or extract to the creamed butter and sugar mixture. Continue to mix on high speed for another one to two minutes, or until everything is thoroughly combined and the mixture appears even fluffier.
The egg yolks are vital here; they provide essential moisture and fat, contributing to the tender, melt-in-your-mouth quality of the finished cookies. Their inclusion also helps bind the dough together, preventing it from becoming too crumbly. Ensure your egg yolks are at room temperature, as they emulsify more effectively with the fats in the dough, leading to a smoother, more cohesive batter.
Next, it’s time to bring in the star ingredient: the Biscoff cookie butter. Add the entire cup of Biscoff cookie butter to the bowl. Reduce the mixer speed to medium-low and mix until the cookie butter is completely incorporated and the batter is uniformly smooth and creamy. The aroma at this stage is absolutely divine, signaling that the unique spiced, caramelized flavor is beginning to meld into the dough.
Step 4: Combining Wet and Dry Mixtures
Now, the moment arrives to unite the two halves of your cookie dough: the dry ingredients and the enriched wet mixture. Gradually add the flour mixture to the wet ingredients in the mixing bowl. It’s best to add the dry ingredients in two or three additions, mixing on low speed after each addition just until the flour is incorporated.
The key here is not to overmix once the flour is added. Overmixing develops the gluten in the flour too much, which can result in tough, dense cookies rather than the desired chewy texture. Stop mixing as soon as you no longer see any streaks of dry flour. A few gentle stirs with a spatula at the end can ensure everything is perfectly combined without overworking the dough.
This gradual incorporation ensures the dry ingredients are evenly distributed without becoming overworked. If you are adding optional ingredients like chocolate chips, this is also a good time to gently fold them in by hand using a spatula after the main dough has just come together. The resulting dough should be thick, cohesive, and wonderfully aromatic, ready for shaping.
Step 5: Shaping and Baking the Cookies
With your beautifully combined dough ready, it’s time to transform it into perfectly shaped cookies. Using a 2-tablespoon cookie scoop is highly recommended to ensure uniform size and even baking. Scoop mounds of dough and gently roll them into balls between your palms if desired, though the scoop alone provides a great starting point for consistent cookies. Place these dough balls about 2 inches apart on your prepared baking sheets; this spacing allows ample room for the cookies to spread as they bake without touching each other.
Aim to place about six dough balls per standard-sized baking sheet, depending on their size. This spacing is crucial for preventing the cookies from merging into one large cookie mass. Once your baking sheets are filled, it’s time for them to enter the preheated oven. Place the baking sheets in the center rack of your oven to ensure the most even heat distribution.
Bake for approximately 10 to 11 minutes. The cookies are ready when the edges are golden brown, but the centers still appear slightly soft and underbaked. This visual cue is essential for achieving that signature chewy texture; they will continue to cook slightly from residual heat once removed from the oven. Avoid overbaking, as this will lead to dry, hard cookies.
Step 6: Cooling and Finishing Touches
As soon as the cookies emerge from the oven, resist the urge to move them immediately. Let the cookies cool on the baking sheet for about 5 minutes. During this time, they will continue to set and firm up slightly, making them easier to handle without losing their shape or causing them to break. This brief resting period is crucial for their structural integrity.
If you desire perfectly round cookies, this is the moment to act: gently swirl an extra-large circular cookie cutter around each cookie right after they come out of the oven while they are still warm and pliable. This simple technique creates beautiful, uniform circles and gives them a professional finish. It’s a delightful way to elevate the presentation of your homemade treats.
After their initial cool-down on the baking sheet, carefully transfer the cookies to a wire rack to cool completely. This allows air to circulate around them, preventing the bottoms from becoming soggy. Allow them to cool for another 10 to 15 minutes, or until they are cool enough to handle and firm to the touch. Once fully cooled, they are ready to be stored, shared, or enjoyed with a warm beverage!
Pro Tips for biscoff butter cookies
Elevating your Biscoff Butter Cookies from simply delicious to absolutely perfect often comes down to a few expert techniques. Mastering these simple tips can make a noticeable difference in the final texture and overall enjoyment of your baked goods.
Chill the Dough: For cookies that hold their shape beautifully and bake up thicker, chilling the dough for at least 30 minutes before baking is highly recommended. This allows the fats to solidify, which slows down the spread during baking, resulting in a chewier cookie with a more pronounced dome.
Proper Measuring is Key: When measuring your flour, always spoon it into the measuring cup and then level it off with a straight edge, rather than scooping directly from the bag. Packing too much flour into the cup can lead to dry, dense cookies, which is exactly what you want to avoid for that perfect chewy bite.
Watch the Baking Time Closely: Keep a vigilant eye on your cookies during the last few minutes of baking. They should look golden brown around the edges but still soft and slightly underdone in the center. The residual heat will continue to cook them as they cool, ensuring that delightful chewy texture.
Use Fresh Ingredients: Ensure your baking powder and baking soda are within their expiration dates. Old leavening agents can result in flat, unappealing cookies, diminishing the rise and overall texture. Fresh ingredients are fundamental for optimal results.
Embrace Experimentation: Don’t shy away from adding your favorite mix-ins. Chocolate chips, chopped nuts, or even a sprinkle of sea salt on top before baking can add exciting new dimensions to your Biscoff Butter Cookies. Just be mindful that additional ingredients might slightly alter the baking time.
Serving Suggestions for biscoff butter cookies
Decoration
Once cooled, these Biscoff Butter Cookies are a canvas for delightful embellishments. A simple yet elegant option is a drizzle of melted chocolate, either dark, milk, or white, adding an extra layer of richness and visual appeal. For a truly decadent touch, consider melting a little extra Biscoff cookie butter and drizzling that over the cooled cookies; it enhances the core flavor profile beautifully.
You can also press a few extra Biscoff cookie crumbles onto the tops of the cookies before baking, or sprinkle them with a touch of flaky sea salt once they’ve just come out of the oven. A light dusting of powdered sugar can also add a festive touch, especially if serving them during holidays or special occasions.
For a more intricate design, consider using a stencil with cocoa powder or powdered sugar over a cooled cookie. The key is to complement, not overpower, the unique Biscoff flavor. Simple enhancements often yield the most satisfying results and look incredibly appealing.
Side Dishes
These Biscoff Butter Cookies are fantastic on their own, but they pair wonderfully with a variety of accompaniments that enhance the tasting experience. A classic and highly recommended pairing is a steaming cup of coffee or a rich espresso; the bold, slightly bitter notes of the coffee beautifully cut through the sweet, spiced depth of the cookies.
A tall, cold glass of milk is another timeless partner, evoking nostalgic comfort and providing a refreshing contrast. For those seeking a more indulgent dessert, a scoop of high-quality vanilla bean ice cream served alongside or even crumbled on top of a warm cookie creates a delightful hot-and-cold, creamy-and-chewy sensation.
Fresh berries, such as raspberries or strawberries, offer a bright, tart counterpoint to the cookie’s sweetness, adding a burst of freshness and vibrant color to the plate. A simple fruit salad can also provide a light, palate-cleansing option that balances the richness of the cookies.
Creative Serving Ideas
Transform your Biscoff Butter Cookies into a show-stopping dessert with a few creative serving ideas. Consider layering crumbled cookies into parfaits with whipped cream, custard, or even yogurt and fresh fruit for a delightful deconstructed dessert. This method showcases the cookie’s texture and flavor in a new context.
Another fun approach is to create miniature ice cream sandwiches using two smaller Biscoff cookies with a dollop of ice cream or Biscoff-flavored cream cheese frosting in between. This adds an extra touch of indulgence and is perfect for parties or special occasions.
You can also use them as a base for a no-bake tart or cheesecake; crush the cookies into crumbs and mix them with melted butter to form a crust, then fill with your favorite cheesecake batter. The distinct spiced caramel flavor of the Biscoff will add a unique twist to traditional dessert recipes, making them truly memorable.
Preparation & Storage
Storing Leftovers
To keep your delicious Biscoff Butter Cookies tasting as fresh and delightful as possible, proper storage is essential. Once the cookies have completely cooled, transfer them to an airtight container. This is crucial for preventing them from drying out and for protecting them from absorbing any unwanted odors from other foods in your kitchen.
Store the container at room temperature. In an airtight container, these cookies will maintain their ideal chewy texture and wonderful flavor for up to three days. If you find that your cookies are starting to become a little dry after a couple of days, placing a slice of fresh bread in the airtight container alongside the cookies can help reintroduce moisture through evaporation, reviving their soft texture.
It is important to avoid storing them in humid environments, as this can lead to sogginess. Always ensure the lid is securely fastened to maximize their shelf life and enjoy them at their best.
Freezing
If you’ve baked a larger batch than you can consume within a few days, or simply want to have a stash of these delightful cookies ready for any craving, freezing is an excellent option. For the best results, freeze the cookies individually before storing them in a larger container or bag. Place the completely cooled cookies in a single layer on a baking sheet and freeze them until they are firm to the touch, which usually takes about 1 to 2 hours.
Once frozen solid, transfer the cookie pucks into a heavy-duty, airtight freezer bag or a freezer-safe container. Ensure you remove as much air as possible from the bag before sealing it to prevent freezer burn. Properly stored, your Biscoff Butter Cookies can maintain their excellent quality and flavor for up to two weeks in the freezer.
This makes them a perfect make-ahead treat for unexpected guests or simply for ensuring you always have a delicious homemade cookie on hand. Thawing them is as simple as letting them sit at room temperature for about 15-20 minutes.
Reheating
For those who adore the warm, comforting sensation of freshly baked cookies, reheating your Biscoff Butter Cookies is a simple yet rewarding process. If you have stored them at room temperature and they have become a bit firm, or if you are reheating them from frozen, a quick stint in the oven can bring them back to their former glory.
Preheat your oven to a moderate temperature, around 350°F (175°C). Arrange the cookies on a baking sheet lined with parchment paper. Place the baking sheet in the preheated oven and heat for approximately 5 to 7 minutes. This short period is usually enough to warm them through, slightly soften the centers, and reawaken their delightful aroma without overcooking them.
Keep a close eye on them during the reheating process, as ovens can vary. The goal is a gentle warming that restores their tender texture and enhances their spiced, caramel flavors. They will emerge from the oven tasting almost as if they were baked moments ago, perfect for enjoying with a cup of tea or coffee.
Frequently Asked Questions
-
How do I select the best cookie butter for my Biscoff Butter Cookies?
When choosing Biscoff cookie butter, prioritize brands that offer a smooth, creamy texture without any oily separation or graininess. The flavor should be a harmonious blend of sweet caramel and warm spices, characteristic of authentic Speculoos biscuits. Always check the ingredient list for purity; opt for products with recognizable, natural ingredients and minimal additives for the most authentic taste. Ensure the product is specifically labeled as “cookie butter” or “Speculoos spread” to get the intended flavor profile that defines these cookies.
-
What is the best way to store leftover Biscoff Butter Cookies to maintain their texture?
To preserve the delightful texture of your Biscoff Butter Cookies, it’s crucial to store them properly. Once completely cooled, place them in an airtight container at room temperature. This prevents them from drying out and maintains their signature chewy center and crisp edges. For optimal freshness, consume them within three days. If you notice they are losing their moisture, adding a slice of fresh bread to the container can help replenish some of that softness.
-
Can I freeze the Biscoff Butter Cookie dough before baking, and if so, for how long?
Yes, you can absolutely freeze the Biscoff Butter Cookie dough for future baking, and it’s a fantastic make-ahead strategy. After scooping the dough into balls, place them on a parchment-lined baking sheet and freeze until firm, typically for 1-2 hours. Once frozen solid, transfer these dough balls to a heavy-duty freezer bag or an airtight container, removing as much air as possible to prevent freezer burn. Frozen dough balls can be stored for up to two weeks, ensuring you have freshly baked cookies whenever the craving strikes.