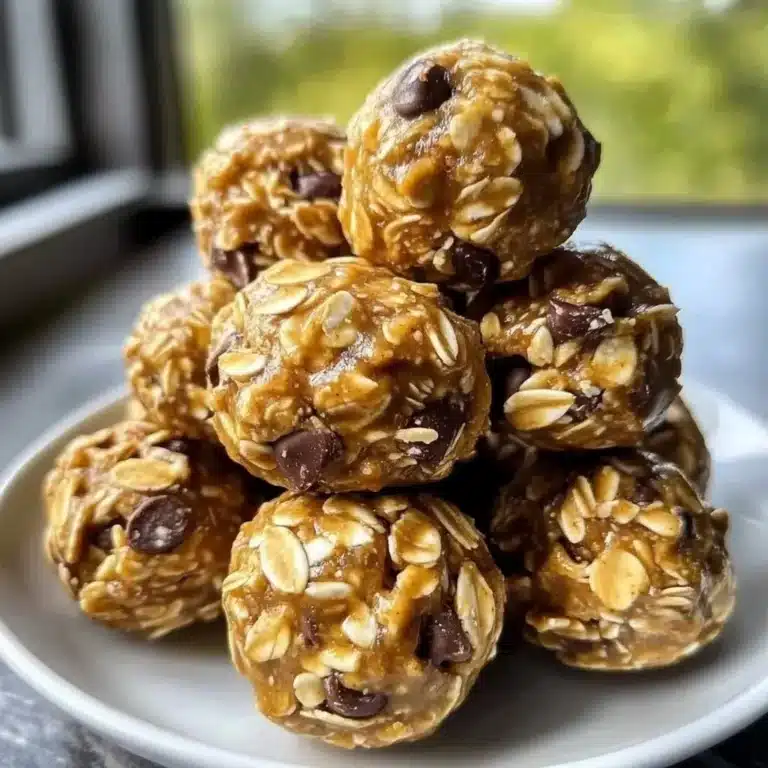
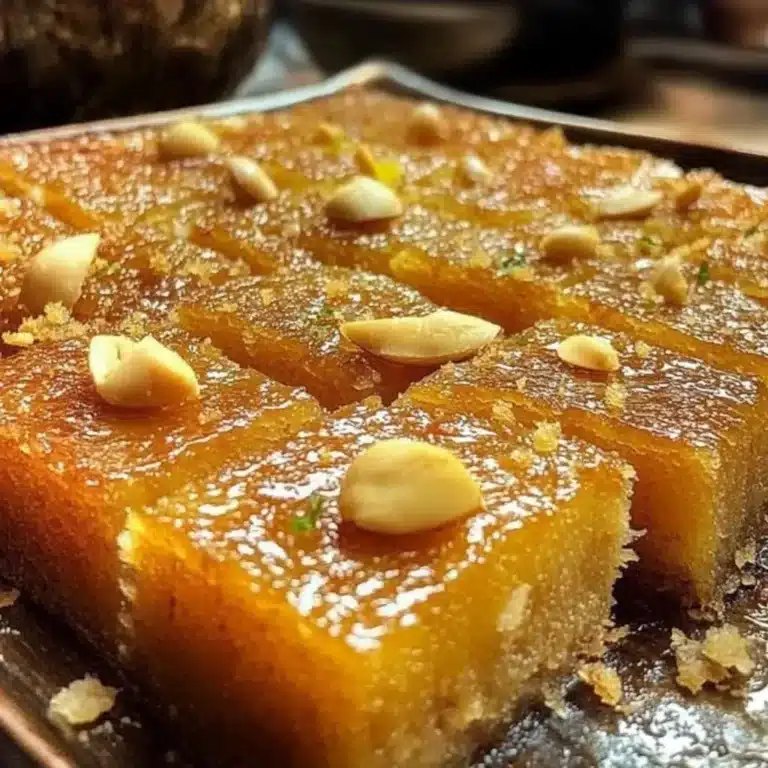
Irresistible No-Bake Maple Nut Goodies for Sweet Tooth Lovers

There I was, scrolling through my kitchen pantry, searching for a sweet escape from the humdrum of daily meals. Nothing beats the comfort of homemade desserts, and that’s when I stumbled upon the perfect inspiration: Easy No-Bake Maple Nut Goodies. With their delightful blend of creamy peanut butter, sweet maple, and crunchy peanuts, all enrobed in rich chocolate, these treats are an absolute showstopper that requires no oven time at all. They are the epitome of simple, satisfying indulgence, proving that truly magnificent desserts can be both quick and incredibly easy to assemble, perfect for any occasion or just because.
These goodies are a celebration of textures and flavors, offering a delightful contrast between the smooth, fudgy base and the satisfying crunch of the peanuts. Their no-bake nature makes them an ideal activity for families, a welcome addition to any potluck, or simply a perfect way to treat yourself after a long day. Get ready to discover why these Maple Nut Goodies are about to become your new go-to dessert, a guaranteed hit that brings smiles and satisfied sighs with every single bite. Let’s embark on this sweet and simple culinary journey together and create some delicious memories.
Why You Will Love This Recipe
- Effortless Preparation: These no-bake delights come together in a flash, making them perfect for last-minute sweet cravings or busy weeknights. You can achieve decadent results with minimal cooking, freeing up your time for other enjoyable activities.
- Irresistible Flavor Combination: The harmonious blend of creamy peanut butter, sweet maple essence, and rich chocolate creates a taste sensation that’s utterly addictive. Each bite offers a complex yet perfectly balanced sweetness that appeals to almost everyone.
- Satisfying Textural Contrast: Experience the delightful interplay between the smooth, melt-in-your-mouth chocolatey base and the satisfying, nutty crunch from the cocktail peanuts. This textural variety keeps every bite interesting and incredibly moreish.
- Versatile & Customizable: While this recipe is perfect as is, it also invites your creativity; feel free to experiment with different nut butters, chocolates, or even add-ins for a personalized touch. This adaptability ensures you can tailor these treats to your exact preferences.
- Gluten-Free Friendly: For those managing dietary restrictions, these Maple Nut Goodies are a dream come true. They offer a delightful dessert experience that is naturally gluten-free, making them a safe and inclusive option for gatherings.
Ingredients You Need
The quality of your ingredients truly shines through in simple, no-bake recipes like these Maple Nut Goodies. Opting for fresh, high-quality components will elevate the final taste and texture, making each bite even more memorable and delicious. Pay attention to the nuances of each element, as they all play a vital role in creating that perfect sweet confection we all crave.
Maple Nut Goodies: Heavenly No-Bake Dessert Bliss
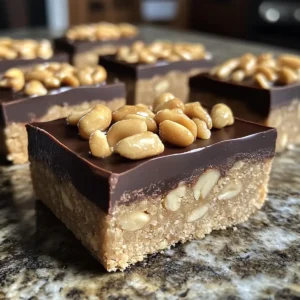
Indulge in these Maple Nut Goodies, a no-bake dessert combining peanut butter, maple flavoring, and chocolate for a heavenly treat. This recipe is quick to prepare, gluten-free, and perfect for satisfying your sweet tooth.
- 2 cups Cocktail Peanuts
- 1½ cups Milk Chocolate Chips
- 1 cup Evaporated Milk
- 2 cups Powdered Sugar
- 2 teaspoons Maple Flavoring
- 1 package Vanilla Pudding Mix
- 1 cup Peanut Butter
- 1 cup Semi-Sweet Chocolate Chips
- 1In a medium saucepan, combine ½ cup of margarine, 1 cup of evaporated milk, and 1½ cups of milk chocolate chips. Over medium-low heat, gently stir this mixture until melted completely, about 5 to 7 minutes.
- 2Allow the chocolate mixture to cool for about 5 minutes, then stir in 1 cup of creamy peanut butter and 2 teaspoons of maple flavoring until fully integrated and smooth.
- 3In a large mixing bowl, whisk together 2 cups of powdered sugar and 1 cup of vanilla pudding mix. Gradually pour in the cooled chocolate and peanut butter mixture, mixing gently.
- 4Carefully fold in 2 cups of cocktail peanuts, ensuring they are evenly distributed throughout.
- 5Grease a 13×9-inch baking pan, pour the mixture into the prepared pan, and spread it evenly.
- 6Sprinkle 1 cup of semi-sweet chocolate chips evenly over the top, then refrigerate for at least 2 hours.
- 7Once set, slice the Maple Nut Goodies into squares or rectangles and serve at room temperature or slightly chilled.
Keywords: no-bake, dessert, chocolate, peanut butter, maple, gluten-free, easy
The exact quantities and specific types of each ingredient are detailed within the recipe card above, guiding you to achieve the perfect consistency and flavor profile.
Variations
Let your culinary imagination run wild with these Maple Nut Goodies, transforming them into personalized delights. For a refreshing twist, consider infusing a tropical vibe by substituting some of the peanut butter with a creamy cashew butter and adding a sprinkle of toasted shredded coconut on top before chilling. This subtle change introduces a new layer of nutty complexity and a delightful texture that complements the maple and chocolate notes beautifully, offering a taste of the tropics in every bite.
If you’re aiming for a more decadent and adult-friendly version, think about incorporating a hint of espresso powder into the chocolate melting stage or adding a tablespoon of a rich liqueur, such as rum or bourbon, to the peanut butter mixture. This sophisticated enhancement deepens the chocolate flavor and adds an intriguing warmth, making these goodies perfect for an after-dinner treat or a special occasion, impressing even the most discerning palates with their elevated taste.
For those seeking a lighter, brighter flavor profile, consider a citrus-infused variation. Replace half of the milk chocolate chips with white chocolate chips and stir in the zest of one orange or lemon into the warm chocolate mixture before it cools. This bright citrus note cuts through the richness of the peanut butter and maple, creating a wonderfully refreshing and elegant dessert that is both unique and incredibly appealing, perfect for a springtime gathering or a tea party.
How to Prepare Maple Nut Goodies
Step 1: Melt the Base Mixture
Begin by gathering a medium-sized saucepan, which will serve as the vessel for creating the luscious base of your Maple Nut Goodies. Into this saucepan, carefully add the margarine or butter, along with the evaporated milk and the milk chocolate chips. It’s essential to use medium-low heat for this stage; this gentle heat prevents the delicate chocolate from scorching or burning, which could affect the final flavor and texture of your delightful confection.
As the heat gently warms the ingredients, start stirring continuously. This constant motion ensures that the chocolate chips melt evenly and smoothly, integrating with the margarine and milk to create a homogenous, glossy mixture. This process typically takes about five to seven minutes of patient stirring. The goal is a silky, luxurious liquid that forms the foundation of your no-bake treat, so resist the urge to rush this important melting step.
Once everything has beautifully melted and blended into a smooth, flowing liquid, it is crucial to remove the saucepan from the heat source immediately. Allowing it to sit on the hot stove for too long after melting can continue to cook the chocolate and potentially lead to a grainy or burnt texture, which is exactly what we want to avoid for that perfect, smooth finish. Your beautifully melted base is now ready for the next stage of flavor infusion.
Step 2: Add Flavorful Components
After removing the saucepan from the heat, allow the melted chocolate mixture to cool slightly for approximately five minutes. This brief cooling period is important; it prevents the peanut butter and maple flavoring from becoming too oily or separating when added to the still-hot chocolate base. Patience here ensures a beautifully emulsified and smooth final mixture.
Once the mixture has cooled for those crucial few minutes, it’s time to introduce the star flavor elements: the creamy peanut butter and the aromatic maple flavoring. Add the specified amount of peanut butter, ensuring it’s creamy and smooth for the best integration. Then, carefully measure and add the maple flavoring, which is key to the distinctive taste of these goodies, providing that signature sweet and slightly woody aroma.
Now, vigorously mix these new ingredients into the slightly cooled chocolate base. Stir until the peanut butter is completely incorporated and the entire mixture is uniformly smooth and lustrous. The scent that emanates from the pan at this point is heavenly, a sweet and nutty perfume that promises a truly delicious outcome. This rich, blended concoction is the heart of your Maple Nut Goodies, setting the stage for the delightful textures to come.
Step 3: Combine Dry Ingredients
In a large mixing bowl, the kind that offers ample space for thorough mixing without spills, whisk together the powdered sugar and the vanilla pudding mix. Using a whisk here helps to aerate the dry ingredients slightly and ensures that there are no clumps of powdered sugar or pudding mix. This step creates a light, fluffy foundation that will absorb the wet ingredients wonderfully.
It’s important to achieve a homogenous blend of these dry components before introducing the wet mixture. This ensures that the powdered sugar and pudding mix distribute evenly throughout the final batter, preventing any pockets of undissolved powder and contributing to a consistently smooth texture in the finished goodies. Take a moment to make sure everything looks uniform before proceeding.
Gradually pour the cooled chocolate and peanut butter mixture from the saucepan into the large bowl containing the dry ingredients. Begin mixing gently at first, using a sturdy spoon or spatula, to incorporate the wet into the dry without creating a mess. Continue to mix until a thick, luscious batter starts to form, with no visible streaks of dry powder remaining. This batter should be dense and pliable, perfect for folding in the crunchy elements.
Step 4: Fold in the Cocktail Peanuts
Now it’s time to introduce the delightful crunch that makes these Maple Nut Goodies so appealing. Carefully add the cocktail peanuts to the thick, luscious batter you’ve just created in the large mixing bowl. It’s important to be gentle at this stage; you don’t want to crush the peanuts too much, as their whole or halved form contributes significantly to the texture.
Using your spatula or large spoon, begin to fold the peanuts into the batter. This means scooping from the bottom of the bowl and gently bringing the batter over the peanuts, rotating the bowl as you go. Continue this folding motion until the peanuts are evenly distributed throughout the entire mixture. Every part of the batter should contain peanuts, ensuring that each bite of your finished goodies will have that satisfying crunch.
Take your time to ensure thorough distribution. You want to avoid large pockets with no peanuts and areas where they are overly concentrated. The goal is a harmonious blend of creamy, sweet batter and crisp, nutty pieces. This even distribution is key to the overall success and enjoyment of the Maple Nut Goodies, making them a delightful treat from the first piece to the last.
Step 5: Transfer to Baking Dish
Prepare your chosen baking dish, which is typically a 13×9-inch pan, by greasing it thoroughly. You can use non-stick cooking spray for a quick and even coating, or a thin layer of butter or margarine. This crucial step prevents the gooey mixture from adhering to the pan, ensuring that your Maple Nut Goodies can be easily removed and sliced once they are set.
Carefully pour the entire peanut and chocolate batter from the mixing bowl into the prepared baking pan. Don’t leave any of that deliciousness behind! You can use your spatula to scrape out every last bit from the bowl, ensuring you get the maximum amount of treat into the pan for even setting.
Once the mixture is in the pan, use the spatula to spread it evenly across the bottom. Aim for a uniform thickness throughout the entire pan. Smooth the top surface as much as possible; this not only makes for a neater appearance but also ensures consistent texture and easier cutting later on. A smooth, even layer is the foundation for perfectly shaped and delicious Maple Nut Goodies.
Step 6: Add the Chocolate Topping
With the mixture spread evenly in the baking pan, it’s time to add the crowning glory: the semi-sweet chocolate chip topping. Sprinkle the chocolate chips evenly over the entire surface of the mixture. Try to cover as much of the surface area as possible to create a complete chocolate layer once melted.
Now, carefully place the entire baking pan into the refrigerator. It’s essential to let the goodies chill undisturbed for at least two hours. This chilling time is not just about cooling; it allows the mixture to firm up considerably, the flavors to meld together beautifully, and the chocolate chips to begin their transformation into a smooth, decadent topping. Don’t rush this critical setting period.
During these two hours, the base will become firm enough to slice, and the chocolate chips will soften and begin to melt slightly from the residual warmth of the base, creating a beautifully cohesive chocolate layer. This step is paramount for achieving the perfect, sliceable texture that makes these Maple Nut Goodies so appealing and easy to handle and serve. Patience now will lead to perfect results.
Step 7: Cut and Serve
Once the Maple Nut Goodies have thoroughly chilled and set in the refrigerator for at least two hours, it’s time to bring them out and prepare them for serving. Remove the pan from the cold and place it on a stable surface, ready for slicing. You will notice the mixture is firm to the touch, and the chocolate topping should look smooth and slightly softened, indicating it’s perfectly set.
Using a sharp knife, carefully slice the chilled block into your desired serving sizes. Squares or rectangles are common and easy to handle, but you can also get creative with shapes if you wish. Run the knife under hot water and dry it between cuts if the mixture is particularly sticky, ensuring clean, neat edges for a professional presentation.
Finally, the moment of truth: serve your delicious homemade Maple Nut Goodies! They can be enjoyed straight from the refrigerator, offering a firm, chilled treat, or allowed to come to room temperature for a slightly softer, chewier texture. Present them on a platter, and watch as they disappear quickly, a testament to their irresistible flavor and delightful texture.
Pro Tips for Maple Nut Goodies
Measure Accurately: Precision is key when crafting these no-bake treats. Over-measuring liquids or under-measuring dry ingredients can lead to a gooey or crumbly texture that deviates from the desired fudgy consistency. Always use proper measuring cups and spoons and level off ingredients for the most reliable results.
Chill Well: Allow ample chilling time in the refrigerator before attempting to cut into the mixture. This period is crucial for the goodies to firm up properly, making them sliceable and preventing them from falling apart. Rushing this step often results in a messy, unappealing presentation, so be patient and let the cold do its work.
Microwave Shortcut: For a quicker melting process, you can use the microwave for your chocolate chips. Place them in a microwave-safe bowl and heat in 30-second intervals, stirring well after each interval. This method is efficient and helps prevent scorching, provided you stir diligently between each heating period to ensure even melting.
Customize Flavor: Don’t hesitate to experiment with different nut butters, like almond butter or cashew butter, for a unique nutty profile. Similarly, switching to dark chocolate chips or even white chocolate can dramatically alter the flavor experience, allowing you to create a batch that perfectly suits your personal taste preferences. The possibilities for delicious variations are truly endless.
Storage Tip: To maintain the freshness and delightful texture of your Maple Nut Goodies, store them in an airtight container. At room temperature, they will stay fresh for up to a week, making them ideal for easy snacking throughout the week. For longer storage, refrigerating them can extend their shelf life up to two weeks, ensuring you always have a sweet treat on hand.
Serving Suggestions for Maple Nut Goodies
Decoration
Elevate the visual appeal of your Maple Nut Goodies with simple yet effective decorative touches. Before the chocolate topping fully sets, consider sprinkling a few extra whole cocktail peanuts or chopped nuts over the surface for added texture and visual interest. A light dusting of powdered sugar or a drizzle of melted white chocolate in a contrasting pattern can also create a beautiful and inviting presentation, making these simple treats look like gourmet confections.
Side Dishes
These rich and sweet goodies pair wonderfully with a variety of complementary items that can balance their intensity. A glass of cold milk is a classic pairing that cuts through the sweetness and complements the chocolate and peanut butter flavors perfectly. For a more sophisticated pairing, consider a warm cup of coffee or an herbal tea, as the slight bitterness can enhance the sweetness of the bars and offer a comforting contrast.
Fresh fruit also makes an excellent accompaniment, offering a burst of freshness and a touch of tartness that balances the richness of the goodies. Sliced strawberries, raspberries, or even a small fruit salad featuring seasonal produce can add a vibrant and healthy element to your dessert spread. This combination provides a delightful interplay of sweet, rich, and fresh flavors and textures that will be appreciated by all your guests.
Creative Serving Ideas
Think outside the usual square when presenting these delightful treats. You can serve them as part of a larger dessert platter, alongside other cookies, brownies, or mini cheesecakes, offering a variety of textures and flavors for guests to explore. This allows the Maple Nut Goodies to be one star among many, contributing their unique appeal to a diverse sweet spread.
For a fun party idea, consider cutting them into smaller bite-sized pieces and serving them in mini cupcake liners or small decorative cups. This makes them easy to grab and eat while mingling and adds an element of elegance to the presentation. They also work wonderfully crumbled over ice cream or yogurt parfaits, adding a delightful crunch and concentrated flavor that transforms a simple dessert into something truly special and decadent.
Another creative approach is to serve them warm, slightly heated in a microwave or oven for just a few seconds. This can enhance their gooeyness and intensify their flavors, especially when paired with a scoop of vanilla ice cream, creating a delicious lava-like effect. This warm presentation offers a comforting and indulgent experience, perfect for a cozy evening or a special dessert course.
Preparation & Storage
Storing Leftovers
Proper storage is key to maintaining the delightful texture and flavor of your Maple Nut Goodies. Once they have completely cooled and set, transfer them to an airtight container. This is crucial to prevent them from drying out or absorbing unwanted odors from other foods in your kitchen. If stored at room temperature, they can remain fresh and delicious for up to a week, making them a perfect grab-and-go snack.
For extended freshness, especially in warmer climates or if you plan to keep them longer than a week, refrigeration is your best bet. Store them in the same airtight container in the refrigerator for up to two weeks. The cooler temperature helps to preserve their firm texture and prevents the chocolate from becoming too soft. Ensure the container is well-sealed to maintain their deliciousness.
If your goodies tend to become a bit hard after refrigeration, don’t worry. They can easily be brought back to their optimal texture by gently reheating them. This simple step ensures you can enjoy their wonderfully fudgy consistency no matter how long they’ve been stored, guaranteeing a delightful treat every time.
Freezing
Maple Nut Goodies freeze exceptionally well, making them an excellent candidate for make-ahead treats or for stocking your freezer for future cravings. To freeze them, it’s best to wrap each individual goodie tightly in plastic wrap, ensuring there are no air gaps. This creates a protective barrier against freezer burn and moisture loss, preserving their quality.
After wrapping each piece, place the individually wrapped goodies into a freezer-safe container or a heavy-duty freezer bag. Again, make sure the container is airtight to further protect them from freezer conditions. Properly packaged, your Maple Nut Goodies can be stored in the freezer for up to three months, providing a delicious, ready-to-eat dessert whenever the mood strikes.
When you are ready to enjoy your frozen treats, the best method for thawing is to transfer them from the freezer to the refrigerator. Allow them to thaw overnight in the fridge; this gentle thawing process helps them retain their texture and prevents condensation from making them soggy. Enjoy them chilled or allow them to come to room temperature for a softer bite.
Reheating
Occasionally, after refrigeration or freezing, your Maple Nut Goodies might feel a bit too firm for your liking. Fortunately, they can be easily revived to their wonderfully creamy, delicious texture with a little bit of gentle reheating. The microwave is your best friend for this quick revival process, offering a fast and effective way to restore their perfect consistency.
Place one or two goodies on a microwave-safe plate. Heat them in short bursts of about 10 to 15 seconds. It is crucial to use short intervals and check their texture frequently. The goal is to warm them just enough to soften the chocolate and the base, not to melt them completely. Overheating can turn them into a greasy mess, so keep a close eye on them.
After each short burst, test the texture. You are looking for a slightly softened, fudgy consistency that is still firm enough to hold its shape. This method quickly brings them back to that delightful melt-in-your-mouth quality, ensuring that even leftovers are just as enjoyable as when they were freshly made. This reheating technique guarantees you get the most out of your delicious Maple Nut Goodies.
Frequently Asked Questions
-
What kind of peanuts should I use for this recipe?
For the ideal texture and flavor in these Maple Nut Goodies, cocktail peanuts are highly recommended. Their classic shape and mild saltiness provide a delightful crunch without overpowering the other sweet components of the recipe. However, if cocktail peanuts are unavailable or if you prefer a different nut profile, salted peanuts can be used, or you could experiment with a mix of your favorite nuts like chopped almonds, pecans, or even cashews for a unique twist on the classic flavor. The key is to ensure they are unsalted or lightly salted to complement rather than compete with the sweetness of the bars.
-
How should I store my Maple Nut Goodies to keep them fresh?
To ensure your Maple Nut Goodies remain deliciously fresh, proper storage is essential. For short-term storage, an airtight container at room temperature is perfect, and they will typically stay delightful for up to one week. If you wish to extend their freshness further, or if your kitchen tends to be warm, storing them in an airtight container in the refrigerator is recommended; this method can preserve their quality for up to two weeks. Always ensure the container is securely sealed to prevent the goodies from drying out or absorbing any unwanted kitchen aromas, thereby maintaining their rich, sweet flavor profile.
-
Can I freeze Maple Nut Goodies, and if so, how?
Yes, absolutely! Maple Nut Goodies are excellent candidates for freezing, making them a convenient treat to have on hand. To freeze them effectively, it’s best to wrap each individual goodie tightly in plastic wrap, making sure to seal all edges to prevent freezer burn. Following this, place the wrapped goodies into a freezer-safe container or a heavy-duty freezer bag, ensuring it is also sealed tightly. When stored this way, they can maintain their quality for up to three months, offering a delightful dessert option whenever the craving strikes.
When you decide to enjoy them after freezing, the ideal method is to transfer them from the freezer directly to the refrigerator. Allow them to thaw overnight in the cool environment of the fridge. This gradual thawing process helps them retain their intended texture and prevents the formation of excess condensation, ensuring they are just as enjoyable as when they were freshly made. Enjoy these delightful frozen treats!
-
What can I do if my Maple Nut Goodies turn out too gooey or soft?
If your Maple Nut Goodies are softer than expected, it typically indicates an imbalance in the ingredient ratios or insufficient chilling time. To rectify this, first ensure that all measurements were precise; sometimes even small discrepancies in liquid or dry ingredients can affect the final consistency. It is also critical to allow the mixture to chill completely in the pan for the full recommended time, or even an additional hour or two if needed, as this is essential for them to firm up properly.
If they still seem too soft after adequate chilling, you might consider placing them back in the refrigerator for a longer period, perhaps for another 2-3 hours, to allow them to solidify further. For future batches, you can try slightly increasing the amount of powdered sugar or pudding mix, or reducing the amount of liquid ingredients by a small fraction, to achieve a firmer texture. Patience during the chilling process is usually the most effective solution.
-
Are these Maple Nut Goodies suitable for people with gluten sensitivities?
Yes, these Maple Nut Goodies are wonderfully gluten-free, offering a delightful dessert option for those who need to avoid gluten. The core ingredients like peanuts, margarine, evaporated milk, powdered sugar, maple flavoring, peanut butter, and chocolate chips are generally gluten-free. However, it’s always a wise precaution to double-check the labels of your ingredients, especially the vanilla pudding mix and chocolate chips, as some brands may contain additives or processing agents that include gluten.
By selecting a vanilla pudding mix that is certified gluten-free and ensuring your chocolate chips are also free from gluten, you can confidently prepare a batch that is safe and delicious for everyone. This makes them an excellent choice for parties or gatherings where you need to cater to various dietary needs, ensuring all your guests can enjoy this sweet treat without worry. Always prioritize checking ingredient labels for peace of mind.
-
Is it safe for pets to consume Maple Nut Goodies?
It is generally advisable to keep Maple Nut Goodies out of reach of your pets. The primary concerns are the presence of chocolate and peanut butter. While small amounts of plain peanut butter are often considered safe for dogs, chocolate contains theobromine, which is toxic to both dogs and cats and can cause serious health issues, even in small quantities. Additionally, the high sugar content and fats in these treats are not ideal for a pet’s digestive system.
Therefore, to ensure the health and safety of your furry companions, it is best to reserve these delicious Maple Nut Goodies for human consumption only. Store them in a secure location where pets cannot access them, and if you suspect your pet has ingested any part of these treats, contact your veterinarian immediately for advice. Enjoying these treats yourself is the safest option for your pets.