Cookie Monster Cookies: Irresistible Treats for Joyful Moments
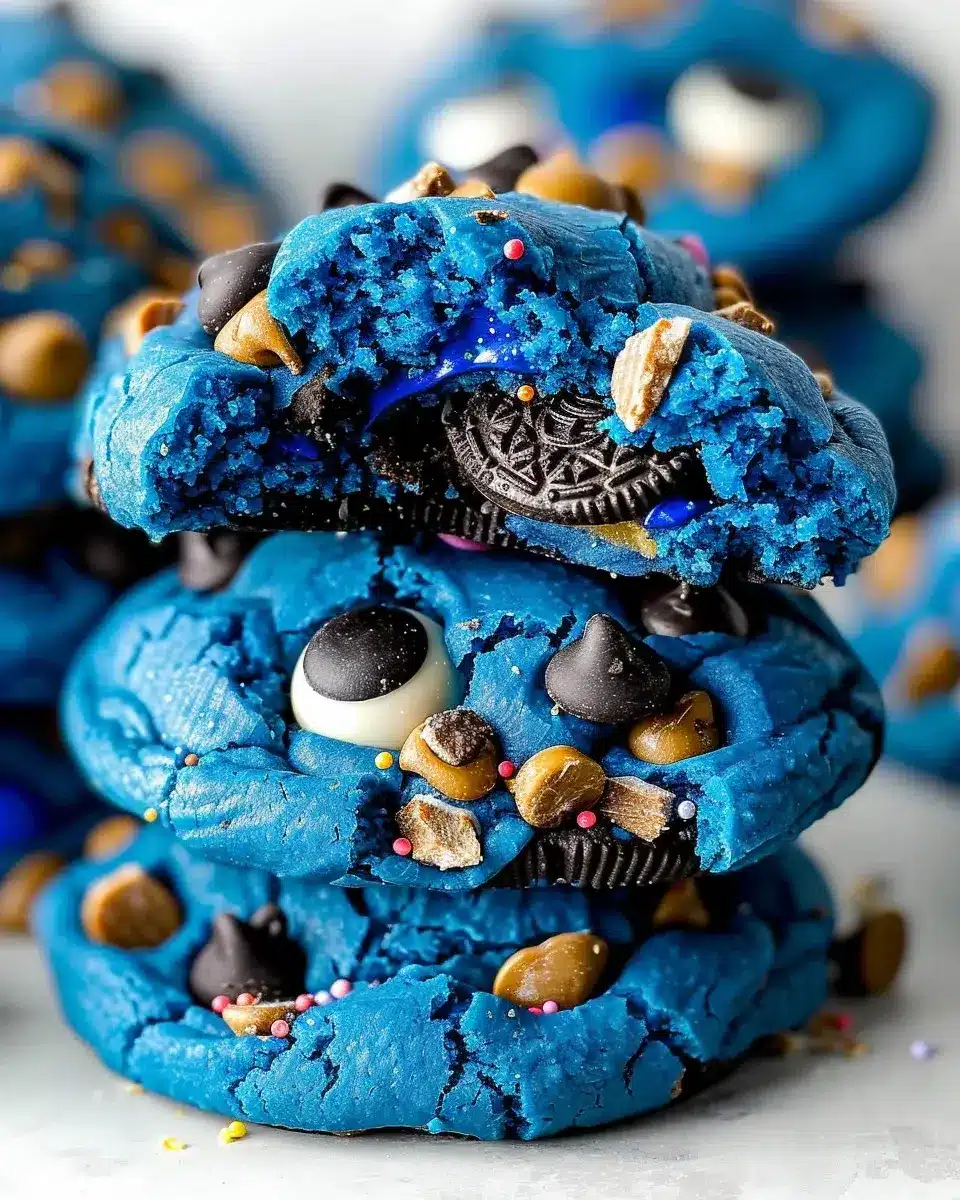
There is something inherently magical about baking treats that capture the imagination of both children and adults alike. These Cookie Monster Cookies are a vibrant, whimsical addition to any kitchen, boasting a striking blue hue and a decadent, hidden center that surprises everyone at first bite.
Whether you are preparing for a themed birthday bash, a neighborhood bake sale, or simply looking to brighten a rainy afternoon, these cookies provide the perfect solution. They combine the comfort of a classic homemade dessert with the playful aesthetic of a beloved childhood character.
Why You Will Love This Recipe
- Eye-catching Color: The brilliant, saturated blue shade immediately draws the eye and makes these treats the star of any snack table.
- Decadent Flavors: Each cookie is loaded with a combination of crunchy crushed Oreos and melted chocolate chips, ensuring a rich taste in every mouthful.
- Versatile Sizes: You have the creative freedom to bake massive, monster-sized treats or smaller, bite-sized portions depending on your specific needs.
- Fun for All Occasions: These cookies are ideal for holiday gatherings, school events, or as a creative family project that gets everyone into the kitchen.
- Straightforward Instructions: Despite their elaborate appearance, the steps are logically structured to ensure success for bakers at every level of expertise.
Ingredients You Need
Achieving the perfect texture and color relies heavily on the quality of your ingredients, so aim for fresh staples and high-quality chocolate. High-quality butter and fresh eggs provide the necessary fat for a chewy, soft interior that holds its shape during the bake. Please note that all exact measurements and quantities for your lunch or afternoon snack preparations can be found in the recipe card below.
Cookie Monster Cookies

These Cookie Monster Cookies are a fun and vibrant treat, perfect for all ages! With their bright blue color and delicious Oreo stuffing, they bring joy to any gathering.
- 2 large eggs
- 2 teaspoons vanilla extract
- 2⅓ cups bread flour (or all-purpose flour, 280 grams)
- 1¾ teaspoons baking powder
- 1 teaspoon baking soda
- 1 teaspoon salt
- 1 cup crushed cookies (Oreo/Chips Ahoy)
- 2 milk chocolate bars (cut into squares)
- 12 whole cookies (Oreos, Samoas, Chips Ahoy)
- Candy eyeballs
- 1In a large mixing bowl, beat together butter, brown sugar, granulated sugar, and vanilla extract until fluffy.
- 2Add eggs one at a time, mixing well after each addition; stir in blue food coloring.
- 3Sift in flour, baking powder, baking soda, and salt; mix until combined.
- 4Fold in crushed cookies and chocolate chips.
- 5Scoop dough onto baking sheets, adding candy fillings if desired.
- 6Chill the dough for at least three hours before baking.
- 7Preheat oven to 350°F (175°C) and bake cookies for 10-12 minutes (smaller) or about 20-22 minutes (larger).
Keywords: Cookie Monster Cookies, Blue Cookies, Stuffed Cookies, Dessert, Party Treats
- butter: softened to room temperature for the best creaming consistency.
- brown sugar: packed tightly to add moisture and a hint of caramel depth.
- granulated sugar: creates the necessary structure and helps achieve those slightly crispy edges.
- vanilla extract: a high-quality extract enhances the overall flavor profile of the buttery dough.
- eggs: large, room-temperature eggs serve as the vital binding agent.
- royal blue gel food coloring: the key to achieving that iconic, vibrant Sesame Street shade.
- bread flour: provides a higher protein content for a chewier, heartier cookie structure.
- baking powder and baking soda: the essential leavening agents for the perfect rise.
- salt: balances the sweetness and brings out the nuances of the chocolate and vanilla.
- crushed cookies: a mix of Oreos and Chips Ahoy adds texture and classic appeal.
- white and milk chocolate chips: create a mosaic of sweetness hidden throughout the dough.
- milk chocolate bars: cut into squares to serve as the gooey, melted heart of the cookie.
- candy eyeballs: the essential finishing touch to give these treats their signature monster personality.
Variations
Vegan Adaptation: You can easily transform this recipe by using plant-based butter sticks and replacing the eggs with flax eggs or a high-quality commercial egg replacer. Ensure your chosen cookie mix-ins, such as Oreos, are accidentally vegan to maintain the integrity of the dietary swap.
Low-Carb Alternative: For those following a keto lifestyle, substitute the flour with almond or coconut flour and use a granular erythritol sweetener instead of regular sugars. Replace traditional cookies with sugar-free sandwich cookies to keep the theme while reducing the carb impact.
Gluten-Free Option: Simply swap the bread flour for a premium 1-to-1 gluten-free baking blend that includes xanthan gum. Verify that your added cookies and chocolate chips are certified gluten-free to ensure the entire treat is safe for sensitive diets.
How to Prepare Cookie Monster Cookies
Step 1: Combine Wet Ingredients
Start by taking a large mixing bowl and adding your softened butter, along with the packed brown sugar and granulated sugar. The process of creaming these together is vital for the texture of the dough.
Use your stand mixer or a reliable hand mixer to beat the mixture on medium speed for roughly 6 to 8 minutes. You are looking for a pale, airy, and fluffy consistency.
Remember to pause your mixer halfway through this process to scrape down the sides of the bowl. This ensures every bit of butter and sugar is incorporated evenly without leaving any grit behind.
Step 2: Add Eggs and Coloring
Once your butter mixture is sufficiently fluffy, it is time to add the eggs one at a time. Mixing between each addition ensures the emulsification remains stable and the dough stays cohesive.
Next, introduce your Royal Blue gel food coloring into the bowl. Start with a small amount and increase it until you reach that deep, iconic shade.
Continue mixing until the blue is completely uniform throughout the batter. There should be no streaks of uncolored butter remaining before you proceed to the dry stage.
Step 3: Mix Dry Ingredients
Before adding the dry components, stop your mixer to protect the texture of the batter. Place a metal sifter over the bowl and carefully sift in your bread flour, baking powder, baking soda, and salt.
Sifting is a crucial step that removes any clumps from the flour and ensures your leavening agents are distributed perfectly. You can also whisk these together in a separate bowl if you prefer a different workflow.
Turn the mixer to the lowest speed setting and incorporate the dry ingredients just until they disappear. Overmixing at this stage can develop too much gluten, which might lead to tough cookies.
Step 4: Add Cookies and Chocolate Chips
Fold in your crushed Oreo and Chips Ahoy cookie pieces gently. You want these chunks to remain visible throughout the dough for the best texture.
Add the white chocolate and milk chocolate chips into the mixture. Stir them in slowly by hand or with the mixer on its lowest setting for just a few seconds.
This distribution creates a diverse flavor profile in every bite. Every cookie should have a good balance of both cookie pieces and melting chocolate chips.
Step 5: Shape Your Cookies
Use a large cookie scoop to portion out the dough into equal spheres. Roughly two tablespoons of dough per portion is ideal for standard, consistent results.
Take each ball and press it down slightly into a flat disk. Place a square of milk chocolate or a whole cookie in the center of the disk.
This serves as the delicious core that will melt into a gooey center. Make sure the centers are firmly placed so they don’t shift during the later steps.
Step 6: Encase Filling and Finalize
Take an additional scoop of dough and place it over the filled center, carefully sealing the edges. Use your fingers to pinch and smooth the dough so the stuffing is completely hidden.
Press extra crushed cookies and a few chocolate chips onto the top surface of the dough ball. This adds a beautiful, textured finish to the exterior of the cookie.
Finally, carefully press your candy eyeballs into the top of the dough. The heat will secure them, giving your cookies their famous and fun breakfast-defying look.
Pro Tips for Cookie Monster Cookies
The Temperature Factor: Always use room-temperature butter and eggs to ensure they emulsify correctly. Cold ingredients can cause the butter to clump, resulting in an uneven dough structure that may not bake consistently.
The Power of Chilling: Never skip the three-hour chilling phase in the refrigerator. This step allows the flour to hydrate and the fats to solidify, which significantly prevents the cookies from spreading too thin in the oven.
Precision Measuring: When measuring your flour, use the spoon-and-level method rather than scooping directly from the bag. Packing the flour into the cup can lead to a dry, crumbly cookie, whereas the proper amount yields a soft, chewy result.
Baking Vigilance: Keep a close eye on your oven, especially during the last few minutes of baking. The edges should look set, but the center should appear slightly underbaked, as the residual heat from the pan will finish the cooking process.
Serving Suggestions for Cookie Monster Cookies
Decoration
For an elevated presentation, serve these cookies alongside a bowl of fresh berries or a sprinkle of additional blue-tinted coconut shavings. Using a small amount of edible glitter can also give the cookies a magical, sparkling appearance that kids absolutely adore.
Side Dishes
These treats pair beautifully with a cold glass of milk, which cuts through the richness of the chocolate. Alternatively, consider serving them alongside a light fruit salad to provide a refreshing, acidic contrast to the heavy, sugary profile of the cookies.
Creative Serving Ideas
Transform the cookies into a luxurious sundae by sandwiching a scoop of vanilla ice cream between two warm cookies. You can also stack them in a clear glass jar tied with a blue ribbon to create a thoughtful and eye-catching gift for a friend or neighbor.
Preparation & Storage
Storing Leftovers
To keep these cookies fresh, store them in an airtight container at room temperature for up to three days. If you prefer them to last longer, place the container in the refrigerator where they will remain delicious for up to one week.
Freezing
Freezing is an excellent option if you want to save these cookies for later enjoyment. Place the baked cookies in a freezer-safe bag or container with parchment paper between layers to prevent sticking, and they will stay fresh for up to three months.
Reheating
When you are ready to eat, reheat the cookies in a 350°F oven for about 5 minutes to restore their original texture. If you are in a rush, a brief 10-second blast in the microwave will warm the chocolate center, though you should enjoy them immediately after.
Frequently Asked Questions
- What is the best way to get that vibrant blue color? The secret is using a high-quality Royal Blue gel food coloring rather than liquid drops. Gel is much more concentrated, meaning you need less of it to reach a deep, rich color without affecting the consistency of your cookie dough.
- Can I use a different type of cookie for the center? Absolutely, the beauty of this recipe lies in its adaptability for your favorite treats. You can swap the traditional Oreos for peanut butter cups, crushed graham crackers, or even small brownie bites to change the flavor profile while keeping the fun monster appearance.
- Why are my cookies spreading too much on the tray? Spreading usually occurs if the butter was too warm when mixing or if the dough was not chilled long enough before entering the oven. Ensure you follow the three-hour cooling recommendation to guarantee your cookies maintain their thick, chunky shape while baking.
If you enjoyed these cookies, you might also like trying out our funfetti cookies for another colorful option. For more baking inspiration, be sure to check out our easy berry tart or explore more recipes on our Pinterest page.