Banana Split Dump Cake Recipe: Easy & Irresistible Delight

Imagine the sweet aroma of caramelized bananas and bubbling pineapple wafting through your cozy kitchen on a lazy Sunday afternoon. This Banana Split Dump Cake Recipe is the ultimate comfort food that brings all the joy of a classic ice cream parlor treat into a warm, baked dessert form.
The best part: You do not need any advanced baking skills or professional equipment to master this impressive and indulgent dish. It is a fantastic way to end a family dinner or to surprise your favorite friends at your next festive backyard gathering.
Why You Will Love This Recipe
- Minimal Effort: You can prepare the entire base of this dessert in about ten minutes without ever needing a heavy stand mixer.
- Tropical Flavor: The combination of Pineapple and ripe bananas creates a sunshine-infused flavor profile that appeals to everyone.
- Texture Contrast: You get a wonderful mix of soft, jammy fruit and a buttery, slightly crunchy cake crust in every single bite.
- Crowd Pleaser: This recipe makes a large batch, making it the perfect solution for potlucks, office parties, or large holiday celebrations.
- Highly Customizable: You can easily swap the fruits or add extra toppings like chocolate chips or caramel sauce to suit your personal preferences.
Ingredients You Need
Quality Matters: Using fresh, ripe fruit and a high-quality butter will ensure your cake has the best possible depth of flavor. Always check that your dry cake mix is fresh to guarantee the best rise and texture during the baking process.
Banana Split Dump Cake Recipe
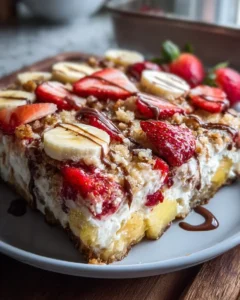
Indulge in the delightful Banana Split Dump Cake Recipe, a blissful combination of ripe bananas, juicy strawberries, and tangy pineapple layered under a golden cake crust. This quick and easy dessert is perfect for family gatherings, birthday parties, or a sweet ending to any meal. In just 10 minutes of prep time, you can create this impressive treat that’s both comforting and delicious. Top it with whipped cream and fresh fruit for a show-stopping presentation that will have everyone coming back for seconds!
- 4 medium ripe bananas, sliced
- 1 can (20 oz) crushed pineapple, drained
- 1 cup fresh strawberries, sliced
- 1 box yellow or white cake mix
- 1 cup heavy whipping cream (or whipped topping)
- Optional toppings: sliced bananas, strawberries, chopped nuts, chocolate syrup
- 1Preheat your oven to 350°F (175°C).
- 2In a baking dish, layer sliced bananas, followed by drained crushed pineapple and sliced strawberries.
- 3Sprinkle dry cake mix evenly over the fruit layer.
- 4Drizzle melted butter on top of the cake mix.
- 5Bake for about 40 minutes until golden brown.
- 6While baking, whip heavy cream until soft peaks form.
- 7Once cooled slightly, serve topped with whipped cream and additional fruit.
Keywords: dump cake, banana, strawberry, pineapple, dessert, easy, quick, baking, fruit, cake mix
- banana: four medium-sized fruits that are yellow and slightly spotted for maximum sweetness.
- crushed pineapple: one twenty-ounce can, ensuring you drain the liquid thoroughly before layering.
- fresh strawberries: one cup of berries, sliced thin to create an even layer of bright red color.
- yellow or white cake mix: one standard box of your favorite brand to serve as the buttery crust.
- unsalted butter: one half-cup stick, melted slowly to a golden liquid state for easy drizzling.
- heavy whipping cream: one cup of chilled cream to be whipped into a fluffy cloud-like topping.
- chopped nuts: a half-cup of pecans or walnuts to provide a satisfying crunch to the finish.
Please remember that the specific quantities and measurements for each item can be found in the detailed recipe card above. This ensures you have the exact ratios needed for a perfect result every time you bake.
Variations
The Vegan Twist: You can easily make this recipe plant-based by using a vegan-certified cake mix and substituting the butter for a melted coconut oil or vegan margarine. For the topping, use a chilled can of coconut cream whipped with a bit of powdered sugar.
The Chocolate Lover: If you want a more decadent experience, swap the yellow cake mix for a rich chocolate fudge cake mix. You can also sprinkle a handful of semi-sweet chocolate chips over the fruit layer before adding the dry powder.
Low Carb Option: While traditional dump cakes are sugar-heavy, you can use a keto-friendly cake mix and sugar-free canned pineapple. Substitute the bananas with a smaller amount of berries to keep the net carb count lower while maintaining the fruity spirit.
How to Prepare Banana Split Dump Cake Recipe
Step 1: Preheating and Preparing the Workstation
Preparation: Start by setting your oven to 350 degrees Fahrenheit, which is the ideal temperature for caramelizing the fruit while browning the crust. You want the oven to be fully preheated before the dish enters so that the butter begins to work its magic immediately upon contact.
The Dish: Take a standard nine-by-thirteen-inch baking dish and lightly grease the sides with a bit of butter or non-stick spray. This step is often overlooked, but it ensures that the sticky fruit juices do not bond permanently to the ceramic or glass edges.
Organization: Place all your ingredients on the counter so you can work quickly and efficiently through the assembly process. Having your butter already melting on the stove or in the microwave will save you precious minutes as you layer the fruit.
Step 2: Layering the Sweet Bananas
Selecting Fruit: Peel your four medium bananas and ensure they are ripe enough to provide a soft, creamy texture after they have spent time in the heat. If the bananas are too green, they will remain firm and lack the sugary punch needed for this funfetti cookies style sweetness.
The Base: Slice the bananas into rounds that are roughly a quarter-inch thick to ensure even cooking throughout the pan. Arrange these slices in a single, overlapping layer across the bottom of your prepared baking dish until the entire surface is covered.
Flavor Foundation: This bottom layer is crucial because the bananas will release their natural sugars, creating a built-in syrup that moistens the cake mix from below. Avoid stacking them too high in one spot; a flat, even layer provides the best structural support for the layers to follow.
Step 3: Adding the Tropical Pineapple and Berries
The Pineapple: Open your can of crushed pineapple and pour it into a fine-mesh strainer over the sink to remove the excess juice. If you leave too much liquid in the fruit, your cake might turn out soggy rather than tender and moist.
Spreading: Gently spoon the drained pineapple over the banana layer, using the back of the spoon to spread it into the corners. The acidity of the pineapple balances the heavy sweetness of the bananas and the buttery crust perfectly.
Berry Layer: Wash and hull your fresh strawberries, then slice them into beautiful thin discs or halves. Distribute the strawberries over the pineapple, adding a pop of vibrant red that will peek through the golden crust once the cake is sliced.
Step 4: Distributing the Cake Mix Barrier
The Powder: Open your box of yellow or white cake mix and begin sprinkling it evenly over the top of your fruit layers. It is important to use the dry mix exactly as it comes out of the box without adding any water or eggs.
Leveling: Use your fingers or a spatula to smooth out any large clumps of powder that might have formed during storage. You want an even landscape of dry mix so that the melted butter can penetrate every single inch of the surface.
The Seal: Ensure that no fruit is visible through the powder, as the cake mix acts as a seal that traps the steam from the fruit. This steam is what “cooks” the bottom of the cake mix, turning it into a soft, cobbler-like dough.
Step 5: The Butter Drizzle and Baking
Liquid Gold: Take your melted stick of unsalted butter and slowly drizzle it back and forth across the entire surface of the dry cake mix. Try to cover as much of the white powder as possible, focusing on any dry patches that look particularly thick.
The Reaction: As the butter hits the cake mix, it will start to form little golden craters that will eventually bake into a crisp, shortbread-like crust. Do not stir the mixture; the magic of a “dump cake” is that the layers remain distinct and cook in place.
In the Oven: Slide the dish into the center rack of your oven and set a timer for forty minutes. You will know it is done when the top is a deep golden brown and the fruit juices are bubbling vigorously around the edges of the pan.
Step 6: Whipping the Topping and Final Garnish
The Cream: While the cake is cooling slightly on a wire rack, pour your cold heavy whipping cream into a chilled bowl. Beat the cream on high speed until it forms soft, billowy peaks that hold their shape but still look luscious.
Temperature Check: It is vital to let the cake cool for at least fifteen to twenty minutes before adding any whipped cream. If the cake is too hot, the cream will melt into an oily puddle rather than sitting proudly on top of each serving.
Presentation: Once the cake has reached a warm but manageable temperature, you can serve it in bowls or on plates. Garnish with extra fresh banana slices, a few more strawberries, and a generous sprinkle of chopped nuts for that authentic Banana split appearance.
Pro Tips for Banana Split Dump Cake Recipe
Tip 1: Always drain your pineapple for at least five minutes in a sieve to prevent the bottom of your cake from becoming a watery mess. The more liquid you remove, the more concentrated and delicious the tropical flavor will become in the final dish.
Tip 2: If you notice dry spots of cake mix halfway through the baking time, you can carefully spray those areas with a bit of butter-flavored cooking spray. This helps ensure that every bit of the powder transforms into a delicious, edible crust.
Tip 3: Use a clear glass baking dish if you want to see the beautiful layers of fruit as they bubble and cook. This creates a stunning visual for your guests and allows you to easily check if the fruit at the bottom is caramelized.
Tip 4: To get the most flavor out of your nuts, toast the pecans or walnuts in a dry pan for three minutes before sprinkling them on the cake. This releases the natural oils and provides a much deeper, more professional flavor profile to the dessert.
Tip 5: For an extra touch of indulgence, drizzle some warm chocolate syrup or salted caramel over the whipped cream right before you walk the dish to the table. It mimics the classic sundae experience and makes the dessert feel much more expensive than it actually is.
Serving Suggestions for Banana Split Dump Cake Recipe
Decoration
Visual Appeal: You can make this cake look like a million dollars by adding a maraschino cherry on top of every dollop of whipped cream. This small detail immediately signals to your guests that they are about to enjoy a classic banana split experience.
Sprinkles: If you are serving this at a child’s birthday party, do not be afraid to add some colorful rainbow sprinkles over the top. The bright colors contrast beautifully with the golden crust and the white whipped topping, making it a very festive easy berry tart alternative.
Side Dishes
Ice Cream: While the cake is rich on its own, a side of cold vanilla bean ice cream is the traditional way to serve a warm dump cake. The contrast between the freezing cold ice cream and the steaming hot fruit is truly a sensation you must experience.
Fruit Platter: Serve this alongside a fresh lunch platter of sliced melon and grapes to provide a light, refreshing counterpoint to the heavy cake. This helps cleanse the palate and allows your guests to enjoy more of the dessert without feeling overly full.
Creative Serving Ideas
Mason Jars: For a rustic or outdoor event, try scooping the warm cake into individual small mason jars. Top them with the whipped cream and a mini spoon for a portable and charming dessert option that everyone will love.
Dessert Nachos: You can serve the dump cake in the center of a platter surrounded by cinnamon-sugar pita chips. Guests can use the chips to scoop up the warm fruit and cake mixture, creating a fun and interactive eating experience.
Preparation & Storage
Storing Leftovers
The Fridge: If you happen to have any leftovers, cover the baking dish tightly with plastic wrap or aluminum foil. It will stay fresh and delicious in the refrigerator for up to three full days, though the crust may soften slightly over time.
Separation: If possible, store any extra whipped cream in a separate container. This prevents the cream from deflating or making the top of the cake soggy during its time in the cold environment of the fridge.
Freezing
Long Term: You can freeze this dump cake by placing individual portions in airtight, freezer-safe containers for up to two months. This is a great way to have a quick and easy sweet treat available whenever the craving for a banana split strikes.
Thawing: When you are ready to enjoy it again, move the container to the refrigerator the night before to let it thaw slowly. Avoid thawing it on the counter, as the fruit can release too much moisture if it warms up too quickly.
Reheating
Microwave Method: For a quick fix, place a single slice on a microwave-safe plate and heat it for thirty to forty-five seconds. This will revive the soft fruit and make the butter in the crust fragrant and delicious once again.
Oven Method: If you want to restore some of the original crunch to the crust, reheat the entire dish in a 300-degree oven for about fifteen minutes. This gently warms the center without burning the top, making it taste almost as good as the day it was first baked.
Frequently Asked Questions
- Can I use frozen fruit instead of fresh strawberries and bananas for this recipe? While you can use frozen strawberries, it is highly recommended that you use fresh bananas for the best texture and flavor profile. Frozen fruit tends to release more water during the baking process, which could result in a thinner, more liquid fruit layer that might make the cake mix base feel a bit undercooked or mushy. If you must use frozen berries, do not thaw them first; simply toss them in a little bit of cornstarch before layering to help thicken any excess juices that are released in the oven.
- Why is my dump cake still powdery on top after the full baking time has finished? This usually happens if the melted butter was not distributed evenly enough or if there were particularly large mounds of dry cake mix in certain areas. To fix this, you can simply melt a tablespoon or two of extra butter and drizzle it over the dry spots, then return the cake to the oven for another five to ten minutes. Alternatively, using a butter spray can help saturate those dry flour pockets quickly so they can finish cooking and browning along with the rest of the crust.
- Is it possible to make this recipe in a slow cooker for a hands-off approach? Yes, this Banana Split Dump Cake Recipe translates very well to a slow cooker environment for those days when you do not want to heat up your entire kitchen. Simply layer the ingredients in the same order into a greased slow cooker liner and cook on high for two to three hours or on low for four hours. Keep in mind that the top will not get as crispy as it would in the oven, but the flavors will meld together beautifully and the result will be more like a warm, steamed pudding or cobbler.
For more inspiration and to save this recipe for your next big event, be sure to visit our Pinterest page. We love seeing your creations, so do not forget to share your photos and let us know how your family enjoyed this tropical treat!