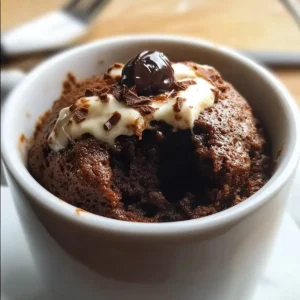
Moist Protein Mug Cake: Easy Guilt-Free Chocolate Delight

As I stood in my cozy kitchen, the aroma of chocolate swirling around me, a small mug filled with promise caught my attention. This Moist Protein Mug Cake is my secret weapon against sugary cravings, ready in just five minutes. It’s the perfect healthy dessert for anyone who wants to indulge without the guilt.
Loaded with protein and incredibly easy to whip up, this quick recipe is not only a crowd-pleaser but also a delightful treat for those quiet evenings at home. Imagine sinking your spoon into a fluffy cake that feels like a warm hug while fitting snugly into your wellness goals. Are you ready to elevate your culinary game with this protein-packed delight?
Why You Will Love This Recipe
- Quick Preparation: You can whip up this Moist Protein Mug Cake in just five minutes, making it an ideal choice for busy individuals seeking a fast, satisfying treat.
- Healthy Indulgence: With protein-packed ingredients, this cake aligns perfectly with your dietary goals, allowing you to enjoy a sweet moment without straying from your healthy lifestyle.
- Flavor Versatility: The recipe invites endless creativity; you can use any flavor of protein powder or add your favorite mix-ins like chocolate chips or crushed nuts for a personalized touch.
- Soft and Decadent Texture: Its fluffy, sponge-like texture is reminiscent of a rich brownie, ensuring that every spoonful is a delightful sensory experience.
- Crowd-Pleasing Sweetness: Whether you are entertaining guests or enjoying a quiet night in, this mug cake impresses everyone with its delicious taste and balanced nutritional profile.
Ingredients You Need
Creating the perfect mug cake relies heavily on the quality of your base ingredients, especially the protein powder and cocoa. Using fresh, high-quality components ensures the ideal rise and depth of flavor in every bite. Please refer to the quantities provided below to achieve the best results.
Moist Protein Mug Cake
A quick and healthy chocolate mug cake packed with protein, ready in just five minutes. Perfect for satisfying dessert cravings without the guilt.
- 2 tablespoons protein powder (any flavor)
- 1 tablespoon cocoa powder (dark cocoa for richer flavor)
- 1/4 teaspoon baking powder
- A pinch of salt
- 1 tablespoon honey or maple syrup
- 3 tablespoons milk (dairy or plant-based)
- 1 tablespoon nut butter (optional, or applesauce)
- 1/2 teaspoon vanilla extract
- 1In a microwave-safe mug, combine the protein powder, cocoa powder, baking powder, and salt. Blend thoroughly until no lumps remain.
- 2Pour in the honey or maple syrup, milk, and vanilla extract. Stir until smooth and creamy.
- 3Fold in the nut butter if using, ensuring it is well combined into the batter.
- 4Microwave the mug on high for 1 to 1.5 minutes, keeping an eye on it to prevent overcooking.
- 5Remove the mug from the microwave and let it cool for about one minute.
- 6Top with fresh berries or a drizzle of honey if desired and enjoy!
Keywords: protein mug cake, healthy dessert, quick dessert, chocolate mug cake, microwave recipe
- protein powder: the primary source of structure and flavor, available in various types like whey or plant-based.
- cocoa powder: provides the deep chocolate essence; dark cocoa is often preferred for a more intense, gourmet taste.
- baking powder: acts as the leavening agent that allows your cake to rise and maintain a fluffy, airy consistency.
- salt: a small pinch helps to balance the sweetness and intensify the richness of the chocolate profile.
- honey or maple syrup: natural liquid sweeteners that provide moisture and the essential binding quality needed for a soft cake.
- milk: acts as the primary liquid base, helping to hydrate the dry ingredients into a smooth, pourable batter.
- nut butter: adds a luxurious creaminess and healthy fats, though it is entirely optional if you prefer a lighter base.
- vanilla extract: a splash of this classic extract enhances the aromatic complexity of the dessert.
Variations
The Vegan Twist: You can easily transform this recipe by using a plant-based protein powder and your favorite nut milk, such as almond or oat milk. This ensures that the dessert remains entirely dairy-free while still delivering that classic, moist chocolate experience.
Low Carb Friendly: If you are monitoring your sugar intake, simply swap the honey or maple syrup for a high-quality sugar substitute like monk fruit or stevia. Pair this with a low-carb protein powder to keep your blood sugar stable while satisfying your sweet tooth.
Nut-Free Indulgence: For those managing allergies, simply replace the nut butter with a smooth applesauce or even a dollop of Greek yogurt. This adjustment maintains the necessary moisture level for a tender crumb while ensuring the recipe remains safe for everyone to enjoy.
How to Prepare protein mug cake
Step 1: Mix Dry Ingredients
In a microwave-safe mug, carefully combine your dry ingredients. You will need two tablespoons of protein powder, one tablespoon of cocoa powder, a quarter teaspoon of baking powder, and a tiny pinch of salt.
Use a small whisk or a fork to blend these components until they are fully integrated. Ensuring there are no lumps of cocoa or protein powder is essential for a smooth, consistent batter. This foundational step sets the stage for the success of your breakfast or evening snack.
Step 2: Add Wet Ingredients
Once your dry mixture is perfectly blended, it is time to introduce the moisture. Pour in one tablespoon of your chosen sweetener, such as honey or maple syrup, followed by three tablespoons of milk.
Add half a teaspoon of vanilla extract to round out the flavor profile. Stir the contents of the mug gently but thoroughly until the mixture becomes smooth and glossy. You want to ensure there are absolutely no dry spots clinging to the bottom of the mug.
Step 3: Incorporate Nut Butter
If you have decided to include nut butter for added richness, fold it into the batter at this stage. Carefully mix it through until it is evenly distributed, creating a fudgy consistency.
This addition is particularly great for those who enjoy a heartier, more decadent mouthfeel in their desserts. If you prefer a lighter cake, feel free to skip this step or use a teaspoon of Greek yogurt instead.
Step 4: Microwave the Cake
Place your mug in the center of the microwave and cook on high power for one to one and a half minutes. Keep a close watch as the cake rises during the cooking process.
Remember that every microwave has a different power intensity, so it is better to start at the lower end of the time spectrum. Your goal is for the top of the cake to look set and firm, yet remain slightly moist in the center. Avoid overcooking the batter, as this will lead to a dry or rubbery texture.
Step 5: Let It Cool
Once the microwave timer finishes, remove your mug carefully, as it will be quite hot to the touch. It is crucial to let the cake sit undisturbed for at least one full minute before taking your first bite.
This resting period allows the internal structure of the protein cake to finish setting properly. The residual heat will continue to cook the center gently without drying it out, resulting in a much more pleasurable eating experience.
Step 6: Serve and Enjoy
Your delicious Moist Protein Mug Cake is now ready for your favorite toppings. You might consider adding a dollop of fresh berries, a drizzle of extra honey, or a small scoop of Greek yogurt for contrast.
Grab your favorite spoon and savor each bite of this quick, healthy indulgence. Knowing that you have created a nutritious treat in under seven minutes makes the experience even more rewarding. Enjoy this guilt-free delight at any time of day!
Pro Tips for protein mug cake
Watch the Timer: Because microwaves vary significantly in wattage, always start with a conservative cooking time. It is much easier to add another ten seconds of heat than it is to recover a cake that has become overly dry or rubbery.
Mug Selection: Always use a microwave-safe mug that has a capacity of at least 12 ounces. This provides enough space for the cake to rise without spilling over the sides and creating a mess in your appliance.
Flavor Customization: Treat your protein powder flavor as the primary profile of your cake. Vanilla protein provides a neutral base that pairs well with added spices, while chocolate protein enhances the cocoa for a more intense dessert experience.
The “Done” Test: You can check for doneness by gently pressing the center of the cake with a clean finger or a toothpick. If the surface springs back and appears slightly moist, it is perfectly cooked and ready to cool.
Serving Suggestions for protein mug cake
Decoration
Enhance the presentation of your cake by dusting the top with a tiny amount of cocoa powder or powdered sugar. A few fresh raspberries or blueberries arranged on top add a professional touch and a pop of vibrant color. For a final flourish, a small mint leaf can provide a refreshing contrast to the rich chocolate flavors.
Side Dishes
Pairing your mug cake with a side of plain Greek yogurt creates a wonderful balance of textures. The creamy, slightly tart yogurt cuts through the dense, chocolatey cake, creating a refreshing harmony. Alternatively, a handful of toasted almonds or walnuts served on the side provides a satisfying crunch that complements the soft cake perfectly.
Creative Serving Ideas
Transform your mug cake into a sophisticated dessert by flipping it out onto a small plate. Surround the cake with fresh berry coulis or serve it alongside a small glass of chilled almond milk. If you are feeling extra indulgent, a thin layer of melted almond butter drizzled over the top makes for an exquisite finish.
Preparation & Storage
Storing Leftovers
If you find yourself with extra cake, simply store it in an airtight container within the refrigerator for up to two days. This prevents the cake from absorbing unwanted fridge odors and keeps the texture from drying out prematurely. Ensure the container is sealed tightly before placing it on the shelf.
Freezing
For longer-term storage, you can freeze your prepared mug cake for up to one month. Wrap the cooled cake securely in plastic wrap, then place it inside a freezer-safe bag or container to protect it from moisture. This method is excellent for meal-prepping desserts in advance for those hectic weeks ahead.
Reheating
To enjoy a frozen or refrigerated cake, reheat it in the microwave using short, 20-second bursts. Check the temperature periodically to ensure the cake warms evenly throughout without overheating. A quick splash of milk over the top before heating can help restore the original moisture content if necessary.
Frequently Asked Questions
-
What type of protein powder works best for this recipe?
You can use almost any protein powder, including whey, casein, or vegan blends like pea or soy. Keep in mind that casein typically absorbs more liquid than whey, so you may need an extra tablespoon of milk if you find the batter is too thick. Vanilla and chocolate are the most versatile flavors for creating a base that feels like a traditional dessert. -
Can I make this recipe if I do not have a microwave?
While this recipe is specifically designed for quick microwave preparation, you can achieve similar results in a conventional oven. Pour the batter into an oven-safe ramekin and bake at 350°F (175°C) for approximately 10 to 12 minutes. Keep a close eye on it, as oven baking can dry out protein-based batters much faster than microwaving. -
Why is my cake turning out tough or rubbery?
A rubbery texture is almost always the result of overcooking the protein powder, which denatures and stiffens under high heat. To prevent this, reduce your microwave power level to 50% or 70% and cook for a slightly longer duration. Additionally, ensure you are not over-mixing the batter, as this can develop excess air bubbles that contribute to a denser, more rubbery bite.
For more inspiration, you can visit our Pinterest page for visual guides and additional serving ideas. If you enjoy this quick treat, you might also want to explore our collection of healthy lunch options or our favorite drinks to pair with your desserts. Remember, cooking should be fun and creative, so never be afraid to try new ingredients in your next dinner party or snack break!