Ultimate Red Velvet Pink Buttercream Cupcakes

When it comes to delicious treats, nothing beats the dreamy combination of vibrant red velvet and luscious pink buttercream frosting. The Red Velvet Pink Buttercream Cupcakes embody indulgence and elegance in every bite, making them perfect for celebrations, gatherings, or simply savoring a sweet moment in your day.
These cupcakes not only look stunning but taste incredible, offering a velvety texture combined with sweet, creamy frosting that creates a magical flavor experience. Imagine biting into a rich, moist cupcake topped with fluffy pink frosting that just melts in your mouth; it’s a dessert that appeals to both adults and children alike, making it an excellent choice for family events or parties.
Why You Will Love This Recipe
- Amazing Flavor Profile: The classic red velvet cake offers a delightful balance of rich cocoa and a hint of tang from buttermilk, perfectly complemented by a sweet, airy pink buttercream.
- Visually Stunning: The vibrant red hue of the cake paired with the soft pink frosting is incredibly appealing, making these cupcakes a showstopper at any event or gathering.
- Customizable Sweetness: You have the flexibility to adjust the sweetness of the buttercream to your preference and even add other flavorings to the cake batter for a personalized touch.
- Relatively Simple to Make: Despite their elegant appearance, these cupcakes are designed with straightforward steps, making them accessible for bakers of all skill levels to achieve impressive results.
- Perfect for Any Occasion: From birthdays and holidays to bridal showers and ‘just because’ moments, these cupcakes bring joy and sweetness to any celebration or quiet indulgence.
Ingredients You Need
Selecting the finest ingredients is paramount to achieving the signature taste and texture of these Red Velvet Pink Buttercream Cupcakes. Each component, from the rich cocoa powder to the fresh strawberries, plays a vital role in creating a truly memorable dessert experience. Ensuring your ingredients are at the correct temperature, such as room temperature buttermilk and softened butter, will significantly impact the final outcome of your bake. When quality ingredients come together, they transform simple baking into an art form.
Red Velvet Pink Buttercream Cupcakes
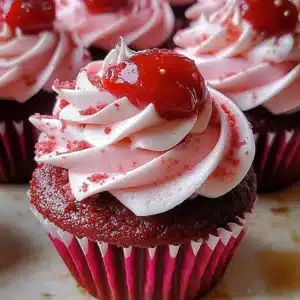
Indulge in the delightful combination of rich red velvet cupcakes topped with creamy pink buttercream frosting, perfect for any celebration. These cupcakes are visually stunning with their vibrant red color and delicate pink frosting, and they offer a moist and tender texture that melts in your mouth. The addition of fresh strawberries adds a burst of fruity freshness, making them a well-rounded and irresistible dessert.
- For the Red Velvet Cupcakes:
- 2 ½ cups all-purpose flour
- 1 ½ cups granulated sugar
- 1 teaspoon baking soda
- 1 teaspoon salt
- 1 teaspoon cocoa powder
- 1 cup vegetable oil
- 1 cup buttermilk, room temperature
- 2 large eggs
- 2 tablespoons red food coloring
- 1 teaspoon vanilla extract
- 1 teaspoon white vinegar
- For the Pink Buttercream Frosting:
- 1 cup unsalted butter, softened
- 4 cups powdered sugar
- ¼ cup heavy cream
- 2 teaspoons vanilla extract
- Pink food coloring to achieve desired shade
- For Decoration:
- 6 fresh strawberries, halved or whole
- Sweet liquid drizzle like honey, maple syrup, or strawberry syrup (optional)
- 1Prepare Ingredients: Gather all your ingredients. Preheat your oven to 350°F (175°C) and line your cupcake pan with paper liners.
- 2Cook the Base: In a large mixing bowl, combine the dry ingredients: flour, sugar, baking soda, salt, and cocoa powder. Whisk these together until well mixed. Next, in another bowl, blend the oil, buttermilk, eggs, food coloring, vanilla extract, and vinegar until unified.
- 3Combine Wet and Dry Ingredients: Pour the wet mixture into the bowl with the dry ingredients. Mix gently until just combined. Be careful not to over-mix; a few lumps are okay. This will help ensure a tender, fluffy cupcake that melts in your mouth.
- 4Fill the Cupcake Liners: Use a scoop or measuring cup to fill each paper liner about two-thirds full with the batter. This will allow room for the cupcakes to rise beautifully without overflowing.
- 5Bake: Place your cupcake tray in the preheated oven and bake for about 20-22 minutes. You’ll know they’re ready when a toothpick inserted in the center comes out clean. The aroma will be heavenly!
- 6Cool: Once baked, remove the cupcakes from the oven. Allow them to cool in the pan for 5 minutes before transferring to a wire rack. Ensure they cool completely before frosting.
- 7Prepare the Pink Buttercream Frosting: In a mixing bowl, beat the softened butter until creamy. Gradually add the powdered sugar, alternating with the heavy cream, and continue mixing until it’s light and fluffy. Add vanilla extract and pink food coloring until you achieve your desired shade.
- 8Frost the Cupcakes: Transfer the pink buttercream frosting into a piping bag fitted with your preferred tip. Pipe a generous swirl or dollop of frosting onto each cooled cupcake, creating a stunning visual effect.
- 9Decorate with Strawberries: Top each frosted cupcake with a fresh strawberry, cut or whole, for added freshness and vibrancy. This not only looks appealing but adds a burst of flavor with every bite.
- 10Optional Drizzle: If you feel adventurous, drizzle a touch of sweet syrup over the strawberries. It elevates the sweetness, making every bite even more indulgent.
Keywords: Baking, Celebrations, Desserts, Pink Buttercream, Red Velvet Cupcakes, Frosting, Strawberries
- all-purpose flour: the base structure for your tender cupcakes.
- granulated sugar: provides sweetness and aids in creating a tender crumb.
- baking soda: a leavening agent that helps the cupcakes rise to a perfect height.
- salt: enhances the flavors of the other ingredients and balances the sweetness.
- cocoa powder: imparts that characteristic rich, slightly bitter flavor to the red velvet cake.
- vegetable oil: contributes to the moistness and tenderness of the cake.
- buttermilk, room temperature: adds moisture and a slight tanginess that is crucial for red velvet.
- large eggs: bind the ingredients and add richness and structure to the cake.
- red food coloring: provides the iconic vibrant red hue of the cupcakes.
- vanilla extract: a fundamental flavoring that enhances all the other sweet notes.
- white vinegar: reacts with baking soda to help with leavening and tenderize the cake.
- unsalted butter, softened: the creamy foundation for your delightful buttercream frosting.
- powdered sugar: creates the smooth, sweet, and pipeable texture of the frosting.
- heavy cream: adds richness and helps achieve the perfect consistency for the buttercream.
- pink food coloring: to achieve your desired shade of delicate pink for the frosting.
- fresh strawberries: a beautiful and flavorful garnish that adds a touch of freshness.
- sweet liquid drizzle (optional): like honey, maple syrup, or strawberry syrup, for an extra touch of sweetness and visual appeal.
The precise quantities for each ingredient are detailed within the recipe card, ensuring accuracy for your baking endeavors.
Variations
For those seeking a delightful dairy-free option, transforming these Red Velvet Pink Buttercream Cupcakes into a vegan masterpiece is entirely achievable. You can substitute the eggs with a flax egg, which is made by mixing one tablespoon of ground flaxseed with three tablespoons of water and letting it sit for five minutes until gelled. Plant-based butter and non-dairy milk, such as almond or oat milk, can replace their conventional counterparts in both the cake and the frosting, ensuring every component is free from animal products.
To cater to a low-carb lifestyle, significant adjustments can be made to the traditional recipe. Almond flour or coconut flour can replace all-purpose flour, significantly reducing the carbohydrate count while still providing a good cake texture. Sugar can be substituted with a granular sweetener like erythritol or xylitol, ensuring sweetness without the glycemic impact. The frosting can be made using a cream cheese base with a sugar-free sweetener and a splash of heavy cream to maintain richness.
Adding a delightful twist to the classic red velvet involves incorporating other flavors or ingredients. Consider adding mini chocolate chips to the cake batter for a double chocolate experience, or infusing the batter with a hint of orange zest for a subtle citrus note that complements the cocoa. You could also introduce a sprinkle of cinnamon or nutmeg for a warm, spiced undertone, transforming the cupcakes into a delightful treat perfect for cooler weather.
How to Prepare Red Velvet Pink Buttercream Cupcakes
Step 1: Gather and Prepare Your Ingredients
The journey to creating these exquisite Red Velvet Pink Buttercream Cupcakes begins with meticulous preparation. Ensure all your ingredients are measured precisely and at the correct temperatures; room temperature buttermilk and softened butter are key for optimal texture. Preheating your oven to 350°F (175°C) is crucial, as is lining your muffin tin with paper liners to prevent sticking.
Having all your ingredients at the ready before you start mixing will streamline the process and prevent any last-minute scrambling. This initial step sets the foundation for a smooth and enjoyable baking experience, ensuring you can focus on the creative process without interruption. A well-organized station often leads to a perfectly executed recipe.
Step 2: Create the Red Velvet Cake Batter Base
In a large mixing bowl, commence by combining all your dry ingredients: the all-purpose flour, granulated sugar, baking soda, salt, and cocoa powder. Whisk these elements thoroughly until they are completely integrated, ensuring an even distribution of leavening agents and flavor. This ensures that the chemical reactions during baking will occur uniformly, leading to a consistent crumb throughout the cupcakes.
In a separate, medium-sized bowl, meticulously blend together the wet ingredients. This includes the vegetable oil, buttermilk (at room temperature), large eggs, red food coloring, vanilla extract, and white vinegar. Whisk these liquid components until they form a homogenous mixture, creating a vibrant, ruby-red liquid base that is ready to be introduced to the dry ingredients. The vinegar’s role is subtle but important in reacting with the baking soda for that perfect lift.
Step 3: Combine Wet and Dry Mixtures
Gently pour the vibrant wet mixture into the bowl containing the dry ingredients. Using a spatula or a whisk, carefully combine the two until they are just incorporated. It is essential to avoid over-mixing at this stage, as overworking the gluten in the flour can lead to tough and dense cupcakes. A few small lumps in the batter are perfectly acceptable and actually desirable for a tender result.
The goal here is to achieve a smooth, velvety batter with a beautiful red hue, indicative of the classic red velvet cake. Once combined, the batter should have a rich, flowing consistency, ready to be portioned into your prepared cupcake liners. This delicate balance ensures the cupcakes will bake up light and airy, a hallmark of superior baking.
Step 4: Portion the Batter into Cupcake Liners
Utilize an ice cream scoop or a large measuring spoon to evenly distribute the red velvet batter into each of the prepared cupcake liners. Fill each liner approximately two-thirds of the way full. This measured amount is critical, as it allows sufficient space for the cupcakes to rise beautifully during baking without overflowing the liners or creating a domed top that is too large.
Achieving uniform batter distribution ensures that all cupcakes bake at the same rate and come out with consistent sizes and shapes. This attention to detail is what elevates home-baked goods to a professional standard, making each cupcake a perfect miniature version of the ideal. The visual uniformity is just as important as the flavor.
Step 5: Bake the Red Velvet Cupcakes
Carefully place the filled cupcake tray into the preheated oven at 350°F (175°C). Allow them to bake for approximately 20 to 22 minutes. The most reliable way to check for doneness is by inserting a toothpick or a thin skewer into the center of a cupcake; if it comes out clean, they are ready. The aroma filling your kitchen at this stage will be absolutely heavenly.
The baking time can vary slightly depending on your oven, so it’s always wise to start checking a few minutes before the suggested time. The cupcakes should have a springy texture when lightly touched. Once baked to perfection, remove the tray from the oven immediately to prevent over-baking and ensure the optimal fluffy texture.
Step 6: Cool the Cupcakes Properly
After removing the cupcakes from the oven, let them rest in the muffin tin for about 5 minutes. This brief cooling period allows them to firm up slightly, making them easier to handle. Following this, carefully transfer the cupcakes from the tin to a wire cooling rack. This is an essential step, as allowing them to cool completely on the rack prevents the bottoms from becoming soggy and ensures the cake is stable for frosting.
Patience is a virtue when it comes to cooling baked goods. Attempting to frost warm cupcakes can lead to melted frosting, creating a messy and unappealing finish. Ensure each cupcake has reached room temperature before proceeding to the frosting stage; this guarantees a beautiful, smooth application of the pink buttercream.
Step 7: Prepare the Luscious Pink Buttercream Frosting
In a clean, large mixing bowl, begin by creaming the softened unsalted butter until it achieves a light and fluffy consistency. This process aerates the butter, which is crucial for a smooth and stable frosting. Gradually add the powdered sugar, alternating with the heavy cream, and continue to beat the mixture on medium speed. Scrape down the sides of the bowl periodically to ensure all ingredients are thoroughly incorporated.
Once the frosting is light and fluffy, incorporate the vanilla extract for added flavor. Then, carefully add the pink food coloring, a few drops at a time, mixing until you achieve your desired shade of delicate pink. Continue to beat for another minute or two to ensure the frosting is perfectly smooth and ready for piping. The consistency should be creamy but firm enough to hold its shape.
Step 8: Decorate the Cupcakes with Pink Buttercream
Transfer the prepared pink buttercream frosting into a piping bag. Fit the bag with your favorite piping tip – a star tip or a French tip works beautifully for creating decorative swirls. Begin piping a generous swirl or dollop of frosting onto the top of each completely cooled red velvet cupcake. Aim for an even distribution and a visually appealing design that showcases the beautiful contrast between the cake and the frosting.
The way you pipe the frosting can significantly enhance the aesthetic appeal of your cupcakes. Experiment with different techniques to create varied textures and heights, making each cupcake a unique work of art. Ensure the frosting is applied generously to provide that perfect balance of cake and creamy topping.
Step 9: Add Fresh Strawberry Garnishes
To complete the presentation and add a burst of fresh flavor, top each frosted cupcake with a fresh strawberry. You can use a whole strawberry or halve it, depending on your preference and the size of the strawberry. This addition not only enhances the visual appeal, adding a vibrant splash of color, but also introduces a complementary fruity note that brightens the richness of the cake and frosting.
The natural sweetness and slight tartness of the strawberries cut through the richness of the buttercream, creating a more complex and satisfying flavor profile. This simple garnishing step elevates the cupcakes from delicious to truly elegant, making them perfect for any special occasion or a sophisticated dessert. The fresh fruit adds a natural sweetness that is hard to replicate.
Step 10: Optional Drizzle for Extra Flair
For those who desire an extra touch of sweetness and a more elaborate visual presentation, consider adding a delicate drizzle over the strawberries and frosting. A touch of honey, maple syrup, or a vibrant strawberry syrup can add another layer of flavor and shine. This optional step transforms your cupcakes into even more of a showstopper, adding a glossy finish and an extra hint of sweetness that complements the other flavors beautifully.
This final flourish is like signing your name on a masterpiece. The drizzle should be applied sparingly and artistically, ensuring it enhances rather than overwhelms the other components. It’s a small detail that can make a big difference in the overall perception and enjoyment of these delightful Red Velvet Pink Buttercream Cupcakes, making them truly unforgettable.
Pro Tips for Red Velvet Pink Buttercream Cupcakes
Achieving the Perfect Red Hue: For a truly vibrant red color, use a good quality gel food coloring rather than liquid. Gel colors are more concentrated and require less volume to achieve the desired intensity without adding excess moisture that could affect the batter’s consistency.
Buttermilk Substitute: If you find yourself without buttermilk, don’t worry! You can easily make your own by mixing one cup of milk (dairy or non-dairy) with one tablespoon of white vinegar or lemon juice. Let it stand for 5-10 minutes until it thickens slightly; it’s ready to use.
Room Temperature is Key: Ensuring your butter is truly softened (not melted) and your buttermilk is at room temperature is critical for both the cake and the frosting. This allows for better emulsification and creates a smoother, more consistent texture.
Avoid Overmixing: Overmixing the cake batter can develop the gluten in the flour too much, resulting in tough cupcakes. Mix only until the ingredients are just combined; a few small lumps are perfectly fine.
Cooling is Crucial: Never frost warm cupcakes. Allowing them to cool completely on a wire rack ensures the frosting will set beautifully without melting and sliding off, creating a neat and professional finish.
Serving Suggestions for Red Velvet Pink Buttercream Cupcakes
Decoration
The beauty of these Red Velvet Pink Buttercream Cupcakes lies in their inherent visual appeal, but a few thoughtful decorative touches can elevate them further. Beyond the mandatory fresh strawberry, consider adding a sprinkle of edible glitter for a touch of magic, especially for children’s parties. Small, delicate edible flowers can add an elegant and sophisticated touch, perfect for adult gatherings or special events.
For themed parties, mini red or pink sprinkles can be added to the frosting before it sets, complementing the color scheme. Alternatively, a light dusting of powdered sugar over the top, or a contrasting drizzle of dark chocolate, can offer a different aesthetic while still being delicious. The key is to enhance, not overpower, the inherent charm of the cupcake.
Side Dishes
While these cupcakes are a decadent dessert in themselves, they can be wonderfully complemented by lighter accompaniments to balance the sweetness. A simple fruit salad featuring berries, melon, and kiwi provides a refreshing contrast and adds a healthy element to the dessert course. A light, citrus-infused panna cotta or a delicate mousse could also serve as a sophisticated lighter dessert option served alongside.
For a more casual gathering, consider serving them alongside other easy-to-share baked goods like funfetti cookies or a simple pound cake. This offers variety without competing with the star of the show. The idea is to provide options that either offer a refreshing counterpoint or a complementary sweetness.
Creative Serving Ideas
Transforming these cupcakes into a stunning dessert platter can be achieved by arranging them artfully on a tiered stand, allowing guests to easily select their treat. For a fun, interactive experience, consider a “cupcake decorating station” where guests can add their own sprinkles, drizzles, or small candies to pre-frosted cupcakes. This is particularly engaging for children’s parties or team-building events.
You can also deconstruct the elements for a more gourmet presentation: serve the red velvet cake layers alongside a dollop of the pink buttercream and fresh strawberries on a plate. This showcases the individual components and allows guests to assemble their perfect bite. Another idea is to use them as the base for miniature trifles, layered with whipped cream and cake crumbles in individual glasses for an elegant touch.
Preparation & Storage
Storing Leftovers
To keep your Red Velvet Pink Buttercream Cupcakes tasting as fresh as possible, it’s best to store them in an airtight container at room temperature. This method is ideal for the first 2-3 days after baking. Ensure the container is indeed airtight to prevent the cupcakes from drying out or absorbing any unwanted odors from your kitchen environment. This simple step maintains their delightful texture and flavor.
If you anticipate needing to store them for a longer period, or if your kitchen tends to be warm, refrigerating them is a viable option. Place them in an airtight container and keep them in the refrigerator for up to a week. However, be aware that refrigeration can sometimes slightly alter the texture of the cake, making it a bit firmer. Always bring refrigerated cupcakes back to room temperature before serving for the best taste and texture experience.
Freezing
Freezing is an excellent strategy for preserving these delicious cupcakes for future enjoyment. The most effective method is to freeze the unfrosted cupcakes. Once they have cooled completely, wrap them individually in plastic wrap, then place them in a freezer-safe airtight container or a heavy-duty freezer bag. This double layer of protection helps prevent freezer burn and maintains their quality for up to three months.
When you are ready to enjoy your frozen cupcakes, the best approach is to transfer them from the freezer to the refrigerator and let them thaw overnight. This gradual thawing process helps to maintain their delicate texture and prevents condensation from forming. Once fully thawed, you can then frost them as desired, essentially having freshly baked cupcakes ready at your convenience. This makes them perfect for last-minute dessert needs.
Reheating
For the most part, reheating Red Velvet Pink Buttercream Cupcakes isn’t typically necessary, especially if they are stored properly at room temperature or thawed from freezing. However, if you find the cake part feels a little firm after refrigeration or thawing, a very brief period in the microwave can help. Heat on low power for just 10-15 seconds to gently warm the cake without melting the frosting.
It is crucial to be extremely cautious when microwaving frosted cupcakes. The frosting can melt very quickly, ruining the presentation and texture. If your cupcakes are completely unfrosted and you wish to warm them slightly before adding frosting, this can be done more safely. Always err on the side of caution and use the lowest heat setting for the shortest duration possible to avoid unintended consequences.
Frequently Asked Questions
-
Can I make the red velvet cake part ahead of time and freeze it for later use?
Yes, absolutely! The unfrosted red velvet cake layers are quite resilient and freeze exceptionally well. Once the cupcakes have completely cooled, wrap them tightly in plastic wrap, ensuring no air can get to them, and then place them in a freezer-safe airtight container or heavy-duty freezer bag. They can be stored this way for up to three months. When you’re ready to use them, the best practice is to transfer them directly from the freezer to the refrigerator to thaw overnight. This gradual thawing process helps maintain their moisture and texture. Once fully thawed, you can then proceed with frosting them, making it a convenient option for planning desserts in advance.
-
My pink buttercream frosting seems too soft and isn’t holding its shape well. What can I do to fix it?
A soft or runny buttercream frosting is a common issue, but thankfully, it’s often easily remedied. The most effective solution is to chill it. Place the bowl of frosting in the refrigerator for about 15-30 minutes, stirring occasionally. The cold will firm up the butter, helping it to hold its shape better. If it becomes too stiff, you can add a tablespoon of heavy cream or milk and beat again until the desired consistency is reached. Another potential cause can be if the butter was too soft to begin with; in such cases, starting the frosting again with properly softened, but not melted, butter might be necessary for a perfect outcome.
-
What is the best way to achieve that signature vibrant red color for the cupcakes without an overpowering food coloring taste?
Achieving a vibrant red hue is key to iconic red velvet, and using gel food coloring is the most effective method to avoid a metallic or overpowering taste from liquid colors. Gel colors are highly concentrated, meaning you need much less product to achieve intense color. Start by adding a small amount, mix thoroughly, and then gradually add more until you achieve your desired shade. Another traditional approach involves using natural ingredients like beet juice or pomegranate juice for coloring, though these can subtly alter the flavor and may not produce as intense a red as commercial food dyes. For the best results and a true red velvet look, high-quality gel food coloring is generally recommended by most bakers.