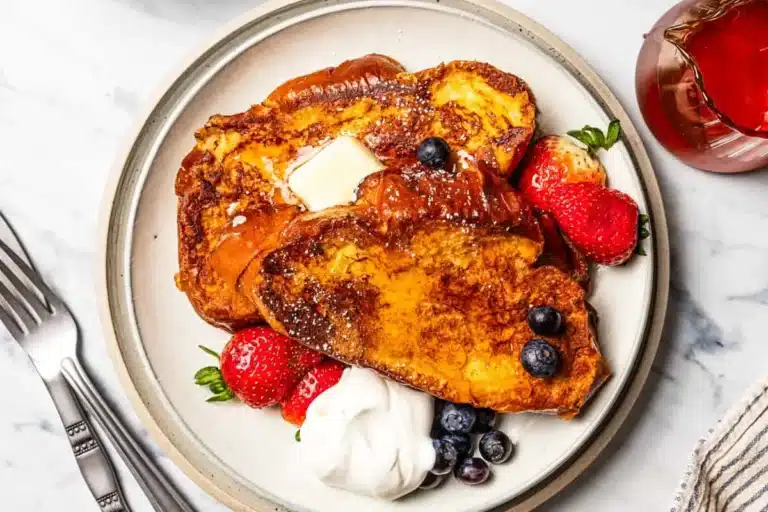
Irresistible Red Velvet Marble Waffles: A Fluffy Breakfast Treat

With a swirl of vibrant color and a promise of decadent flavor, my kitchen recently transformed into a haven of pure delight as I perfected these Fluffy Red Velvet Marble Waffles. They are a true feast for the eyes, boasting a captivating marbled design that instantly elevates any breakfast or brunch spread. Beyond their stunning appearance, these waffles deliver a heavenly combination of airy fluffiness and a subtle, sweet richness that I’ve come to adore.
What truly sets this recipe apart is its inherent adaptability; you can effortlessly introduce new flavor dimensions to match your culinary mood while maintaining a refreshingly quick and uncomplicated preparation process. These waffles are wonderfully light and airy, making them an indulgent treat that you can savor without the feeling of heaviness, ensuring everyone at your gathering leaves with a smile. Are you ready to master this vibrant and utterly delicious morning masterpiece? Let’s embark on this culinary adventure together!
Why You Will Love This Recipe
- Stunning Visual Appeal: The intricate red and brown marbling is not only incredibly photogenic and perfect for sharing on social media but also builds anticipation and excitement for the deliciousness that awaits.
- Incredibly Fluffy Texture: Thanks to the precise balance of leavening agents and the rich buttermilk, each bite offers an unbelievably light and airy texture that practically dissolves on your tongue.
- Versatile Flavor Base: While red velvet is iconic, this recipe serves as a fantastic canvas for experimentation; consider adding a hint of chocolate or matcha for delightful variations.
- Quick and Easy Preparation: Despite their elegant appearance, these waffles come together surprisingly fast, making them ideal for busy mornings or spontaneous brunch plans.
- Balanced Sweetness: They offer a pleasant sweetness that is satisfying without being overwhelming, allowing other flavors to shine through and making them a perfect base for various toppings.
Ingredients You Need
Crafting these exceptional waffles begins with selecting high-quality ingredients, which form the foundation of their incredible flavor and texture. From the richness of buttermilk to the delicate sweetness of sugar, each component plays a vital role in achieving that perfect fluffy bite. Using fresh leavening agents like baking powder and baking soda is paramount for achieving the signature airy crumb.
Fluffy Red Velvet Marble Waffles
Enjoy Red Velvet Marble Waffles that are fluffy and visually stunning, making them perfect for breakfast or brunch gatherings.
- For the Classic Waffle Batter:
- 1 ¾ cups all-purpose flour
- 2 tablespoons sugar
- 1 tablespoon baking powder
- 1 ¾ cups buttermilk
- 2 large eggs
- 1 teaspoon vanilla extract
- For the Red Velvet Batter:
- 1 ½ cups all-purpose flour
- 1 tablespoon cocoa powder
- 2 tablespoons sugar
- 1 tablespoon baking powder
- 1 ¾ cups buttermilk
- 1 large egg
- 1 teaspoon vanilla extract
- 1 tablespoon red food coloring
- 1Prepare Classic Waffle Batter: In a mixing bowl, whisk together 1 ¾ cups of all-purpose flour, 2 tablespoons of sugar, 1 tablespoon of baking powder, ½ teaspoon of baking soda, and ½ teaspoon of salt. In a separate bowl, blend 1 ¾ cups of buttermilk, 2 large eggs, ½ cup of melted butter, and 1 teaspoon of vanilla extract. Gradually pour the wet mixture into the dry ingredients, stirring gently until just combined; avoid overmixing to keep the batter light and fluffy.
- 2Prepare Red Velvet Batter: In another bowl, combine 1 ½ cups of all-purpose flour, 1 tablespoon of cocoa powder, 2 tablespoons of sugar, 1 tablespoon of baking powder, ½ teaspoon of baking soda, and ½ teaspoon of salt. In a different container, mix 1 ¾ cups of buttermilk, 1 large egg, ½ cup of melted butter, 1 teaspoon of vanilla extract, and 1 tablespoon of red food coloring until smooth. Fold the wet mixture into the dry ingredients until just combined, keeping the batter slightly lumpy for optimal fluffiness.
- 3Preheat Waffle Iron: Preheat your waffle iron according to the manufacturer’s instructions, typically at medium-high heat. Lightly grease the surface with cooking spray or a brush of melted butter.
- 4Create Marble Effect: Pour about ½ cup of the classic batter onto the center of the hot waffle iron. Next, add a similar amount of the red velvet batter on top of the classic batter. Using a toothpick or skewer, gently swirl the two batters together to create a beautiful marbled effect.
- 5Cook Waffles: Close the waffle iron and cook until the waffles are golden brown and crisp, which usually takes 5 to 7 minutes.
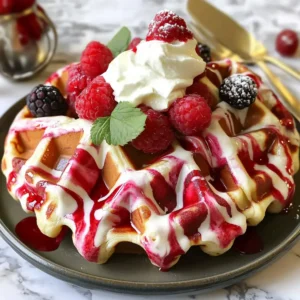
- 6Serve: Carefully remove the waffles from the waffle iron and let them cool slightly on a wire rack. Serve warm, topped with a dollop of whipped cream, fresh berries, or a drizzle of maple syrup.
Keywords: Red Velvet, Waffles, Marble, Breakfast, Brunch, Baking, Sweet
- all-purpose flour: provides the essential structure and body for the waffles, ensuring they hold their shape while remaining tender; for a healthier alternative, you can substitute a portion with whole wheat flour.
- sugar: contributes sweetness to the batter, balancing the tanginess of the buttermilk and the richness of the cocoa; coconut sugar is a good option for a slightly different flavor profile and a lower glycemic index.
- baking powder: this is a crucial leavening agent, working with the baking soda to create lift and that coveted fluffy texture; always ensure your baking powder is fresh for optimal results.
- baking soda: essential for both leavening and achieving a beautiful golden-brown color during cooking; it reacts with acidic ingredients in the batter to produce carbon dioxide bubbles.
- salt: a flavor enhancer that balances the sweetness and highlights the other ingredients, preventing the waffles from tasting flat.
- buttermilk: its acidity reacts with baking soda to create a tender crumb and adds a delightful tang that complements the red velvet flavor; you can make a quick substitute by adding a tablespoon of lemon juice or vinegar to regular milk.
- large eggs: they bind the ingredients together, add richness, and contribute to the overall structure and fluffiness of the waffles; for best results, use eggs that are at room temperature.
- melted butter: imparts a rich flavor and contributes to a tender texture; unsalted butter is preferred to control the salt content, and vegetable oil can be used as a dairy-free alternative.
- vanilla extract: enhances the overall aroma and flavor profile of the waffle batter, adding a warm, inviting sweetness; pure vanilla extract is always recommended for the best taste.
- cocoa powder: this key ingredient in the red velvet batter provides that characteristic deep, chocolatey flavor that pairs so beautifully with the red hue; Dutch-processed cocoa offers a smoother, richer taste.
- red food coloring: essential for achieving the signature vibrant red color of the red velvet portion of the batter; gel food coloring is highly recommended as it provides more intense color with less liquid.
The precise measurements for each ingredient are detailed within the recipe card, ensuring you can achieve perfection with every batch.
Variations
While the classic red velvet and plain waffle batter combination is delightful, the possibilities for culinary creativity are truly endless with this recipe. You can easily adapt the batter to suit different tastes and dietary preferences, transforming a beloved breakfast staple into something uniquely yours.
Consider a decadent chocolate lover’s dream by preparing a rich chocolate batter for the second half instead of the classic. This can be achieved by adding an extra tablespoon or two of cocoa powder to the second batch of dry ingredients and perhaps a touch more sugar to balance the intensified chocolate flavor. The resulting marble will be a symphony of deep browns and vibrant reds, a truly indulgent experience.
For those seeking a healthier or allergen-conscious option, a vegan and gluten-free adaptation is wonderfully straightforward. You can replace the dairy milk and butter with your favorite non-dairy alternatives, such as almond milk, soy milk, or coconut oil. For egg substitutes, flax eggs or commercial egg replacers work exceptionally well, ensuring the waffles still achieve a lovely lightness and binding. Similarly, a quality gluten-free all-purpose flour blend can seamlessly replace the wheat flour, making these waffles accessible to more people.
Another exciting variation involves infusing the batter with fruit. Adding a small amount of fruit puree, like raspberry or strawberry, to the red velvet batter can enhance its fruity undertones and deepen its color. Alternatively, finely chopped fresh or frozen berries can be gently folded into either batter for bursts of flavor and a pleasing texture contrast. This approach adds a wonderful freshness and complexity to the waffles.
How to Prepare Fluffy Red Velvet Marble Waffles
Step 1: Prepare the Classic Waffle Batter
Begin by gathering your dry ingredients for the classic waffle batter. In a spacious mixing bowl, meticulously whisk together the all-purpose flour, sugar, baking powder, baking soda, and salt. This initial whisking is crucial for evenly distributing the leavening agents, which is key to achieving a uniform and fluffy texture throughout your waffles. Ensure there are no clumps, creating a perfectly uniform blend.
In a separate, medium-sized bowl, combine all your wet ingredients for the classic batter. Gently whisk together the buttermilk, large eggs, melted butter, and pure vanilla extract until thoroughly incorporated. Using room-temperature eggs and buttermilk will greatly assist in creating a smoother, more emulsified batter, which is vital for a tender waffle. Taking this extra step ensures the ingredients meld together seamlessly.
Now, it’s time to unite the wet and dry components. Gradually pour the blended wet ingredients into the bowl containing the dry ingredients. Using a whisk or a spatula, gently stir the mixture until it is just combined; it’s perfectly acceptable and even desirable to have a few small lumps remaining. Overmixing at this stage can develop the gluten in the flour excessively, leading to tougher, less fluffy waffles. The goal is a light and airy batter.
Step 2: Prepare the Red Velvet Batter
In a separate mixing bowl, prepare the dry ingredients for your vibrant red velvet batter. Combine the specified amount of all-purpose flour, cocoa powder for that characteristic richness, sugar for sweetness, baking powder and baking soda for lift, and a pinch of salt to balance the flavors. Whisk these dry components together thoroughly to ensure the cocoa powder is evenly distributed and there are no lumps, which is especially important for a consistent color and taste.
In another container, carefully mix together the wet ingredients for the red velvet portion. This will include buttermilk, one large egg, melted butter, and vanilla extract. The star of this show, however, is the red food coloring; add your gel coloring here, starting with the recommended amount and adjusting to achieve your desired vibrant hue. Gel coloring is preferred as it provides intense color without adding excess liquid to the batter. Whisk until everything is smoothly combined, creating a beautifully colored liquid base.
Once your wet and dry ingredients are ready, it’s time to bring them together. Gradually incorporate the wet red velvet mixture into the dry ingredients. As with the classic batter, stir gently until everything is just combined. Again, avoid the temptation to overmix; a slightly lumpy batter will yield the fluffiest results for your red velvet waffles. The aim is a cohesive mixture where the ingredients are united but not overworked, preserving that delicate airiness.
Step 3: Preheat Your Waffle Iron
This is a critical step that often gets overlooked but is essential for achieving perfectly cooked, golden-brown waffles. Before you even think about pouring batter, ensure your waffle iron is fully preheated according to the manufacturer’s specific instructions. Most waffle irons will have an indicator light that signals when the ideal cooking temperature has been reached, usually at a medium-high setting. Do not rush this process; patience here pays off significantly.
Once your waffle iron is hot, it’s time to prepare its surface for the batter. Lightly grease the cooking plates using a pastry brush dipped in melted butter or a cooking spray specifically designed for high-heat applications. This greasing step is vital to prevent the waffles from sticking to the iron, ensuring they release cleanly and maintain their beautiful marbled pattern. A well-greased iron also contributes to that desirable crispy exterior.
The importance of a properly preheated and greased waffle iron cannot be overstated. This ensures that the batter hits a hot surface immediately, triggering the Maillard reaction that creates that sought-after crispiness and golden color on the outside, while the inside cooks through to a perfect fluffy consistency. An underheated iron will result in pale, soft waffles that may also stick, so always give your iron ample time to reach its optimal temperature.
Step 4: Create the Marble Effect
With your waffle iron perfectly hot and ready, begin the mesmerizing process of creating the marble effect. Carefully pour approximately half a cup of the classic waffle batter directly onto the center of the preheated waffle iron. Distribute it evenly across the bottom plate, ensuring it spreads out to form a good base for your marbled design. The amount may vary slightly depending on your waffle iron’s size and depth.
Immediately after pouring the classic batter, add a similar amount of your vibrant red velvet batter on top. Try to place it in dollops or a swirling pattern over the classic batter. This layering is what will allow for the distinct marbled appearance. The contrast between the two batters will be the canvas for your artistic edible creation, setting the stage for a visually stunning breakfast.
Now comes the artistic touch: using a toothpick, skewer, or even the tip of a small knife, gently swirl the two batters together. Make swift, light strokes, moving between the red and classic batter. The key here is to swirl just enough to create an attractive marbled pattern without overmixing, which would cause the colors to blend too much and lose their definition. You want distinct ribbons of red and brown, not a uniform pinkish-brown color. Aim for a mesmerizing, unique design with each waffle.
Step 5: Cook the Waffles
Once your beautiful marbled batter is in place on the waffle iron, carefully close the lid. Allow the waffle iron to work its magic, cooking the batter until the waffles are gloriously golden brown and possess a satisfying crispiness. The cooking time will vary depending on your specific waffle iron, but typically ranges from 5 to 7 minutes. Keep an eye on the steam escaping from the iron; as it subsides, it often indicates that the waffles are nearing completion.
A tell-tale sign that your waffles are ready to be removed is when they can be easily lifted from the waffle iron without sticking. If you encounter resistance, give them another minute or two. The aroma filling your kitchen should be intoxicating – a delightful blend of sweet vanilla, rich cocoa, and toasted batter. This stage is crucial for achieving that perfect texture that makes these waffles so irresistible.
As each waffle finishes cooking, carefully remove it from the waffle iron using a fork or spatula. It’s best to let the waffles cool slightly on a wire rack for a minute or two before serving. This allows the steam to escape, which helps to maintain their crisp exterior and prevents them from becoming soggy. This brief cooling period also makes them easier to handle when adding toppings.
Step 6: Serve and Enjoy
With your golden-brown, beautifully marbled waffles ready, it’s time for the best part – serving and savoring them! Carefully transfer the cooked waffles from the wire rack to individual plates. The visual appeal alone will be enough to excite everyone at the table, showcasing your culinary artistry.
Now, let your creativity guide your topping choices! A classic dollop of freshly whipped cream provides a cool, creamy contrast to the warm waffle. Fresh berries, such as sliced strawberries, raspberries, or blueberries, add a burst of vibrant color and a refreshing tartness that perfectly complements the sweetness. And of course, a generous drizzle of warm maple syrup is an absolute must for many, adding that comforting, familiar sweetness that ties all the flavors together.
These Fluffy Red Velvet Marble Waffles are more than just a breakfast item; they are an experience. They offer a delightful combination of visual appeal, fluffy texture, and balanced flavor that makes any morning feel special. Serve them warm, and watch them disappear as your loved ones indulge in this delightful treat.
Pro Tips for Fluffy Red Velvet Marble Waffles
Don’t Overmix the Batter: This is perhaps the most crucial tip for achieving truly fluffy waffles. When combining wet and dry ingredients, stir only until they are just incorporated. A few small lumps in the batter are perfectly fine and actually preferable, as overmixing develops gluten, leading to dense, tough waffles. Gentle folding is the key to maintaining that light, airy texture.
Ensure Your Waffle Iron is Properly Preheated: A hot waffle iron is essential for achieving a crispy exterior and a perfectly cooked interior. Allow your waffle iron to heat up completely before adding batter. A hot surface will immediately start the cooking process, creating steam that puffs up the batter and forms that signature crisp crust. Don’t underestimate the time it takes for your iron to reach its optimal temperature.
Master the Marble Swirl: When creating the marbled effect, use a light hand. Insert your toothpick or skewer and make a few gentle passes through the batters to create swirls. Over-swirling will cause the colors to blend too much, resulting in a uniform hue rather than a distinct marbled pattern. The goal is to see beautiful ribbons of red and classic batter.
Use Fresh Leavening Agents: Baking powder and baking soda are vital for the lift and fluffiness of your waffles. Check the expiration dates on your containers. If they are old, they may have lost their potency, leading to flat, dense waffles. A simple test for baking powder is to mix a teaspoon with hot water; it should fizz vigorously. For baking soda, mix a teaspoon with vinegar; it should also bubble enthusiastically.
Room Temperature Ingredients are Key: For both batters, using ingredients like eggs and buttermilk at room temperature helps them emulsify better with the other components. This leads to a smoother, more uniform batter and ultimately, a more tender and evenly cooked waffle. If you forget to take them out of the fridge in advance, you can quickly warm eggs in a bowl of warm water for a few minutes and gently warm buttermilk.
Serving Suggestions for Fluffy Red Velvet Marble Waffles
Decoration
The inherent beauty of the marbled design means these waffles don’t need much adornment, but a few thoughtful touches can elevate them further. A generous dollop of freshly whipped cream is a classic for a reason, providing a cool, creamy counterpoint to the warm waffle. For an extra visual flourish, sprinkle the whipped cream with a few edible red glitter stars or some finely chopped dark chocolate.
Fresh berries are another fantastic decorative element. Arrange vibrant red strawberries, plump raspberries, or a scattering of deep blue blueberries around the waffle. The natural colors of the fruit beautifully complement the red velvet hue. A light dusting of powdered sugar can also add a touch of elegance, mimicking a gentle snowfall over the rich colors.
Consider a drizzle of contrasting sauces for both visual appeal and flavor. A white chocolate ganache drizzled artfully over the top can create a striking contrast with the red velvet. Alternatively, a thin drizzle of dark chocolate syrup can enhance the chocolate notes present in the red velvet batter. The key is to keep the decoration balanced, allowing the marble pattern to remain the star.
Side Dishes
While these waffles are substantial on their own, pairing them with complementary side dishes can create a truly memorable breakfast or brunch experience. Crispy bacon or savory breakfast sausages offer a delightful salty counterpoint to the waffles’ sweetness, providing a balanced flavor profile that appeals to a wide range of palates. The contrast in textures and tastes is incredibly satisfying.
For a lighter, fresher option, a simple fruit salad is an excellent choice. A mix of seasonal fruits like melon, grapes, kiwi, and citrus segments provides hydration and a refreshing palate cleanser. This also adds another layer of color to your brunch spread, making it even more visually appealing. It’s a wonderful way to balance the richness of the waffles.
If you’re serving a larger brunch, consider including other breakfast favorites that pair well. Mini quiches, a bowl of creamy yogurt with granola, or even a small serving of scrambled eggs can round out the meal perfectly. The goal is to offer variety while ensuring that each component complements the unique flavor of the Red Velvet Marble Waffles without overpowering them.
Creative Serving Ideas
Move beyond the standard plate presentation with some creative serving ideas that add an element of fun and surprise. Instead of stacking them, consider cutting the waffles into fun shapes using cookie cutters once they’ve cooled slightly. This is particularly delightful for children’s parties or themed brunches, turning a simple waffle into a playful treat.
Another innovative idea is to transform the waffles into a “waffle board.” Arrange several waffles on a large platter and then surround them with an assortment of toppings, allowing guests to customize their own creations. Include various fruits, whipped cream, chocolate chips, nuts, and different syrups. This interactive approach makes serving a communal and engaging experience.
For a more elegant presentation, you could crumble a cooked waffle and use it as a base for a deconstructed dessert-style waffle. Layer the waffle crumbles with sweetened cream cheese, fresh berries, and a drizzle of raspberry coulis in a clear glass or bowl. This sophisticated take transforms the humble waffle into a charming dessert or a special brunch course, showcasing its versatility.
Preparation & Storage
Storing Leftovers
Should you be fortunate enough to have any Red Velvet Marble Waffles left over, proper storage is key to maintaining their quality. Once the waffles have completely cooled to room temperature, place them in an airtight container. You can layer them with parchment paper between each waffle to prevent them from sticking together. Stored this way in the refrigerator, they should remain fresh and retain a good portion of their texture for up to two days.
It’s important to ensure the container is truly airtight. This will prevent the waffles from drying out or absorbing any unwanted odors from other foods in your refrigerator. If you plan on consuming them within a day or two, refrigeration is the simplest and most effective method. Avoid storing them at room temperature for extended periods, as this can affect their texture and safety.
When you’re ready to enjoy your leftovers, the method of reheating will significantly impact the final result. As we’ll discuss later, certain reheating methods are far superior to others for bringing back that desirable crispness. Proper initial storage, however, sets the stage for successful reheating, so take these steps seriously.
Freezing
For longer-term storage, freezing is an excellent option to preserve the deliciousness of your Red Velvet Marble Waffles. After the waffles have completely cooled, the best practice is to freeze them individually on a baking sheet lined with parchment paper. This prevents them from clumping together into one frozen mass, ensuring you can easily retrieve just one or two waffles when needed. This initial freeze takes about 1 to 2 hours until they are firm.
Once the waffles are frozen solid on the baking sheet, transfer them into a freezer-safe bag or an airtight container. Be sure to remove as much air as possible from the bag before sealing to prevent freezer burn. Properly frozen waffles can maintain their quality for up to two months, making them a convenient option for a quick and tasty treat on demand. Label the bag or container with the date for easy tracking.
When you decide to enjoy your frozen waffles, they can be reheated directly from their frozen state, though thawing them slightly first might yield even better results for some reheating methods. The key is to avoid thawing them at room temperature for too long, as this can negatively impact their texture. The convenience of having homemade waffles ready to go is a game-changer for busy mornings.
Reheating
Reheating is where you can bring your stored or frozen waffles back to their former glory. The absolute best method to revive that delightful crispiness is by using a toaster or a toaster oven. Simply place the waffle (fresh from the fridge or still slightly frozen from the freezer) into the toaster slots or on the rack of your toaster oven and toast on a medium setting until warm and crisp throughout. This method mimics the original cooking process and works wonders.
Alternatively, you can reheat waffles in a conventional oven. Preheat your oven to around 350°F (175°C). Place the waffles on a baking sheet and warm them for about 5-10 minutes, or until they are heated through and have regained some crispness. This method is particularly good for reheating larger batches of waffles simultaneously. Keep an eye on them to prevent overcooking or burning.
It is strongly advised to avoid reheating waffles in the microwave. While a microwave will warm them quickly, it tends to make them soft, chewy, and rather soggy, completely diminishing their appealing texture. The moisture trapped inside the waffle during microwaving can lead to an undesirable rubbery consistency. Therefore, stick to the toaster, toaster oven, or conventional oven for the best results.
Frequently Asked Questions
-
How do I choose ripe ingredients for this recipe?
Selecting fresh, quality ingredients is paramount for the best-tasting waffles. For the buttermilk, opt for one that has a pleasant, slightly tangy aroma and a smooth consistency; avoid any that appear separated or have an off-putting smell, as freshness directly impacts the flavor profile. When it comes to eggs, ensure they are fresh, which can often be gauged by their weight and the integrity of the shell; room-temperature eggs are essential for proper emulsification, so if they’ve been refrigerated, allow them to sit out for about 30 minutes prior to use, or gently warm them by placing them in a bowl of lukewarm water for a few minutes. This temperature adjustment is crucial for achieving a smooth, homogenous batter that bakes evenly, leading to fluffier waffles.
-
What is the best way to store leftover Red Velvet Marble Waffles?
After you’ve had your fill of these delightful waffles, proper storage is key to enjoying them later. Ensure the waffles have cooled down completely to room temperature before storing them; this prevents condensation from forming inside the container, which can make them soggy. Place the cooled waffles in an airtight container, ideally with parchment paper separating layers to prevent sticking. Refrigerate them promptly, and they should maintain their good quality for up to two days. An airtight seal is critical to ward off dryness and prevent them from absorbing any unwanted flavors from other items in your refrigerator.
-
Can I freeze my waffles, and if so, how?
Absolutely! Freezing is a fantastic method for preserving these delicious Red Velvet Marble Waffles for longer enjoyment. Once the waffles are completely cooled, lay them in a single layer on a baking sheet lined with parchment paper. This crucial step prevents them from freezing into a single, inseparable block. Place the baking sheet in the freezer for about 1 to 2 hours, until the waffles are firm and solid. Then, carefully transfer these frozen waffles into a freezer-safe bag or an airtight container, removing as much air as possible before sealing. Properly frozen, they can be stored for up to two months, offering a convenient treat whenever the craving strikes.
-
What should I do if my waffles are coming out dense?
If your waffles are consistently dense, there are a few common culprits to investigate. Firstly, the most frequent cause is overmixing the batter; remember, gentle stirring until just combined is ideal, and a few lumps are a good sign. Overmixing develops the gluten, resulting in a tougher, less airy texture. Secondly, ensure your baking powder and baking soda are fresh and active. Expired leavening agents will not produce enough lift, leading to dense waffles. You can test their freshness by dissolving a teaspoon in hot water (for baking powder) or vinegar (for baking soda); vigorous bubbling indicates they are still potent.
-
Are there any dietary restrictions I should keep in mind?
This recipe, in its standard form, contains gluten, dairy, and eggs, making it unsuitable for individuals with those specific allergies or intolerances. For a gluten-free version, substitute the all-purpose flour with a 1:1 gluten-free baking blend that contains xanthan gum for binding. To make the waffles dairy-free, replace the buttermilk with non-dairy milk (like almond or soy) mixed with a teaspoon of lemon juice or vinegar, and use a dairy-free butter substitute or vegetable oil. For a vegan preparation, in addition to the dairy-free substitutions, replace the eggs with flax eggs (1 tablespoon flaxseed meal mixed with 2.5 tablespoons water per egg) or another suitable vegan egg replacer. These adjustments allow for delicious variations while accommodating various dietary needs.