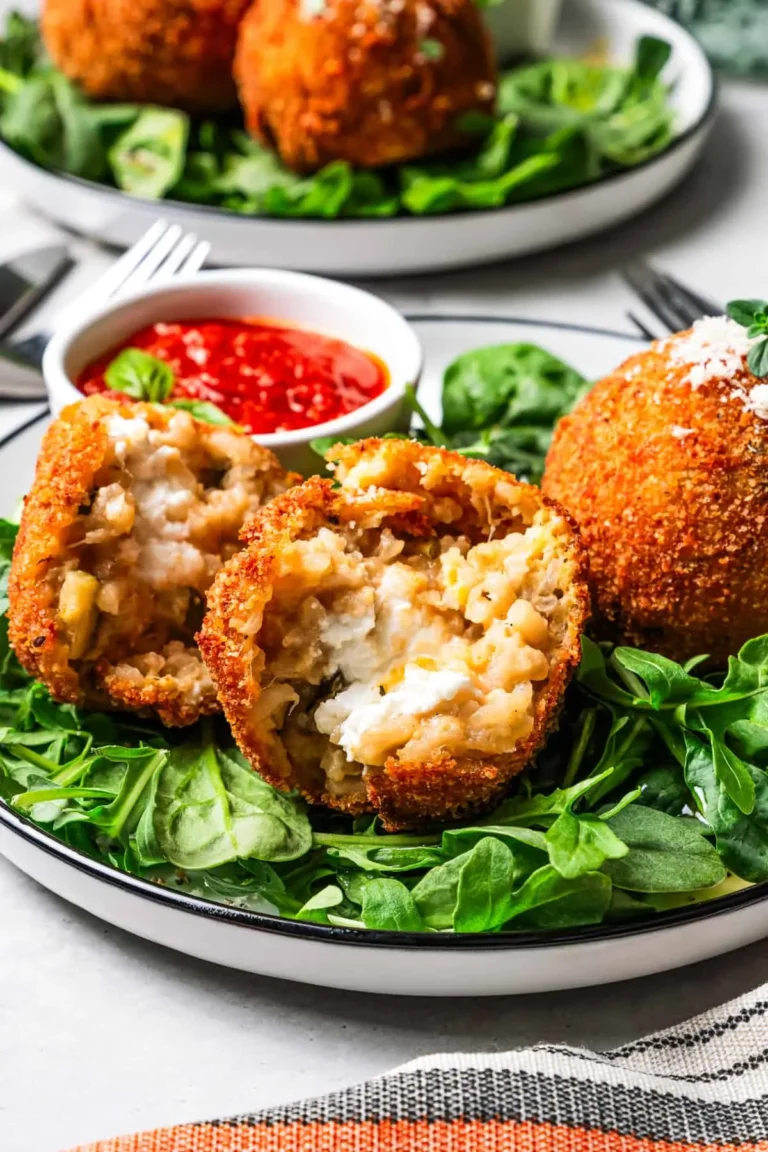
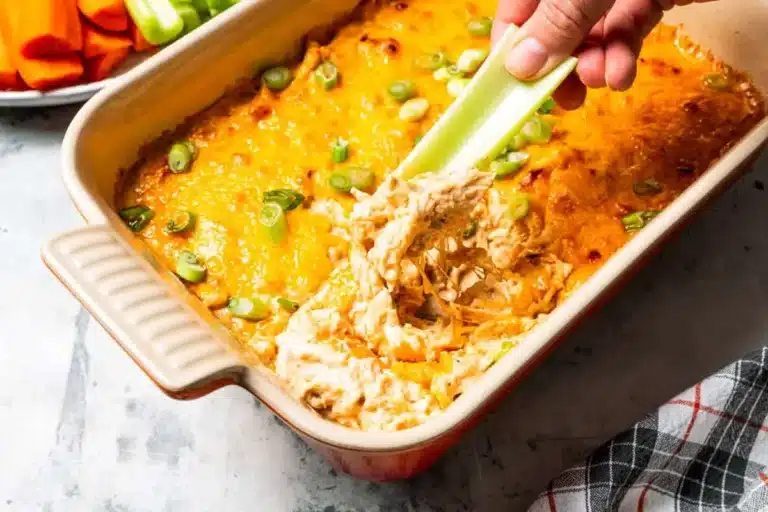
Ultimate Hot 7 Layer Dip: A Delicious Game Day Treat

There’s an undeniable magic that happens when layers of vibrant flavors meld together in the oven, creating a warm, bubbling dish that beckons everyone to gather around. Picture this: golden, melted cheese gracefully cascading over savory beef, fresh veggies, and a hint of spice that tickles your taste buds.
This Hot 7 Layer Dip is the perfect solution for anyone tired of the same old weeknight meals or mundane snacks. I first whipped this dish up for a casual get-together with friends, and the response was overwhelming. It quickly became our go-to for everything from football Sundays to cozy movie nights.
Why You Will Love This Recipe
- Flavor Explosion: Each layer brims with vibrant tastes, from the savory seasoned beef to the creamy sour cream and the zesty salsa components, culminating in a delightful blend that satisfies every craving.
- Quick Assembly: Despite its impressive appearance and layered complexity, this dip comes together with surprising speed. You’ll be amazed at how quickly you can prepare this delicious dish from start to finish, making it ideal for spontaneous gatherings or busy weeknights.
- Versatile Options: This recipe is incredibly adaptable. Serve it with traditional crispy tortilla chips for that classic crunch, or opt for fresh vegetable sticks like bell peppers, carrots, and celery for a healthier, refreshing twist.
- Crowd-Pleasing Favorite: Whether you’re hosting a lively game day party, a relaxed family dinner, or a sophisticated cocktail hour, this dip is guaranteed to be a hit with guests of all ages and palates. Its universally appealing flavors make it a reliable choice for any occasion.
- Elevate Your Events: Consider pairing it with a game-changing guacamole or a fresh pico de gallo to take your gathering to the next level, offering an even richer tapestry of flavors and textures.
Ingredients You Need
Crafting this Hot 7 Layer Dip begins with selecting the freshest, highest-quality ingredients, as they form the foundation of its incredible taste. The vibrant colors and distinct textures of each component play a crucial role in the overall sensory experience of this beloved appetizer.
Ultimate Hot 7 Layer Dip
A flavor-packed game day treat that's a vibrant, flavorful dish perfect for game day or casual gatherings. This warm, bubbling dip beckons everyone to gather around, with layers of golden melted cheese, savory beef, fresh veggies, and a hint of spice.
- 1 Tbsp vegetable oil
- 1/2 medium yellow onion, diced
- 1/2 lb ground beef
- 1 large garlic clove, minced
- Salt
- 1/2 tsp chipotle chili pepper powder
- 1/4 tsp paprika
- 1/2 tsp cumin
- 2 Tbsp sour cream
- 1 Tbsp tomato paste
- 2 jalapeno peppers, seeded and diced
- 1/2 cup canned black beans, drained
- 1/2 cup canned corn, drained
- 1 tomato, seeded and diced
- 2 Tbsp fresh cilantro, minced
- 1 1/2 cups shredded Mexican cheese mix
- Additional cumin
- Additional salt
- More chipotle chili pepper powder
- 1Heat an oven-safe skillet over medium heat and add the vegetable oil.
- 2Sauté the diced onion until it becomes transparent and fragrant, about 3-4 minutes.
- 3Brown the ground beef in the skillet, stirring often until it's almost cooked through, about 5-7 minutes.
- 4Add the minced garlic, salt, paprika, cumin, and chipotle chili powder. Cook until fully browned, about 2-3 minutes.
- 5Stir in the sour cream and tomato paste until fully combined, then spread the mixture evenly across the skillet.
- 6Preheat your oven to 350°F (175°C).
- 7Layer the diced jalapeno peppers evenly over the beef, followed by the black beans, sweet corn, and diced tomatoes.
- 8Sprinkle additional salt and cumin over the veggies and add fresh cilantro on top.
- 9Spread the shredded Mexican cheese mix evenly over the layered veggies.
- 10Top with a little extra salt and chipotle chili powder for a final flavor boost.
- 11Bake in the preheated oven for 20 minutes, or until the cheese is golden and bubbly.
- 12Serve warm with crispy tortilla chips for scooping.
Keywords: 7 layer dip, hot dip, game day food, party appetizer, Mexican dip, cheesy dip, beef dip, easy appetizer
The specific quantities and detailed preparations for each element are outlined in the full recipe card provided, ensuring you have all the information needed to create this masterpiece.
Variations
For those seeking a completely meat-free experience, transforming this classic into a vegetarian delight is remarkably simple. Replace the seasoned ground beef with a hearty mixture of sautéed mushrooms and onions, or opt for crumbled extra-firm tofu seasoned with similar spices for a satisfying protein boost. This ensures everyone can enjoy a flavorful, plant-based version.
If you’re navigating a low-carbohydrate lifestyle, this dip offers plenty of opportunities for delicious modifications. Instead of relying solely on tortilla chips, serve an abundance of colorful vegetable crudités such as bell pepper strips, cucumber slices, celery sticks, and broccoli florets. These provide a wonderfully crunchy and healthy vehicle for scooping up all those amazing layers.
Elevate the spice profile with this fiery variation. Incorporate diced serrano peppers or a pinch of cayenne pepper into the beef mixture for an extra kick. You could also add a layer of spicy corn salsa or a drizzle of hot sauce over the top just before serving to truly tantalize those who crave a bit more heat.
How to Prepare Hot 7 Layer Dip
Step 1: Sautéing the Aromatics and Browning the Beef
Begin by placing an oven-safe skillet over medium heat. Add the tablespoon of vegetable oil and let it warm up, allowing it to shimmer slightly, which indicates it’s ready to start cooking. This initial step is crucial for building the flavor base of your dip.
Once the oil is heated, introduce the finely diced yellow onion to the skillet. Sauté the onion, stirring occasionally, until it becomes beautifully translucent and releases its sweet, fragrant aroma, which typically takes about three to four minutes. This gentle cooking process softens the onion and integrates its sweetness into the dish.
Next, add the ground beef to the skillet. Break it apart with your spoon and stir it frequently as it cooks. Continue to brown the beef until it is no longer pink, aiming for a process that takes approximately five to seven minutes. Ensure the beef is thoroughly cooked through before moving on to the next stage of flavor development.
To infuse the beef layer with rich, complex tastes, add the minced garlic, a pinch of salt, smoky paprika, earthy cumin, and the slightly spicy chipotle chili powder. Stir all these aromatic spices into the browned beef, continuing to cook for another two to three minutes until the spices become fragrant. This blooming of spices releases their full potential and coats the beef evenly.
The final touch for this savory base involves stirring in the two tablespoons of sour cream and one tablespoon of tomato paste. Blend these ingredients thoroughly with the seasoned beef until they are completely combined, creating a cohesive and moist mixture. This step adds a creamy depth and a concentrated tomato richness that binds the beef layer together perfectly.
Carefully spread this seasoned beef mixture evenly across the bottom of the oven-safe skillet. Ensure an even distribution so that every serving of dip will have a substantial and flavorful beef component. Once the beef layer is spread, remove the skillet from the direct heat, as you will soon be layering on the vibrant fresh ingredients.
Step 2: Building the Vibrant Veggie Layers
Preheat your oven to 350°F (175°C) while you prepare to assemble the remaining layers of your Hot 7 Layer Dip. This ensures the oven is at the optimal temperature when your creation is ready to bake, allowing for perfect melting and bubbling of the cheese.
Begin by evenly distributing the diced jalapeño peppers over the prepared beef layer. If you prefer a milder dip, you can remove the seeds and membranes from the jalapeños before dicing, or even substitute them with diced sweet bell peppers for a different flavor profile. Adjust the amount of jalapeño based on your personal preference for heat.
Next, add a layer of drained canned black beans over the jalapeños. The beans provide a wonderful texture and a boost of protein, creating a hearty foundation for the subsequent ingredients. Ensure they are spread out uniformly across the skillet.
Follow the black beans with a layer of drained canned corn. The sweet kernels of corn offer a delightful contrast to the spicy jalapeños and savory beef, adding a touch of sweetness that brightens up the entire dip. Again, spread them evenly to ensure consistent flavor distribution.
Introduce the diced fresh tomato over the corn layer. Be sure to seed the tomato before dicing to prevent excess moisture from making the dip watery. The fresh tomatoes add a burst of acidity and a juicy element that complements the other components beautifully.
Now, it’s time to add a sprinkle of salt and cumin over the assembled vegetable layers. This enhances the natural flavors of the vegetables and ties them together with the seasoned beef. Finally, scatter the minced fresh cilantro generously over the tomatoes and other vegetables. The cilantro provides a fresh, herbaceous note that truly elevates the entire dip.
Step 3: The Cheesy Crown and Baking
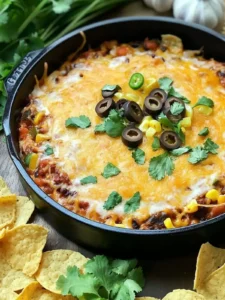
Generously spread the shredded Mexican cheese mix evenly over the entire surface of the layered vegetables. Ensure that every corner and crevice is covered with the melty cheese, as this is the crowning glory of your Hot 7 Layer Dip and provides that irresistible gooey texture.
For an extra burst of flavor and visual appeal, sprinkle a little additional cumin and salt over the cheese layer. A final dash of chipotle chili powder on top can add an extra hint of warmth and spice that will tantalize your taste buds with every scoop.
Place the skillet into the preheated oven at 350°F (175°C). Bake the dip for approximately 20 minutes, or until the cheese is completely melted, golden brown, and bubbling around the edges. The aroma wafting from your oven during this time will be absolutely irresistible and indicative of the deliciousness to come.
Once the dip is perfectly bubbly and golden, carefully remove the hot skillet from the oven using oven mitts. The vibrant layers will be melded together, creating a visually stunning and mouth-watering appetizer that is ready to be enjoyed immediately.
Serve the Hot 7 Layer Dip warm, directly from the skillet, accompanied by plenty of crispy tortilla chips for scooping. The contrast of the warm, gooey dip with the crunchy chips is absolutely divine and makes for a perfect party snack.
As an optional finishing touch, you can garnish the dip with a little extra fresh cilantro for a pop of color and a fresh herbaceous note. This final touch adds to the visual appeal and enhances the overall freshness of the dish.
Step 4: The Glorious Reveal and Enjoyment
The moment of truth arrives as you present the steaming, bubbling Hot 7 Layer Dip to your eager guests. The visual appeal of the golden, melted cheese cascading over the colorful layers of vegetables and savory beef is enough to make mouths water in anticipation.
Encourage your guests to grab a scoop and dig in! The magic of this dip lies in its layered construction, ensuring that each bite offers a complex and harmonious blend of flavors and textures. The interplay between the creamy, the savory, the spicy, and the fresh is what makes it so addictive.
Provide an ample supply of your favorite tortilla chips, ensuring everyone can fully partake in the dipping experience. The satisfying crunch of the chips against the warm, gooey dip is a classic combination that never fails to please. This is where the communal joy of sharing a delicious appetizer truly shines.
Step 5: The Delightful Dance of Flavors
Each spoonful is a culinary adventure, a testament to the power of simple ingredients coming together in perfect harmony. The initial taste might be the rich, savory beef, followed by the subtle heat of the jalapeños, and then the creamy coolness of the sour cream.
The sweetness of the corn and the fresh zest of the tomato and cilantro cut through the richness, providing a balanced and exciting flavor profile. The overarching sensation is one of comfort, warmth, and pure deliciousness, making it a favorite for any occasion.
This dip is more than just an appetizer; it’s an experience. It’s the centerpiece of conversations, the fuel for celebrations, and a simple pleasure that brings people together. The satisfaction derived from a well-made Hot 7 Layer Dip is immense.
Step 6: Final Touches and Lingering Flavors
As your guests continue to enjoy the dip, observe the delightful interaction and conversation it sparks. This dish has a unique ability to foster a sense of togetherness and shared enjoyment, making any gathering more memorable.
The lingering warmth and savory notes on the palate serve as a delightful reminder of the deliciousness you’ve created. It’s a testament to the recipe’s success when empty bowls and happy faces are the only evidence left.
Consider the possibilities for encore performances. The ease of preparation and the guaranteed success of this recipe mean it will undoubtedly become a regular feature in your culinary repertoire, always ready to impress and satisfy.
Pro Tips for Hot 7 Layer Dip
Layer with Love: For the most balanced and enjoyable bites, ensure each layer is spread as evenly as possible across the skillet. This prevents any one flavor from overpowering the others and guarantees a consistent taste experience with every scoop, making sure no one gets a bite that’s all cheese or all beans.
Watch the Heat: If you’re sensitive to spice or serving to guests with varying heat preferences, it’s wise to adjust the jalapeño quantity or remove the seeds and membranes. Alternatively, a simple swap with diced sweet bell peppers will offer flavor without the heat, ensuring your Hot 7 Layer Dip is approachable for all palates.
Use Fresh Ingredients: The vibrancy of this dip is significantly enhanced by using fresh ingredients whenever possible. Fresh tomatoes, crisp jalapeños, and fragrant cilantro bring a brightness and superior texture that canned or dried alternatives simply cannot match, elevating the overall taste profile.
Avoid Soggy Bottoms: To prevent excess moisture from compromising the texture of your dip, ensure that canned ingredients like black beans and corn are thoroughly drained. You can even gently pat them dry with a paper towel to remove any residual liquid, helping to maintain the integrity of each layer.
Experiment Boldly: Don’t be afraid to personalize this recipe! Feel free to swap out the Mexican cheese blend for Monterey Jack or sharp cheddar, or add a layer of sliced black olives for an extra salty kick. These small adjustments can transform your dip into a sensational signature dish.
Baking Perfection: Keep a close eye on your dip while it’s baking, as oven temperatures can vary. You’re aiming for that perfect golden, bubbly cheese without letting it burn. A quick check around the 15-18 minute mark is often helpful to ensure optimal results.
Serving Suggestions for Hot 7 Layer Dip
Decoration
For a visually stunning presentation, garnish the top of your Hot 7 Layer Dip with freshly chopped cilantro. This adds a vibrant green contrast to the melted cheese and a fresh, aromatic finish. Consider also adding a few thin slices of jalapeño or small diced red bell pepper for extra color and a hint of visual spice.
Side Dishes
The classic accompaniment for this dip is, of course, crispy tortilla chips, offering a perfect crunch to contrast the warm, gooey layers. For a healthier option, consider serving it with an assortment of fresh vegetable crudités such as bell pepper strips, carrot sticks, cucumber slices, and celery. Fresh salsa or a chunky guacamole also makes for excellent complementary side dishes.
Creative Serving Ideas
Instead of serving directly from a skillet, consider layering the dip into individual ramekins for a more elegant presentation. Another fun idea is to create a “build-your-own” dip bar, where guests can choose their favorite dippers and toppings. For a more substantial meal, serve the dip alongside baked lemon chicken or a hearty lobster bisque for a delightful dinner experience.
Preparation & Storage
Storing Leftovers
To store any leftover Hot 7 Layer Dip, allow it to cool to room temperature. Then, transfer it into an airtight container. Properly stored in the refrigerator, the dip will maintain its delicious flavor and texture for up to 3 days. This makes it a great option for meal prepping or for enjoying leftovers the next day.
Freezing
Yes, you can absolutely freeze this Hot 7 Layer Dip, especially if you want to prepare it in advance. Assemble the dip in an oven-safe dish but do not bake it. Cover it tightly with plastic wrap and then with aluminum foil. Freeze for up to one month. Thaw it completely in the refrigerator overnight before baking as usual.
Reheating
When you’re ready to enjoy your chilled or frozen and thawed Hot 7 Layer Dip, reheating is straightforward. Place the dish in a preheated oven at 350°F (175°C). Bake for approximately 15-20 minutes, or until the dip is heated through and the cheese is once again golden and bubbly. This process revitalizes the flavors and textures.
Frequently Asked Questions
-
How do I ensure each layer in my Hot 7 Layer Dip is distinct and not mushy?
Achieving distinct layers is primarily about moisture management and careful assembly. Ensure that any canned ingredients, such as black beans and corn, are thoroughly drained and even patted dry with paper towels to remove excess water. When dicing fresh tomatoes, remove the seeds and pulp to prevent them from releasing too much liquid. Spreading each layer evenly without pressing down too firmly also helps maintain their integrity. Finally, be mindful not to over-bake, as prolonged heat can cause some ingredients to break down and meld together excessively.
-
Can I make certain components of the Hot 7 Layer Dip ahead of time?
Absolutely! This is a fantastic recipe for making ahead, which significantly reduces preparation time on the day of serving. You can prepare the seasoned beef mixture up to 24 hours in advance and store it in an airtight container in the refrigerator. Similarly, chop all your vegetables – jalapeños, tomatoes, and cilantro – and store them separately in airtight containers to maintain their freshness. The cheese can also be shredded ahead of time. Assemble all the layers just before baking for the best results and to maintain the vibrancy of the fresh ingredients.
-
What are some creative substitutions for the ground beef in the Hot 7 Layer Dip?
For a delicious vegetarian or vegan alternative, you can replace the ground beef with crumbled extra-firm tofu that has been seasoned similarly, or with a hearty mix of sautéed mushrooms and onions. Another option is to use cooked lentils, which provide a great texture and absorb flavors well. If you prefer poultry, ground turkey is an excellent lean substitute. For an even heartier, meatier flavor profile, consider using cooked and crumbled chorizo or Italian sausage, though this will alter the spice profile.