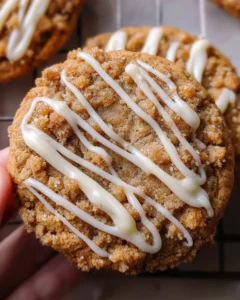
Coffee Cake Cookies: Irresistible Treats for Comfort

Imagine a cookie that captures the very essence of a comforting coffee cake: warm cinnamon spice, a delightful crumble, and a sweet, tender crumb. That’s precisely what these coffee cake cookies deliver, offering a perfect marriage of two beloved baked goods in one irresistible package. They are more than just a cookie; they are a moment of pure indulgence, ideal for kickstarting your day or as a sweet finale to any meal.
These delightful treats boast crispy edges that give way to a wonderfully chewy center, all enhanced by a rich, buttery streusel topping and a delicate vanilla drizzle. This combination creates a sensory experience that is both familiar and excitingly new, making them an instant favorite for anyone who tries them. Prepare to be enchanted by their flavor and texture.
Why You Will Love This Recipe
- Irresistible Flavor: Experience the perfect harmony of cinnamon, brown sugar, and buttery notes in every single bite.
- Versatile Treat: Whether it’s a morning indulgence, an afternoon snack, or a sweet dessert, these cookies are always the right choice.
- Easy to Make: With clear instructions and common pantry staples, even novice bakers can achieve bakery-quality results effortlessly.
- Bakery-Style Quality: Enjoy the satisfaction of creating professional-looking and tasting cookies right in your own home kitchen.
- Great for Sharing: Bake a generous batch to brighten the day of friends, family, or colleagues; their deliciousness is contagious.
Ingredients You Need
The magic of these coffee cake cookies truly lies in the quality of the ingredients you use. Opting for fresh, high-quality butter and vanilla extract will significantly enhance the depth of flavor, making each bite a luxurious experience. Ensuring your eggs are at room temperature is also a key step for achieving the perfect cookie texture, allowing them to emulsify properly with the fats and sugars.
Coffee Cake Cookies
Coffee Cake Cookies are a delightful fusion of classic coffee cake flavors and the convenience of cookies. With their crispy edges and chewy centers, these treats are perfect for breakfast, snacks, or dessert. Topped with a buttery streusel and sweet vanilla icing, they are sure to impress family and friends at any gathering or cozy afternoon at home.
- For the Streusel Topping:
- 4 tbsp Unsalted Butter (cold, cut into cubes)
- 1/3 cup + 1 tbsp Brown sugar
- 2/3 cup All-purpose flour
- 1/8 tsp Salt
- 1 tsp Ground cinnamon
- For the Cookies:
- 1 cup Unsalted butter (softened)
- 1 cup White granulated sugar
- 1/3 cup Light brown sugar
- 1 Large egg (room temperature)
- 1 Large Egg yolk (room temperature)
- 1 tsp Vanilla extract
- 2 3/4 cup + 2 tbsp All-purpose flour (sifted)
- 1 tsp Baking soda
- 3/4 tsp Salt
- 1/2 tsp Ground cinnamon
- For the Icing:
- 1/2 cup Powdered sugar (sifted)
- 1 tbsp Whole milk
- 1/4 tsp Vanilla extract
- 1Preheat your oven to 350°F (175°C) and line a baking sheet with parchment paper.
- 2Prepare the streusel topping by mixing cold butter cubes, brown sugar, flour, salt, and cinnamon until crumbly. Set aside.
- 3In a large mixing bowl, cream together softened unsalted butter, white granulated sugar, and light brown sugar until light and fluffy (about 2-3 minutes with an electric mixer).
- 4Add one large egg, one egg yolk, and vanilla extract to the creamed mixture. Mix until well combined.
- 5In a separate bowl, whisk together sifted all-purpose flour, baking soda, salt, and ground cinnamon. Gradually add this dry mixture to the wet ingredients while mixing on low speed until just combined.
- 6Using a cookie scoop or tablespoon, drop spoonfuls of dough onto the prepared baking sheet, leaving space between each cookie.
- 7Sprinkle the prepared streusel topping generously over each cookie.
- 8Bake in the preheated oven for about 12-15 minutes, or until the edges are lightly golden.
- 9Remove from the oven and let cool on the baking sheet for a few minutes before transferring to a cooling rack.
- 10In a small bowl, whisk together powdered sugar, whole milk, and vanilla extract until smooth. Drizzle over the cooled cookies once they are completely set on the cooling rack.
Keywords: Coffee Cake Cookies, streusel, cinnamon, vanilla icing, bakery style, breakfast cookies, dessert cookies
- streusel topping butter (cold, cut into cubes): Essential for creating the signature crumbly texture that defines the topping.
- brown sugar: Adds moisture and a rich, molasses-like flavor to the streusel, making it wonderfully complex.
- all-purpose flour: The base of the streusel, providing structure and a satisfying crunch.
- salt: Balances the sweetness and enhances all the other flavors in the streusel mixture.
- ground cinnamon: The quintessential spice for coffee cake, providing warmth and that unmistakable aroma.
- unsalted butter (softened): Forms the creamy foundation of the cookie dough, contributing richness and tenderness.
- white granulated sugar: Sweetens the cookie dough and helps create those desirable crispy edges.
- light brown sugar: Adds moisture, chewiness, and a deeper caramel note to the cookie base.
- large egg (room temperature): Binds the ingredients together and contributes to the overall structure and richness of the cookie dough.
- large egg yolk (room temperature): Enriches the dough, adding extra tenderness and a delightful chewiness.
- vanilla extract: A classic flavor enhancer that rounds out the sweet and spiced notes of the cookie.
- all-purpose flour (sifted): Provides the main structure for the cookie dough, and sifting ensures a lighter, more tender crumb.
- baking soda: Acts as a leavening agent, helping the cookies to spread and achieve a chewy texture.
- salt: Enhances the overall flavor profile and balances the sweetness in the cookie dough.
- ground cinnamon: Infuses the cookie dough with a warm, comforting spice that is characteristic of coffee cake.
- powdered sugar (sifted): The base for the sweet and simple vanilla icing, creating a smooth and delicate glaze.
- whole milk: Thins the powdered sugar to the perfect drizzling consistency for the icing.
- vanilla extract: Adds a hint of pure vanilla flavor to the icing, complementing the cookie’s spice.
The precise quantities for each ingredient are thoughtfully detailed within the accompanying recipe card, ensuring you have all the specifics for baking success.
Variations
Elevate your coffee cake cookies with some creative twists that cater to different dietary needs and taste preferences. Imagine a completely plant-based version that still delivers all the comforting flavors you adore.
For a delicious vegan coffee cake cookie, you can easily substitute the butter with a high-quality vegan butter alternative. Replace the eggs with a flax egg (1 tablespoon ground flaxseed mixed with 3 tablespoons water, let sit for 5 minutes) or a commercial egg replacer to maintain the dough’s structure and richness. Ensure your chosen plant-based milk is used for the icing, and the result will be a cruelty-free treat that’s just as satisfying.
If you’re following a low-carb lifestyle, these cookies can also be adapted. Utilize a blend of almond flour and coconut flour for the dry ingredients in both the cookie and streusel components. For sweetness, opt for a granular erythritol or xylitol blend, adjusting to your preferred sweetness level. A touch of psyllium husk can help with binding and texture in the absence of traditional flour, resulting in a delightfully chewy and flavorful cookie that fits your dietary goals.
Another exciting variation involves adding a touch of chocolate. Consider folding in some mini chocolate chips into the cookie dough before baking for a decadent chocolate chip coffee cake cookie experience. Alternatively, you could melt some good quality chocolate and drizzle it over the cooled cookies instead of the vanilla icing, creating a mocha-inspired delight that’s perfect for any chocolate lover.
How to Prepare coffee cake cookies
Step 1: Prepare Your Oven and Baking Sheet
The journey to perfectly baked coffee cake cookies begins with the proper setup of your baking environment. First, preheat your oven to precisely 350°F (175°C). This crucial step ensures that the oven is at the optimal temperature when the cookies go in, promoting even baking and proper spread.
Next, prepare your baking sheet by lining it with parchment paper. This simple action is a game-changer, preventing your cookies from sticking to the pan, which makes for effortless removal and cleaner cookies. It also aids in even heat distribution across the bottom of the cookies, contributing to that perfect golden-brown crust. Make sure to use a good quality parchment paper that can withstand the oven’s heat without scorching.
Pro Tip: If you don’t have parchment paper, you can lightly grease and flour your baking sheet, but parchment paper generally yields superior results and easier cleanup. Ensure the baking sheet is placed on the middle rack of the oven for the most consistent heat exposure.
Step 2: Make the Streusel Topping
Crafting the streusel topping is where the signature coffee cake flavor truly begins to shine. In a medium mixing bowl, combine the cold, cubed unsalted butter, brown sugar, all-purpose flour, salt, and ground cinnamon. Using your fingertips, a pastry blender, or even two forks, work the ingredients together until the mixture resembles coarse crumbs. The key here is to use cold butter; this ensures that the pieces of butter remain distinct, which bakes into delightful little pockets of crispiness.
Continue to mix until the crumbly texture is achieved. You want some larger, pea-sized pieces mixed with finer crumbs. This textural variation is what makes the streusel so appealing and provides a delightful contrast to the soft cookie base. Avoid overmixing, which can turn the streusel into a paste. The goal is a loose, crumbly mixture ready to be sprinkled atop your cookie dough.
Texture Insight: The cold butter is paramount; it melts slowly in the oven, creating steam and pockets that result in a lighter, crispier topping. If the butter is too warm, it will fully incorporate into the flour and sugar, leading to a denser, less desirable streusel texture. Aim for a mixture that holds together loosely when squeezed but still crumbles easily.
Step 3: Cream the Butters and Sugars
Now, it’s time to build the foundation of your delicious cookie dough. In a large mixing bowl, combine the softened unsalted butter, white granulated sugar, and light brown sugar. Using an electric mixer on medium speed, cream these ingredients together until the mixture becomes light, fluffy, and pale in color. This process, known as creaming, incorporates air into the dough, which is vital for achieving a tender cookie texture and helping the cookies rise and spread properly.
Dedicate at least 2-3 minutes to this creaming process, scraping down the sides of the bowl occasionally to ensure all the butter and sugar are evenly incorporated. The mixture should look significantly lighter and have a fluffy, almost whipped consistency. This step is critical for the overall texture and structure of the final cookie, so don’t rush it. Properly creamed butter and sugar create air pockets that will expand during baking.
The Science of Creaming: When butter and sugar are beaten together, the sharp edges of the sugar crystals cut into the butter, creating small air pockets. As you continue to beat, more air is incorporated, and the mixture lightens. This trapped air will expand in the oven’s heat, contributing to the cookie’s rise and tender crumb. The brown sugar also adds moisture, which helps create a chewier cookie.
Step 4: Add Eggs and Vanilla
Once your butter and sugar mixture is perfectly creamed and fluffy, it’s time to add the binding and flavoring agents. Gently add the room temperature large egg, followed by the room temperature large egg yolk, to the creamed mixture. Beat on low to medium speed until each egg is fully incorporated and the mixture is smooth. The egg yolk, in particular, contributes to the richness and chewiness of the cookie.
Next, stir in the pure vanilla extract. Vanilla is a flavor enhancer that amplifies the sweetness and spice, adding a warm, aromatic note that complements the coffee cake flavors beautifully. Ensure the vanilla extract is evenly distributed throughout the mixture. Again, scrape down the sides of the bowl to make sure everything is thoroughly combined. Room temperature eggs incorporate more easily into the batter, creating a smoother, more homogenous dough.
Ingredient Temperature Matters: Using room temperature eggs is crucial. Cold eggs can shock the creamed butter and sugar mixture, causing it to curdle or seize, leading to a dense, oily cookie. Allowing them to come to room temperature ensures they emulsify properly with the fats, creating a stable batter that bakes into a tender cookie. You can speed up this process by placing eggs in a bowl of warm (not hot) water for about 5-10 minutes.
Step 5: Combine Dry Ingredients
In a separate medium bowl, whisk together the sifted all-purpose flour, baking soda, salt, and ground cinnamon. Whisking these dry ingredients thoroughly ensures that the leavening agent (baking soda) and salt are evenly distributed throughout the flour, which is essential for uniform rising and flavor. Sifting the flour not only removes any lumps but also aerates it, contributing to a lighter cookie texture.
Once the dry ingredients are well combined, gradually add this mixture to the wet ingredients in the large bowl. Mix on low speed with your electric mixer until the ingredients are just combined. Be careful not to overmix the dough at this stage. Overmixing can develop the gluten in the flour too much, resulting in tough, dense cookies. Stop mixing as soon as you no longer see streaks of dry flour.
The Role of Baking Soda: Baking soda is a chemical leavener that reacts with acidic ingredients (like brown sugar) to produce carbon dioxide gas. This gas expands during baking, causing the cookies to rise and spread. It also contributes to the browning and crispiness of the cookie’s edges. Too much baking soda can lead to a bitter taste and excessive spreading.
Step 6: Form Cookies
With your delicious dough ready, it’s time to shape the cookies. Using a cookie scoop of about 2 tablespoons or two spoons, drop rounded portions of dough onto the prepared baking sheet. Aim for uniformly sized cookies so they bake evenly. Leave ample space between each cookie, typically about 2 inches, as they will spread considerably during baking.
Dough Handling Tip: If the dough feels too soft or sticky to handle, you can chill it in the refrigerator for about 15-30 minutes. This will firm up the butter, making the dough easier to scoop and preventing excessive spreading. Chilling the dough also allows the flavors to meld, potentially enhancing the cookie’s taste.
Visual Guide: A good cookie scoop ensures consistent size, leading to even baking. Imagine uniform mounds of dough, ready to be transformed into delightful cookies. The spacing is just as important as the size, allowing each cookie room to expand without merging into one giant cookie sheet.
Step 7: Add Streusel Topping
This is where your coffee cake cookies truly take on their namesake charm. Take the prepared streusel topping and generously sprinkle it over the top of each formed cookie dough ball. Ensure a good, even coating of the crumbly mixture on each one. The streusel should cover a good portion of the surface area, creating that signature textured topping.
Press the streusel down very lightly with your fingertips to help it adhere to the dough. This ensures that the topping stays put during baking and doesn’t fall off, creating a beautiful visual and textural element. This step is quick but incredibly impactful on the final appearance and taste of your cookies. The aroma of cinnamon will already be quite noticeable.
The Visual Appeal: The streusel topping not only adds flavor and texture but also makes these cookies incredibly appealing. A well-dressed cookie with a generous crumble beckons to be eaten. This step transforms simple cookie dough into a miniature work of art, reminiscent of a classic coffee cake.
Step 8: Bake Cookies
It’s time to bake these beauties and transform them into golden delights. Carefully place the prepared baking sheet into the preheated oven. Bake for approximately 12-15 minutes, or until the edges of the cookies are lightly golden brown and the centers appear set but still slightly soft. It’s crucial not to overbake them, as they will continue to cook slightly on the hot baking sheet after removal from the oven.
Once baked to perfection, remove the baking sheet from the oven. Let the cookies cool on the baking sheet for about 5-10 minutes. This resting period allows them to firm up sufficiently so they don’t break apart when you try to move them. After this initial cooling, carefully transfer the cookies to a wire cooling rack to cool completely. This ensures air circulates around them, preventing the bottoms from becoming soggy and helping them achieve the perfect texture.
The Baking Sweet Spot: The 12-15 minute baking window is an estimate, and oven temperatures can vary. Look for those lightly golden edges as your primary indicator. The centers should look set, not wet and gooey, but a slight softness is desirable for a chewy texture. They will continue to set and firm up as they cool. Overbaking leads to dry, crumbly cookies, so it’s better to err on the side of slightly underbaked.
Step 9: Prepare Icing
While your cookies are cooling, prepare the simple yet elegant vanilla icing that adds the perfect finishing touch. In a small bowl, combine the sifted powdered sugar, whole milk, and vanilla extract. Sifting the powdered sugar is essential to prevent any lumps from appearing in your icing, ensuring a smooth, professional-looking drizzle. Add the milk gradually, whisking until you achieve a smooth, pourable consistency.
The consistency is key here; you want an icing that is thick enough to drizzle attractively but not so thick that it’s difficult to work with. If it’s too thick, add a tiny bit more milk, a drop at a time. If it’s too thin, add a little more sifted powdered sugar. Once you have the desired consistency, you’re ready to adorn your cooled cookies.
Drizzling Technique: Once the cookies are completely cool on the wire rack, use a spoon or a piping bag with a small round tip to drizzle the icing over the tops. You can create random, artistic patterns or simple lines, whatever your preference. The contrast of the white icing against the golden-brown cookie and streusel is visually delightful and adds a touch of sweetness that perfectly complements the spiced flavors.
Pro Tips for coffee cake cookies
- Use Cold Butter for Streusel: For that perfect, crumbly texture in your streusel topping, always start with very cold, cubed butter. This prevents it from melting too quickly and ensures distinct, crispy pockets after baking.
- Don’t Overmix the Dough: Overmixing develops gluten, leading to tough cookies. Mix your flour into the wet ingredients until just combined; a few streaks of flour remaining are perfectly fine and will be incorporated as the dough sits.
- Room Temperature Ingredients: Ensure your butter for the dough and your eggs are at room temperature. This allows them to emulsify properly, creating a smooth, cohesive dough that bakes into tender, perfectly textured cookies.
- Chill the Dough (Optional but Recommended): Chilling the cookie dough for at least 30 minutes before baking can significantly improve texture and flavor. It helps the flavors meld and prevents the cookies from spreading too much, leading to thicker, chewier cookies.
- Watch Baking Time Closely: Ovens vary, so keep a close eye on your cookies during the last few minutes of baking. Remove them when the edges are lightly golden, and the centers still look slightly soft; they will continue to set as they cool.
Serving Suggestions for coffee cake cookies
Decoration
The streusel topping itself provides a beautiful, rustic decoration for these cookies, giving them a homemade, artisanal look. The final drizzle of vanilla icing adds a touch of elegance and sweetness, creating a lovely contrast in color and texture. For an extra festive touch, you could sprinkle a tiny bit of extra cinnamon sugar over the icing while it’s still wet, or even add a few edible gold or silver sprinkles for a bit of sparkle.
Side Dishes
Coffee cake cookies are wonderfully versatile. They pair exceptionally well with a warm cup of coffee or a soothing mug of tea, making them a perfect breakfast or afternoon treat. For a more elaborate brunch, consider serving them alongside fresh fruit salad, yogurt parfaits, or even a light pastry cream for dipping. A glass of cold milk is always a classic and satisfying accompaniment, especially for younger guests.
Creative Serving Ideas
Present these cookies on a tiered stand at a party for a visually stunning dessert display. They can also be packaged in decorative cellophane bags tied with ribbon as a thoughtful, edible gift. For an indulgent dessert, serve a warm coffee cake cookie with a scoop of vanilla bean ice cream, allowing the warmth of the cookie to melt the ice cream into a decadent sauce.
Preparation & Storage
Storing Leftovers
To keep your coffee cake cookies fresh and delicious, store them in an airtight container at room temperature. Ensure the cookies have cooled completely before packing them away to prevent condensation, which can make them soggy. Properly stored, they should maintain their delightful texture and flavor for up to 3-4 days.
Freezing
Coffee cake cookies freeze exceptionally well, making them a great make-ahead treat. You can freeze the baked and completely cooled cookies in a single layer on a baking sheet until firm, then transfer them to a freezer-safe airtight container or a heavy-duty freezer bag. They will keep their best quality for up to 2-3 months. For the best results, place parchment paper between layers of cookies to prevent sticking.
Reheating
If you’ve stored your cookies at room temperature or refrigerated them, a short reheating can revive their freshness. For a slightly warm cookie, microwave one or two cookies on a microwave-safe plate for about 10-15 seconds. Alternatively, you can gently warm them in a toaster oven at 300°F (150°C) for about 3-5 minutes until slightly warmed through. Frozen cookies can be reheated directly from frozen in a 350°F (175°C) oven for 5-10 minutes until warmed through.
Frequently Asked Questions
-
What makes Coffee Cake Cookies distinct from traditional cookies like chocolate chip or sugar cookies?
The primary differentiator lies in their flavor profile and texture, which are inspired by classic coffee cake. These cookies typically feature a prominent cinnamon and brown sugar flavor, often enhanced with a streusel topping, mirroring the beloved components of coffee cake. While regular cookies might focus on vanilla, chocolate, or simple sweetness, coffee cake cookies aim to replicate the warm, spiced, crumbly goodness of their namesake dessert in a portable, cookie format. The inclusion of a distinct streusel topping is a hallmark that sets them apart from most other cookie varieties.
-
Can I really customize these Coffee Cake Cookies with different additions, and what are some popular choices?
Absolutely! The base recipe for coffee cake cookies is wonderfully adaptable. Popular additions include chopped nuts like pecans or walnuts, which add a delightful crunch and earthy flavor that complements the cinnamon and brown sugar beautifully. Mini chocolate chips can be folded into the dough for a decadent twist, creating a chocolate-cinnamon fusion. Dried fruits such as raisins or chopped cranberries can introduce a chewy texture and a burst of tartness. Some bakers even enjoy adding a hint of espresso powder to the dough to enhance the “coffee” aspect without adding actual coffee flavor.
-
How can I be certain my Coffee Cake Cookies are perfectly baked and achieve that ideal chewy-yet-set texture?
Determining doneness is key to achieving the perfect texture. The edges of the cookies should appear lightly golden brown and set. The centers, however, should still look slightly soft and underbaked – they will continue to cook and firm up as the cookies cool on the baking sheet. If the centers look completely set or brown, they have likely been overbaked and may turn out dry and crumbly. A good indicator is gently pressing the center of a cookie; it should yield slightly but not be wet. It’s always better to underbake slightly than overbake, as the residual heat will do the rest of the work.