Green Chili Chicken Enchiladas – Easy Family Dinner Idea!
Spice up your weeknight meals with a vibrant and flavorful dish that promises a fiesta in every bite. These Green Chili Chicken Enchiladas are a comforting casserole-style delight, bringing together tender, seasoned chicken, creamy sour cream, and a zesty green chili sauce, all enveloped in soft tortillas and baked to bubbly perfection under a blanket of melted cheese.
This recipe is an absolute game-changer, offering a delightful twist on classic enchiladas with its bright, homemade green chili sauce that you can easily customize to your preferred level of heat. It’s a guaranteed crowd-pleaser that’s surprisingly simple to whip up, even on a busy evening.
Why You Will Love This Recipe
- Family Favorite: Once this cheesy, spicy casserole hits the table, it’s incredibly difficult to resist, and leftovers (if any!) are rarely a problem.
- Homemade Sauce: The star of the show is the from-scratch green chili sauce, which is wonderfully bold, zesty, and offers a mild, adjustable heat.
- Effortless Preparation: These enchiladas are designed for ease, requiring no special techniques and allowing for the use of convenient ingredients like leftover chicken or a store-bought rotisserie chicken for ultimate speed.
- Flavorful Ingredients: The combination of seasoned chicken, tangy green chilis, creamy sour cream, and rich Mexican cheese blend creates a harmonious and deeply satisfying taste experience.
- Versatile Customization: Whether you prefer it milder or spicier, with different proteins, or even a vegetarian option, this recipe is remarkably adaptable to suit any dietary preference or ingredient availability.
Ingredients You Need
The beauty of these Green Chili Chicken Enchiladas lies in its accessible ingredients, many of which you likely already have in your pantry and refrigerator, making impromptu dinner plans a breeze. Opting for fresh, high-quality ingredients will always elevate the final dish, but this recipe is forgiving and incredibly delicious even with everyday staples. Remember, the exact quantities are detailed in the recipe card below for your convenience.
Green Chili Chicken Enchiladas

Spice up your life with these flavorful Green Chili Chicken Enchiladas! This casserole-style Mexican dinner features soft tortillas filled with creamy chicken, all drenched in a bright, tangy homemade green chili sauce and baked under a blanket of melted cheese. They are easy to assemble, use readily available ingredients, and are perfect for a family favorite meal.
- 1 pound boneless skinless chicken thighs
- 1 teaspoon salt
- ½ teaspoon freshly ground black pepper
- 1 teaspoon smoked paprika
- 1 teaspoon ground cumin
- 1 teaspoon garlic powder
- 1 tablespoon olive oil
- 1 tablespoon olive oil
- 1 small yellow onion, diced
- 2 jalapeño, seeded and diced
- 5 cloves garlic, minced
- 2 cups chicken stock
- 2 4-ounce cans of diced green chilis
- 1 tablespoon ground cumin
- salt and freshly ground black pepper, to taste
- ½ cup sour cream
- 4 ounces diced green chilis
- 2 cups shredded Mexican blend cheese, divided
- 10 8-inch flour tortillas
- 1Roast the chicken: Preheat oven to 425°F and line a baking sheet. Season chicken thighs with salt, pepper, smoked paprika, cumin, garlic powder, and olive oil. Roast for 20 minutes, or until internal temperature reaches 165°F. Shred chicken and set aside. Reduce oven temperature to 375°F.
- 2Make the sauce: Heat olive oil in a skillet over medium heat. Sauté onion and jalapeños until softened. Add garlic and sauté until fragrant. Stir in chicken stock, diced green chilis, and cumin. Simmer for about 10 minutes. Season with salt and pepper to taste. Blend the sauce until almost smooth.
- 3Make the filling: In a mixing bowl, combine shredded chicken, sour cream, diced green chilis, and 1 cup of shredded Mexican blend cheese. Mix until well combined.
- 4Assemble the enchiladas: Spread a thin layer of sauce on the bottom of a 9x13-inch baking dish. Spoon the chicken mixture onto each tortilla, then roll tightly around the filling. Place seam-side down in the baking dish. Pour remaining sauce over the top and sprinkle with the remaining cheese.
- 5Bake: Cover with foil and bake for 15 minutes. Remove foil and bake for an additional 15 minutes.
Keywords: enchiladas, chicken, green chili, Mexican, casserole, baked, spicy, cheesy
- boneless skinless chicken thighs: ideal for tenderness and flavor, though chicken breasts work too.
- salt: essential for enhancing all other flavors.
- freshly ground black pepper: adds a subtle warmth and bite.
- smoked paprika: provides a lovely smoky depth and a hint of color.
- ground cumin: a quintessential spice for Mexican-inspired dishes, adding earthy warmth.
- garlic powder: offers a convenient and consistent garlic flavor.
- olive oil: used for both cooking the chicken and sautéing the sauce base.
- small yellow onion: its mild sweetness forms the aromatic foundation of the sauce.
- jalapeño: adds a fresh, bright heat; seeds and membranes can be removed for less spice.
- cloves garlic: fresh garlic offers a pungent aroma and robust flavor.
- chicken stock: forms the liquid base for the rich green chili sauce.
- 4-ounce cans of diced green chilis: the namesake ingredient, providing signature flavor and mild heat.
- sour cream: brings creaminess and a cooling counterpoint to the spices in the filling.
- shredded Mexican blend cheese: a melty, gooey topping that ties everything together.
- 8-inch flour tortillas: soft, pliable wrappers that hold the delicious filling.
These are the core components that make these enchiladas so spectacular, and their quantities are readily available in the accompanying recipe card.
Variations
This Green Chili Chicken Enchilada recipe is wonderfully versatile, allowing for numerous delicious adaptations to suit different tastes and dietary needs. Consider exploring these exciting variations to keep your culinary adventures fresh and engaging.
Vegan Delight: For a plant-based twist, the chicken can be expertly replaced with crumbled extra-firm tofu or a hearty mix of black beans and corn, seasoned similarly to mimic the savory depth. Use a dairy-free sour cream alternative and a plant-based shredded cheese blend to complete this satisfying vegan version, ensuring all the creamy, zesty goodness remains intact without any animal products.
Low-Carb Embrace: To cater to a low-carbohydrate lifestyle, swap the traditional flour tortillas for low-carb tortillas made from almond flour or coconut flour. Alternatively, you could serve the flavorful chicken and green chili mixture over a bed of cauliflower rice or even use large lettuce leaves, like romaine or butter lettuce, for a refreshing, lighter wrap. This adjustment maintains the delightful flavor profile while adhering to carb-conscious goals.
Spicy Fiesta: If you crave an extra kick, don’t shy away from incorporating hotter peppers into the sauce base. Substituting the jalapeños with serrano peppers or even a small habanero (use with extreme caution and proper ventilation!) will significantly amp up the heat. You can also choose hot green chilis instead of mild ones for a more intense flavor experience throughout the dish.
How to Prepare Green Chili Chicken Enchiladas
Step 1: Cook and Shred the Chicken
Begin by preheating your oven to a moderately high temperature of 425°F (220°C). Prepare a baking sheet by lining it with parchment paper, which ensures easy cleanup and prevents sticking. This initial step is crucial for cooking the chicken evenly and efficiently, setting the stage for the tender filling that will define your enchiladas.
In a small bowl, combine the seasonings: salt, freshly ground black pepper, smoked paprika, ground cumin, and garlic powder. Generously rub this flavorful mixture all over the boneless, skinless chicken thighs, ensuring each piece is well-coated with the aromatic blend. Drizzle a tablespoon of olive oil over the seasoned chicken, further ensuring it cooks up moist and flavorful.
Arrange the seasoned chicken thighs in a single layer on the prepared baking sheet. Place them in the preheated oven and roast for approximately 20 minutes. The chicken is ready when it reaches an internal temperature of 165°F (74°C), indicating it’s cooked through and safe to consume. Once cooked, carefully transfer the hot chicken to a cutting board. Using two forks, shred the chicken into bite-sized pieces, creating the perfect texture for the enchilada filling. Set the shredded chicken aside while you proceed to the next stage, and remember to reduce the oven temperature to 375°F (190°C) for baking the enchiladas later.
Step 2: Make the Green Chili Sauce
While the chicken is busy roasting in the oven, you can initiate the creation of the vibrant green chili sauce. Heat one tablespoon of olive oil in a large skillet or a Dutch oven over medium heat. Add the diced yellow onion and the seeded and diced jalapeño peppers to the skillet. Sauté these aromatic vegetables for about 5-7 minutes, stirring occasionally, until they begin to soften and become translucent, releasing their sweet and slightly spicy fragrances into your kitchen.
Next, add the finely minced garlic cloves to the skillet with the softened onions and jalapeños. Cook for another minute until the garlic becomes fragrant, being careful not to let it burn, which can impart a bitter taste. Once the garlic is aromatic, pour in the chicken stock, ensuring you scrape up any browned bits from the bottom of the pan, as these add depth of flavor to the sauce. Stir in the two 4-ounce cans of diced green chilis and one tablespoon of ground cumin, incorporating these key ingredients for the signature enchilada taste.
Bring the mixture to a simmer and let it gently bubble for about 10 minutes, allowing the flavors to meld and deepen. After simmering, carefully transfer the hot sauce mixture to a blender. Blend until the sauce is almost smooth, leaving a slight texture for added character, or blend until completely smooth if you prefer a silkier consistency. Taste the sauce and season generously with salt and freshly ground black pepper according to your preference. This homemade sauce is the heart of your enchiladas, providing a bright, tangy, and perfectly spiced coating.
Step 3: Prepare the Enchilada Filling
In a medium-sized mixing bowl, combine the beautifully shredded chicken that you set aside earlier. Add the ⅓ cup of sour cream to the bowl, which will contribute a wonderful creaminess and a slight tang to the filling. Incorporate the 4 ounces of diced green chilis, adding another layer of that distinct green chili flavor and texture to the mixture.
Next, add one cup of the shredded Mexican blend cheese to the bowl with the chicken, sour cream, and green chilis. This cheese will help bind the filling together as it melts during baking, creating a delightful gooeyness. Mix all these ingredients together thoroughly until they are well combined. Ensure the chicken is evenly coated with the sour cream and cheese, and the green chilis are distributed throughout the mixture for consistent flavor in every bite.
This filling is now ready to be generously spooned into your tortillas. The combination of savory chicken, tangy sour cream, spicy chilis, and melted cheese creates a hearty and irresistible component that is central to the overall success of your green chili chicken enchiladas. It’s a simple yet incredibly effective blend of textures and flavors.
Step 4: Assemble the Enchiladas
Begin the assembly process by spreading a thin, even layer of your freshly made green chili sauce across the bottom of a 9×13-inch baking dish. This initial layer of sauce prevents the enchiladas from sticking to the dish and adds moisture and flavor from the very base. Take one 8-inch flour tortilla at a time and spoon a generous portion of the prepared chicken filling onto its center. Be careful not to overfill, as this can make rolling difficult.
Roll the tortillas up tightly around the chicken mixture, enclosing the delicious filling. Place each rolled enchilada seam-side down in the prepared baking dish, arranging them snugly next to each other. This close packing helps them maintain their shape during baking and ensures they are all evenly coated with sauce later. Continue this process until all the filling has been used and all tortillas are rolled and placed in the dish.
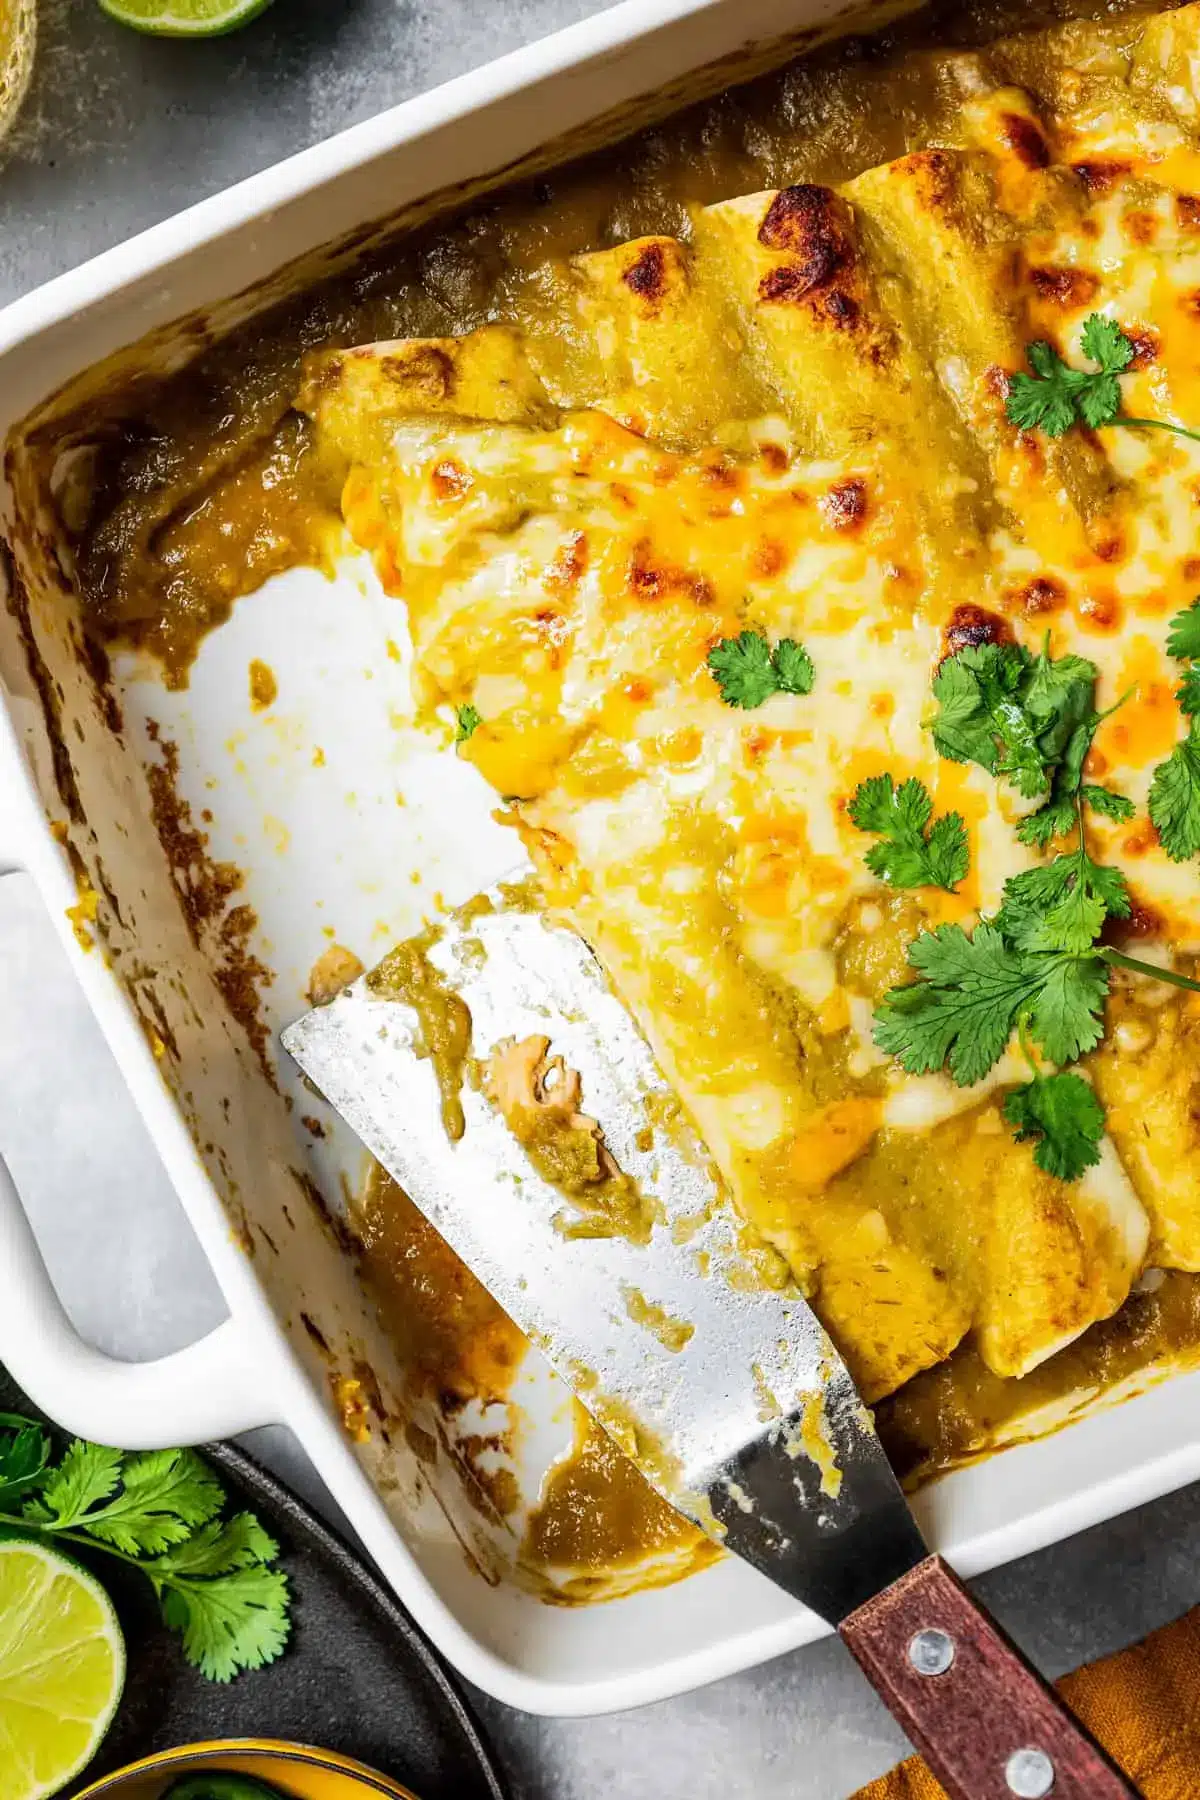
Once all the enchiladas are nestled in the baking dish, pour the remaining green chili sauce evenly over the top, ensuring that every enchilada is generously covered. This is crucial for keeping the tortillas moist and infusing them with the sauce’s vibrant flavor. Finally, sprinkle the remaining 1 cup of shredded Mexican blend cheese evenly over the sauced enchiladas. The cheese will melt and bubble, creating a beautiful golden-brown crust.
Step 5: Bake to Perfection
Cover the entire baking dish tightly with aluminum foil. This initial covering traps steam, which helps to cook the tortillas through and ensures the enchiladas remain moist and tender without drying out. Place the foil-covered dish into the preheated oven, which should still be at 375°F (190°C).
Bake the enchiladas in this covered state for approximately 15 minutes. This steaming period allows the flavors to meld and the filling to heat through thoroughly. After 15 minutes, carefully remove the aluminum foil from the baking dish. This step allows the cheese on top to melt beautifully and start to brown, creating that irresistible cheesy crust.
Continue baking the uncovered enchiladas for an additional 15 minutes, or until the cheese is fully melted, bubbly, and lightly golden brown, and the sauce is hot and slightly thickened. The aroma filling your kitchen at this point will be absolutely mouthwatering. Once they’ve reached this perfect state of bubbly, cheesy, saucy goodness, carefully remove the baking dish from the oven and let them rest for a few minutes before serving. This resting period allows the enchiladas to set slightly, making them easier to serve and preventing the filling from oozing out too much.
Pro Tips for Green Chili Chicken Enchiladas
Soften Your Tortillas: To prevent your tortillas from cracking or tearing as you roll them, a quick softening technique is key. A few seconds in the microwave, wrapped in a damp paper towel, or briefly warmed in a dry skillet will make them pliable and much easier to work with. This simple step ensures neat, well-formed enchiladas.
Utilize Leftover Chicken: Don’t hesitate to use pre-cooked chicken for an even faster assembly. A store-bought rotisserie chicken is an excellent shortcut, providing pre-shredded, seasoned meat that significantly cuts down on prep time. Simply shred it and incorporate it into the filling mixture as directed.
Adjust the Spice Level: The heat in these enchiladas is entirely customizable. For a milder dish, ensure you thoroughly seed and de-vein the jalapeños before dicing them, or omit them entirely. If you crave more heat, consider leaving some seeds in, using a hotter pepper like a serrano, or choosing hot green chilis from the can. Taste as you go to perfect your preferred level of spice.
Don’t Skimp on the Cheese: While the recipe calls for a specific amount, feel free to be generous with the shredded Mexican blend cheese. A good amount of cheese on top is essential for that classic, gooey, and satisfying enchilada experience. Consider adding a sprinkle of cotija cheese for an extra salty, crumbly dimension.
Resting is Key: After baking, allow the enchiladas to rest for about 5-10 minutes before serving. This brief resting period allows the sauce to thicken slightly and the filling to settle, making it much easier to serve individual portions without everything falling apart. It ensures a neater presentation and a more cohesive bite.
Serving Suggestions for Green Chili Chicken Enchiladas
Decoration
Elevate the visual appeal of your Green Chili Chicken Enchiladas with a few simple, colorful garnishes. A dollop of cool, creamy sour cream or Mexican crema provides a beautiful contrast to the vibrant green sauce and melted cheese. Freshly chopped cilantro adds a burst of green and a refreshing herbaceous note that complements the savory flavors wonderfully. For a pop of color and freshness, a sprinkle of finely diced red onion or some vibrant pico de gallo can also make your enchiladas look as inviting as they taste.
Side Dishes
These enchiladas are a hearty meal on their own, but they pair exceptionally well with classic Mexican and Tex-Mex sides that round out the dining experience. A simple side of fluffy Mexican rice, perhaps seasoned with a hint of cumin and tomato, is always a welcome addition. Refried beans, either traditional or a black bean variation, offer a creamy, savory counterpoint. For a lighter option, a crisp green salad tossed with a lime vinaigrette or a fresh corn and black bean salsa can provide a refreshing contrast to the richness of the enchiladas.
Creative Serving Ideas
Take your enchilada serving to the next level with a few creative touches. Consider serving them family-style directly from the baking dish for a warm, communal dining experience, perhaps accompanied by a selection of fresh toppings on the side so everyone can customize their plate. For a more elegant presentation, carefully plate individual enchiladas and top them with a drizzle of your favorite salsa, a dollop of guacamole, or even some crumbled queso fresco. You could also transform this dish into a vibrant bowl by serving the chicken and green chili mixture over a bed of seasoned rice or quinoa, topped with all the usual enchilada fixings for a deconstructed take.
Preparation & Storage
Storing Leftovers
Leftover Green Chili Chicken Enchiladas can be stored easily for future enjoyment. Once the dish has cooled to room temperature, transfer any remaining enchiladas into an airtight container. Ensure the container is sealed tightly to prevent the enchiladas from drying out or absorbing odors from other foods in the refrigerator. They will keep well in the refrigerator for up to 3 days, maintaining their delicious flavor and texture.
Freezing
For longer-term storage, these enchiladas are also excellent candidates for freezing. After they have completely cooled, you can freeze the entire dish in its baking dish (if it’s freezer-safe) or portion them into individual freezer-safe containers. Wrap them very well in plastic wrap and then in aluminum foil to prevent freezer burn. Properly frozen enchiladas can be stored for up to 3 months, making them a convenient option for quick meals down the line.
Reheating
Reheating your leftover or frozen Green Chili Chicken Enchiladas is straightforward and ensures they are enjoyed at their best. For refrigerated leftovers, a simple reheating method in a warm oven at around 350°F (175°C) for 15-20 minutes, covered with foil initially, will do the trick. If reheating from frozen, allow them to thaw in the refrigerator overnight first for more even heating, or bake them directly from frozen at a slightly lower temperature (around 325°F/160°C) for a longer duration, ensuring they are heated all the way through. A microwave can also be used for quicker reheating, though the texture of the cheese and tortillas might be slightly softer.
Frequently Asked Questions
-
Can I make the green chili sauce ahead of time?
Absolutely! The green chili sauce is an excellent component to prepare in advance, which can significantly streamline the assembly process when you’re ready to make the enchiladas. You can make the sauce up to 2 days ahead of time and store it in an airtight container in the refrigerator. When you’re ready to assemble the enchiladas, simply reheat the sauce gently on the stovetop or in the microwave before proceeding with the recipe. This advance preparation not only saves time but also allows the flavors of the sauce to meld even further, potentially enhancing its taste.
-
What kind of chicken is best for these enchiladas?
While the recipe specifically calls for boneless, skinless chicken thighs, which offer superior flavor and moisture due to their higher fat content, you can certainly use chicken breasts if that’s what you have on hand or prefer. If using chicken breasts, be mindful that they can dry out more easily, so avoid overcooking them. Another fantastic and time-saving option is to use a store-bought rotisserie chicken. The pre-cooked meat is already seasoned and tender, making it incredibly convenient for a quick enchilada preparation. Regardless of the chicken type, ensure it is cooked through and shredded into bite-sized pieces before mixing it into the filling.
-
Are there any alternatives to flour tortillas for this recipe?
Yes, there are several excellent alternatives to traditional flour tortillas that can be used for these Green Chili Chicken Enchiladas, catering to different dietary needs and preferences. Corn tortillas are a popular choice and offer a distinct flavor; however, they can be more prone to breaking when rolled. To prevent this, warm them briefly in a little oil in a skillet or microwave them to make them more pliable before filling. For those looking to reduce carbohydrates, low-carb flour tortillas, almond flour tortillas, or even large lettuce leaves can serve as effective wrappers. If using corn tortillas, ensure they are the smaller street taco size or 8-inch tortillas to make rolling manageable, and consider lightly frying them in oil for added texture and to prevent sogginess.