Classic Cheeseburger – Hey Grill, Hey
There’s a universal comfort found in a perfectly crafted cheeseburger. It’s more than just a meal; it’s an experience, a memory, a celebration of simple, delicious flavors coming together in harmony. The satisfying weight of it in your hands, the first juicy bite, the melty cheese clinging to the tender beef—these are the moments that make a classic cheeseburger truly unforgettable.
This recipe aims to capture that essence, guiding you through the creation of a cheeseburger that will make your taste buds sing. We’ll focus on quality ingredients, simple techniques, and those crucial little details that elevate a good burger to an exceptional one, ensuring your next burger night is a resounding success.
Why You Will Love This Recipe
- Effortless Preparation: This classic cheeseburger recipe is designed for ease, allowing you to create a restaurant-quality burger at home with minimal fuss, perfect for busy weeknights or relaxed weekend gatherings.
- Customizable Toppings: While we celebrate the classic fixings, this recipe serves as a fantastic foundation, inviting you to experiment with your favorite additions and truly make it your own culinary creation.
- Juicy & Flavorful Patties: We’ll delve into the secrets of achieving incredibly juicy and deeply flavorful beef patties that are the heart and soul of any great cheeseburger.
- Perfectly Melty Cheese: The art of achieving that ideal gooey, melted cheese blanket over your burger will be demystified, ensuring every bite is a delightful fusion of beef and dairy.
- Satisfyingly Simple: It embodies the joy of classic comfort food, delivering a deeply satisfying meal without overwhelming complexity, making it a go-to recipe for many occasions.
Ingredients You Need
The foundation of any exceptional dish lies in the quality of its ingredients, and the classic cheeseburger is no exception. Opting for fresh, high-quality components will significantly enhance the final flavor and texture, transforming a simple meal into a culinary delight. Ensuring you have the right elements is the first step towards achieving burger perfection at home.
Classic Cheeseburger
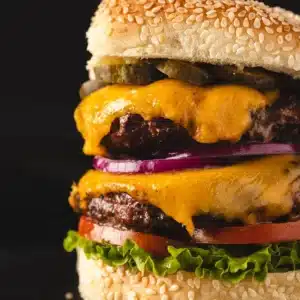
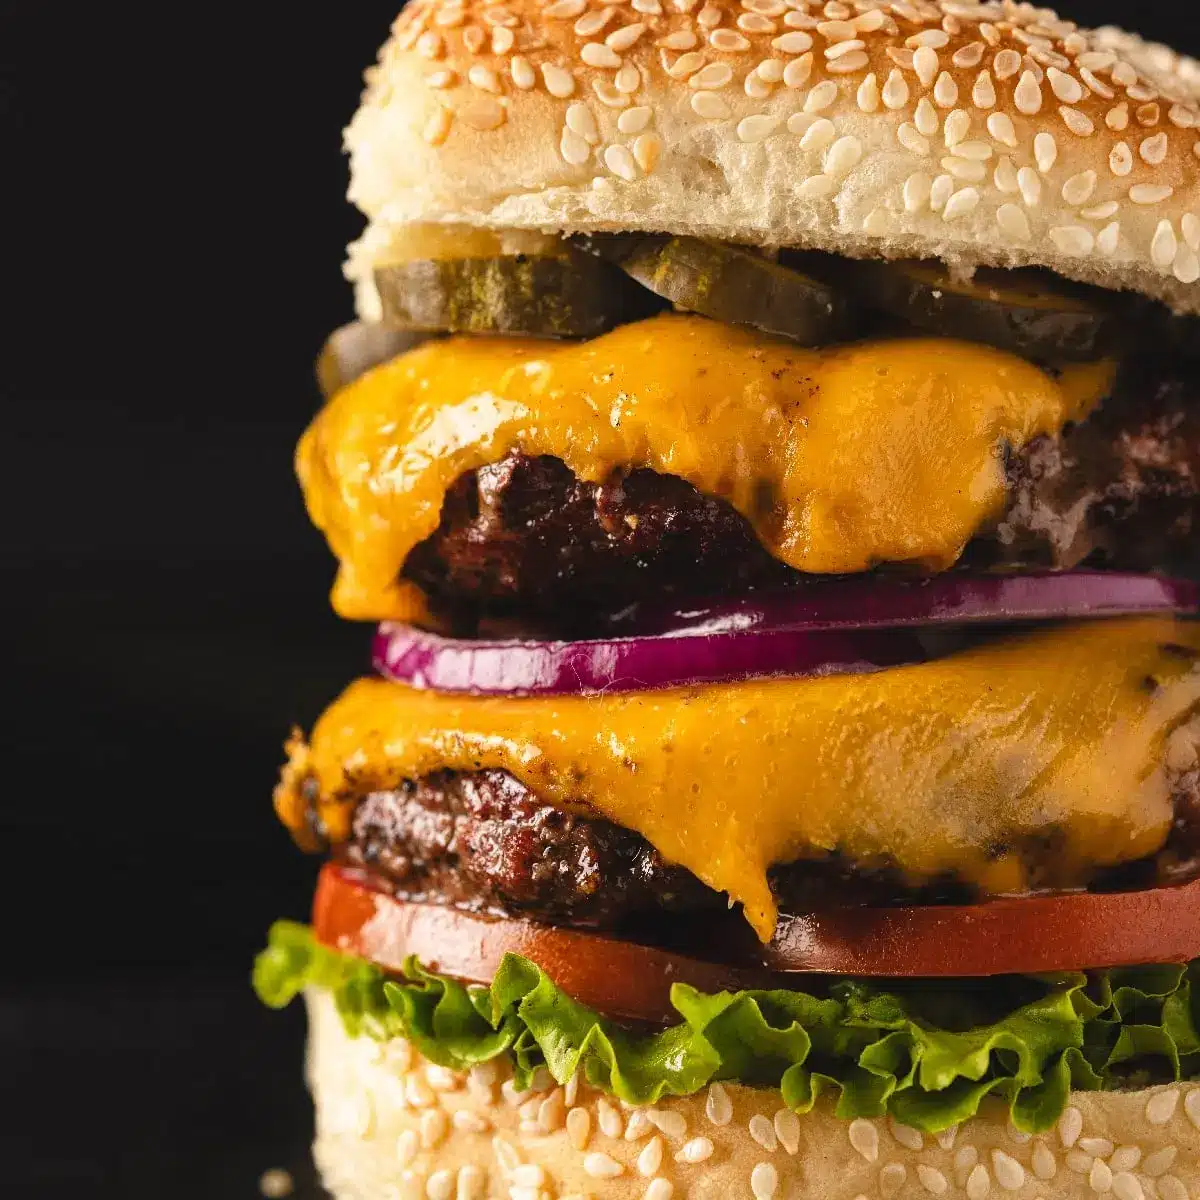
Juicy beef patties, melty cheese, creamy mayo, sweet tomato, crisp lettuce and red onion, and finished with dill pickle chips, this Classic Cheeseburger is what burger dreams are made of.
- 2 pounds ground beef (80/20)
- 4 hamburger buns (regular or sesame seed)
- 2 Tablespoons Kosher salt
- 1 Tablespoon black pepper
- 2 teaspoons smoked paprika
- 1 teaspoon garlic powder
- 1 teaspoon onion powder
- 8 slices American cheese (or cheddar cheese)
- 1 head romaine lettuce
- 1 tomatoes (sliced)
- 1 red onion (sliced)
- dill pickle chips
- 2 Tablespoons mayonnaise
- 1Preheat your grill or smoker to medium-high heat (400-450 degrees F).
- 2Form ground beef into 4-6 ounce patties, slightly larger than the buns.
- 3Season patties on both sides with a blend of Kosher salt, black pepper, smoked paprika, garlic powder, onion powder, chili powder, and ground mustard powder.
- 4Grill patties for 4-5 minutes per side, or until about 10 degrees F below desired doneness, flipping only once.
- 5Top each burger with a slice of American cheese and cook for 1-2 more minutes until melted. Toast buns on the grill.
- 6Assemble burgers by spreading mayonnaise on buns, topping with patties, lettuce, red onion, tomato slices, and dill pickle chips.
Keywords: cheeseburger, classic burger, grilled burger, beef burger, American burger
The specific quantities for each ingredient are detailed within the recipe card for your convenience, ensuring you have precisely what you need for perfectly portioned burgers.
Variations
While the classic cheeseburger is undeniably perfect, its inherent simplicity allows for endless creativity and adaptation. Exploring variations can introduce new dimensions of flavor and cater to diverse dietary preferences or adventurous palates.
For those seeking a plant-based alternative, a vegan cheeseburger can be achieved with a hearty black bean or mushroom patty. Top it with a dairy-free cheese slice, crisp lettuce, ripe tomato, and a tangy vegan aioli for a satisfyingly ethical and delicious experience. The key is to create a patty with a good texture and robust flavor that can stand up to the traditional accompaniments.
A low-carb or ketogenic approach can be equally delightful. Skip the bun altogether and serve your perfectly grilled patty on a bed of crisp lettuce, or use large portobello mushroom caps as a bun. Load it up with avocado, bacon, and a creamy blue cheese dressing for a decadent, guilt-free indulgence. This adaptation focuses on high-fat, low-carbohydrate toppings and ensures the flavor profile remains rich and satisfying.
Another exciting avenue is to infuse international flavors. Consider a teriyaki cheeseburger with grilled pineapple and a spicy sriracha mayo, or perhaps a Mediterranean-inspired version featuring feta cheese, olives, and a dollop of tzatziki sauce. These creative twists can transform a familiar favorite into an exotic culinary journey, proving that the humble cheeseburger is a truly global and adaptable delight.
How to Prepare classic cheeseburger recipe
Step 1: Preparing the Patties
Begin by selecting the right ground beef, ideally an 80/20 lean-to-fat ratio. This balance is crucial for achieving maximum juiciness and flavor without the burger becoming greasy. Avoid overworking the meat when forming your patties; gentle handling is key to a tender result.
Gently form the ground beef into patties that are slightly larger than your chosen hamburger buns, as they will shrink during the cooking process. Create a slight indentation in the center of each patty with your thumb. This technique helps prevent the burgers from puffing up into a dome shape while cooking, ensuring a more evenly cooked patty.
Season both sides of your formed patties generously with your chosen seasoning blend. For a classic flavor, a simple mix of Kosher salt and freshly ground black pepper works wonderfully. Alternatively, you can use a dedicated burger seasoning mix for an extra layer of complexity and depth of flavor that complements the rich beef.
Step 2: Preheating the Grill
Preheat your grill to a medium-high heat, aiming for a temperature range of 400-450 degrees Fahrenheit. A well-heated grill is essential for achieving a beautiful sear on the patties, creating that desirable crust and locking in the juices. Ensure your grill grates are clean to prevent sticking and impart a pleasant smoky flavor.
If using a charcoal grill, arrange your coals for direct heat, allowing for intense searing. For a gas grill, ensure all burners are set to medium-high. The high heat is critical for quickly developing the exterior of the burger while the interior cooks to your desired level of doneness, a crucial step for a perfectly grilled cheeseburger.
Allow the grill to preheat for at least 10-15 minutes. This ensures the grates are hot enough to create that characteristic char and prevents the burgers from sticking. A proper preheating also contributes to a more even cooking temperature throughout the grilling process, which is vital for consistent results every time you prepare this classic dish.
Step 3: Grilling the Patties
Carefully place the seasoned patties onto the hot grill grates. Resist the urge to move or press down on the burgers immediately, as this can force out their flavorful juices and disrupt the developing crust. Allow them to sear undisturbed for the initial cooking period.
Grill the patties for approximately 4-5 minutes per side. The exact timing will depend on the thickness of your patties and your desired level of doneness. The goal is to achieve a beautiful sear on the outside while keeping the inside moist and tender, a hallmark of a truly great cheeseburger.
Flip the patties only once, if possible, to further enhance the crust and retain maximum moisture. Use a spatula to gently lift and flip them. Continue grilling for another 4-5 minutes, or until the internal temperature reaches your preferred level of doneness. For medium, aim for around 150-155 degrees Fahrenheit.
Step 4: Melting the Cheese and Toasting Buns
In the final 1-2 minutes of grilling, place a slice of your chosen cheese, such as American or cheddar, onto each burger patty. Cover the grill briefly or turn down the heat to allow the cheese to melt evenly and beautifully over the warm beef. This creates that irresistible gooey texture that defines a cheeseburger.
While the cheese is melting, take this opportunity to lightly toast your hamburger buns on the grill. Place them cut-side down on the cooler side of the grill grates or for just a minute or two. This adds a delightful crispness and a touch of warmth to the buns, preventing them from becoming soggy and enhancing their flavor.
Ensure the cheese has fully melted and is luxuriously gooey before removing the patties from the grill. The toasted buns should be golden brown, offering a perfect textural contrast to the soft patty and melted cheese. This careful timing ensures all components are ready simultaneously for assembly.
Step 5: Assembling the Cheeseburger
Begin the assembly by spreading a generous layer of mayonnaise on the toasted bottom halves of your hamburger buns. Mayonnaise provides a creamy base that complements the richness of the beef and adds a subtle tanginess that balances the flavors perfectly.
Carefully place the cheesy burger patty onto the bottom bun. If you prefer a double-decker experience, you can stack two patties here. This forms the substantial core of your delicious cheeseburger, ready for its flavorful toppings.
Now, pile on your favorite toppings. Start with a generous layer of crisp Romaine lettuce, followed by thinly sliced red onion, and a ripe tomato slice. Finish with a few dill pickle chips for that essential tangy crunch, creating a symphony of textures and flavors in every bite. This layering ensures each element contributes to the overall deliciousness.
Step 6: The Final Touches
Once assembled, gently place the top half of the toasted bun onto your creation. The goal is to create a harmonious balance where all the ingredients are present but not overflowing, making for a manageable yet satisfying bite.
Take a moment to admire your handiwork. The vibrant colors of the fresh toppings, the glistening melted cheese, and the perfectly seared patty all come together to form an appetizing spectacle. This visual appeal is an integral part of the cheeseburger experience, hinting at the deliciousness to come.
Your classic cheeseburger is now ready to be devoured. Serve immediately while it’s warm, juicy, and perfectly put together. The anticipation of that first bite is often the best part, a testament to the simple perfection of this iconic dish. Enjoy every moment of this culinary masterpiece.
Pro Tips for classic cheeseburger recipe
Quality Beef is Paramount: Always opt for ground beef with a good fat content, ideally 80/20 or 85/15. The fat renders during cooking, contributing significantly to juiciness and that rich, beefy flavor that defines a great burger. Leaner options can result in a drier, less satisfying patty.
Don’t Overwork the Meat: When forming your patties, handle the ground beef as little as possible. Overmixing or over-kneading can develop the gluten in the meat, leading to a tough, dense burger instead of a tender, succulent one. Gentle shaping is the key to a tender texture.
Season Generously and Properly: Season your patties on both sides just before grilling. A simple blend of Kosher salt and freshly cracked black pepper is classic and effective, but you can also explore pre-made burger seasonings for added complexity. Ensure even distribution for consistent flavor in every bite.
Master the Flip: Resist the urge to flip your burgers multiple times. One or two carefully timed flips are sufficient. This allows a good crust to form on each side, trapping the juices inside and contributing to that desirable texture and deeply savory flavor profile. Patience here pays off.
Utilize a Meat Thermometer: For perfectly cooked burgers every time, especially when catering to different preferences, a reliable instant-read meat thermometer is invaluable. It takes the guesswork out of determining doneness, ensuring you hit the perfect internal temperature for medium-rare, medium, or well-done.
Serving Suggestions for classic cheeseburger recipe
Decoration
The visual appeal of a cheeseburger can be significantly enhanced with thoughtful presentation. A vibrant green leaf of Romaine lettuce peeking out from beneath the bun adds a fresh, appealing contrast to the rich colors of the beef and cheese. Thinly sliced red onion rings provide a pop of color and a sharp, visual interest that complements the overall aesthetic.
Strategically placed dill pickle chips can add a delightful visual element, their bumpy texture and pale green hue offering a charming touch. A perfectly ripe, thick slice of tomato, often the star of the burger’s toppings, brings a bright red hue and juicy promise. These simple additions elevate the burger from a mere meal to a visually engaging culinary creation.
Consider a light drizzle of your favorite sauce, like mayonnaise or a special burger sauce, artfully placed on top of the bun or peeking from the sides. This final touch adds a glistening sheen and a hint of extra flavor, ensuring your cheeseburger looks as delicious as it tastes. The goal is to create an inviting and appetizing presentation that stimulates the appetite.
Side Dishes
No cheeseburger is truly complete without its classic accompaniments, and a good portion of crispy, golden French fries is almost universally the preferred partner. The salty crunch of the fries provides a delightful textural and flavor contrast to the soft, juicy burger. Make sure they are hot and freshly made for the best experience.
For a slightly healthier option that still provides a satisfying crunch, consider a fresh coleslaw. The creamy, tangy dressing of the coleslaw cuts through the richness of the burger beautifully. Opt for a version with finely shredded cabbage and carrots for optimal texture and appeal, offering a refreshing counterpoint.
Onion rings, with their golden, crispy coating and sweet, tender onion interior, offer another irresistible side dish option. Their unique texture and flavor profile make them a beloved companion to any burger. Alternatively, a simple side salad with a light vinaigrette can offer a refreshing and lighter accompaniment, balancing the heartiness of the burger.
Creative Serving Ideas
Transform your classic cheeseburger into a slider for a fun appetizer or a party pleaser. Use mini buns and smaller patties, and offer a variety of miniature toppings for guests to customize their bites. This approach is excellent for gatherings where variety and interactive dining are key.
Consider deconstructing the cheeseburger into a delicious bowl. Layer the seasoned ground beef, melted cheese, lettuce, tomato, onion, and pickles over a base of rice or a salad mix. Drizzle with your favorite burger sauce for a healthy yet satisfying meal that captures all the classic flavors in a new format.
Another innovative idea is to create a “burger board” with all the components laid out separately. This allows guests to build their own gourmet cheeseburger masterpieces, choosing from an array of artisanal buns, premium cheeses, gourmet condiments, and even different types of pickles and greens. This interactive approach adds an element of fun and personalization to your dining experience, turning a simple meal into an event.
Preparation & Storage
Storing Leftovers
To store leftover classic cheeseburgers, it’s best to separate the components if possible. Store the cooked patty and any unmelted toppings like lettuce, tomato, and onion in airtight containers in the refrigerator. This helps maintain the texture and freshness of each ingredient, preventing sogginess.
If the burger is already assembled, wrap it tightly in plastic wrap or aluminum foil, and then place it in an airtight container. While assembled burgers can be stored this way, they are best consumed fresh. Leftovers will typically remain good for 1-2 days, though the bun may become softer over time.
For optimal results when you’re ready to enjoy your leftovers, consider reheating the patty separately. This can be done in a skillet or briefly in the oven to regain some of its original texture and warmth before reassembling with fresh or carefully stored toppings. Always ensure the food has been kept at safe temperatures.
Freezing
Freezing cooked cheeseburger patties is a viable option for longer-term storage. Allow the patties to cool completely before wrapping them individually and tightly in plastic wrap, followed by a layer of aluminum foil or placing them in a freezer-safe bag. This double-layer protection prevents freezer burn and preserves quality.
Cooked patties can typically be stored in the freezer for up to 2-3 months for the best quality. Ensure they are clearly labeled with the date of freezing to keep track of their freshness. Avoid freezing assembled burgers, as the bun and toppings will degrade significantly in texture and flavor.
When you’re ready to use frozen patties, it’s best to thaw them in the refrigerator overnight. This gradual thawing helps maintain the patty’s structure and juiciness. Once thawed, they can be reheated as you would fresh patties, though some moisture loss might occur.
Reheating
Reheating a classic cheeseburger patty requires a bit of care to restore its deliciousness. The best method for reheating is often in a skillet over medium heat. Add a small amount of oil or butter, and cook the patty for a few minutes on each side until heated through and a nice crust has reformed.
Alternatively, you can reheat the patty in a preheated oven at around 350°F (175°C). Place the patty on a baking sheet and heat for about 5-10 minutes, or until warmed through. This method is good for reheating multiple patties simultaneously and helps maintain an even temperature.
If you are reheating an assembled burger, it’s often best to reheat just the patty and toast the bun separately. You can then reassemble with the toppings. Microwaving is an option, but it tends to make the bun soggy and the patty rubbery, so it’s generally less recommended for achieving the best texture and flavor.
Frequently Asked Questions
-
What is the best type of ground beef to use for classic cheeseburgers?
For the most flavorful and juicy classic cheeseburgers, it’s highly recommended to use ground beef with an 80/20 lean-to-fat ratio. This fat content is crucial because it renders during cooking, basting the meat from within and ensuring a succulent, tender result. Ground chuck or round are excellent choices, as they offer a good balance of flavor and texture. While leaner options like 90/10 ground beef might seem healthier, they often lead to drier burgers that lack the rich, satisfying taste associated with a truly great cheeseburger. The fat not only contributes to juiciness but also helps in forming a desirable crust when seared properly on the grill.
-
How can I prevent my burger patties from drying out on the grill?
Preventing dryness in burger patties involves several key techniques. Firstly, as mentioned, using ground beef with a higher fat content (80/20 is ideal) is paramount, as fat equals moisture and flavor. Secondly, avoid overworking the meat when forming the patties; handle it as little as possible to keep the meat tender. When grilling, resist the urge to press down on the burgers with your spatula, as this squeezes out the precious juices. Furthermore, flipping the burgers only once or twice during cooking is essential; excessive flipping disrupts the cooking process and can lead to moisture loss. Finally, using a meat thermometer to cook the burgers to your desired level of doneness, rather than overcooking them, is the surest way to guarantee a juicy outcome. For medium-rare to medium, aim for an internal temperature of 135-150°F.
-
What are the best cheese options for a classic cheeseburger, and how can I ensure it melts properly?
When aiming for a truly classic cheeseburger experience, American cheese is often the top choice due to its superior melting properties and mild, creamy flavor that complements beef beautifully. Its high moisture and fat content allow it to melt into a smooth, gooey blanket that coats the patty perfectly. Cheddar cheese, particularly medium or sharp varieties, is another excellent option, offering a more robust flavor profile. Other popular choices include Swiss for its nutty notes, Monterey Jack for its mildness and excellent melt, or even Provolone for a slightly sharper taste. To ensure your cheese melts properly, add it during the last 1-2 minutes of grilling, or immediately after removing the patties from the heat. Covering the grill briefly can help trap heat and encourage even melting, creating that signature cheesy finish.