Sheet Pan Chicken Dinner – Easy Meal Prep Idea!
Embark on a culinary adventure that promises deliciousness with minimal fuss. This sheet pan chicken recipe is designed to be your new weeknight savior, transforming simple ingredients into a beautifully roasted meal that’s both wholesome and incredibly satisfying.
Imagine the aroma filling your kitchen as juicy chicken and perfectly roasted vegetables mingle, all cooked to perfection on a single baking sheet. It’s a meal that’s not only a joy to eat but also a dream to prepare and clean up afterward, making it ideal for busy families and solo cooks alike.
Why You Will Love This Recipe
- Effortless Preparation: With just a few minutes of chopping and seasoning, the oven does all the heavy lifting, meaning less time in the kitchen and more time enjoying your meal.
- One-Pan Wonder: The beauty of this recipe lies in its simplicity; everything cooks together on one sheet pan, drastically reducing cleanup time and making post-dinner chores a breeze.
- Customizable to Your Taste: Feel free to swap out vegetables based on what’s in season or what you have on hand, ensuring endless flavor combinations and a recipe that never gets boring.
- Healthy and Balanced: Packed with lean protein from the chicken and a rainbow of nutrient-rich vegetables, this dish offers a complete and healthy meal that will leave you feeling energized and satisfied.
- Perfect for Meal Prep: This recipe is a meal prep champion, yielding delicious leftovers that are easy to store and reheat, providing convenient and healthy lunches or dinners for days to come.
Ingredients You Need
The key to any successful dish, especially one as straightforward as this sheet pan chicken, lies in the quality of your ingredients. Opting for fresh, vibrant produce and good quality chicken will elevate the flavors and textures, ensuring a truly memorable meal. Don’t underestimate the power of simple seasonings to bring out the natural deliciousness of each component.
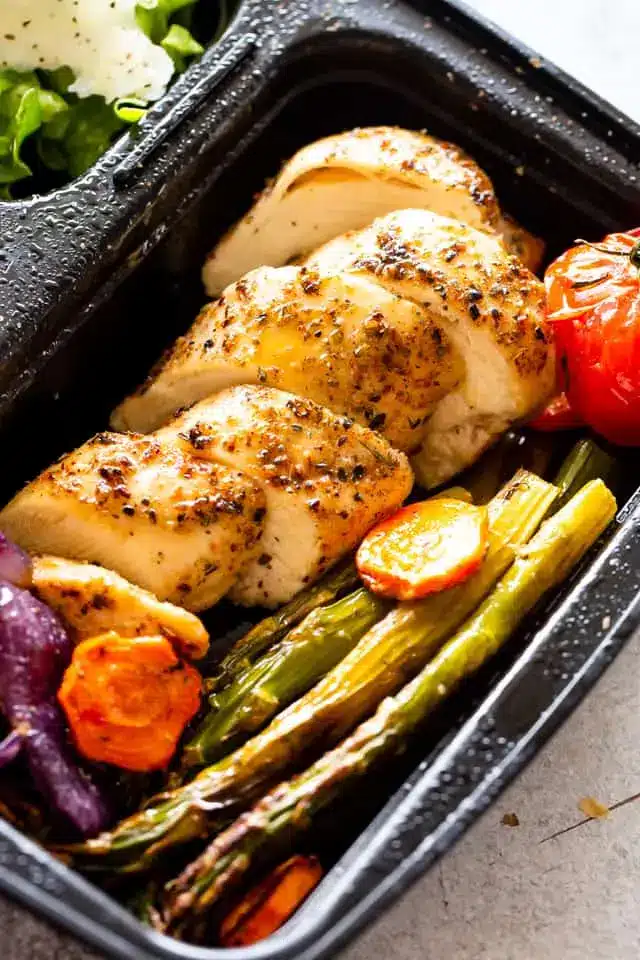
Sheet Pan Chicken

This flavorful sheet pan chicken recipe is ready in under an hour, with juicy seasoned chicken breasts, tender potatoes, and vegetables all baked together. It’s perfect for an easy weeknight chicken dinner, and I love it as a meal prep idea!
- 4 boneless, skinless chicken breasts (about 1 to 1½ pounds total)
- 3 cups diced potatoes
- 1 pound asparagus, ends trimmed
- 2 large carrots, diced or thinly sliced
- 1 large red onion, quartered
- 2 cups cherry tomatoes, optional
- 2 tablespoons olive oil, divided
- 2 cloves garlic, minced, divided
- 1 teaspoon garlic powder
- 1½ teaspoons dried rosemary, divided
- 1½ teaspoons dried thyme, divided
- Salt and freshly ground black pepper, to taste
- 1 tablespoon butter, cut into 4 pats
- 1Preheat oven to 425°F. Line a large sheet pan with parchment paper or foil; set aside.
- 2Cut up the potatoes, Brussels sprouts, asparagus, carrots, and red onion. Place each in a separate corner of the prepared sheet pan. Do not add the cherry tomatoes yet.
- 3Drizzle olive oil over the veggies. Season with garlic powder, ½ teaspoon dried rosemary, ½ teaspoon dried thyme, salt, and pepper.
- 4Place 2 chicken breasts over a large piece of parchment paper. Rub both sides of the chicken with a bit of olive oil, and season with salt, pepper, ½ teaspoon rosemary, ½ teaspoon thyme, and half of the minced garlic.
- 5Place a pat of butter on top of each chicken breast and tightly seal the parchment paper around the chicken breasts. Repeat the same process with the remaining 2 chicken breasts.
- 6Bake for 30 minutes, or until the chicken is cooked through. Chicken is done when its internal temperature reaches 165°F.
- 7Optionally, 10 minutes before it’s done cooking, add cherry tomatoes to the sheet pan.
- 8Remove from oven and let stand 5 minutes. Unwrap the chicken and serve.
Keywords: Sheet Pan Chicken, Chicken Dinner, Easy Weeknight Meal, Meal Prep, Roasted Vegetables, One Pan Meal
Detailed quantities for each ingredient can be found in the printable recipe card.
Variations
This versatile sheet pan chicken recipe serves as an excellent canvas for culinary creativity, allowing you to adapt it to various dietary preferences and flavor profiles. By making a few simple substitutions or additions, you can transform this classic dish into something entirely new and exciting, catering to every palate at your table.
For a delightful vegan iteration, replace the chicken breasts with firm tofu or tempeh, ensuring it’s pressed well to remove excess moisture before marinating and roasting. Complement the protein with hearty vegetables like sweet potatoes, broccoli, bell peppers, and red onions, seasoned with your favorite plant-based spices. A drizzle of balsamic glaze or a sprinkle of nutritional yeast can add an extra layer of savory depth, proving that vegan meals can be just as robust and satisfying as their meat-based counterparts.
If you’re following a low-carb lifestyle, focus on non-starchy vegetables and ensure your protein choice aligns with your goals. Instead of potatoes, consider incorporating cauliflower florets, Brussels sprouts, asparagus, zucchini, and bell peppers. These vegetables roast beautifully and offer a delightful texture contrast to the chicken. Season with herbs like rosemary and thyme, and perhaps a touch of lemon zest for brightness, keeping the overall carbohydrate count delightfully low.
To introduce an international flair, consider a Mediterranean twist. Marinate the chicken in lemon juice, olive oil, garlic, oregano, and a pinch of red pepper flakes before roasting. Alongside the chicken, add chopped zucchini, bell peppers, red onion, and Kalamata olives. A sprinkle of feta cheese after roasting, or a dollop of tzatziki sauce on the side, will transport your taste buds straight to the sun-drenched shores of the Mediterranean, offering a flavorful and vibrant departure from the original recipe.
How to Prepare sheet pan chicken
Step 1: Prepare to Bake and Cut the Veggies
Begin by preheating your oven to a robust 425°F (220°C). This high heat is crucial for achieving that perfect caramelization on the vegetables and ensuring the chicken cooks through beautifully without becoming dry. Lining a large baking sheet with parchment paper or aluminum foil is a smart move; it not only prevents sticking but also makes cleanup significantly easier, a welcome bonus after a busy day.
Next, turn your attention to the star players of the vegetable medley: potatoes, Brussels sprouts, asparagus, carrots, and red onion. The key to achieving even cooking is to cut these vegetables into roughly uniform sizes, about 1-inch chunks is ideal. Place each type of vegetable in its own designated section on the prepared baking sheet, creating distinct piles. This initial separation allows for better heat circulation and ensures each vegetable can roast properly before they are all tossed together.
Resist the urge to add the cherry tomatoes at this stage; they are delicate and will cook much faster than the heartier vegetables, so they are best added towards the end of the cooking process. Ensuring all the root vegetables and denser greens are cut to a similar size is paramount for a cohesive cooking experience. The goal is for everything to reach tender perfection simultaneously.
Step 2: Season the Veggies
Now it’s time to infuse those vegetables with incredible flavor. Drizzle a generous amount of olive oil over all the cut vegetables arranged on the baking sheet. The olive oil acts as a conductor for heat, helping them to roast and crisp up, and it also provides a base for the seasonings to adhere to. Aim for an even coating, ensuring every piece of vegetable gets its share of the oil.
Sprinkle the vegetables with garlic powder, a portion of your dried rosemary, a portion of your dried thyme, and a good pinch of salt and freshly ground black pepper. The garlic powder provides a foundational savory note, while the rosemary and thyme offer an aromatic, earthy depth that pairs wonderfully with roasted vegetables. Don’t be shy with the salt and pepper; they are essential for bringing out and balancing all the other flavors.
Gently toss the vegetables directly on the baking sheet to ensure they are all evenly coated with the oil and seasonings. This step is crucial for preventing any bland spots and for maximizing the surface area that will caramelize and develop delicious flavor during roasting. The aroma at this stage should already be hinting at the delicious meal to come.
Step 3: Season and Wrap the Chicken
Prepare your chicken breasts by placing two of them on a separate large piece of parchment paper. This separate wrapping is a technique that helps the chicken steam in its own juices and butter, resulting in incredibly tender and moist meat. Rubbing both sides of the chicken with a bit more olive oil will help the seasonings adhere and contribute to a beautiful sear.
Season the chicken generously on all sides with salt, freshly ground black pepper, the remaining dried rosemary, the remaining dried thyme, and half of the minced fresh garlic. The fresh garlic will infuse the chicken with a pungent, aromatic kick that complements the other herbs beautifully. Ensure an even coating of these seasonings so that every bite of chicken is bursting with flavor.
The secret to incredibly juicy chicken in this recipe is the addition of butter. Place a pat of butter on top of each chicken breast; as it melts during baking, it will baste the chicken, locking in moisture and adding a rich, decadent flavor. Tightly seal the parchment paper around the chicken breasts, creating a packet. Repeat this exact process with the remaining two chicken breasts, ensuring each packet is well-sealed to trap all those wonderful flavors and juices inside.
Step 4: Bake
Carefully arrange the parchment-wrapped chicken packets in the center of the large baking sheet, nestled amongst the seasoned vegetables. The vegetables will surround the chicken, allowing them all to roast and cook in harmony. The high oven temperature of 425°F (220°C) is optimal for achieving beautifully roasted vegetables and perfectly cooked chicken in a relatively short amount of time.
Bake the sheet pan for approximately 30 minutes. This duration is a guideline, and actual cooking time may vary slightly depending on the thickness of your chicken breasts and your oven’s calibration. The goal is for the chicken to be cooked through and for the vegetables to become tender and slightly caramelized at the edges.
To ensure the chicken is safely cooked, it’s essential to check its internal temperature. It is done when a meat thermometer inserted into the thickest part of a breast registers 165°F (74°C). This step is crucial for food safety and for achieving the best possible texture for your chicken.
Step 5: Add Cherry Tomatoes (Optional) and Rest
If you’ve chosen to include cherry tomatoes, now is the time to add them to the culinary ensemble. Approximately 10 minutes before the end of the total baking time, carefully remove the sheet pan from the oven. Scatter the vibrant cherry tomatoes around the vegetables on the pan. They will soften and burst slightly, releasing their sweet, tangy juices which will mingle beautifully with the other ingredients.
Return the sheet pan to the oven for those final 10 minutes of cooking. This allows the tomatoes to warm through and develop their characteristic sweetness without becoming overly mushy or losing their shape entirely. The brief cooking time ensures they retain a pleasant pop when bitten into, adding a burst of freshness to each serving.
Once the chicken has reached its target internal temperature and the vegetables are tender, remove the entire sheet pan from the oven. It’s important to let the chicken rest for about 5 minutes inside its parchment packet. This resting period allows the juices to redistribute throughout the chicken, ensuring it remains moist and tender when served. This small but significant step makes a huge difference in the final texture of the chicken.
Step 6: Unwrap and Serve
With the chicken rested, it’s time for the grand unveiling. Carefully unwrap the parchment paper packets, being mindful of the hot steam that will escape. The aroma should be absolutely divine, a testament to the simple yet effective cooking methods employed. The chicken should be golden brown and succulent, and the vegetables tender and beautifully roasted.
Serve the tender, juicy chicken breasts alongside the assortment of roasted vegetables directly from the sheet pan. This presentation highlights the rustic, home-cooked nature of the dish, making it visually appealing and inviting. The flavors and textures should be perfectly balanced, creating a harmonious and satisfying meal that’s both healthy and delicious.
For an added touch of freshness, consider garnishing with a sprinkle of fresh parsley or a squeeze of lemon juice just before serving. This simple addition can brighten the overall flavor profile and add a vibrant visual appeal, making your sheet pan chicken dinner even more irresistible. Enjoy this delightful and easy meal that celebrates wholesome ingredients cooked to perfection.
Pro Tips for sheet pan chicken
To achieve the most flavorful and perfectly cooked sheet pan chicken, consider these expert tips. Ensuring your ingredients are prepped correctly and your oven temperature is accurate are fundamental steps to success. Paying attention to the details can elevate this simple dish to restaurant-quality standards.
Even Cutting is Key: The most crucial tip for a successful sheet pan dinner is to cut all your vegetables into uniform sizes. This ensures that everything cooks evenly and at the same rate, preventing some items from becoming overcooked and mushy while others remain underdone. Aim for roughly 1-inch pieces for denser vegetables like potatoes and carrots, and slightly smaller for quicker-cooking items like asparagus and Brussels sprouts.
Don’t Overcrowd the Pan: A common mistake is to pile all the ingredients onto a single baking sheet, which can lead to steaming rather than roasting. If your ingredients are too close together, they will release moisture and steam, resulting in soggy vegetables and less flavorful chicken. Use two baking sheets if necessary to give everything ample space for proper air circulation and optimal caramelization.
High Heat for Roasting: Don’t be tempted to lower the oven temperature to cook things more slowly. A high heat, around 425°F (220°C), is essential for achieving that desirable browning and slight crispness on the vegetables, as well as for cooking the chicken through quickly without drying it out. This high heat mimics the effect of a hot oven, perfect for sheet pan meals.
Flavor Layering is Essential: While the recipe calls for specific seasonings, don’t be afraid to experiment with your favorite herbs and spices. Consider adding paprika for a smoky flavor, onion powder for an extra savory punch, or even a pinch of red pepper flakes for a touch of heat. Marinating the chicken for at least 30 minutes before cooking can also significantly enhance its flavor and tenderness.
Resting is Non-Negotiable: Just like with any roasted meat, allowing the chicken to rest after cooking is vital for juicy results. When chicken rests, the muscle fibers relax, and the juices redistribute throughout the meat. Skipping this step will result in juices running out onto the plate, leaving the chicken drier. A short resting period of 5-10 minutes makes a significant difference.
Serving Suggestions for sheet pan chicken
Decoration
Elevate the visual appeal of your sheet pan chicken with simple yet elegant garnishes. A sprinkle of freshly chopped parsley or chives adds a vibrant green contrast and a hint of freshness. For a touch of color and sophistication, a few edible flowers, like nasturtiums or pansies, can be artfully arranged on the plate. A drizzle of balsamic glaze or a dollop of herbed Greek yogurt can also add visual interest and a complementary flavor.
Side Dishes
This versatile sheet pan chicken pairs wonderfully with a variety of side dishes that complement its hearty and roasted nature. A simple green salad with a light vinaigrette offers a refreshing counterpoint to the richness of the chicken and roasted vegetables. Fluffy jasmine rice or quinoa are excellent for soaking up any delicious pan juices. For a more indulgent option, consider serving with German pancakes or a creamy lobster bisque for a truly special meal.
Creative Serving Ideas
Transform your sheet pan chicken into a delightful wrap by shredding the chicken and mixing it with the roasted vegetables. Spoon this mixture into warm tortillas or tortilla wraps, perhaps with a smear of hummus or a spicy aioli. Another creative idea is to serve the chicken and vegetables over a bed of couscous or orzo, creating a complete and satisfying grain bowl. For a lighter option, deconstruct the meal and serve the chicken and vegetables over a bed of fresh greens, creating a hearty salad.
Preparation & Storage
Storing Leftovers
To keep your delicious sheet pan chicken and vegetables fresh for later, store them in an airtight container in the refrigerator. Ensure the container is completely sealed to prevent air exposure, which can lead to spoilage and a loss of moisture. Properly stored leftovers can typically last for up to 4 to 5 days, making this an excellent dish for meal prepping throughout the week.
Allow the cooked chicken and vegetables to cool completely before transferring them to the storage container. Storing warm food can create condensation inside the container, which can affect the texture and freshness of the food. Taking this small step ensures the best possible quality for your refrigerated leftovers, maintaining their deliciousness for several days.
When ready to eat, simply reheat the desired portion. The flavors often meld and deepen overnight, making leftovers just as enjoyable, if not more so, than the freshly cooked meal. This makes it a perfect candidate for easy lunches or quick dinners when you’re short on time.
Freezing
For longer-term storage, this sheet pan chicken and vegetables can be successfully frozen. Once cooled, portion the leftovers into freezer-safe containers or heavy-duty freezer bags. It’s beneficial to freeze individual portions, allowing you to thaw and reheat only what you need, preventing unnecessary thawing and refreezing of the entire batch.
Ensure that the containers or bags are well-sealed to prevent freezer burn, which can degrade the quality and flavor of the food. Label the containers with the date of freezing to keep track of your frozen inventory. Properly frozen leftovers can maintain their quality for up to 2 months, offering a convenient and ready-to-eat meal solution whenever you need it.
When you are ready to use your frozen leftovers, the best method is to thaw them overnight in the refrigerator. This slow thawing process helps to maintain the integrity of the ingredients and ensures they are evenly defrosted. Avoid thawing at room temperature, as this can encourage bacterial growth. Once thawed, they can be reheated as usual.
Reheating
Reheating sheet pan chicken and vegetables is a straightforward process, with several methods yielding good results. The microwave is the quickest option; place the leftovers in a microwave-safe dish, cover loosely, and heat on medium power until thoroughly warmed through. Stirring halfway through can help ensure even heating.
For a slightly crisper texture, especially for the vegetables, reheating in a skillet on the stovetop is an excellent choice. Heat a tablespoon of oil or butter in a non-stick skillet over medium heat. Add the leftovers and cook, stirring occasionally, until hot and slightly re-crisped. This method helps revive some of the original texture that might be lost in the microwave.
Alternatively, you can reheat your sheet pan chicken and vegetables in the oven. Spread the leftovers on a baking sheet and warm them in a preheated oven at around 350°F (175°C) for 10-15 minutes, or until heated through. This method is particularly good if you want to achieve a similar result to the original roasting process, bringing back a pleasant warmth and texture.
Frequently Asked Questions
-
Can I use chicken thighs instead of chicken breasts?
Absolutely! Chicken thighs are an excellent substitute for chicken breasts in this sheet pan recipe, and they often yield even juicier results due to their higher fat content. However, keep in mind that chicken thighs, especially bone-in varieties, may require a slightly longer cooking time to reach the safe internal temperature of 165°F (74°C). It’s always best to use a meat thermometer to ensure they are cooked through. The extra fat from the thighs will also render down, adding wonderful flavor to the vegetables on the pan.
-
What other vegetables can I roast with the chicken?
The beauty of this sheet pan recipe is its versatility when it comes to vegetables. You can confidently substitute or add a wide array of vegetables that have similar cooking times. Consider hearty options like broccoli florets, cauliflower florets, diced sweet potatoes, parsnips, or butternut squash. For quicker-cooking additions that can be added halfway through baking, think about cherry tomatoes, bell pepper strips, zucchini rounds, or green beans. The key is to cut denser vegetables smaller so they cook at the same rate as the chicken.
-
How can I ensure the chicken doesn’t dry out while the vegetables are cooking?
Several factors contribute to keeping the chicken moist and tender. First, using chicken thighs, as mentioned, inherently adds moisture. Second, not overcrowding the pan is crucial for proper roasting, allowing hot air to circulate. Third, the recipe’s technique of wrapping the chicken in parchment paper with butter creates a steaming effect that locks in juices. Finally, accurately monitoring the chicken’s internal temperature with a meat thermometer and removing it as soon as it reaches 165°F (74°C) prevents overcooking, which is the primary culprit for dry chicken. Resting the chicken after cooking also plays a significant role in retaining moisture.