Strawberry Cheesecake Cookies – The Perfect Tempting Treat
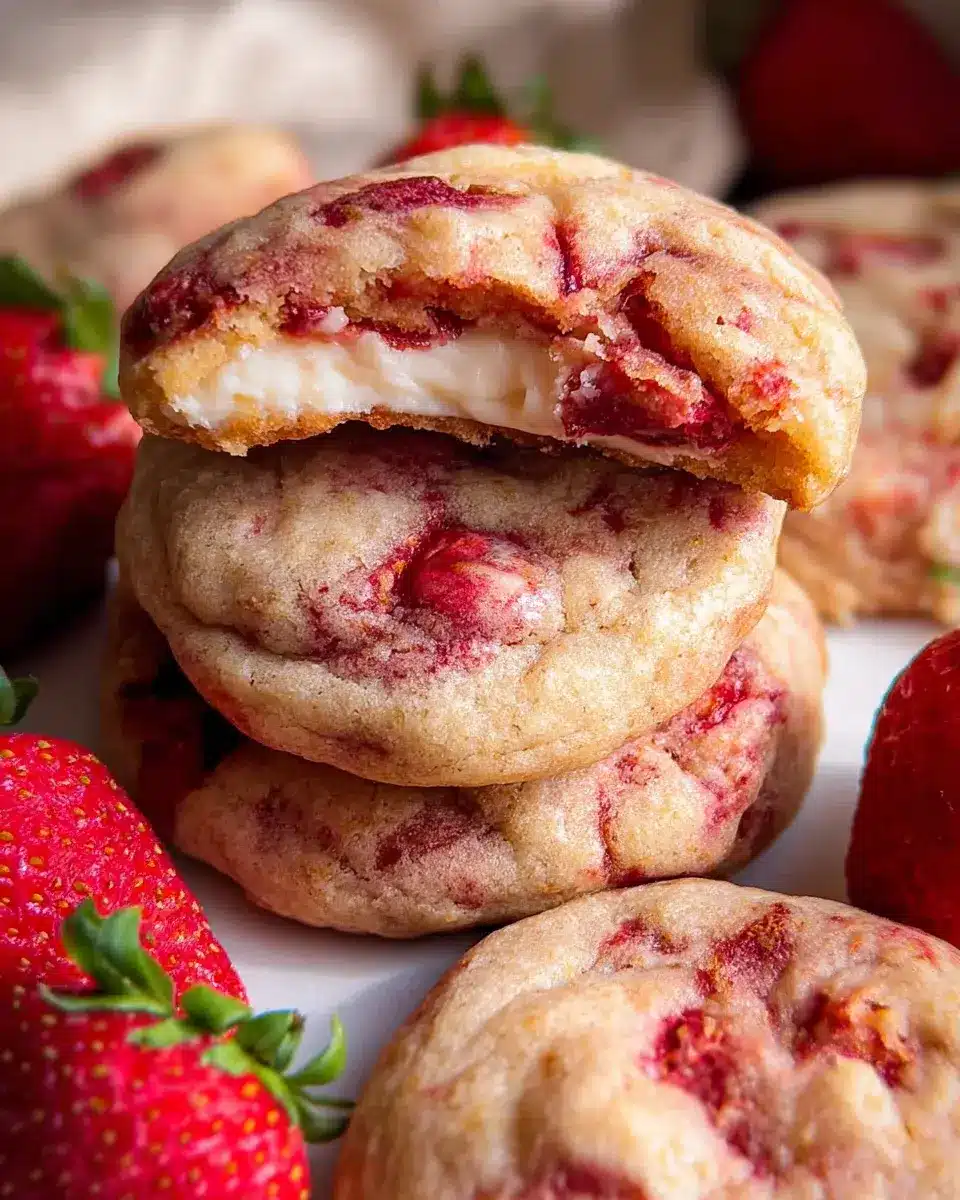
Indulge in the delightful world of Strawberry Cheesecake Cookies, where the classic flavors of strawberry cheesecake transform into a scrumptious cookie treat. These cookies feature a soft and chewy exterior filled with jammy strawberries and a luscious cream cheese center, creating an irresistible combination that will impress friends and family alike.
Perfect for any occasion, from backyard barbecues to cozy nights in, each bite delivers a burst of fresh strawberry goodness and creamy decadence. With simple ingredients and easy steps, even novice bakers can whip up this delicious dessert. Treat yourself to these Strawberry Cheesecake Cookies and experience the joy of homemade sweetness!
Why You Will Love This Recipe
- Delicious Flavor: The combination of fresh strawberries and creamy cheesecake creates a unique taste that everyone will love.
- Easy to Make: With simple ingredients and straightforward steps, these cookies are perfect for bakers of all levels.
- Versatile Treat: Ideal for gatherings, bake sales, or just an afternoon snack, they suit any occasion!
- Soft and Chewy Texture: Enjoy the delightful contrast of a chewy cookie with a creamy center.
- Impressive Presentation: These cookies look as good as they taste, making them a hit at any event.
Ingredients You Need
To successfully create these delightful Strawberry Cheesecake Cookies, focusing on ingredient quality is paramount. Using fresh, ripe strawberries will ensure a vibrant flavor and beautiful color throughout the cookie. Similarly, ensuring your cream cheese and butter are at the correct temperatures, as specified in the recipe, will guarantee the perfect texture for both the filling and the cookie dough.
Strawberry Cheesecake Cookies

Indulge in the delightful world of Strawberry Cheesecake Cookies, where the classic flavors of strawberry cheesecake transform into a scrumptious cookie treat. These cookies feature a soft and chewy exterior filled with jammy strawberries and a luscious cream cheese center, creating an irresistible combination that will impress friends and family alike. Perfect for any occasion, from backyard barbecues to cozy nights in, each bite delivers a burst of fresh strawberry goodness and creamy decadence. With simple ingredients and easy steps, even novice bakers can whip up this delicious dessert. Treat yourself to these Strawberry Cheesecake Cookies and experience the joy of homemade sweetness!
- For the Cheesecake Filling:
- 6 oz cream cheese, cold
- 3 tbsp granulated white sugar
- 1/2 tsp vanilla
- For the Cookie Dough:
- 12 oz fresh strawberries, hulled and finely diced
- 1/4 cup granulated white sugar
- 2 3/4 cups all-purpose flour, spooned and leveled
- 1/2 tsp baking powder
- 1/2 tsp baking soda
- 1/2 tsp salt
- 1 cup granulated white sugar
- 1 cup unsalted butter, very softened
- 1 egg, at room temperature
- 2 tsp vanilla
- 1/4 cup granulated white sugar, for rolling dough in
- 1Prepare the Cheesecake Filling: In a mixing bowl, combine cold cream cheese with granulated white sugar and vanilla. Use an electric mixer to beat until smooth. Set aside in the refrigerator to chill.
- 2Prepare the Strawberries: Hull and finely dice fresh strawberries. Sprinkle them with 1/4 cup granulated white sugar; let sit for about 15 minutes to release their juices.
- 3Make the Cookie Dough: In another mixing bowl, whisk together all-purpose flour, baking powder, baking soda, and salt. In a large bowl, cream together softened butter with 1 cup granulated white sugar until light and fluffy. Add the egg and vanilla; mix well until combined. Gradually add dry ingredients to wet ingredients while mixing until just combined.
- 4Combine Strawberries with Dough: Gently fold in the prepared strawberries into your cookie dough mixture.
- 5Assemble the Cookies: Preheat your oven to 350°F (175°C). Scoop out cookie dough using a tablespoon; flatten slightly in your palm. Place about a teaspoon of cheesecake filling in the center; fold dough over filling to seal completely.
- 6Bake: Roll each cookie ball in remaining granulated white sugar before placing on lined baking sheets. Bake for about 11 minutes or until edges are lightly golden.
Keywords: Strawberry Cheesecake Cookies, cheesecake cookies, strawberry cookies, dessert, baking, cookies, easy cookies, soft cookies, chewy cookies, fruity cookies
- cream cheese: cold, for the rich cheesecake filling.
- granulated white sugar: a staple for sweetness in both the filling and cookie dough.
- vanilla: essential for depth of flavor in the creamy cheesecake component.
- fresh strawberries: hulled and finely diced to provide bursts of fruity goodness.
- all-purpose flour: the foundation for a soft and chewy cookie structure.
- baking powder: helps the cookies achieve a pleasant lightness.
- baking soda: contributes to the chewiness and spread of the cookies.
- salt: balances the sweetness and enhances all the other flavors.
- unsalted butter: very softened, crucial for creating a tender and pliable cookie dough.
- egg: at room temperature, binds the dough together and adds richness.
- granulated white sugar: for rolling the dough balls, creating a delightful sugary crust.
The precise quantities for each ingredient are detailed within the accompanying recipe card, ensuring you have all the necessary measurements for perfect results.
Variations
For those seeking a completely plant-based indulgence, transforming these Strawberry Cheesecake Cookies into a vegan delight is wonderfully achievable. You can easily substitute the cream cheese with a high-quality vegan cream cheese alternative, ensuring it’s firm and cold for the best texture. For the cookie dough, opt for vegan butter and an egg replacer, such as a flax egg or commercial vegan egg substitute, to maintain that beloved chewy consistency. The strawberries will remain a fresh and vibrant addition, bringing natural sweetness and a beautiful color to your vegan creations. This adaptation allows everyone to enjoy the essence of strawberry cheesecake in cookie form, making it inclusive for all dietary preferences.
If you’re managing your carbohydrate intake, adapting these cookies for a low carb lifestyle is a rewarding endeavor. The key lies in smart ingredient swaps. For the cheesecake filling, use a sugar-free cream cheese and a low-carb sweetener like erythritol or stevia. The cookie dough can be modified by using almond flour or coconut flour instead of all-purpose flour, adjusting the liquid content as needed to achieve the right consistency. Sugar substitutes will replace the granulated sugar in the dough and for rolling. While the texture might vary slightly from the original, the distinct strawberry and creamy cheesecake flavors will still shine through, offering a satisfying treat that aligns with your dietary goals.
For a burst of citrusy brightness, consider adding a hint of lemon to your Strawberry Cheesecake Cookies. The zest of one or two lemons, finely grated, can be incorporated into both the cheesecake filling and the cookie dough. This addition provides a refreshing counterpoint to the sweetness of the strawberries and the richness of the cream cheese, creating a more complex and sophisticated flavor profile. The subtle tang of lemon enhances the overall taste experience, making these cookies feel even more like a gourmet dessert. This simple variation can elevate the cookies from delicious to truly extraordinary, perfect for those who appreciate a touch of zest.
How to Prepare Strawberry Cheesecake Cookies
Step 1: Prepare the Cheesecake Filling
The foundation of these delightful cookies lies in a perfectly smooth and rich cheesecake filling. Begin by gathering your cold cream cheese, granulated white sugar, and pure vanilla extract. It’s crucial that the cream cheese remains cold; this helps it to emulsify properly without becoming too soft or runny, which is essential for the cookie’s structure. Too-soft cream cheese can lead to a filling that escapes during baking or makes the cookie dough too wet.
In a medium-sized mixing bowl, combine the cold cream cheese, granulated white sugar, and vanilla extract. Using an electric mixer on medium speed, beat these ingredients together until the mixture is completely smooth and creamy. You want to ensure there are absolutely no lumps of cream cheese remaining. A truly smooth filling will integrate seamlessly into the cookie dough and provide that signature cheesecake texture. Once perfectly blended, cover the bowl tightly and place it in the refrigerator to chill thoroughly. This chilling process will firm up the filling, making it easier to handle and enclose within the cookie dough.
The chilling is not just about texture; it’s also about flavor development. As the ingredients mingle in the cold, the vanilla’s aroma deepens, and the sweetness of the sugar becomes more rounded. The cold also helps to slightly thicken the filling, which is a crucial step before it’s encased in the warm cookie dough. This step is a testament to how seemingly small details can dramatically impact the final outcome of your baked goods. It ensures that when you bite into the cookie, you experience that distinct, luscious cheesecake surprise.
Step 2: Prepare the Strawberries
The vibrant heart of these cookies comes from the fresh strawberries, and their preparation is key to achieving that perfect jammy texture. Start by washing your fresh strawberries under cool running water and then gently pat them dry with a paper towel. Any excess moisture can make your dough too wet, impacting the final cookie’s chewiness and shape. Next, carefully hull the strawberries by removing the green leafy tops.
Once hulled, finely dice the strawberries into small, manageable pieces. The size of the dice is important; you want pieces that will soften and meld into the cookie dough during baking, creating pockets of jammy fruit rather than large, waterlogged chunks. After dicing, place the strawberry pieces into a small bowl. Sprinkle them generously with the 1/4 cup of granulated white sugar. This sugar will draw out the natural juices from the strawberries, creating a delicious, concentrated syrup as they sit. Let this mixture stand at room temperature for at least 15 minutes, allowing the strawberries to macerate beautifully.
This maceration process is vital for two main reasons: it softens the strawberries and infuses them with added sweetness from the sugar, intensifying their natural flavor. It also creates a lovely, slightly syrupy consistency that will distribute wonderfully throughout the cookie dough. The released juices will contribute to the cookie’s moistness and add an extra layer of fruity flavor. Don’t skip this step, as it’s essential for achieving that desirable jam-like quality of the strawberries within your finished cookies.
Step 3: Make the Cookie Dough
Crafting the perfect cookie dough is an art, and for these Strawberry Cheesecake Cookies, a balanced, chewy base is essential. In a medium mixing bowl, begin by whisking together your dry ingredients: the all-purpose flour, baking powder, baking soda, and salt. Whisking these together thoroughly ensures that the leavening agents and salt are evenly distributed throughout the flour, which is critical for uniform rising and flavor in your cookies. This step prevents pockets of unsalted dough or overly risen cookies.
In a separate, larger mixing bowl, the magic of the cookie dough truly begins. Cream together the very softened unsalted butter and 1 cup of granulated white sugar until the mixture is light, fluffy, and pale yellow. This creaming process incorporates air into the dough, which contributes to the cookie’s tender texture and helps it spread just the right amount during baking. Next, add the room-temperature egg and the 2 teaspoons of vanilla extract to the creamed butter and sugar mixture. Mix well until everything is thoroughly combined, creating a rich, cohesive base for your dough. Room temperature ingredients emulsify better, creating a smoother, more stable dough.
Now, it’s time to combine the wet and dry ingredients. Gradually add the whisked dry ingredients to the wet ingredients while mixing on a low speed or by hand. Continue mixing only until the ingredients are just combined and no dry streaks of flour remain. It’s very important not to overmix the dough at this stage; overmixing can develop the gluten in the flour too much, resulting in tough, dense cookies instead of the desired soft and chewy texture. A light touch is key to achieving cookie perfection.
Step 4: Combine Strawberries with Dough
This is where the two main components of your Strawberry Cheesecake Cookies come together, creating that signature flavor and texture. Take the prepared strawberry mixture, which should now be juicy and fragrant, and gently fold it into the cookie dough. It’s important to use a gentle folding motion rather than vigorous mixing. This ensures that the strawberries are evenly distributed throughout the dough without breaking them down too much or overworking the dough itself.
Use a rubber spatula or a wooden spoon for this task. Carefully scoop the strawberries and their released juices into the bowl containing your cookie dough. Work from the bottom of the bowl upwards, turning the dough over itself to incorporate the strawberries. Aim for an even distribution so that each cookie gets a delightful surprise of fruity sweetness and a hint of jamminess. The goal is to have vibrant pieces of strawberry suspended within the cookie dough, not mashed into a uniform pink color.
Be mindful of the dough’s consistency. If the dough seems excessively wet due to the strawberry juices, don’t be tempted to add a large amount of extra flour, as this can alter the cookie’s final texture. The slight increase in moisture is part of what makes these cookies so tender and delicious. This blending step is crucial for creating cookies that are not only visually appealing with the flecks of red but also incredibly flavorful, offering a perfect balance between the creamy cheesecake and the bright, sweet strawberries.
Step 5: Assemble the Cookies
The assembly of these cookies is where the delightful surprise of the cheesecake filling is encased within the strawberry-infused dough. Before you begin, preheat your oven to 350°F (175°C). While the oven heats, prepare your baking sheets by lining them with parchment paper or silicone baking mats. This prevents the cookies from sticking and ensures even baking. Proper preparation of your baking sheets contributes to easy cleanup and perfectly shaped cookies.
Begin by scooping out portions of the cookie dough using a tablespoon or a cookie scoop. Roll each portion into a neat ball between your palms. Once you have a dough ball, gently flatten it slightly in your palm to create a small indentation or disc. This flattened shape will make it easier to add the cheesecake filling and then enclose it without the dough cracking or breaking. The size of your dough balls will determine the final size of your cookies, so aim for consistency for even baking.
Now, carefully take about a teaspoon of the chilled cheesecake filling and place it directly in the center of the flattened cookie dough disc. The key here is to use the chilled filling, which will be firm and manageable. Gently pull the edges of the dough up and around the cheesecake filling, carefully folding and sealing it completely. Ensure there are no gaps where the filling can leak out during baking. Pinch the seams tightly to create a perfectly sealed ball. Once sealed, you can gently re-roll the ball between your palms to ensure it’s smooth and uniformly round, ready for its final sugary coating.
Step 6: Bake
The final stage is baking, where the raw cookie dough transforms into golden, delicious treats. Once your cookie balls are assembled and sealed, roll each one gently in the remaining granulated white sugar set aside for this purpose. This sugar coating will create a delightful slightly crisp exterior and add an extra layer of sweetness. Place the sugar-coated cookie balls onto your prepared baking sheets, leaving about 2 inches of space between each cookie to allow for slight spreading during baking.
Bake the cookies in the preheated oven at 350°F (175°C) for approximately 11 minutes. The baking time is crucial; you want the edges of the cookies to be lightly golden brown, indicating they are set. However, the centers should still appear slightly soft and underbaked. This is the secret to achieving that wonderfully chewy texture that defines these Strawberry Cheesecake Cookies. Overbaking will result in a dry, cakey cookie, so keep a close eye on them during the last few minutes of baking.
As soon as the cookies are done, remove the baking sheets from the oven. Let the cookies cool on the baking sheets for about 5-10 minutes before carefully transferring them to a wire rack to cool completely. This cooling period on the baking sheet allows them to set further, preventing them from falling apart. Once fully cooled, your delicious Strawberry Cheesecake Cookies are ready to be savored and shared, offering a delightful blend of fruity sweetness and creamy cheesecake indulgence in every bite.
Pro Tips for Strawberry Cheesecake Cookies
Use Cold Cream Cheese: For the most stable and creamy cheesecake filling, always start with cold cream cheese. This ensures the filling holds its shape during assembly and baking, preventing it from becoming too runny and escaping the cookie dough. Cold cream cheese also contributes to a smoother, lump-free texture.
Don’t Overmix the Dough: Once you add the dry ingredients to the wet ingredients, mix only until just combined. Overmixing develops the gluten in the flour, leading to tough, dense cookies instead of the desired soft and chewy texture. A gentle hand is key for tender results.
Chill the Dough: While this recipe doesn’t explicitly call for extensive chilling, if you find your dough is too sticky or spreading too much, refrigerating it for at least 30 minutes before scooping can significantly help. Chilled dough is firmer and holds its shape better during baking.
Adjust Baking Time: Oven temperatures can vary, so keep a close watch on your cookies during the last few minutes of baking. They should be lightly golden around the edges but still appear soft in the center. They will continue to firm up as they cool, ensuring that perfect chewy consistency.
Store in an Airtight Container: To maintain their freshness and chewy texture, store cooled cookies in an airtight container at room temperature or in the refrigerator. This prevents them from drying out and keeps them tasting delicious for longer. You can also add a slice of bread to the container to absorb excess moisture and keep them soft.
Experiment with Flavors: For an enhanced cheesecake flavor, consider adding a touch of lemon zest to the cream cheese filling or a splash of almond extract along with the vanilla. These additions can complement the strawberry and cheesecake notes beautifully, offering a more complex taste profile.
Serving Suggestions for Strawberry Cheesecake Cookies
Decoration
These cookies are already beautiful, but a little extra flair can elevate them further. A simple dusting of powdered sugar can mimic the look of cheesecake topping, offering a delicate sweetness and visual appeal. Alternatively, a light drizzle of white chocolate ganache or a vibrant strawberry glaze can add another layer of flavor and a professional finish. For a more rustic look, a few thinly sliced fresh strawberries or even a tiny mint leaf placed on top just after baking can add a fresh, homemade touch.
Side Dishes
While these cookies are a perfect standalone treat, they also pair wonderfully with other desserts. Imagine them served alongside a scoop of creamy vanilla bean ice cream, where the cold contrasts beautifully with the cookie’s chewiness. A small bowl of fresh mixed berries, like raspberries and blueberries, can complement the strawberry flavor and add a refreshing element to the dessert spread. For a true indulgence, consider a side of light whipped cream for dipping or a decadent chocolate sauce drizzle.
Creative Serving Ideas
Transform these cookies into a charming dessert bar by arranging them on a tiered stand with other bite-sized treats. They also make for a delightful addition to a picnic basket or a bake sale, individually bagged for easy distribution. Consider serving them as part of a special brunch spread, perhaps alongside fresh fruit salads and pastries. For a festive touch, you could even use them as edible decorations on a larger cake or as a whimsical topping for a fruit tart, demonstrating their versatility beyond a traditional cookie format.
Preparation & Storage
Storing Leftovers
To keep your delicious Strawberry Cheesecake Cookies tasting fresh and retaining their delightful chewy texture, proper storage is key. Once completely cooled, transfer the cookies to an airtight container. For optimal freshness, line the container with parchment paper between layers of cookies to prevent them from sticking together. Stored this way at room temperature, they will remain wonderfully fresh and enjoyable for up to 3 to 4 days. If your kitchen tends to be warm, storing them in the refrigerator can extend their shelf life for an additional couple of days, although they might become slightly firmer.
Freezing
These cookies freeze exceptionally well, making them a fantastic make-ahead treat for future cravings or unexpected guests. To freeze them, ensure they are completely cooled. Wrap each individual cookie tightly in plastic wrap to protect it from freezer burn. After wrapping, place the individually wrapped cookies into a freezer-safe airtight container or a heavy-duty freezer bag. Properly stored, your Strawberry Cheesecake Cookies can be frozen for up to 2 to 3 months without a significant loss in quality or flavor. This method preserves their texture and taste beautifully.
Reheating
When you’re ready to enjoy your frozen or refrigerated Strawberry Cheesecake Cookies, a simple reheating process can bring back their fresh-baked appeal. For a gentle warming, you can place them on a baking sheet in a preheated oven at 350°F (175°C) for about 5 to 7 minutes, just until they are slightly warm through. Alternatively, for a quick individual reheat, place a cookie on a microwave-safe plate and microwave on medium power for about 10 to 15 seconds. Be careful not to overheat, as this can make them tough. If you prefer a stovetop method, a non-stick skillet over low heat with a lid can also warm them evenly for a few minutes.
Frequently Asked Questions
- Can I use frozen strawberries instead of fresh ones for this recipe?
Yes, you can certainly use frozen strawberries for these Strawberry Cheesecake Cookies, but it requires a bit of preparation to ensure the best results. First, make sure to thaw the frozen strawberries completely. Once thawed, drain them thoroughly to remove as much excess liquid as possible; you can even press them gently with a paper towel. Excess moisture from frozen strawberries can make your cookie dough too wet, potentially leading to cookies that spread too much or have a gummy texture. While they will still provide flavor, the texture might be slightly different compared to using fresh strawberries that have been macerated, as the freezing process can alter their cell structure.
- How can I make my Strawberry Cheesecake Cookies even more flavorful or enhance the cheesecake taste?
To elevate the flavor profile of your Strawberry Cheesecake Cookies, consider incorporating a few key additions. For a brighter, more complex taste that beautifully complements the strawberry and creamy notes, finely grate the zest of one small lemon and add it to both the cheesecake filling and the cookie dough. A tiny pinch of sea salt, added to the cookie dough in addition to the measured salt, can also subtly enhance all the existing flavors and balance the sweetness. If you desire a more pronounced cheesecake essence, a small amount of almond extract, perhaps 1/4 teaspoon, mixed into the cheesecake filling can add a delightful nutty depth that is often associated with classic cheesecakes.
- What should I do if my cookie dough turns out too sticky to handle?
If you find your cookie dough is excessively sticky and difficult to work with, don’t worry, there are a couple of effective solutions. The primary reason for sticky dough is often the balance of moisture and flour. Your first step should be to chill the dough. Place the entire bowl of dough, covered tightly with plastic wrap, into the refrigerator for at least 30 minutes, or even up to an hour. The cold will firm up the butter and other fats, making the dough much less sticky and easier to scoop and shape. If, after chilling, it’s still too sticky, you can gradually add a small amount of additional all-purpose flour, about a tablespoon at a time, mixing gently until it reaches a workable, non-sticky consistency that can be rolled into balls without adhering excessively to your hands. Avoid adding too much flour, as this can result in dry, tough cookies.