Texas Roadhouse Rolls – Easy Copycat Recipe!
There’s a certain magic in biting into a warm, impossibly soft dinner roll that’s been freshly baked. It evokes feelings of comfort, home, and shared meals. For many, the iconic rolls served at Texas Roadhouse are the pinnacle of this delightful experience, boasting a unique sweetness and pillowy texture that’s utterly addictive.
Crafting these beloved rolls at home might seem like a culinary feat, but this recipe demystifies the process, allowing you to recreate that signature taste and texture with surprising ease. Prepare to impress your family and friends with a batch of these delightful copycat rolls that rival the restaurant favorite.
Why You Will Love This Recipe
Perfectly Soft Texture: These rolls achieve an unparalleled softness and fluffiness, reminiscent of clouds, thanks to the precise combination of ingredients and gentle kneading.
Incredibly Easy to Make: Even if you’re new to baking bread, this recipe breaks down each step clearly, making it accessible for all skill levels, and requires minimal ingredients.
Better Than Store-Bought: Experience the superior taste and freshness of homemade bread, free from preservatives and made with love, that store-bought or frozen options simply cannot match.
Versatile Sweet or Savory: Enjoy these rolls as a sweet treat with their classic cinnamon butter, or adapt them for a savory accompaniment to any main course, offering delightful flexibility.
Quick Assembly: While the rise time is essential, the actual hands-on preparation is surprisingly swift, meaning you can have warm rolls on your table without an extensive time commitment.
Ingredients You Need
The beauty of these Texas Roadhouse copycat rolls lies in their simplicity, requiring just a handful of common pantry staples. Focusing on quality ingredients, like fresh yeast and good butter, will elevate the final product significantly, ensuring that authentic, comforting flavor.
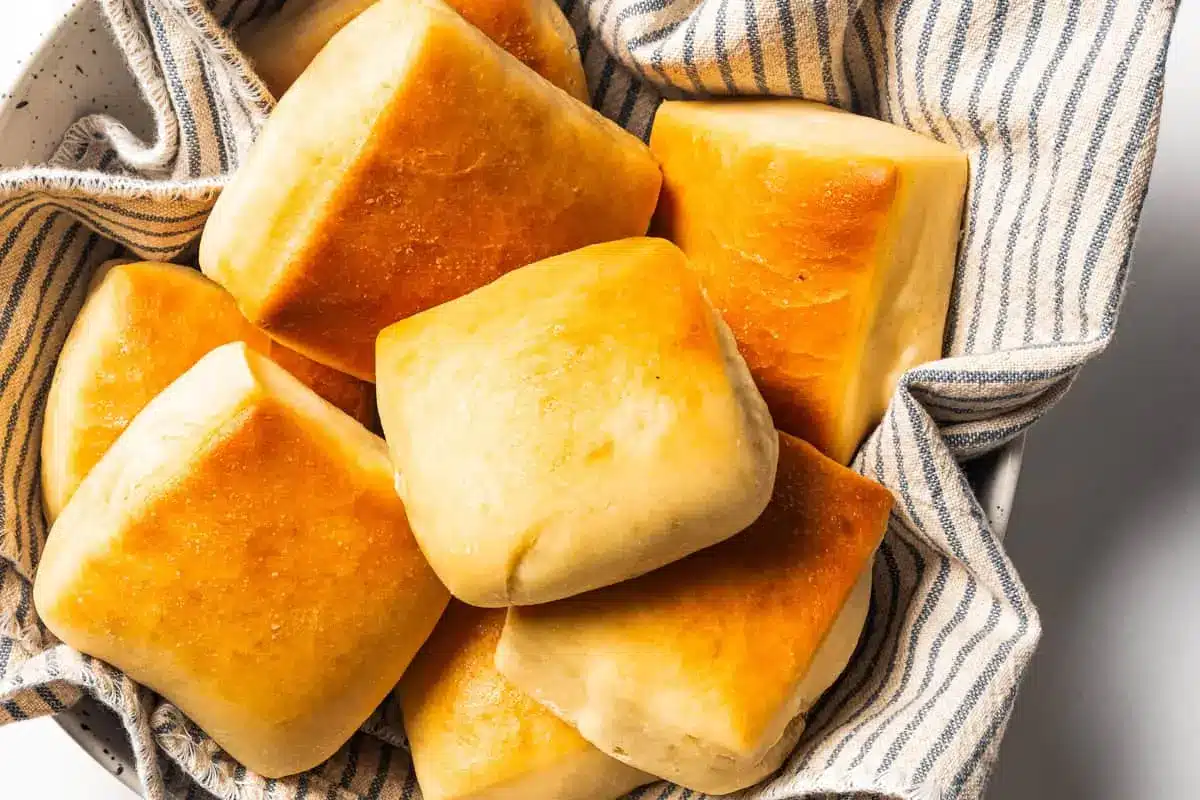
Texas Roadhouse Rolls Copycat

These copycat Texas Roadhouse rolls are soft and fluffy, and you can serve them warm with homemade cinnamon butter as a side with any meal. They are even better fresh from the oven!
- 2 teaspoons active dry yeast
- ½ teaspoon granulated sugar
- ¼ cup warm water (between 100ºF and 110ºF)
- 1 cup milk (lukewarm, about 105ºF)
- 2 tablespoons unsalted butter, melted and cooled
- 1 large egg
- 1 teaspoon salt
- 3¾ cup all purpose flour
- 1½ tablespoons unsalted butter, melted and cooled (for brushing)
- Cinnamon butter (recipe below in notes)
- 1Bloom the yeast: Add active dry yeast and sugar to a bowl. Add warm water and stir. Cover and let sit for 5-10 minutes until foamy.
- 2Add wet ingredients: Add lukewarm milk, melted butter, and yeast mixture to the bowl of a stand mixer. Add egg and salt; mix until well combined.
- 3Add flour: Attach dough hooks and gradually add flour while mixing. The dough should start to pull away from the sides of the bowl. Add more flour if it's too sticky.
- 4Rise the dough: Transfer dough to a lightly oiled bowl, cover with a clean kitchen towel, and let rise in a warm place for 1½ hours, or until doubled in size.
- 5Roll out the dough: Punch down the dough and roll it into a ½-inch thick rectangle.
- 6Cut out the dough: Cut the dough into 15 squares or rectangles. Transfer to a parchment paper-lined baking sheet.
- 7Second rise: Cover the rolls with a clean kitchen towel and let them rise until doubled in size, about 30-45 minutes.
- 8Bake: Preheat oven to 350ºF. Bake for 20 minutes.
- 9Serve: Immediately brush the baked rolls with melted butter. Let cool for 5-10 minutes before serving with cinnamon butter.
Keywords: Texas Roadhouse Rolls, Copycat Recipe, Dinner Rolls, Bread, Homemade Bread, Yeast Rolls, Soft Rolls, Fluffy Rolls
You’ll find the exact quantities for each ingredient listed in the recipe card below, guiding you through the measurements needed for a perfect batch.
Variations
While the classic Texas Roadhouse roll is a masterpiece on its own, there are several exciting ways to adapt this recipe to suit different dietary needs or flavor preferences. These variations ensure that everyone can enjoy a delicious, homemade roll, regardless of their dietary restrictions or cravings.
For those following a plant-based lifestyle, a delicious vegan version is easily achievable. Simply substitute the dairy milk with your favorite non-dairy alternative, such as almond, soy, or oat milk, ensuring it’s unsweetened and at the correct lukewarm temperature. The butter can be replaced with vegan butter or a good quality plant-based margarine. The egg can be omitted entirely, as the dough will still come together beautifully without it, relying on the other liquid ingredients for moisture and structure. The resulting vegan rolls will be just as tender and delightful, perfect for enjoying with a dairy-free cinnamon butter alternative.
If you’re seeking a lower-carbohydrate option, these rolls can be adapted by using a quality keto-friendly flour blend. Look for blends that are designed for baking and contain ingredients like almond flour, coconut flour, and psyllium husk. You may need to adjust the liquid content slightly, as different keto flours absorb moisture differently. Sweeteners can be replaced with erythritol, stevia, or monk fruit extract to maintain the subtle sweetness characteristic of the original rolls, while keeping the carbohydrate count low. These modifications allow for a more guilt-free indulgence, fitting into a low-carb or ketogenic eating plan.
Another creative twist involves infusing the dough with subtle savory notes. Consider adding a tablespoon of finely chopped fresh rosemary or thyme directly into the dough mixture during the flour addition stage. For an extra layer of flavor, you could also brush the baked rolls with a garlic-herb infused olive oil instead of butter. This transforms the sweet roll into a sophisticated accompaniment for heartier dishes like stews, roasts, or pasta. Experimenting with herbs can lead to a surprisingly complex and aromatic bread that perfectly complements a variety of savory meals.
How to Prepare texas roadhouse rolls
Step 1: Blooming the Yeast
Begin by ensuring your active dry yeast is fresh and viable. In a small bowl, combine the active dry yeast with a pinch of sugar, which acts as food for the yeast, and the warm water. Stir gently to incorporate. It’s crucial that the water is between 100°F and 110°F; too hot, and you’ll kill the yeast, too cool, and it won’t activate properly.
Cover this mixture with a clean kitchen towel or plastic wrap and let it sit undisturbed for about 5 to 10 minutes. You’re looking for the yeast to become foamy and bubbly, indicating it’s alive and ready to work its magic. If after 10 minutes, you don’t see any signs of activity, it’s best to discard this batch and start with a new packet of yeast, as it might be expired.
This initial step is fundamental for achieving a good rise in your dough, as it ensures that the yeast is active and will effectively leaven the bread. Properly bloomed yeast is the first promise of light and airy rolls.
Step 2: Mixing the Wet Ingredients
In the bowl of your stand mixer, or in a large mixing bowl if you’re kneading by hand, combine the lukewarm milk, which should be around 105°F, the melted and slightly cooled unsalted butter, and the activated foamy yeast mixture. Add the large egg, which brings richness and contributes to the tender crumb, and the salt, which enhances the overall flavor of the bread.
Whisk these wet ingredients together until they are thoroughly combined. The mixture should be homogenous, with no distinct separation of ingredients. This blend of liquids and the yeast mixture forms the flavor base for your rolls and provides the necessary moisture for the dough to form correctly.
Ensuring all the wet ingredients are at the right temperature is as important as the yeast activation. The milk, like the water, should not be too hot, as it can still negatively impact the yeast’s activity and cook the egg prematurely. A gentle warmth is ideal for promoting a smooth and successful dough formation.
Step 3: Incorporating the Flour and Kneading
Now, it’s time to introduce the flour. Attach the dough hooks to your stand mixer. Gradually add the all-purpose flour, about a cup at a time, to the wet ingredients while the mixer is on a low speed. As the dough begins to come together, you’ll notice it starting to pull away from the sides of the bowl, forming a cohesive ball.
Continue to mix until the dough is well-formed. If the dough seems too sticky and is still adhering heavily to the sides of the bowl, you can add a tablespoon of flour at a time until it reaches the desired consistency. Conversely, if it seems too dry and crumbly, you can add a teaspoon of milk or water. The goal is a soft, slightly tacky dough that is manageable.
Once the dough has formed, increase the mixer speed to medium-low and knead for about 5 to 7 minutes. If kneading by hand, turn the dough out onto a lightly floured surface and knead for 8 to 10 minutes. The kneading process develops the gluten in the flour, which is crucial for the structure and texture of the finished rolls, making them elastic and light.
Step 4: The First Rise
Lightly grease a clean, large bowl with a bit of oil or cooking spray. Gently place the kneaded dough ball into the prepared bowl, turning it once to coat all sides with a thin layer of oil. This prevents the dough from drying out as it rises.
Cover the bowl tightly with plastic wrap or a clean, damp kitchen towel. Find a warm, draft-free spot in your kitchen for the dough to rise. An ideal spot could be inside a slightly warmed oven that has been turned off, or near a sunny window.
Allow the dough to rise for approximately 1.5 to 2 hours, or until it has doubled in size. The exact rising time can vary depending on the ambient temperature of your kitchen. A longer, slower rise can sometimes develop more flavor, but ensure it doesn’t over-proof, which can lead to a gummy texture.
Step 5: Shaping the Rolls
Once the dough has doubled in size, gently punch it down to release the accumulated air. Turn the dough out onto a lightly floured surface. For Texas Roadhouse style rolls, you’ll want to roll the dough out into a rough rectangle, about 1/2 inch thick. This thickness is key to achieving the signature soft, slightly dense interior.
Using a sharp knife or a pizza cutter, slice the rectangle into approximately 15 equal squares or rectangles. These will form your individual rolls. Aim for consistent sizing so they bake evenly.
Line a large baking sheet with parchment paper or a silicone baking mat. Carefully transfer the cut dough pieces onto the prepared baking sheet, spacing them about 1-2 inches apart. This allows them room to expand during their second rise and while baking. Arrange them neatly for an appealing presentation once baked.
Step 6: The Second Rise and Baking
Once the rolls are shaped and arranged on the baking sheet, cover them loosely with the clean kitchen towel again. Let them rise for a second time in a warm spot for about 30 to 45 minutes, or until they appear puffy and have nearly doubled in size. This second rise is crucial for achieving that light, airy texture.
While the rolls are undergoing their second rise, preheat your oven to 350°F (175°C). Ensure the oven rack is positioned in the center of the oven for even heat distribution. Proper preheating is vital for consistent baking results.
Once the rolls have finished their second rise and the oven is preheated, carefully place the baking sheet into the oven. Bake for approximately 18 to 20 minutes, or until the rolls are golden brown on top and the bottoms are also nicely browned. The exact baking time may vary slightly depending on your oven.
Step 7: The Finishing Touch
As soon as the rolls come out of the oven, they are still warm and ready for their signature finishing touch. Melt the additional 1.5 tablespoons of unsalted butter. While the rolls are still hot, generously brush the tops of each roll with the melted butter. This adds an extra layer of richness and a beautiful sheen.
Allow the rolls to cool on the baking sheet for about 5 to 10 minutes before serving. This brief cooling period allows the internal structure to set slightly, making them easier to handle and serve. They are best enjoyed warm, straight from the oven, for the ultimate taste and texture experience.
Pro Tips for texas roadhouse rolls
Use a Kitchen Scale for Flour: For consistent results, especially when baking, weighing your flour with a kitchen scale is far more accurate than using measuring cups. This ensures the correct flour-to-liquid ratio, which is critical for dough texture.
Don’t Overwork the Dough: While kneading is essential for gluten development, over-kneading can result in tough, dense rolls. Stop kneading as soon as the dough is smooth and elastic and pulls away from the sides of the bowl.
Proofing in a Warm Environment: Yeast thrives in warmth. If your kitchen is cold, consider using the residual heat from your oven (turned off after a few minutes on low) or placing the covered dough bowl in a slightly warm, turned-off dryer.
Test Your Yeast: Always ensure your yeast is active before incorporating it into your ingredients. The “blooming” process where it becomes foamy is your visual confirmation of viable yeast, preventing wasted effort.
Brush with Butter Immediately: For that signature glossy finish and extra flavor boost, brush the hot rolls with melted butter right out of the oven. The heat of the rolls will help the butter absorb beautifully.
Serving Suggestions for texas roadhouse rolls
Decoration
While these rolls are undeniably delicious on their own, a few decorative touches can enhance their visual appeal. A light brushing of melted butter is the classic and most effective method, imparting a subtle sheen and preventing them from drying out too quickly. For a slightly more gourmet look, consider a sprinkle of flaky sea salt over the buttered tops just before serving, adding a delightful textural contrast and a touch of elegance.
If you’re serving these for a special occasion or want to lean into the “sweet” aspect, a very light dusting of powdered sugar after they’ve cooled slightly can offer a delicate, dessert-like finish. Alternatively, a tiny drizzle of honey or a sprinkle of cinnamon sugar can be added for an extra hint of sweetness and visual interest, making them even more enticing.
Side Dishes
These rolls are the perfect bread accompaniment to a wide array of meals, particularly those that benefit from a delicious bread to soak up sauces or complement hearty flavors. They are a natural fit for classic American comfort foods, such as a rich and savory lobster bisque or a hearty bowl of chili. Their soft texture makes them ideal for sopping up every last drop of delicious broth or sauce.
For larger dinners, these rolls pair wonderfully with roasted meats like chicken or beef, or with saucy pasta dishes. They can also serve as a delightful addition to a barbecue spread, complementing ribs or pulled pork beautifully. Consider serving them alongside a hearty stew or a flavorful casserole, where their mild sweetness provides a pleasing contrast to the savory main dish.
They also make a fantastic partner for lighter fare, such as a fresh salad or a simple soup, offering a satisfying element to the meal. For a truly Texas Roadhouse-inspired experience, of course, they are essential with a perfectly cooked steak. Their versatility truly shines, making them a go-to bread for almost any occasion.
Creative Serving Ideas
Move beyond the traditional and explore some fun ways to serve these delightful rolls. For a delightful breakfast or brunch option, serve them warm with a generous dollop of homemade cinnamon butter, transforming them into a sweet treat reminiscent of a pastry. You could also offer a variety of flavored butters, such as garlic herb butter or a spicy jalapeño butter, to cater to different palates.
Consider turning them into mini slider buns for a fun appetizer. Split them horizontally and fill with pulled pork, mini meatballs, or even a slice of cheese and a small piece of grilled chicken. This is a fantastic way to make them the star of a party platter. For a more refined presentation, hollow out the center of a few rolls and fill them with a creamy dip, like spinach artichoke dip, baking them until warm and bubbly for an edible serving bowl.
Another idea is to incorporate them into a bread pudding. Cube the leftover rolls, soak them in a sweet custard mixture, and bake for a decadent dessert. This is a wonderful way to reduce waste and create something truly special. For a casual get-together, create a “roll bar” where guests can customize their rolls with different toppings and spreads, making for an interactive and enjoyable dining experience.
Preparation & Storage
Storing Leftovers
Once the rolls have cooled completely, proper storage is key to maintaining their delightful softness and freshness. The best way to store leftover rolls at room temperature is in an airtight container or a resealable plastic bag. Ensure all air is pressed out of the bag before sealing to prevent the rolls from drying out.
Stored this way, they will typically remain fresh and enjoyable for up to 3 to 4 days. Avoid storing them in the refrigerator, as the cold air can actually make them stale and dry out faster. For optimal texture, it’s best to enjoy them within the first couple of days.
If you find they are starting to lose a bit of their initial softness, a brief warming in the oven or toaster oven can often revive them. Simply warm them for a few minutes until they are heated through, restoring some of their original delightful texture.
Freezing
For longer-term storage, freezing is an excellent option to preserve the quality of these homemade rolls. Once the rolls have completely cooled, wrap each individual roll tightly in plastic wrap. This double-layer of protection helps prevent freezer burn.
After wrapping them individually, place the wrapped rolls into a heavy-duty freezer bag or an airtight container. Squeeze out as much air as possible from the freezer bag before sealing it to maintain freshness. Properly frozen, these rolls can be stored for up to 3 months.
Freezing is ideal for making a large batch and having fresh rolls readily available whenever a craving strikes, or when unexpected guests arrive. Ensure the packaging is secure to maintain the rolls’ texture and flavor profile for an extended period.
Reheating
Reheating frozen or day-old rolls is quite straightforward and can bring them back to their freshly baked glory. If reheating from frozen, it’s best to let them thaw at room temperature for at least an hour or two first. This allows for more even reheating.
Once thawed or if reheating day-old rolls, you can use your oven or a toaster oven. Preheat your oven to around 300°F (150°C). Place the rolls directly on the oven rack or on a baking sheet and heat for about 5 to 8 minutes, or until they are warmed through. This method is excellent for reviving their soft texture.
Alternatively, a toaster oven works similarly well for reheating a few rolls at a time. If you’re in a real pinch, a microwave can be used, but be cautious as they can become tough if overheated. Reheat in 15-second intervals until just warmed through. A quick brush of melted butter after reheating can enhance their appeal even further.
Frequently Asked Questions
-
Can I make the dough ahead of time and refrigerate it overnight?
Yes, you absolutely can make the dough ahead of time and refrigerate it overnight for a slower, flavor-developing rise. After the initial kneading and first rise, punch down the dough, cover it tightly with plastic wrap, and place it in the refrigerator. The cold temperature will significantly slow down the yeast activity. In the morning, remove the dough from the refrigerator, let it come to room temperature for about 30-60 minutes, then proceed with shaping and the second rise as usual. This method is a fantastic way to fit baking into a busy schedule.
-
What if my dough doesn’t rise after the first hour and a half?
If your dough hasn’t doubled in size after the initial 1.5 hours, several factors could be at play. First, check the temperature of your environment; yeast needs warmth to thrive. Ensure it’s in a draft-free, warm spot. Secondly, consider the age and viability of your yeast; if it wasn’t active when you bloomed it, the dough won’t rise. Another possibility is the temperature of your liquids; if the milk or water was too hot, it may have killed the yeast. If you’ve ruled out these issues and it’s still not rising significantly after an additional 30 minutes, the dough might be too dry, or the yeast may not be potent enough. You can try placing it in a slightly warmer spot or gently kneading in another tablespoon of liquid if it feels too stiff.
-
How do I ensure my rolls are perfectly golden brown without burning the bottoms?
Achieving a perfect golden brown on your rolls involves a few key considerations. Ensure your oven is properly preheated to the correct temperature (350°F or 175°C). Using parchment paper or a silicone baking mat on your baking sheet creates a barrier that prevents the bottoms from browning too quickly. If you notice that the bottoms are browning faster than the tops, you can carefully slide an empty baking sheet onto the rack below the one with the rolls, which can help diffuse the direct heat. Also, rotating the baking sheet halfway through the baking time can ensure more even cooking and browning across all the rolls.