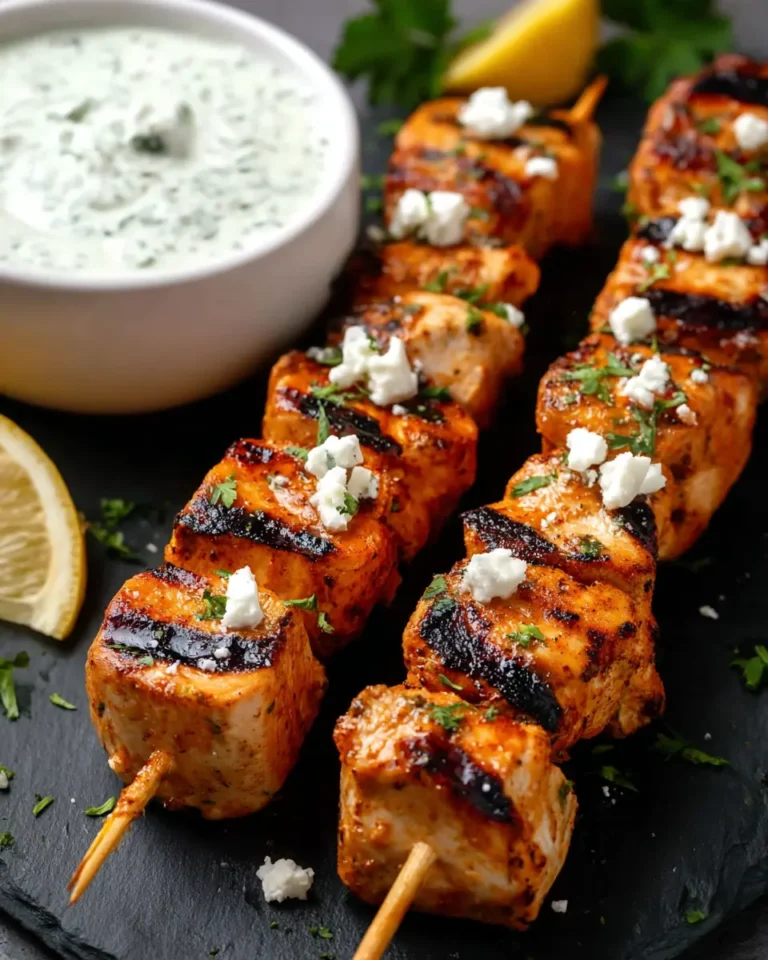
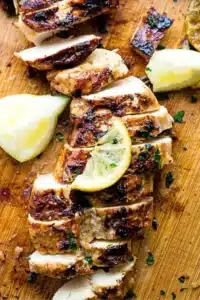
Grilled Lemon Chicken Recipe – The Best Lemon Marinade!

This juicy grilled lemon chicken has always been my family’s go-to grilled chicken recipe for summer. Bursting with fresh flavor and herbs, the garlicky lemon chicken marinade is quick and easy to make, promising a delightful culinary experience for any occasion.
In honor of May Day, I’m marinating juicy chicken with plenty of lemon and tossing it onto the grill, a tradition that evokes cherished memories of holiday picnics in Macedonia. The intoxicating aroma of this garlicky lemon chicken grilling transports me back to those vibrant celebrations, filled with delicious food and joyous company.
Why You Will Love This Recipe
- Quick Preparation: Dinner is on the table in under 30 minutes once the marinating time is complete, making it perfect for busy weeknights.
- Bright, Fresh Flavors: The combination of lemon zest, lemon juice, and fresh garlic creates a vibrant and zesty profile that complements the chicken beautifully.
- Versatile Marinade: This marinade works wonders on various cuts of chicken, from breasts and thighs to whole birds or skewers.
- Simple Ingredients: You only need a few pantry staples and fresh produce to create this incredibly flavorful dish.
- Family Favorite: A beloved recipe passed down through generations, guaranteed to become a hit in your household as well.
Ingredients You Need
The quality of your ingredients plays a pivotal role in the final outcome of this grilled lemon chicken. Opting for fresh, vibrant lemons and fragrant garlic will elevate the marinade’s flavor profile significantly. Using good quality olive oil also contributes to a richer taste and helps tenderize the chicken beautifully.
Grilled Lemon Chicken
This juicy lemon chicken is a go-to grilled chicken recipe for summer! The garlicky lemon marinade is bursting with fresh flavor and needs only 5 ingredients.
- 2 pounds boneless, skinless chicken breasts
- zest of 2 lemons
- 4 cloves garlic, minced
- salt and fresh ground pepper, to taste
- 1 whole lemon, cut into slices
- 1In a large ziploc bag, combine chicken, olive oil, lemon zest, lemon juice, garlic, parsley, salt, and pepper. Seal the bag and shake it all up until well combined. Place the bag in the refrigerator and marinate for about 4 hours or overnight.
- 2Preheat the grill to about 375ºF to 400ºF. Brush the grill grates with olive oil.
- 3Remove the chicken breasts from the marinade and place them on the hot grill; cook without touching the grill until they start to get grill marks, about 5 minutes.
- 4Flip the chicken breasts over, cover the grill, and let them finish cooking, about 7 more minutes, depending on the thickness of the chicken. The chicken is done when a meat thermometer registers 165 degrees Fahrenheit.
- 5Remove chicken from grill; cover and let rest for 5 minutes before cutting and serving.
- 6Grill Pan Instructions: Preheat oven to 350ºF. Grease a grill pan with cooking spray and set it over medium-high heat.
- 7Add the chicken and cook for 4 minutes; flip, and continue to cook for 2 more minutes, or until lightly browned.
- 8Place the grill pan in the oven and cook for 18 to 20 minutes or until the chicken is cooked through. Remove from oven and let rest for 5 to 8 minutes before cutting and serving.
Keywords: grilled lemon chicken, lemon chicken marinade, easy chicken recipe, summer grilling, chicken breast recipe
Quantities for these essential components can be found within the detailed recipe card.
Variations
For those seeking a plant-based alternative, consider transforming this recipe into a delectable vegan lemon-herb “chicken”. Use firm tofu or seitan as your base, marinating it in a similar lemon and herb mixture. The grilling process will impart a wonderful char, mimicking the texture and savory notes of traditional grilled chicken.
A fantastic low-carb option involves swapping out traditional sides for something lighter. Serve the grilled lemon chicken alongside spiralized zucchini noodles tossed with a light garlic and herb sauce, or pair it with a crisp, fresh salad featuring a lemon vinaigrette. This keeps the meal satisfying without the carbohydrate load.
Embracing a gluten-free approach is remarkably straightforward. Ensure all your marinade ingredients are naturally gluten-free, which they largely are in this recipe. If using any pre-made seasonings, always double-check their labels. This makes the dish accessible to a wider range of dietary needs and preferences.
How to Prepare Grilled Lemon Chicken
Step 1: Marinate the Chicken
Begin by preparing the vibrant lemon marinade, the heart of this flavorful dish. In a large, resealable bag or a non-reactive bowl, combine the boneless, skinless chicken breasts or thighs with olive oil, the zest and juice of fresh lemons, minced garlic, chopped fresh parsley, and a generous pinch of salt and freshly ground black pepper. Ensure all the chicken pieces are thoroughly coated in the marinade for maximum flavor infusion.
Seal the bag tightly or cover the bowl, then place it in the refrigerator to allow the chicken to marinate. For optimal taste and tenderness, aim for a marinating time of at least 4 hours. However, if time is a constraint, even 30 minutes will impart some delightful citrusy notes, though an overnight marination will yield the most profound flavor development and tenderizing effect.
The marinating process is crucial as it allows the acidic components of the lemon juice to break down the chicken’s muscle fibers, resulting in a more tender and succulent final product. Furthermore, the oil helps distribute the flavors evenly and creates a protective layer, preventing the chicken from drying out on the grill.
Step 2: Prepare the Grill
While the chicken is soaking up all those wonderful citrusy and garlicky flavors, it’s time to get your grill ready for action. Preheat your outdoor grill to a medium-high heat, aiming for a temperature range of approximately 375°F to 400°F. This consistent heat is essential for achieving those desirable grill marks and ensuring even cooking without burning the chicken’s exterior before the interior is cooked through.
Once the grill has reached the desired temperature, it’s imperative to properly prepare the grates. This involves brushing them with a light coating of olive oil or another high-heat cooking oil. This step is critical in preventing the marinated chicken from sticking to the grill grates, which can lead to torn pieces and a less aesthetically pleasing presentation. A clean and oiled grill ensures a smooth cooking process.
If you are using a grill pan on your stovetop, preheat it over medium-high heat until it is quite hot. For an oven-safe grill pan, ensure it is ready for use. The key is to have a searing hot surface, whether it’s an outdoor grill or an indoor grill pan, to achieve that signature char and delicious crust on the chicken. This initial sear locks in the juices.
Step 3: Grill the Chicken
Now for the exciting part – grilling the marinated chicken! Carefully remove the chicken pieces from the marinade, letting any excess drip off, but do not wipe the marinade away entirely as it contains a wealth of flavor. Place the marinated chicken breasts or thighs directly onto the preheated and oiled grill grates. The moment the chicken hits the hot surface, you should hear a satisfying sizzle, indicating the grill is at the optimal temperature.
Resist the urge to move or flip the chicken immediately. Allow it to cook undisturbed for approximately 5 minutes. This initial period is crucial for developing beautiful grill marks and a slightly caramelized exterior. By letting it sear without interruption, you create a foundation for tender, juicy meat within. The heat will begin to work its magic, creating those desirable crosshatch patterns.
The goal during this phase is to achieve a nice, golden-brown char on one side of the chicken before it’s time to flip. This process not only enhances the visual appeal but also contributes significantly to the overall flavor profile, adding a subtle smokiness that is characteristic of grilled dishes. Patience here will be rewarded with superior results.
Step 4: Flip and Finish Cooking
After the initial 5 minutes of grilling on the first side, it’s time to flip the chicken. Using a pair of tongs, carefully turn each piece over to expose the other side to the direct heat. Once flipped, cover the grill lid. This traps the heat and allows the chicken to cook through evenly and thoroughly. The covered grill environment helps to steam the chicken gently, ensuring it remains moist and tender.
Continue to cook the chicken on the second side for approximately 7 to 10 more minutes. The exact cooking time will depend on the thickness of your chicken pieces. Thicker breasts might require a little longer, while thinner pieces will cook more quickly. It’s always best to rely on an instant-read meat thermometer to ensure accuracy; the chicken is done when its internal temperature reaches 165°F (74°C) at the thickest part.
Monitoring the temperature is the most reliable way to prevent overcooking, which can lead to dry, tough chicken. The combination of direct grilling and the enclosed heat of the covered grill ensures that the chicken is cooked to perfection, juicy on the inside with a delightful exterior char. This two-stage cooking process maximizes both flavor and texture.
Step 5: Rest the Chicken
Once the chicken has reached an internal temperature of 165°F, carefully remove it from the grill using your tongs. Place the cooked chicken onto a clean cutting board or a warm plate. Now, before you slice into it and serve, it’s incredibly important to let the chicken rest for about 5 to 10 minutes. This resting period is a non-negotiable step for achieving truly juicy chicken.
During the cooking process, the juices within the chicken are pushed towards the center. By allowing the chicken to rest, these juices have time to redistribute evenly throughout the meat. If you were to cut into the chicken immediately after removing it from the heat, all those delicious, flavorful juices would simply run out onto the plate, leaving the chicken drier than it needs to be. Patience truly pays off here.
This resting phase allows the muscle fibers to relax, reabsorbing the moisture and ensuring that every bite is tender, succulent, and bursting with flavor. The residual heat will also continue to cook the chicken slightly during this period, bringing it to its final safe temperature. This simple step makes a world of difference in the final texture and overall enjoyment of your grilled lemon chicken.
Step 6: Serve and Enjoy
Your perfectly grilled lemon chicken is now ready to be served and savored! The aroma alone is enough to make your mouth water, promising a delightful dining experience. Whether you’re serving it whole, sliced, or diced, this versatile dish is a crowd-pleaser that pairs beautifully with a variety of accompaniments, making it suitable for a casual weeknight dinner or a more elaborate gathering.
Present the grilled lemon chicken on a platter, perhaps garnished with extra fresh parsley and lemon slices for an attractive presentation. Its bright, zesty flavor makes it an excellent centerpiece for any meal. The vibrant color and enticing aroma will undoubtedly impress your guests and family alike, creating a memorable culinary moment that you’ll want to replicate again and again.
This dish truly shines with its simplicity and deliciousness, embodying the essence of fresh, seasonal cooking. Its success lies in the quality of the ingredients and the straightforward preparation, making it an accessible yet impressive recipe for cooks of all skill levels. Enjoy the fruits of your labor with this spectacular grilled lemon chicken, a testament to the joys of simple, flavorful food.
Pro Tips for Grilled Lemon Chicken
Don’t Overcrowd the Grill: Ensure there is ample space between chicken pieces on the grill. Overcrowding can lower the grill’s temperature and lead to uneven cooking, preventing the development of a nice sear and char. Give each piece enough room to breathe and cook properly.
Use a Meat Thermometer: The most foolproof way to ensure perfectly cooked chicken is by using an instant-read meat thermometer. Insert it into the thickest part of the chicken breast or thigh, avoiding any bone. The chicken is safely cooked when it reaches an internal temperature of 165°F (74°C).
Pat Chicken Dry: Before marinating, or especially before grilling if you’re not marinating, patting the chicken dry with paper towels can help achieve a better sear. Excess moisture on the surface can create steam, hindering the Maillard reaction, which is responsible for browning and flavor development.
Adjust Lemon Intensity: If you prefer a milder lemon flavor, reduce the amount of lemon zest and juice in the marinade. Conversely, for a bolder citrus punch, you can increase these quantities slightly. Always taste and adjust seasonings to your personal preference.
Consider Thighs for Extra Juiciness: While chicken breasts are lean and healthy, chicken thighs (boneless, skinless) tend to be more forgiving on the grill and retain moisture exceptionally well due to their higher fat content. They are an excellent alternative for an even juicier result.
Serving Suggestions for Grilled Lemon Chicken
Decoration
Garnish your beautifully grilled lemon chicken with a sprinkle of freshly chopped parsley, its vibrant green color providing a lovely contrast to the golden-brown chicken. Thinly sliced lemon wheels or wedges placed artfully around the platter also enhance the visual appeal and reinforce the dish’s key flavor profile. A few fresh sprigs of rosemary or thyme can add an aromatic and rustic touch.
Side Dishes
This lemon chicken pairs wonderfully with a variety of dinner sides. Mediterranean rice or a fluffy quinoa pilaf are excellent choices for soaking up any delicious juices. For a lighter option, consider serving it alongside roasted asparagus, grilled zucchini, or a colorful medley of bell peppers. Creamy mashed potatoes or a simple garden salad also make fantastic complements.
Creative Serving Ideas
Slice the grilled lemon chicken and toss it into a vibrant pasta salad with sun-dried tomatoes, olives, and a lemon-herb vinaigrette. Another idea is to chop it into bite-sized pieces and add it to wraps or pitas with crisp lettuce and a garlic yogurt sauce. You could also dice it and mix it into a savory leek and mushroom pasta for an elevated meal.
Preparation & Storage
Storing Leftovers
Once the grilled lemon chicken has cooled completely, store any leftovers in an airtight container. Properly refrigerated, it can be kept fresh for up to 3 to 4 days. The compact nature of these containers helps to prevent the chicken from drying out and absorbs any lingering odors from other foods in the refrigerator.
Freezing
For longer storage, grilled lemon chicken freezes exceptionally well. Wrap individual portions tightly in plastic wrap, then place them in a freezer-safe bag or container. Frozen chicken will retain its best quality for up to 2 to 3 months. Ensure the packaging is robust to protect against freezer burn and maintain optimal texture.
Reheating
To reheat refrigerated leftovers, you can use your microwave, reheating in short intervals until heated through. Alternatively, place the chicken in an oven-safe dish and warm it in a preheated oven at 350°F (175°C) until it reaches your desired temperature. For frozen chicken, thaw it in the refrigerator overnight before reheating using one of the methods described.
Frequently Asked Questions
-
Can I use a grill pan indoors if I don’t have an outdoor grill?
Absolutely! This recipe is very adaptable to indoor cooking. A cast-iron grill pan is ideal for this purpose. Preheat the pan over medium-high heat, grease it well, and sear the chicken for a few minutes on each side to achieve grill marks. You can then finish cooking it in a 350°F oven until the internal temperature reaches 165°F, typically 18-20 minutes. This method yields a similar char and flavor profile.
-
What kind of chicken is best for this recipe, and how does marinating time affect it?
Boneless, skinless chicken breasts or thighs are excellent choices due to their even cooking and ease of handling. Chicken breasts will cook faster and can be more prone to drying out if overcooked, while thighs offer a richer flavor and are more forgiving. The marinating time is crucial for flavor penetration and tenderness; at least 4 hours is recommended for a good balance, but marinating overnight will yield the most pronounced and succulent results. Shorter marinating times will still provide a pleasant lemon-herb flavor, but the tenderizing effect will be less significant.
-
How can I ensure the chicken is perfectly cooked and juicy every time?
The most reliable method is to use an instant-read meat thermometer. Insert it into the thickest part of the chicken, ensuring it registers an internal temperature of 165°F (74°C). Additionally, allowing the chicken to rest for 5-10 minutes after grilling is vital. This resting period allows the juices to redistribute throughout the meat, preventing them from escaping when you cut into the chicken, thus ensuring maximum juiciness and tenderness. Avoiding overcrowding the grill and cooking at the correct temperature also contributes significantly to perfect results.